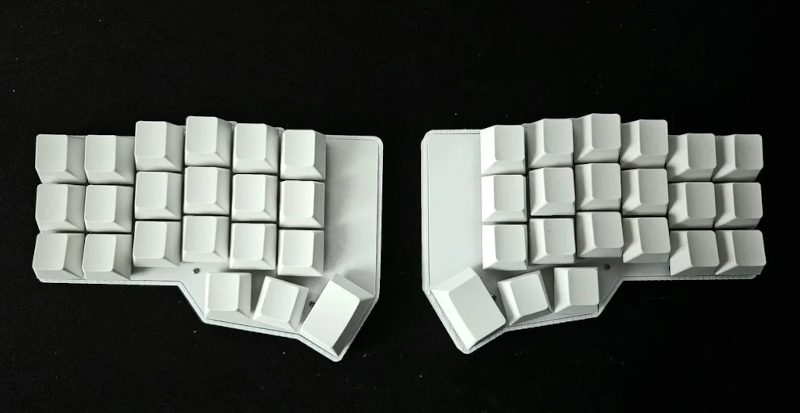
A split keyboard that uses no PCB sounds like the kind of project that begins with “I can totally build this over the weekend” and ends with a desk covered in wires, key switches, tiny diodes, and one very suspicious coffee mug. But behind the chaos is a clever idea: instead of designing and ordering a printed circuit board, a builder can hand-wire the keyboard directly inside a custom case or plate.
The result is a mechanical keyboard that feels personal in the best possible way. It is part typing tool, part electronics lesson, part ergonomic experiment, and part “look what I made with my own hands.” A no-PCB split keyboard is not necessarily easier than buying a kit, but it can be cheaper, more flexible, and far more educational.
The phrase “Split Keyboard Uses No PCB” captures a growing interest in custom input devices that skip traditional manufacturing steps. Instead of waiting for a factory-made board, makers use switches, wires, microcontrollers, firmware, and often a 3D-printed case to create something that fits their hands, their desk, and their typing habits.
What Does “No PCB” Mean in a Split Keyboard?
A PCB, or printed circuit board, normally acts as the electrical backbone of a keyboard. It holds traces that connect each switch to the controller. In many mechanical keyboards, the PCB also supports features like hot-swap sockets, RGB lighting, rotary encoders, displays, and USB circuitry.
When a split keyboard uses no PCB, those neat copper traces are replaced by hand-wired connections. Each switch is mounted in a plate or case, then wired into a matrix using solid-core wire, magnet wire, diode legs, or other conductive paths. The matrix is connected to a microcontroller, and firmware translates switch presses into keycodes.
In a split keyboard, this setup happens on two separate halves. Each side may have its own controller. In wireless builds, each half may also have its own battery. Firmware such as ZMK or QMK handles the logic that makes both halves behave like one keyboard instead of two tiny plastic islands having an identity crisis.
Why Build a Split Keyboard Without a PCB?
1. Lower Cost for One-Off Projects
Designing a PCB can be satisfying, but it adds time and cost. For a one-off keyboard, especially an experimental layout, hand-wiring can make more sense. You do not need to draw a schematic, route traces, order prototypes, wait for shipping, discover a mistake, fix the file, and order another board while quietly questioning your life choices.
A no-PCB split keyboard can be built with commonly available parts: key switches, diodes, wire, two microcontrollers, batteries for wireless builds, and a case or plate. Some projects have demonstrated surprisingly low total costs compared with commercial ergonomic keyboards, especially when the builder already owns basic tools.
2. Faster Layout Experimentation
Split keyboards are deeply personal. A thumb key that feels perfect for one person may feel like a tiny ergonomic prank to someone else. Without a PCB, builders can adjust key placement, thumb clusters, column stagger, tenting, and spacing more freely.
This is especially useful for unusual layouts such as 34-key, 36-key, or 40-key ergonomic boards. If the case is 3D printed, a maker can revise the model, move a key, print again, and rewire the new version. It is not effortless, but it is often more forgiving than redesigning an entire PCB for every experiment.
3. Better Access to Hand-Fit Ergonomics
The biggest reason people fall into the split keyboard rabbit hole is comfort. A split design allows the two halves to sit shoulder-width apart, reducing inward wrist rotation. The halves can be angled, tented, or positioned around a trackball, notebook, coffee, or whatever else has colonized the desk.
No-PCB construction pairs nicely with sculpted or 3D-printed ergonomic cases. Designs inspired by Dactyl-style keyboards, for example, often use curved key wells that follow the natural resting shape of the hands. A rigid PCB is not always ideal for that kind of organic geometry, while hand-wiring can snake through the case like a tiny copper jungle gym.
How a No-PCB Keyboard Matrix Works
A keyboard does not usually connect every switch to its own dedicated microcontroller pin. That would be simple, but it would require too many pins once the key count rises. Instead, keyboards commonly use a matrix made of rows and columns.
Think of it like a spreadsheet. A key sits at the intersection of a row and a column. When the key is pressed, it completes a circuit at that intersection. The firmware scans the rows and columns to determine which switch was activated. This reduces the number of required pins dramatically. A 36-key keyboard might be wired as a 4-by-9 matrix, needing 13 matrix pins instead of 36 direct switch pins.
Diodes are usually added to prevent ghosting, which happens when multiple simultaneous keypresses confuse the circuit and make the keyboard think an extra key was pressed. In a hand-wired build, the diode direction must match the firmware configuration. This is one of those small details that feels boring until the entire keyboard starts typing like a haunted calculator.
Wireless Split Builds: Two Halves, One Keyboard
Wireless no-PCB split keyboards often use Bluetooth-capable microcontrollers, such as boards based on the nRF52840 chip. Each half can run its own firmware, and one side typically acts as the central side while the other behaves as a peripheral. The central side coordinates input and communicates with the host device.
This is where firmware matters. ZMK is popular for wireless ergonomic keyboards because it was built with low-power wireless use in mind. QMK is widely used for wired custom keyboards and supports many split keyboard configurations. Both ecosystems have strong communities, but each has its own learning curve.
The wireless approach looks clean on the desk because there is no cable between the halves. The trade-off is battery management. Each half may need to be charged, switched on, paired, and occasionally reset. A wired split avoids some of that hassle, but the cable can limit placement and add clutter.
The Benefits of a Split Keyboard With No PCB
Maximum Customization
The best thing about a no-PCB split keyboard is freedom. You are not locked into a manufacturer’s key spacing, thumb cluster, or case geometry. Want a three-key thumb arc? Fine. Want a pinky column that drops lower than usual? Go ahead. Want to remove a key because you have declared war on Caps Lock? Nobody can stop you.
Repairability
Hand-wired keyboards are visually understandable. If a key stops working, you can often trace the wire, inspect the joint, test continuity, and repair the connection. A PCB can also be repaired, but tiny traces and surface-mount parts can be less beginner-friendly.
Great for Learning
Building a keyboard without a PCB teaches useful fundamentals: switch behavior, matrix scanning, diode direction, soldering discipline, firmware configuration, microcontroller pin mapping, and troubleshooting. It turns the keyboard from a black box into a very opinionated science project.
Ideal for Prototypes
If the goal is to test a new layout, hand-wiring can be the fastest path to a working prototype. After the design is proven, the builder can always create a PCB later. In that sense, no-PCB construction is not anti-PCB; it is often pre-PCB.
The Drawbacks You Should Know
It Can Be Messy
Hand-wiring looks beautiful when done neatly, but it can become chaotic quickly. Poor wire routing makes troubleshooting harder. Long unplanned wire runs can get in the way of the case. A clean build requires patience, labeling, and a willingness to stop before soldering while tired.
Durability Depends on Build Quality
A well-made hand-wired keyboard can last a long time, but the structure matters. Since there is no PCB to support the switches, the plate or case must hold them securely. Hot glue, printed switch sockets, or carefully designed plates may help keep everything stable.
Firmware Setup Is Not Optional
A no-PCB keyboard still needs firmware. The controller must know how many rows and columns exist, which pins are used, which diode direction is correct, and what each key should do. This is where many first-time builders realize that “custom keyboard” also means “custom homework.”
Wireless Adds Complexity
Bluetooth is wonderfully convenient when it works and mildly dramatic when it does not. Wireless split builds may involve battery charging, pairing behavior, central/peripheral roles, sleep settings, and troubleshooting connection issues. The clean desk comes at the cost of more invisible complexity.
Who Should Build a No-PCB Split Keyboard?
This kind of project is ideal for makers, keyboard hobbyists, programmers, designers, and curious tinkerers who enjoy learning by doing. It is also great for people who want an ergonomic layout that does not exist as a commercial product.
It may not be the best first keyboard for someone who simply wants a reliable typing device by Monday morning. If the goal is instant productivity, a prebuilt ergonomic keyboard or a PCB-based kit is easier. If the goal is exploration, customization, and learning, a no-PCB split keyboard is a fantastic rabbit hole with keycaps.
Specific Example: A Budget Wireless Split Keyboard
A notable no-PCB split keyboard project showed that a wireless split board could be built around a 3D-printed case, hand-wired switches, two microcontrollers, batteries, and ZMK firmware. Each half had its own controller and battery, and the halves connected wirelessly. The design avoided the need for a custom PCB and kept the cost impressively low.
The most interesting part was not just the low price. It was the flexibility. Because the electrical system was hand-wired, the layout could be changed more easily than a fixed PCB design. Keys could be added, removed, or repositioned. A pointing device could potentially be added later. The design invited tinkering instead of treating the keyboard as finished forever.
Practical Design Considerations
Case and Plate
The case is more than decoration. It determines switch stability, typing angle, hand position, tenting, and internal space for wiring. A 3D-printed case can be customized, but it should be strong enough to handle repeated typing and keycap removal.
Switch Count
Fewer keys mean fewer wires, fewer solder joints, and simpler firmware. That is why many DIY split keyboards use compact layouts. Layers replace missing keys, allowing a small board to handle letters, numbers, symbols, navigation, media controls, and shortcuts.
Thumb Cluster
The thumb cluster is the soul of a split ergonomic keyboard. Space, Enter, Backspace, Shift, Control, and layer keys often live there. A well-placed thumb cluster can reduce finger travel dramatically. A poorly placed one can make your thumbs feel like they applied for the wrong job.
Power and Charging
Wireless builds need battery space and charging access. Builders should think about switch placement, USB port access, battery mounting, and safe handling. Anyone new to soldering or lithium batteries should work carefully, follow product documentation, and get experienced help when needed.
SEO-Friendly Takeaway: No-PCB Split Keyboards Are About Freedom
The phrase “split keyboard uses no PCB” is not just a technical curiosity. It represents a larger maker philosophy: build only what you need, modify what does not fit, and learn enough to own the tool you use every day.
A commercial keyboard is a product. A hand-wired split keyboard is a conversation between your hands, your desk, your patience, and your tolerance for tiny wires. It may not be perfect on the first try. In fact, it probably will not be. But that is part of the appeal. Every revision teaches something.
Additional Experience: What Building and Using a No-PCB Split Keyboard Feels Like
The first experience with a no-PCB split keyboard is usually surprise. The parts look too simple to become a real keyboard. A pile of switches, wire, diodes, and controllers does not exactly scream “professional input device.” It whispers, “Are you sure about this?” Yet once the first few switches are mounted and the matrix starts to take shape, the project becomes strangely addictive.
The biggest lesson is that planning matters more than speed. A beginner may want to start soldering immediately, but a better approach is to map the rows, columns, controller pins, battery position, and cable paths before touching the iron. The difference between a clean build and a spaghetti festival is usually decided before the first joint is made.
Typing on the finished keyboard feels different from typing on a standard board. At first, the split layout can feel awkward. Your hands no longer meet in the center, and familiar keys may hide behind layers. After a few days, however, the advantage becomes clearer. The shoulders relax. The wrists sit more naturally. The hands stop reaching across the keyboard like tiny commuters stuck in traffic.
The learning curve is real. Small layouts require trust in layers. A 36-key split keyboard may look incomplete to someone used to a full-size board, but layers can make it efficient. Numbers can live under one thumb key, symbols under another, navigation under a home-row layer, and media controls somewhere you will definitely forget for the first week.
There is also a satisfying repair culture around hand-wired builds. If one key fails, the owner does not need to throw away the keyboard. They can open the case, inspect the joint, check the diode, test the row and column, and fix the issue. That sense of ownership changes the relationship with the device. It is no longer just something bought online; it is something understood.
The most common frustration is troubleshooting invisible mistakes. A diode installed backward, a firmware pin mismatch, a cold solder joint, or a forgotten ground connection can make the keyboard behave strangely. The fix is usually logical, but finding it takes patience. A multimeter becomes the builder’s best friend, followed closely by a notebook and the emotional support snack of choice.
Wireless split keyboards add another layer of experience. The desk looks wonderfully clean, and the halves can be placed exactly where the hands want them. But batteries create new habits. Charging both sides, checking power switches, and dealing with occasional pairing issues become part of ownership. Some users love the freedom. Others eventually decide that one cable is not the villain they thought it was.
From a daily-use perspective, the best no-PCB split keyboard is not the fanciest one. It is the one that disappears while typing. The layout should support the user’s work instead of turning every shortcut into a puzzle. A beautiful build with an uncomfortable thumb cluster will lose to a plain-looking board that feels natural.
The most rewarding part is iteration. A no-PCB design invites change. Maybe the pinky column needs to shift. Maybe the thumb key should move closer. Maybe the left half needs more tenting. With a custom case and hand-wired construction, the keyboard can evolve. That flexibility is the heart of the project.
In the end, building a split keyboard with no PCB is not only about saving money or avoiding circuit board design. It is about understanding a tool deeply enough to shape it around your body and habits. It is a little nerdy, a little messy, and occasionally humbling. But when the first clean sentence appears on screen from a keyboard you wired yourself, the whole thing feels wonderfully worth it.
Conclusion
A split keyboard with no PCB proves that custom hardware does not always need polished factory boards to be useful, clever, or comfortable. By combining hand-wired switches, a matrix layout, microcontrollers, firmware, and a sturdy case, builders can create ergonomic keyboards that are affordable, flexible, and deeply personal.
The approach has trade-offs. It demands patience, careful planning, and a willingness to troubleshoot. Wireless versions add battery and pairing considerations. Still, for makers who want full control over layout and ergonomics, a no-PCB split keyboard is one of the most rewarding DIY keyboard projects available.
Note: This article is written for web publication in original wording and synthesized from real split-keyboard documentation, firmware references, and maker build experiences without inserting source links into the article body.