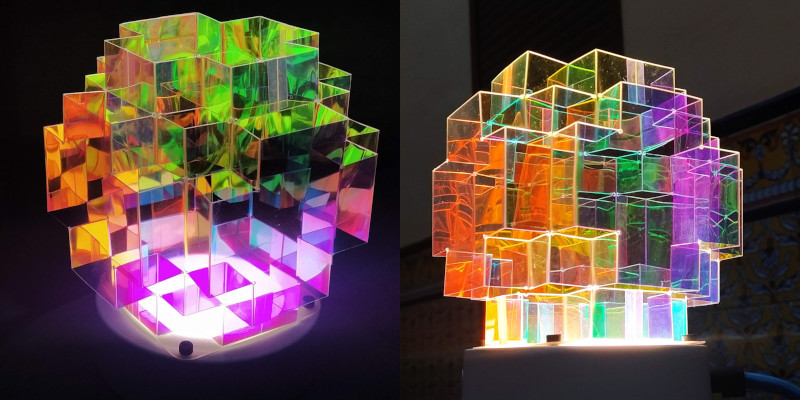
Note: This article is synthesized from real product, lighting, DIY, and safety information from reputable sources including IKEA product guidance, 3M dichroic film specifications, ENERGY STAR and U.S. Department of Energy LED guidance, NFPA electrical safety recommendations, and established DIY lighting resources.
There are two kinds of home lighting projects: the ones that politely brighten a corner, and the ones that make guests stop mid-sentence and say, “Wait… what is that?” Hacking an IKEA lampshade into a stunning dichroic lamp belongs proudly in the second group. It takes something simple, affordable, and familiaran IKEA paper or fabric-style shadeand transforms it into a shifting rainbow sculpture that looks like it escaped from a design gallery, took a detour through a science museum, and landed in your living room.
The magic ingredient is dichroic material. In plain English, dichroic glass or film changes color depending on the viewing angle and the direction of light. It can glow warm gold from one side, flash magenta from another, and throw blue, green, or violet shadows across nearby walls. Unlike RGB smart bulbs, which create color electronically, a dichroic lamp creates color optically. The light itself is filtered, reflected, and split into changing tones. It feels alive without needing an app, subscription, firmware update, or passive-aggressive Wi-Fi router.
An IKEA lampshade is a great starting point because many IKEA shades are lightweight, minimal, and designed to diffuse light softly. Rice paper shades such as IKEA’s round pendant styles spread gentle illumination, while layered shades like RISBYN create depth and decorative patterns. That soft diffusion gives a dichroic upgrade the perfect canvas: not too busy, not too expensive, and not too precious to modify.
What Is a Dichroic Lamp?
A dichroic lamp is a light fixture that uses dichroic glass, acrylic, or film to create color-shifting effects. The word “dichroic” refers to the ability of a material to show different colors under different lighting or viewing conditions. In architectural and decorative products, this effect is often created with thin layers that reflect certain wavelengths of light while allowing others to pass through.
That is why a dichroic surface can look pink, amber, or cyan at one angle and then suddenly slide into blue, green, or violet when you walk across the room. 3M’s dichroic glass finishes, for example, are designed to shift colors depending on viewing angle, with “Blaze” leaning into warmer cyan, blue, magenta, red, and gold effects, while “Chill” moves through cooler blue, magenta, yellow, green, and gold tones. In a lamp, that shifting behavior becomes even more dramatic because the material is constantly interacting with a nearby light source.
Why IKEA Lampshades Are Perfect for This Hack
IKEA lighting is practically built for creative mischief. The brand’s lampshades are accessible, clean-lined, and often inexpensive enough that you do not need to treat them like museum artifacts. IKEA’s paper pendant shades, including rice paper styles, are known for spreading soft, cozy light. Some designs use steel rings, paper shades, or layered construction, giving DIYers a ready-made structure that can be upgraded without building an entire lamp from scratch.
The best lampshade for this project is simple, pale, and roomy. A white paper shade gives you a glowing cloud effect. A cylindrical shade creates a clean modern silhouette. A round lantern-style shade turns into a floating orb of color. A shade with an open bottom lets light spill downward, while a larger shade creates more surface area for reflected color. Basically, the more blank and humble the lampshade looks before the hack, the more satisfying the “after” photo will be.
Materials You’ll Need
You do not need a full workshop for this IKEA lampshade hack, but you do need the right materials. The goal is to create a lamp that looks spectacular while staying practical and safe.
Core supplies
- An IKEA lampshade, preferably white paper, rice paper, or a simple fabric-style shade
- A compatible IKEA cord set, lamp base, or pendant kit
- An LED bulb that matches the lamp’s wattage and socket requirements
- Dichroic window film, dichroic acrylic sheet, or iridescent craft film
- Clear acrylic sheet or thin transparent plastic for support panels, if needed
- Scissors, craft knife, ruler, and cutting mat
- Removable adhesive dots, clear tape, or heat-safe craft adhesive
- Microfiber cloth and dusting cloth
Optional design upgrades
- Warm white LED bulb for a sunset-like effect
- Daylight LED bulb for sharper blue and violet tones
- Diffuser sheet to reduce harsh hot spots
- Gold or black trim tape for a finished edge
- Fishing line or thin wire for suspended internal shapes
Safety First: The Boring Part That Keeps Your Lamp From Becoming Too Exciting
Before we get to the rainbow magic, let’s talk safety. Lampshades and bulbs involve heat, electricity, and sometimes paper. That combination deserves respect. The National Fire Protection Association recommends making sure bulbs match what is safe for the lamp and keeping materials that can burn away from bulbs. ENERGY STAR explains that LED lighting is far more efficient than incandescent lighting, but LEDs still manage heat through heat sinks. Translation: use LED bulbs, follow the lamp label, and do not wrap anything directly around a bulb like you are dressing it for winter.
Never exceed the maximum wattage listed on the lamp or cord set. Avoid incandescent or halogen bulbs for this project because they run much hotter. Use a certified LED bulb, keep film and paper away from direct bulb contact, and make sure air can circulate. If the lamp feels hot after 30 minutes of use, turn it off and redesign the spacing. A beautiful lamp should make your room glow, not make your smoke detector audition for Broadway.
Choosing the Right Dichroic Material
You have three main options for creating the dichroic effect: film, acrylic, or glass. For most DIY projects, dichroic film is the easiest choice. It is thin, flexible, and can be cut into strips, panels, triangles, petals, or abstract shapes. Dichroic acrylic is sturdier and gives a more sculptural look, especially if you want floating panels inside the shade. Real dichroic glass is gorgeous, but it is heavier, sharper, more expensive, and less friendly to casual lampshade hacking.
If you are using film, look for color-shifting architectural or decorative film rather than ordinary rainbow cellophane. Cellophane may look fun for five minutes, but it can wrinkle, fade, or feel more birthday-party-goody-bag than designer lighting. Premium dichroic films are made to create angle-dependent color and often include scratch-resistant surfaces. If you choose acrylic, iridescent acrylic sheets can shimmer without specialty lighting and can be cut into small decorative inserts.
How to Hack an IKEA Lampshade Into a Dichroic Lamp
Step 1: Build and test the lamp first
Assemble the IKEA lampshade and cord set according to the manufacturer’s instructions. Install the LED bulb you plan to use, turn it on, and observe how the plain shade distributes light. This gives you a baseline. You will see where the bulb is brightest, where shadows fall, and where dichroic material will have the most impact.
Step 2: Plan your color zones
Do not cover the entire shade immediately. The best dichroic lamps usually balance clear light, reflected color, and negative space. Start by deciding whether you want a subtle glow or a full cosmic disco. For a soft look, place dichroic film in vertical strips inside the shade. For a dramatic look, create overlapping geometric panels. For an organic look, cut petal shapes and arrange them like a flower blooming around the bulb.
Step 3: Cut the film or acrylic
Measure the inside of the lampshade and cut your dichroic material into manageable pieces. Long vertical strips work well for cylindrical or round shades. Triangles and trapezoids create a stained-glass effect. Curved pieces make the light feel softer and more fluid. If you are using acrylic, keep the pieces small and lightweight so they do not distort the shade or pull on delicate paper.
Step 4: Attach the pieces without damaging the shade
For paper shades, use a light touch. Removable adhesive dots, tiny pieces of clear tape, or carefully placed low-tack adhesive are safer than heavy glue. Attach the dichroic pieces to internal support rings, acrylic backing strips, or the shade’s frame rather than loading the paper itself with weight. If the shade has a metal ring, that ring can become your anchor point for suspended panels.
Step 5: Keep distance from the bulb
This is the most important design rule: do not let film, paper, or acrylic touch the LED bulb. Leave open space around the bulb and maintain ventilation. Even efficient LEDs produce some heat, and enclosed or crowded fixtures can trap it. If you want color near the center, use a low-heat LED and place the dichroic material around the light path, not directly on the bulb.
Step 6: Test in darkness
Turn off the room lights and switch on your new dichroic lamp. Walk around it slowly. This is where the project gets ridiculously fun. A panel that looked orange from the couch may turn blue from the hallway. A strip near the top may cast a magenta arc on the ceiling. If the effect is too subtle, add another piece. If it looks chaotic, remove a few pieces and let the design breathe.
Design Ideas for a Stunning Result
The aurora pendant
Use a large round IKEA paper shade and apply vertical strips of dichroic film inside the upper half. Leave the lower half mostly plain so the lamp still gives usable light. The result resembles northern lights floating in a paper moon.
The stained-glass globe
Cut dichroic film into triangles and irregular polygons. Arrange them inside the shade with small gaps between pieces. When lit, the shade produces a fractured, jewel-like glow without the weight or complexity of real stained glass.
The invisible color engine
Instead of applying film to the shade, suspend small dichroic acrylic pieces inside the lamp using clear fishing line. From a distance, the shade looks simple. When the bulb turns on, hidden panels scatter color like tiny optical confetti. Yes, “optical confetti” is a phrase worth keeping.
The sunset corner lamp
Choose warm-toned dichroic film and pair it with a warm white LED bulb. Place the lamp near a pale wall so it can throw amber, rose, and gold reflections. This works beautifully in reading corners, bedrooms, and anywhere you want cozy drama without installing a fireplace or adopting a mysterious Victorian lifestyle.
Best Bulb Choices for a Dichroic IKEA Lamp
The bulb changes everything. A warm white LED creates softer gold, peach, and rose effects. A neutral white LED gives a balanced color shift. A daylight LED can make blues, greens, and violets appear crisper. For most homes, a warm white or soft white LED is the safest aesthetic bet because it keeps the lamp cozy instead of making the room feel like a dentist’s office with ambitions.
Look for an LED bulb that fits the socket, matches the lamp’s recommended wattage, and is suitable for the fixture type. An opal or frosted bulb is usually better than a clear bulb because it spreads light more evenly and reduces harsh glare. IKEA also recommends opal bulbs for ordinary lampshades when you want even, diffused light, which pairs nicely with this project.
Where to Place Your Dichroic Lamp
A dichroic lamp works best where it has surfaces to play with. Place it near a white wall, pale ceiling, light-colored shelf, or neutral curtain. Dark walls can look moody and sophisticated, but they absorb some of the reflected color. If you want maximum rainbow drama, give the lamp a clean background and a little breathing room.
Try it in a reading nook, entryway, bedroom corner, home office, or creative studio. It can also be a standout piece on a side table if you use a smaller shade. For pendant versions, hang the lamp where people can walk around it, because movement is part of the experience. A dichroic lamp is not just something you look at; it changes as you move.
Common Mistakes to Avoid
The first mistake is using too much material. It is tempting to cover every inch of the shade, but too much dichroic film can block useful light and turn the lamp muddy. The second mistake is placing material too close to the bulb. The third is ignoring the lamp’s structure. Paper shades are delicate, so attach upgrades to frames or supports whenever possible.
Another common problem is using a bulb that is too bright or too cool. A very harsh bulb can create glare and make the film look cheap. Start with a moderate-lumen LED and adjust from there. Finally, avoid permanent glue until you are absolutely sure about the layout. Dichroic effects change from every angle, so test before committing.
Cleaning and Maintenance
Dust is the enemy of glow. Clean the outside of the shade gently with a duster, following IKEA’s typical care guidance for paper lampshades. Do not soak paper shades or spray cleaner directly onto them. For acrylic or film pieces, use a microfiber cloth and avoid abrasive cleaners that could scratch the surface. If a piece loosens over time, reattach it only after the lamp has been turned off and fully cooled.
Experience Notes: What This IKEA Dichroic Lamp Hack Teaches You
The best part of hacking an IKEA lampshade into a dichroic lamp is that the project teaches you to think like both a decorator and a lighting designer. At first, you may assume the goal is simply to add colorful material to a shade. Then you switch on the bulb and realize the real project is about controlling reflection, diffusion, shadow, and angle. Suddenly, your living room becomes a tiny laboratory, except with better vibes and fewer lab coats.
One practical lesson is that less often looks more expensive. A few carefully placed strips of dichroic film can look more refined than a lampshade covered edge to edge. Negative space allows the eye to notice the color shift. It also lets the lamp remain useful for actual lighting. After all, a lamp that looks amazing but cannot illuminate a book is basically a glowing sculpture with a side hustle.
Another lesson is that placement matters as much as construction. The same lamp can look quiet in one corner and spectacular in another. Near a white wall, the reflections become part of the room. Near a window, daylight can create subtle daytime shimmer even when the lamp is off. In a dim bedroom, warm LED light can turn the shade into a relaxing color cloud. In a hallway, the changing angles make the lamp feel interactive as people pass by.
This hack is also a reminder that budget design does not have to look budget. IKEA pieces are popular because they are simple and adaptable. Dichroic material brings the custom element. Together, they create a high-impact object without requiring custom fabrication. You are not pretending the lampshade is something else; you are using its simplicity as the foundation for a more expressive design.
If you are making this project for the first time, expect a little trial and error. Some film pieces may look better before installation than after. Some colors may disappear under warm light. Some shapes may cast odd shadows that look less “architectural installation” and more “haunted salad spinner.” That is normal. The beauty of this hack is that the layout is easy to adjust. Move pieces, rotate them, remove them, and test again.
The most satisfying moment usually happens after sunset. You turn the lamp on, step back, and watch colors appear where there was once only a plain shade. The room feels softer, stranger, and more personal. It is the kind of DIY upgrade that makes a home feel designed rather than merely furnished.
For renters, this project is especially appealing because it does not require rewiring, drilling, or permanent changes to the room. You can take the lamp with you when you move. For homeowners, it is a low-risk way to experiment with artistic lighting before investing in expensive fixtures. For creative people, it is an excuse to play with color theory while still ending up with something useful.
Most importantly, this IKEA lampshade hack proves that small changes can completely alter the mood of a space. A plain lamp becomes a conversation piece. A basic corner becomes a glow zone. A low-cost shade becomes a custom dichroic lamp that shifts color as you move. That is the joy of a good hack: it makes ordinary objects feel full of possibility.
Conclusion
Hacking an IKEA lampshade into a stunning dichroic lamp is one of those rare DIY projects that feels simple, affordable, and genuinely magical. With the right lampshade, a safe LED bulb, and carefully placed dichroic film or acrylic, you can create a color-shifting light fixture that looks far more expensive than it is. The key is balance: keep the structure lightweight, leave space around the bulb, use quality materials, and let the changing colors do the dramatic work.
Whether you want a soft aurora glow, a bold stained-glass effect, or a modern sculptural lamp, this project gives you room to experiment. Start small, test often, and remember that the best lighting does more than brighten a room. It changes how the room feels. And if your guests ask where you bought your new designer lamp, you can smile mysteriously and say, “Oh, this old thing? It’s just IKEA with a science degree.”