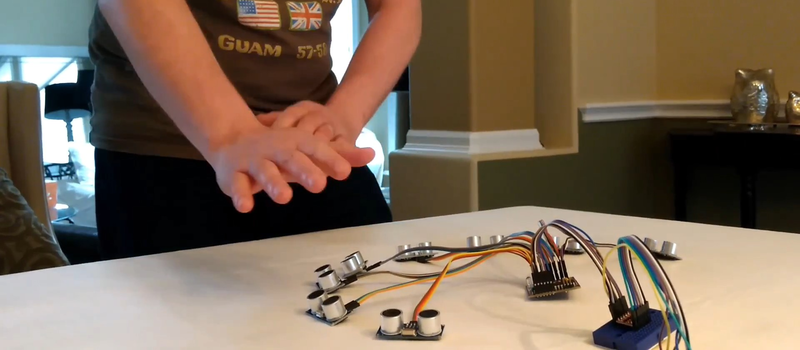
Imagine playing music without touching a key. No sticky fingerprints, no lost piano bench, no dramatic “I meant to play that note” excuses. An Ultrasonic Raspberry Pi Piano turns distance into melody by using a Raspberry Pi, an ultrasonic sensor, and a small Python program that maps hand movement to musical notes. Move your hand closer, and the pitch changes. Move it farther away, and the piano glides into a new note like a tiny robot auditioning for jazz band.
This project sits in the sweet spot between beginner-friendly electronics and genuinely impressive maker magic. It teaches distance measurement, GPIO input, basic sound playback, Python logic, and musical thinking in one build. Better yet, it feels interactive immediately. When a student waves a hand above the sensor and hears a note, the “aha” moment arrives faster than a cat walking across a real keyboard.
In this guide, we will explore what an ultrasonic Raspberry Pi piano is, how it works, what components you need, how to wire it safely, how to think about the software, and how to improve the instrument so it feels more musical and less like a confused parking sensor with stage fright.
What Is an Ultrasonic Raspberry Pi Piano?
An ultrasonic Raspberry Pi piano is a touch-free electronic instrument. Instead of pressing physical piano keys, the player moves a hand, card, ruler, or other object in front of an ultrasonic distance sensor. The Raspberry Pi reads the measured distance, converts that distance into a note, and plays a sound through speakers or headphones.
The idea is simple: distance becomes pitch. For example, an object 5 inches away might trigger middle C, while an object 10 inches away might trigger G. With the right mapping, your hand becomes a floating keyboard. It is part science experiment, part music lesson, and part “wait, did I just build a theremin out of a tiny computer?” moment.
Technically, it is closer to a distance-controlled synthesizer than a traditional piano, but “ultrasonic Raspberry Pi piano” is the phrase most people use because the project produces familiar musical notes. You can set it up to play piano samples, sine waves, MIDI-style tones, or even silly sound effects. Nobody is stopping you from making the C major scale sound like ducks. Nobody should encourage it either, but innovation has its risks.
How the Ultrasonic Sensor Works
Most versions of this project use an HC-SR04 ultrasonic sensor or a compatible module. The sensor has four common pins: VCC, GND, TRIG, and ECHO. The Raspberry Pi sends a short signal to the TRIG pin. The sensor responds by emitting a burst of ultrasonic sound, which is too high-pitched for humans to hear. That sound wave travels outward, bounces off the nearest object, and returns to the sensor. The ECHO pin reports how long the round trip took.
The program then calculates distance using the travel time of sound. Since sound has to travel to the object and back, the measured time is divided by two. The result is a distance value that can be used in code. From there, the Raspberry Pi can decide which note to play.
This is why the project feels so responsive. Your hand is not “pressing” anything. It is changing the measured echo time. The Raspberry Pi turns that measurement into music.
Parts You Need
You do not need a recording studio, a grand piano, or a suspiciously large pile of cables. A basic ultrasonic Raspberry Pi piano can be built with common maker parts:
- Raspberry Pi board, such as Raspberry Pi 3, 4, or 5
- MicroSD card with Raspberry Pi OS installed
- HC-SR04 ultrasonic distance sensor or compatible sensor
- Breadboard
- Jumper wires
- Resistors for a voltage divider, commonly 1kΩ and 2kΩ or similar safe combinations
- Speaker, HDMI audio, USB audio adapter, or headphones
- Python 3
- Audio library such as pygame, or a sound engine such as Sonic Pi
The important safety detail is the sensor’s ECHO pin. Many HC-SR04 modules output a 5V echo signal, while Raspberry Pi GPIO pins are designed for 3.3V logic. That means the echo signal should be reduced before it reaches the Pi. A simple voltage divider is the classic solution. Skipping this is like feeding espresso to a goldfish: technically possible for a very brief moment, but not something you should do.
Safe Wiring for the Raspberry Pi and HC-SR04
A common wiring pattern uses Raspberry Pi 5V for the sensor’s VCC, a ground pin for GND, one GPIO pin for TRIG, and another GPIO pin for ECHO through a voltage divider. Many tutorials use GPIO 23 for TRIG and GPIO 24 for ECHO, though you can choose other GPIO pins if your code matches your wiring.
Basic Wiring Concept
- Sensor VCC connects to Raspberry Pi 5V.
- Sensor GND connects to Raspberry Pi GND.
- Sensor TRIG connects to a Raspberry Pi GPIO output pin.
- Sensor ECHO connects to a Raspberry Pi GPIO input pin through a voltage divider.
The voltage divider reduces the 5V echo output to a safer level for the Raspberry Pi. If you are teaching this project in a classroom, make the voltage divider part of the lesson rather than a hidden detail. It introduces electrical safety, resistance, voltage levels, and the idea that not all digital signals are automatically compatible just because the jumper wire fits.
How Distance Becomes Piano Notes
The musical trick is mapping a range of distances to a set of notes. Suppose the sensor can reliably read hand movement between 5 cm and 40 cm. You can divide that range into zones. Each zone triggers a note in a scale.
For a simple C major scale, the mapping might look like this:
- 5–9 cm: C4
- 10–14 cm: D4
- 15–19 cm: E4
- 20–24 cm: F4
- 25–29 cm: G4
- 30–34 cm: A4
- 35–40 cm: B4
This zone-based approach is easier than continuously changing pitch. It makes the instrument behave more like a piano because notes are discrete. If you want a theremin-like glide, you can map distance directly to frequency instead. That version sounds more sci-fi and slightly more haunted, which may or may not be desirable depending on your audience.
Software Design: The Brain Behind the Beeps
The software has three jobs: read distance, choose a note, and play sound. Python is a natural choice on Raspberry Pi because it is readable, widely taught, and supported by many hardware libraries. A library such as gpiozero can simplify reading the ultrasonic sensor, while pygame can load and play sound files.
A simplified logic flow looks like this:
The phrase “if the note changed” matters. Without it, the program may restart the same note dozens of times per second, creating an audio stutter that sounds like a nervous robot chewing popcorn. A better approach is to remember the last note and only trigger a new sound when the hand moves into a different zone.
Sample Python Structure
The exact code depends on your library and audio setup, but the core structure can remain simple. The following example is a conceptual outline rather than a full plug-and-play script:
This structure gives you a playable starting point. For a better instrument, you can add smoothing, volume control, note duration, chord modes, and calibration settings.
Improving Accuracy and Playability
Ultrasonic sensors are useful, inexpensive, and surprisingly capable, but they are not magical. They can be affected by soft materials, angled surfaces, background noise, and quick hand movement. A flat object, such as a small cardboard paddle, often gives more stable readings than fingers alone.
To make the instrument easier to play, use smoothing. Instead of trusting one reading, average several recent readings. This reduces jitter and prevents the note from jumping back and forth when your hand is near the boundary between two zones.
Another option is hysteresis, which means the note does not change until the hand clearly crosses into the next zone. Think of it as a little patience built into the code. Without it, the piano may behave like it has had too much coffee.
Choosing the Sound Engine
There are several ways to make sound on a Raspberry Pi. The simplest is to use short WAV files and play them with pygame. This approach works well for a piano-like project because you can download or record individual note samples and trigger them on demand.
Sonic Pi is another exciting option. It is designed for live coding music and can produce synth tones, effects, loops, and melodies. A more advanced build can send messages from Python to Sonic Pi and let Sonic Pi handle the musical performance. This creates a richer sound palette and opens the door to live-coded concerts, classroom demonstrations, or the world’s nerdiest living-room recital.
You can also use MIDI, software synthesizers, or command-line audio tools. The best choice depends on your goal. For beginners, pygame with WAV files is usually the fastest path. For musicians, Sonic Pi or MIDI may feel more expressive. For tinkerers, the correct answer is “try all of them and pretend the cable nest was intentional.”
Common Problems and Fixes
No Sound Plays
Check your audio output first. Raspberry Pi audio may route through HDMI, the headphone jack, USB audio, or Bluetooth depending on your setup. Test sound outside your program before blaming the sensor. A simple WAV playback test can save an hour of dramatic debugging.
Distance Readings Are Random
Confirm the wiring, especially TRIG and ECHO. Make sure the ground is shared between the Raspberry Pi and the sensor. Check that the echo pin is protected with a voltage divider. Also verify that your hand is within the sensor’s useful range and not at a sharp angle.
The Same Note Repeats Too Quickly
Add a last-note check or a short cooldown time. This prevents the program from triggering the same sound repeatedly while your hand stays in one zone.
Notes Jump Around
Add smoothing, widen the distance zones, or use a cardboard paddle. Ultrasonic sensors like clear reflections. Fingers are expressive, but they are not always great acoustic targets.
Creative Project Variations
Once the basic ultrasonic Raspberry Pi piano works, the fun really begins. You can add more sensors to create multiple invisible keys. One sensor could control pitch while another controls volume. A third could switch instruments from piano to strings, drums, or alien spaceship noises. This is how a simple project becomes a performance controller.
You can also build a scale selector. Add buttons that switch between C major, pentatonic, blues, or minor scales. The pentatonic scale is especially forgiving because almost every note combination sounds pleasant. It is the musical equivalent of training wheels, except cooler.
For a classroom or maker fair, add LEDs that light up with each note. This makes the connection between distance, code, and sound visible. You can even display the current note and distance on a small OLED screen. Suddenly, the project is not just a piano; it is an interactive exhibit.
Why This Project Is Great for STEM Learning
The ultrasonic Raspberry Pi piano works beautifully as a STEM activity because it connects abstract ideas to immediate feedback. Students learn that code can respond to the physical world. They see how a sensor becomes data, how data becomes logic, and how logic becomes sound.
It also encourages iterative design. The first version might work, but it may not feel musical. Students must ask better questions: Are the zones too narrow? Is the sensor noisy? Are the samples too long? Should the scale have fewer notes? This kind of troubleshooting is real engineering, not just copying instructions.
Music adds emotional reward. A blinking LED is satisfying. A playable instrument is memorable. When learners can perform a melody with a circuit they built, the project sticks. It becomes a story: “I made a piano that plays when I wave my hand.” That is far more exciting than “I completed worksheet 7B,” and frankly, worksheet 7B knows what it did.
Real-World Experience: Building and Playing an Ultrasonic Raspberry Pi Piano
The first experience most builders have with an ultrasonic Raspberry Pi piano is a mix of delight and mild confusion. The circuit may look correct, the code may run, and then the first sound comes out half a second late or repeats like a doorbell stuck in a sitcom. This is normal. The project teaches quickly that “working” and “playable” are not the same thing.
One useful lesson is to start with distance readings only. Before adding music, print the measured distance in the terminal and move your hand slowly in front of the sensor. This simple test reveals the personality of the sensor. You may notice that readings are stable when your palm is flat, but jump around when you use two fingers. You may find that distances below a few centimeters are unreliable or that the far end of the range becomes inconsistent. These observations help you design note zones that match real behavior instead of ideal numbers.
Another practical discovery is that the instrument feels better when it has fewer notes at first. Seven notes sound impressive on paper, but four or five large zones are easier to control with a hand. A beginner-friendly version might use only C, D, E, G, and A. That pentatonic-style setup lets players improvise without constantly hitting sour notes. It also reduces boundary jitter because each zone has more space.
Sound choice matters more than expected. Short, clean WAV files make the piano feel responsive. Long samples with slow attacks can make the project feel delayed even when the sensor is working well. If a note begins with silence or fades in slowly, the player may think the code is lagging. Trim samples tightly and normalize their volume so every note feels equally strong.
Placement also changes the experience. A sensor lying loose on a table may shift every time someone touches a wire. Mounting it in cardboard, foam board, or a small 3D-printed bracket instantly improves playability. The best setup points the sensor upward or outward with a clear “performance lane” for the hand. A strip of tape on the table can mark distance zones, turning invisible notes into a visual guide.
During testing, the funniest moments often come from accidental performances. A sleeve, notebook, coffee mug, or curious pet can trigger unexpected notes. Instead of treating these as failures, use them as teaching moments. The sensor does not know what a hand is; it only sees reflected sound. That single idea explains both the magic and the limitations of the project.
The most satisfying version is usually not the most complicated one. A stable sensor, five good notes, clear audio output, and a small delay between triggers can feel better than a complex build with too many features. Once the basics feel musical, then add extra sensors, visual feedback, or scale switching. Build the piano like a song: start with a strong rhythm, then add the fancy solo.
Conclusion
An Ultrasonic Raspberry Pi Piano is one of those rare projects that feels playful while teaching serious technical ideas. It combines electronics, Python programming, sound design, distance sensing, and musical creativity in a way that is easy to demonstrate and fun to improve. With an HC-SR04 sensor, safe wiring, a Raspberry Pi, and a simple sound engine, you can turn empty air into a keyboard.
The best approach is to build in layers. First, wire the sensor safely. Next, confirm distance readings. Then map those readings to notes. Finally, polish the instrument with smoothing, better samples, wider zones, and visual feedback. By the end, you will understand not just how to make a Raspberry Pi play music, but how sensors can transform human movement into digital expression.
Note: Always protect Raspberry Pi GPIO pins from 5V sensor signals by using a proper voltage divider or level-shifting method. If students are building this project, adult supervision is recommended for wiring, power setup, and troubleshooting.