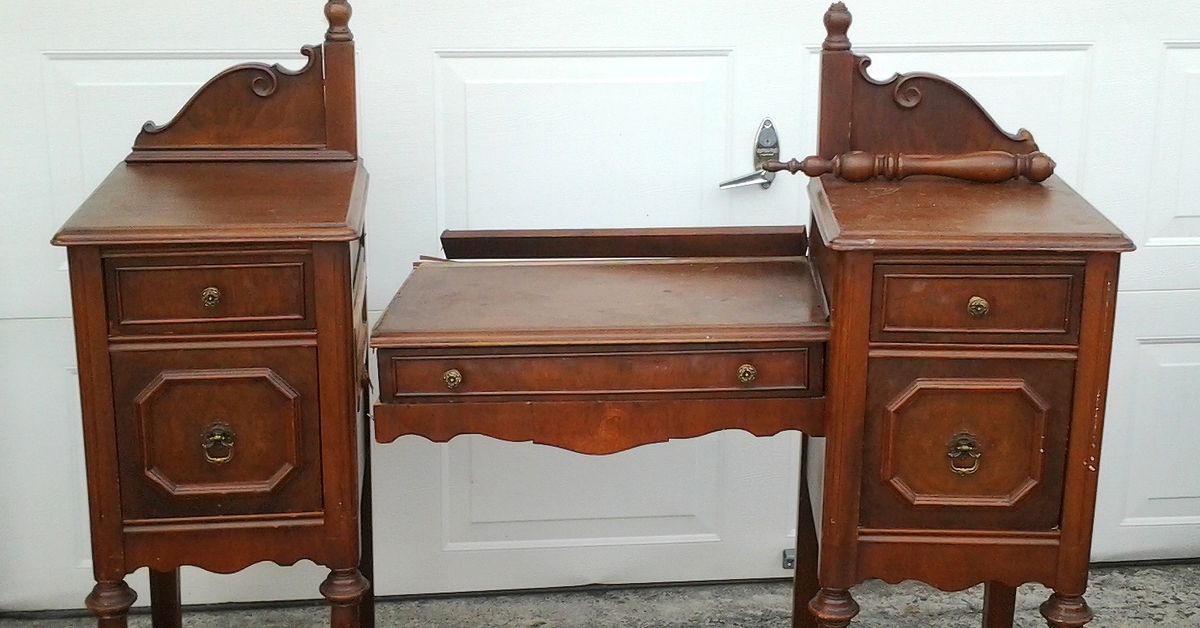
Some furniture walks into a room quietly. An antique vanity, however, tends to make an entrance wearing carved legs, tiny drawers, a dramatic mirror, and the emotional confidence of a silent-film star. The only problem? Many vintage vanities no longer fit the way modern bedrooms function. Maybe the mirror is cracked, the center knee space feels awkward, or the whole piece looks like it has survived three moves, two basements, and one questionable paint job from 1987.
That is exactly why painted upcycled antique vanity nightstands have become such a beloved DIY furniture project. Instead of sending an old vanity to the curb, you can transform it into a matching pair of charming, functional bedside tables. With careful cutting, smart repairs, quality paint, and a little creative courage, one outdated piece becomes two custom nightstands with real history and personality.
This guide covers the design ideas, tools, preparation, painting techniques, styling tips, and practical lessons that make the project successful. Whether you love cottage style, farmhouse charm, French country elegance, moody vintage drama, or soft modern neutrals, upcycled vanity nightstands can give your bedroom a one-of-a-kind look without requiring a designer budget. Your wallet stays calm. Your bedroom gets character. Everybody wins.
What Are Painted Upcycled Antique Vanity Nightstands?
Painted upcycled antique vanity nightstands are bedside tables created by repurposing an old vanity, dressing table, or makeup table. Most traditional vanities have two drawer sections connected by a center desk-like opening. In many makeovers, the center portion is removed, and the two side drawer units are rebuilt into separate nightstands.
The transformation usually includes structural repairs, cleaning, sanding, priming, painting, sealing, and adding new or restored hardware. Some DIYers keep the original wood tops. Others paint the entire piece in a soft matte finish, deep black, creamy white, sage green, dusty blue, or another color that fits the bedroom. The result is a pair of nightstands that look curated rather than mass-produced.
The beauty of this project is that antique vanities often feature details you rarely find on new budget furniture: dovetail drawers, curved fronts, carved trim, solid wood construction, turned legs, and original brass pulls. Even when the finish is rough, the bones can be fantastic. Think of it as rescuing a grand old lady from storage and giving her a fresh outfit.
Why Upcycle an Antique Vanity Instead of Buying New Nightstands?
Buying new nightstands is easy, but easy is not always interesting. Upcycling an antique vanity offers several advantages that go beyond saving money.
1. You Get a Matching Pair With Character
Finding two matching vintage nightstands can be surprisingly difficult. Antique vanities solve that problem because the two side sections already match. Once separated and painted, they naturally become a balanced pair for each side of the bed.
2. Older Furniture Is Often Better Built
Many antique and vintage vanities were made with solid wood, real drawer joinery, and sturdy frames. While not every old piece is automatically high quality, many have better construction than lightweight flat-pack furniture. If the drawers slide well and the frame is stable, you may be working with a gem hiding under a tired finish.
3. Upcycling Reduces Waste
Repurposing furniture keeps usable materials out of landfills and reduces demand for new manufacturing. It is a practical form of sustainable decorating. Instead of buying something new that looks old, you use something old and make it useful again. That is upcycling with a wink.
4. You Can Customize Every Detail
Paint color, hardware, topcoat sheen, drawer lining, distressing, feet, trim, and style are all up to you. Want soft white cottage nightstands with glass knobs? Go for it. Prefer black painted nightstands with antique brass pulls and a dark stained top? Excellent choice. Want blush pink with floral drawer liners? Dramatic, but delightful.
How to Choose the Right Antique Vanity for Upcycling
Before you bring home a vintage vanity, inspect it carefully. A low price is tempting, but a severely damaged piece can become a weekend project that somehow eats three weekends, your patience, and half the garage.
Look for Solid Structure
Check whether the vanity sits level, the legs are secure, and the drawer boxes are intact. Wobbly joints can often be repaired with wood glue and clamps, but broken frames or missing side panels may require more advanced carpentry.
Check the Drawer Sections
Since the drawer towers will become your nightstands, make sure they are deep and tall enough for bedside use. A comfortable nightstand height is usually close to the height of your mattress, though slightly higher or lower can still work depending on your bedroom style.
Inspect the Center Connection
Look underneath the vanity to see how the two sides are connected. Some pieces can be separated with screws and careful cutting. Others may need new side panels, back supports, or trim after the center section is removed.
Be Careful With Old Paint
If the vanity has old paint, especially if it may predate 1978, avoid aggressive sanding until you know whether lead-based paint is present. Use a lead test kit or consult a professional when needed. Safety is not the glamorous part of furniture flipping, but neither is inhaling mystery dust from the Truman administration.
Tools and Supplies You May Need
The exact supply list depends on the condition of your vanity, but most painted antique vanity nightstand projects use a similar set of basics.
- Screwdriver or drill
- Measuring tape and pencil
- Painter’s tape
- Drop cloth
- Degreasing cleaner or mild soap
- Wood filler or wood putty
- Putty knife
- Sandpaper or sanding sponges in medium and fine grits
- Tack cloth or lint-free rags
- Primer suitable for wood or previously finished furniture
- Furniture paint, cabinet paint, chalk-style paint, mineral paint, or enamel paint
- Quality angled brush and small foam roller
- Clear topcoat, furniture wax, or water-based polyurethane
- New knobs, pulls, or restored original hardware
- Optional: saw, clamps, trim pieces, nail gun, drawer liner, decorative appliques
For a smooth finish, do not rely on bargain-bin brushes that shed bristles like a golden retriever in July. A good brush and roller make a visible difference, especially on detailed antique furniture.
Step-by-Step Guide to Creating Painted Upcycled Antique Vanity Nightstands
Step 1: Remove the Mirror, Hardware, and Loose Parts
Start by removing the vanity mirror if it is still attached. Save any screws, brackets, or decorative pieces in a labeled bag. Remove knobs, pulls, drawer stops, and any loose trim. Take photos before disassembly so you remember where everything belongs. Future you will appreciate the evidence.
Step 2: Separate the Vanity Into Two Nightstands
Measure carefully before cutting. Many vanities have a center section that can be removed, leaving two drawer units. If the center top connects the two sides, you may need to cut it away with a circular saw, jigsaw, or handsaw. Work slowly and support the piece so it does not split or shift.
After separation, each nightstand may need a new inner side panel where the center opening used to be. You can create this with plywood, solid wood, beadboard, or decorative trim depending on the style. The goal is to make each piece look intentional, not like it survived a furniture divorce.
Step 3: Repair Damage and Fill Holes
Inspect each nightstand for cracks, missing veneer, gouges, loose joints, and old hardware holes. Use wood glue for loose trim or joints. Fill small holes and dents with wood filler, then let it dry fully before sanding. If you are changing hardware size, fill the old holes and drill new ones after the paint plan is settled.
Missing veneer can be patched, glued down, or smoothed depending on the final finish. Painted furniture is forgiving, but it is not magic. Surface flaws often become more noticeable under fresh paint, especially with glossy finishes.
Step 4: Clean Like You Mean It
Old furniture collects dust, furniture polish, hand oils, wax, and the mysterious scent of every attic it has ever visited. Clean the entire piece thoroughly before sanding or painting. Use a mild degreasing cleaner or warm water with gentle soap, then wipe with clean water and let everything dry.
Do not skip cleaning. Paint will not bond well to grime, wax, or oily residue. A clean surface is the quiet hero of a durable painted finish.
Step 5: Sand for Adhesion
For most painted upcycled nightstands, sanding is less about removing every bit of old finish and more about dulling the surface so primer can grip. Use medium-grit sandpaper for rough areas and fine-grit sandpaper for smoothing. Always wipe away sanding dust with a tack cloth or damp lint-free rag.
If the old finish is glossy, spend extra time scuff-sanding. If the piece has delicate carvings, use sanding sponges or folded sandpaper to reach curves without flattening details. For suspected lead paint, do not dry-sand until the surface has been properly tested and handled safely.
Step 6: Prime for a Longer-Lasting Finish
Primer helps paint adhere, blocks stains, and creates a more even finish. This is especially important with antique wood, dark stain, reddish mahogany, cherry, or pieces that may bleed tannins through light paint. A stain-blocking primer can save you from the heartbreak of yellow or pinkish stains appearing through your perfect creamy white paint.
Apply a thin, even coat and let it dry according to the product instructions. Lightly sand the primer if it feels rough, then wipe away the dust. Thin layers are better than one heavy coat. Furniture painting rewards patience, which is rude but true.
Step 7: Paint in Thin, Even Coats
Choose a furniture paint based on the look and durability you want. Chalk-style paint creates a soft matte vintage finish and works beautifully for cottage or shabby-chic styles. Mineral paint can offer excellent adhesion and a smooth modern look. Cabinet or enamel paint is a smart choice when you want a durable, wipeable finish for everyday use.
Use a brush for corners, trim, legs, and carved details. Use a small foam roller on flat drawer fronts and sides. Paint with the grain when possible, and avoid overworking the paint once it starts to set. Two thin coats usually look better and last longer than one thick coat.
Step 8: Add Style With Distressing, Glaze, or Contrast
This is where painted vanity nightstands become personal. For a soft antique effect, lightly distress edges, corners, and raised details where natural wear would happen. For a more elegant aged look, apply a dark glaze or wax into carvings and wipe back the excess. For modern contrast, leave the tops stained wood and paint the bases.
Popular color ideas include warm white, antique ivory, sage green, dusty blue, charcoal black, mushroom beige, navy, and soft gray. If your bedroom already has a lot of pattern, a neutral paint color may help the nightstands blend in. If the room is simple, a richer color can turn them into statement pieces.
Step 9: Seal the Finish
Nightstands work hard. They hold lamps, books, water glasses, phone chargers, skincare bottles, and occasionally a bowl of midnight cereal that nobody needs to explain. A protective topcoat helps the paint resist scratches, moisture, and everyday wear.
Use wax for a soft hand-rubbed look, but remember it may require more maintenance and curing time. Use a water-based polyurethane or furniture topcoat for stronger protection. Choose matte, satin, semi-gloss, or gloss based on the design. Satin is often a great middle ground because it is practical without looking too shiny.
Step 10: Finish With Hardware and Drawer Details
Hardware is jewelry for furniture. Original brass pulls can look stunning after gentle cleaning, especially against black, blue, green, or cream paint. New knobs can shift the style completely. Glass knobs add cottage romance. Aged brass feels classic. Matte black hardware gives a modern edge.
Do not forget the drawer interiors. Lining drawers with wallpaper, peel-and-stick paper, fabric, or vintage book pages adds a lovely surprise. It is the furniture equivalent of wearing fun socks with a serious outfit.
Best Paint Colors for Upcycled Antique Vanity Nightstands
The best paint color depends on your bedroom style, but a few shades consistently work well on antique furniture.
Creamy White
Creamy white is timeless and bright. It works especially well for cottage, farmhouse, coastal, and French country rooms. Choose warm white rather than stark white if the piece has ornate antique details.
Sage Green
Sage green feels calm, organic, and current without being trendy in a disposable way. It pairs beautifully with brass hardware, linen bedding, wood floors, and botanical prints.
Matte Black
Black paint can make an antique vanity look sophisticated and expensive. Keep the finish smooth, add brass or bronze hardware, and consider leaving the top stained for contrast.
Dusty Blue
Dusty blue gives vintage furniture a gentle, romantic feel. It is a smart choice for bedrooms with white bedding, natural wood, soft gray, or floral accents.
Mushroom Beige or Greige
Neutral beige-gray tones are perfect when you want the nightstands to feel warm and understated. They also hide dust better than black or bright white, which is a tiny but real domestic victory.
Design Ideas for Different Home Styles
Cottage Style
Paint the nightstands in antique white or pale blue, lightly distress the edges, add glass knobs, and line the drawers with floral paper. Style with a ceramic lamp, stacked books, and a small vase of flowers.
Modern Farmhouse
Use warm white, charcoal, or sage green paint. Add black or aged brass hardware. Keep the tops natural wood if possible. Pair with simple lamps and textured bedding.
French Country
Choose soft gray, cream, or muted blue. Highlight carved details with dark wax or glaze. Add curved metal pulls and a linen lampshade for a collected European feel.
Moody Vintage
Paint the pieces in deep navy, forest green, or matte black. Use antique brass hardware and a satin topcoat. Add a dramatic lamp and framed art for a bedroom that feels like it has secrets, but tasteful ones.
Boho Eclectic
Try terracotta, mustard, dusty rose, or olive green. Add patterned drawer liner and mixed-metal hardware. Style with woven baskets, plants, and a colorful rug.
Common Mistakes to Avoid
Skipping Surface Prep
Paint failure usually starts before the paint is even opened. Cleaning, sanding, and priming may not be exciting, but they make the difference between a finish that lasts and one that chips when you look at it too aggressively.
Using the Wrong Paint
Wall paint is not always ideal for furniture. Nightstands need a finish that can handle touching, wiping, and objects being moved across the surface. Furniture, cabinet, trim, enamel, mineral, or chalk-style paints are usually better choices.
Painting Too Thickly
Heavy coats can create brush marks, drips, and long cure times. Thin coats give a smoother finish and better durability. It may feel slower, but it looks more professional.
Ignoring Proportions
After separating a vanity, check that each nightstand feels balanced. You may need to add side panels, trim, or feet so they look complete from every angle.
Forgetting the Topcoat
A beautiful paint job without protection is risky on a nightstand. Seal the top especially well, because that surface gets the most use.
How to Style Painted Vanity Nightstands in the Bedroom
Once your upcycled antique vanity nightstands are painted and cured, styling brings the whole project together. Start with matching or coordinating lamps to create visual balance. The lamps do not have to be identical, but they should share a common feature such as color, height, material, or shade shape.
Keep the tabletop functional. A lamp, a book, a small tray, and one decorative item are usually enough. If everything on the nightstand is tiny, the surface can look cluttered. Mix heights and textures: ceramic, glass, metal, wood, fabric, and greenery all work well.
If the nightstands have open lower shelves, add baskets for hidden storage. If they have deep drawers, use small organizers for chargers, lip balm, reading glasses, and all the little things that somehow multiply beside a bed.
Real-Life Experience: Lessons From Painting Upcycled Antique Vanity Nightstands
The first thing you learn from working on painted upcycled antique vanity nightstands is that old furniture has opinions. A brand-new board from the hardware store just sits there politely. An antique vanity, on the other hand, may have warped slightly, collected layers of polish, lost a screw, gained a mystery stain, and decided that one drawer will only close if you lift it at a very specific angle. This is not failure. This is character with paperwork.
One of the most useful experiences is learning to slow down during the planning stage. Before cutting the vanity apart, it helps to stand back and imagine each side as a finished nightstand. Where will the new inner panel go? Will the back need reinforcement? Are the tops equal in size? Will the drawer hardware look centered after separation? Taking measurements from several points matters because antique furniture is not always perfectly square. Many old pieces were handmade, repaired, or shifted over time. Trust the tape measure more than your optimistic eyeballs.
Another lesson is that cleaning usually takes longer than expected. A vintage vanity may look dusty, but the real problem is often old wax or furniture polish. If you paint over residue, the finish may resist adhesion or develop strange spots. A careful cleaning can feel boring, but it prevents bigger problems later. Think of it as giving the furniture a spa day before its makeover.
Paint color also behaves differently on furniture than it does on a sample card. A soft cream can look yellow beside cool white bedding. A gray can turn blue in north-facing light. Black can look elegant, but it shows dust and fingerprints more than mid-tone colors. Testing paint on the back or inside of a drawer is worth the extra step. It is much easier to change your mind before painting two full nightstands and whispering, “Well, that is definitely more lavender than expected.”
Hardware can completely change the final personality of the project. Original pulls often look dull at first, but gentle cleaning may reveal warm brass or beautiful aged patina. Reusing original hardware helps preserve the antique feel. However, new hardware can make the pieces more practical if the old pulls are broken, uncomfortable, or too ornate for your room. When replacing pulls, measure hole spacing carefully. Filling and redrilling hardware holes is manageable, but it adds time.
One practical experience that surprises many DIYers is the importance of curing time. Paint may feel dry within hours, but it can take days or even weeks to fully harden depending on the product, humidity, and number of coats. During that curing period, avoid setting heavy lamps, water glasses, or decor directly on the surface. Use felt pads, coasters, or a temporary cloth. Nothing hurts quite like finishing a gorgeous painted nightstand and then discovering a circular mark from a coffee mug the next morning.
Finally, the most satisfying part is seeing the pair beside a bed. The matching shapes create symmetry, while the old details add warmth that new furniture often lacks. Painted upcycled antique vanity nightstands tell a story. They prove that a piece does not have to be perfect to be beautiful. Sometimes it just needs repair, paint, patience, and someone willing to see two nightstands hiding inside one forgotten vanity.
Conclusion
Painted upcycled antique vanity nightstands are a smart, stylish, and sustainable way to give old furniture a second life. With the right vanity, careful preparation, quality paint, and thoughtful finishing details, you can create a matching pair of bedside tables that look custom, charming, and full of personality.
The key is to respect the original piece while making it useful for modern living. Clean it well, repair it properly, paint in thin coats, seal the finish, and choose hardware that supports the style. Whether your finished nightstands lean cottage, farmhouse, French country, vintage glam, or modern eclectic, they will bring something special to the bedroom: history, function, and a little DIY bragging rights.
Note: This article is written from current furniture-refinishing best practices, including safe preparation, proper sanding, priming, painting, sealing, and upcycling methods commonly recommended by experienced DIY furniture painters, home improvement educators, and product manufacturers.