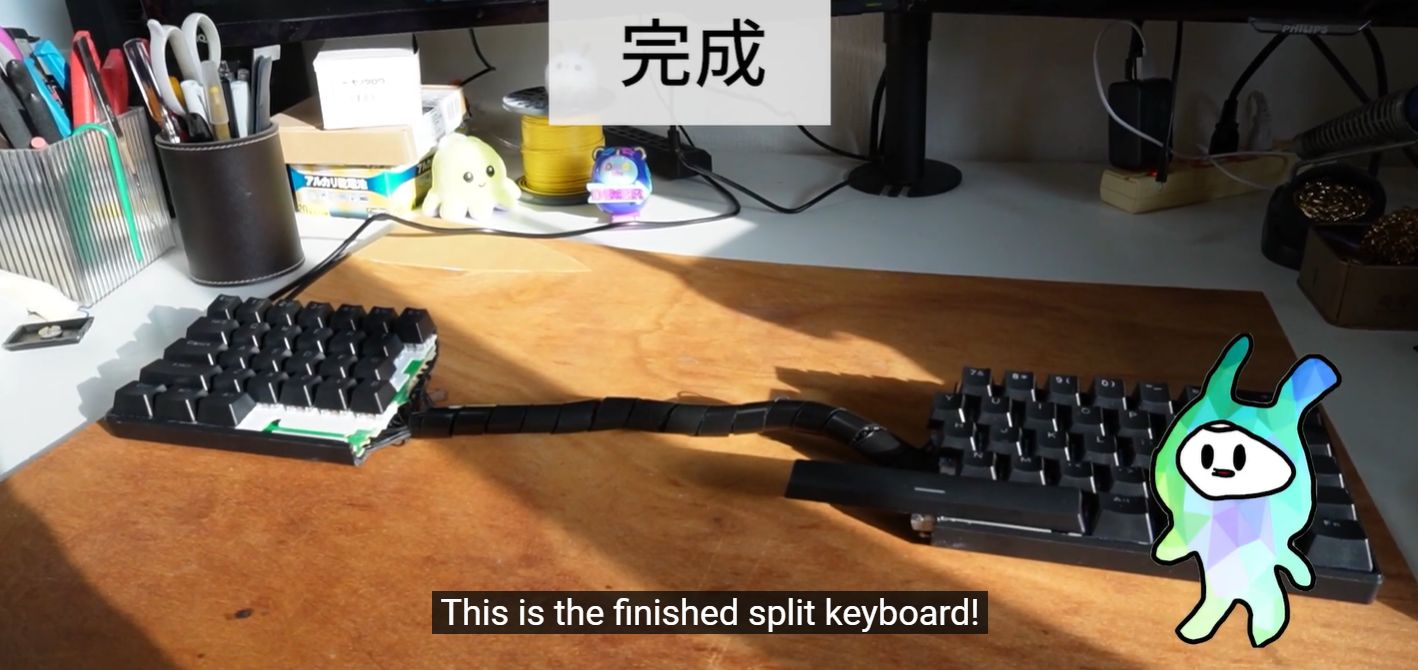
There are two kinds of people in the mechanical keyboard world: those who carefully design a custom PCB with CAD software, and those who look at a perfectly ordinary keyboard and think, “What if I cut this thing in half?” This article is for the second groupthe brave, curious, slightly sawdust-covered keyboard tinkerers who understand that innovation sometimes begins with a cheap keyboard, a marker line, and a mildly alarming power tool.
A DIY split keyboard made with a saw sounds like a joke until you realize it can actually work. Split keyboards are designed to let your hands rest farther apart, reducing awkward wrist angles and giving your shoulders more room to relax. Commercial split ergonomic keyboards can be pricey, and fully custom builds require parts, soldering, firmware knowledge, and patience. But hacking an existing mechanical keyboard into two separate halves offers a wonderfully chaotic shortcut into the world of ergonomic keyboard mods.
Of course, this is not a “grab a saw and hope for the best” project. A keyboard contains a circuit board, switch contacts, traces, stabilizers, cables, and often a plastic or metal case that was never meant to experience lumberjack energy. Done carefully, however, this project can turn an inexpensive keyboard into a functional, conversation-starting split keyboard. Done carelessly, it can turn your keyboard into modern art. Possibly smoky modern art.
What Is a Split Keyboard, Exactly?
A split keyboard separates the left and right typing zones so your hands are not forced to crowd together in front of your body. Some split keyboards are one-piece designs with a fixed gap and angled key sections. Others are fully separated into two independent halves connected by a cable or wireless link. The main goal is comfort: straighter wrists, less shoulder tension, and a typing position that feels more like your body was consulted during the design process.
Traditional rectangular keyboards are convenient to manufacture, but they are not always friendly to human anatomy. When you type on a standard keyboard, your wrists may bend outward toward your pinkies, your shoulders may roll inward, and your forearms may twist flat against the desk. A split layout lets you angle each half so your arms can approach the keys more naturally. Add tentingraising the inner edges of the keyboard halvesand you can reduce how much your forearms rotate downward.
Why Make a DIY Split Keyboard With a Saw?
The obvious answer is: because buying one is too normal. But there are practical reasons too. A budget mechanical keyboard may cost far less than a premium split ergonomic model. If it uses a simple internal design, it may be possible to cut the case and PCB, extend broken electrical connections, and mount the halves apart from each other. The result is not as polished as a factory-made ergonomic keyboard, but it can be surprisingly useful.
This project also teaches you how keyboards work. You will learn about key matrices, rows, columns, traces, continuity testing, soldering, cable routing, and the brutal truth that plastic dust gets everywhere. For DIY electronics fans, that learning process is half the fun. The other half is telling guests, “Yes, I made this keyboard with a saw,” and watching their eyebrows leave the building.
How a Keyboard Matrix Works
Before cutting anything, it helps to understand the keyboard’s nervous system. Most keyboards use a matrix: keys are arranged in rows and columns, and the controller scans the grid to detect which key is pressed. Instead of giving every switch its own dedicated wire, the keyboard shares electrical paths. This saves space and reduces wiring complexity.
When you saw a keyboard in half, you may cut through those shared paths. A clean split usually requires reconnecting the severed row and column traces with wires. Think of it like slicing a city in two and then rebuilding the bridges so traffic can keep moving. The keyboard controller does not care that your keyboard has been through an action movie, as long as the electrical paths still make sense.
Choose the Right Keyboard for the Job
Not every keyboard is a good candidate. A compact mechanical keyboard with a simple PCB and a clear center gap is usually easier to modify than a wireless keyboard packed with batteries, antennas, touch controls, or layered ribbon cables. A full-size board can work, but the numpad and function clusters complicate the split. A tenkeyless or compact layout may be easier for a first attempt.
Look for These Features
- Mechanical switches: They are easier to inspect and repair than many membrane designs.
- A visible PCB layout: Simple traces are easier to reconnect.
- Enough center space: A split line between the G/H, T/Y, and B/N zones is common.
- Wired USB connection: Fewer battery and wireless complications.
- Low replacement cost: Your first saw-split keyboard should not be your prized limited-edition board.
Avoid cutting into lithium batteries, wireless charging circuits, or boards with unknown power components. If a keyboard is rechargeable and you cannot safely identify and remove the battery first, choose a different keyboard. Ergonomic experimentation is fun; accidental battery drama is not.
Tools and Materials You May Need
The exact tool list depends on your keyboard, but most saw-split builds require basic electronics and cutting tools. You do not need a professional lab, but you do need patience and respect for sharp objects.
- Small screwdriver set
- Fine-tooth hacksaw, rotary tool, or small hobby saw
- Painter’s tape or masking tape
- Marker or scribe for the cut line
- Safety glasses and dust mask
- Soldering iron and solder
- Thin insulated wire
- Multimeter with continuity mode
- Heat-shrink tubing or electrical tape
- Epoxy, plastic filler, or 3D-printed trim pieces
- USB cable, TRRS cable, or internal extension wiring depending on the design
If your keyboard uses hot-swap sockets, remove the keycaps and switches near the cut line before cutting. This prevents damage and gives you more room to work. Labeling parts with painter’s tape may feel excessive, but future you will be grateful when tiny screws stop pretending they are identical.
Step-by-Step: How to Make a Split Keyboard With a Saw
1. Disassemble the Keyboard
Unplug the keyboard. Remove keycaps, switches if possible, case screws, foam, plates, and any loose internal parts. Take photos as you go. These photos become your map when it is time to reassemble everything and you no longer remember why there are three extra screws staring at you judgmentally.
2. Study the PCB
Look closely at the circuit board. Find the controller, USB connector, switch pads, diodes, and traces crossing the intended cut line. Use a bright light and magnification if needed. Mark every trace that will be cut. These are the connections you will likely need to rebuild later with jumper wires.
3. Pick the Split Line
The most natural split usually runs between the left and right typing zones. On a QWERTY keyboard, this is often between 5/6, T/Y, G/H, and B/N. However, the best split line is not only about typing comfort. It also depends on the PCB layout. A slightly awkward-looking cut may be easier to repair than a perfect ergonomic line that destroys half the matrix.
4. Tape and Mark the Cut
Apply painter’s tape along the cut area to reduce chipping and make the line easier to see. Mark the cut clearly on the case, plate, and PCB. Measure twice, then measure again because plastic does not grow back.
5. Cut Slowly
Use a fine-tooth saw or rotary tool and cut slowly. Do not force the blade. Let the tool do the work. If you are cutting a PCB, try to minimize dust and avoid breathing fiberglass particles. Wear safety glasses and a mask. Vacuum carefully afterward, but avoid static-heavy cleaning methods directly on electronics.
6. Smooth the Edges
After cutting, clean up the edges with a file or sandpaper. Remove burrs, sharp plastic, and rough PCB corners. The goal is to make each half safe to handle and easier to mount. If the cut looks like it was done during an earthquake, trim pieces or a simple 3D-printed edge cover can hide a lot of sins.
7. Reconnect the Matrix
This is where the project becomes less “woodshop” and more “tiny electronic detective story.” Use a multimeter to identify which traces were severed. Solder jumper wires across the split where needed. Keep wires organized and secure them so they do not tug on solder joints. Heat-shrink tubing helps prevent shorts.
If the original controller remains on one side, the other half may need several wires running back to it. Some builders route these wires through a cable between the halves. Others mount an internal connector so the halves can separate cleanly for transport. A detachable cable is more elegant, but direct wiring is simpler for a first build.
8. Test Before Final Assembly
Before closing the case, plug the keyboard in and test every key with a keyboard tester. Check rows, columns, modifiers, spacebar, enter, backspace, and any keys near the cut line. If a whole row or column is dead, you likely missed a matrix connection. If one key behaves strangely, inspect its diode, switch socket, or nearby trace.
9. Build a Comfortable Mounting Setup
A saw-split keyboard is only useful if it is comfortable. Try placing the halves shoulder-width apart, angled slightly outward. Some people like a flat setup; others prefer tenting the inner edges. You can experiment with rubber feet, wedge stands, 3D-printed legs, foam blocks, or adjustable mounts. The best angle is the one that keeps your wrists relaxed and your typing accurate.
Common Mistakes to Avoid
The biggest mistake is cutting first and thinking later. A keyboard may look symmetrical from the outside while hiding a maze of traces inside. Always inspect the PCB before choosing a cut line. Another common mistake is using wire that is too thick or too stiff. Flexible, thin insulated wire is easier to route and less likely to rip up solder pads.
Do not skip strain relief. Any cable connecting the halves should be secured so movement does not pull directly on solder joints. Hot glue, zip ties, printed brackets, and internal anchors can all help. Also, do not assume the keyboard works just because the first five keys test correctly. Test everything. Keyboards enjoy hiding one broken key until you are writing an important email.
Is a Saw-Split Keyboard Actually Ergonomic?
It can be, but only if you set it up thoughtfully. Splitting the keyboard gives you more freedom, but freedom can be used badly. If the halves are too far apart, too steeply angled, or too high off the desk, you may trade one discomfort for another. The goal is not to create the most dramatic desk setup on social media. The goal is to keep your hands, wrists, arms, and shoulders in a relaxed position.
Start with the halves roughly in line with your shoulders. Keep your wrists straight rather than bent outward. Avoid raising the back of the keyboard so much that your wrists extend upward. If you use wrist rests, rest your palms during pauses rather than planting your wrists while actively typing. And if you have persistent pain, numbness, or tingling, do not rely on a DIY keyboard as medical treatment. Get professional advice.
How This Compares With Buying a Split Keyboard
A commercial split keyboard will usually be cleaner, sturdier, and easier to configure. Popular ergonomic boards may offer tenting kits, thumb clusters, programmable layers, column-staggered layouts, and polished firmware support. A saw-made split keyboard, on the other hand, is cheaper, weirder, and deeply satisfying in the way only a questionable garage project can be.
If you want guaranteed comfort and reliability, buy a proven ergonomic keyboard. If you want to learn electronics, rescue a spare board, and create something that looks like it survived a keyboard divorce, DIY is hard to beat. The saw method is not the most elegant path, but it is one of the most memorable.
Practical Upgrade Ideas
Once your split keyboard works, you can improve it. Add better feet for tenting. Wrap the connecting cable in braided sleeving. Use a detachable connector between halves. Replace rough cut edges with printed covers. Add foam to reduce hollow case noise. Lubricate stabilizers if the spacebar sounds like a shopping cart with one bad wheel.
You can also rethink the layout. If the keyboard supports remapping, move frequently used keys closer to your thumbs or reduce awkward pinky reaches. Even without advanced firmware, simple operating system shortcuts and software remapping tools can make the board more comfortable. A split keyboard is not only a hardware project; it is an invitation to question every key you press 500 times a day.
Who Should Try This Project?
This project is ideal for people who enjoy tinkering, soldering, and solving physical puzzles. It is not ideal for someone who needs a dependable work keyboard by Monday morning and owns exactly one keyboard. The best candidate is a spare wired mechanical keyboard that you will not mourn if the experiment fails.
Beginners can try it, but they should practice soldering first. Cutting a PCB and repairing traces is more advanced than swapping keycaps. If you are new to electronics, consider starting with a hand-wired macropad or a simple keyboard kit. Once you understand rows, columns, and diodes, the saw-split idea becomes much less mysterious.
DIY Experience: What It Feels Like to Build One
The first emotional stage of building a DIY split keyboard with a saw is confidence. This usually lasts until the keyboard is open and you see the PCB. Suddenly, the project stops looking like a fun weekend hack and starts looking like a tiny city map designed by someone who did not believe in straight roads. That is normal. Take photos, breathe, and do not cut yet.
The second stage is negotiation. You begin moving the cut line left and right, trying to avoid traces, screws, stabilizers, and weird plastic posts that seem to exist only to ruin your plan. You may discover that the most comfortable split line passes directly through something important. This is where DIY becomes decision-making. Do you choose the perfect ergonomic split and repair more traces, or choose a slightly less perfect split and preserve more of the original board? For a first project, the easier electrical path is usually the smarter choice.
The cutting stage is strangely intense. Even on a cheap keyboard, the first bite of the saw feels illegal. Go slowly. Rushing creates ugly edges, cracked plastic, and accidental damage. A fine-tooth saw gives you more control than a wild rotary tool, although a rotary tool can be useful for cleanup. The smell of warm plastic is not a badge of honor; it is a reminder to ventilate your workspace.
The most satisfying moment comes during continuity testing. You touch the multimeter probes to two points, hear the beep, and feel like a wizard with safety glasses. The least satisfying moment comes when there is no beep and you have to figure out why. Expect at least one mystery. Maybe a trace lifted. Maybe a wire is connected to the wrong pad. Maybe a tiny solder bridge is causing chaos. Keyboard repair teaches patience because the keyboard will absolutely not negotiate with your feelings.
Reassembly brings another lesson: cables need space. A case that closed perfectly before may not close once you add jumper wires. Plan wire routes before soldering everything permanently. Keep the wires flat, avoid switch stems, and leave room for screws. If the case bulges like a suitcase after vacation, open it and reroute. Do not simply tighten screws until something snaps. That strategy works only in cartoons and very bad repair videos.
Typing on the finished board feels odd at first. Your hands may reach toward the old center position out of habit. The B key may become controversial. Your mouse position may need to change. Give yourself time. Start with a moderate split distance and angle, then adjust over several days. The best setup usually reveals itself through ordinary use, not through dramatic first impressions.
The biggest takeaway from the experience is that a DIY split keyboard made with a saw is less about saving money and more about understanding your tools. You learn that keyboards are not magic slabs. They are circuits, switches, cases, and choices. You also learn that ergonomics is personal. The same split angle that feels heavenly to one person may feel like typing on two dinner plates to another.
Most importantly, the project gives you permission to experiment. Maybe your final keyboard is beautiful. Maybe it looks like a raccoon built it during a thunderstorm. Either way, it works because you made it work. That is the charm of hardware hacking: the object on your desk carries a story. In this case, the story begins with a saw, includes several tiny wires, and ends with a keyboard that finally lets your hands stop arguing over elbow room.
Conclusion
A DIY split keyboard made with a saw is not the safest, cleanest, or most beginner-friendly route into ergonomic typing, but it might be one of the most entertaining. With careful planning, proper safety gear, patient cutting, and tidy soldering, an ordinary keyboard can become a functional split setup that teaches you a lot about electronics and comfort. The key is to respect the process: inspect before cutting, reconnect the matrix carefully, test every key, and adjust the final position for your body rather than for internet points.
If you have a spare wired mechanical keyboard, basic soldering skills, and a strong desire to make your desk look like it has a backstory, this project is worth exploring. Just remember: the saw is only the loudest tool in the project. The real tools are patience, planning, and a multimeter that beeps when you desperately need emotional support.
Note: Always unplug electronics before modification, wear proper safety gear, and avoid cutting any keyboard with a built-in battery unless the battery has been safely removed and handled correctly.