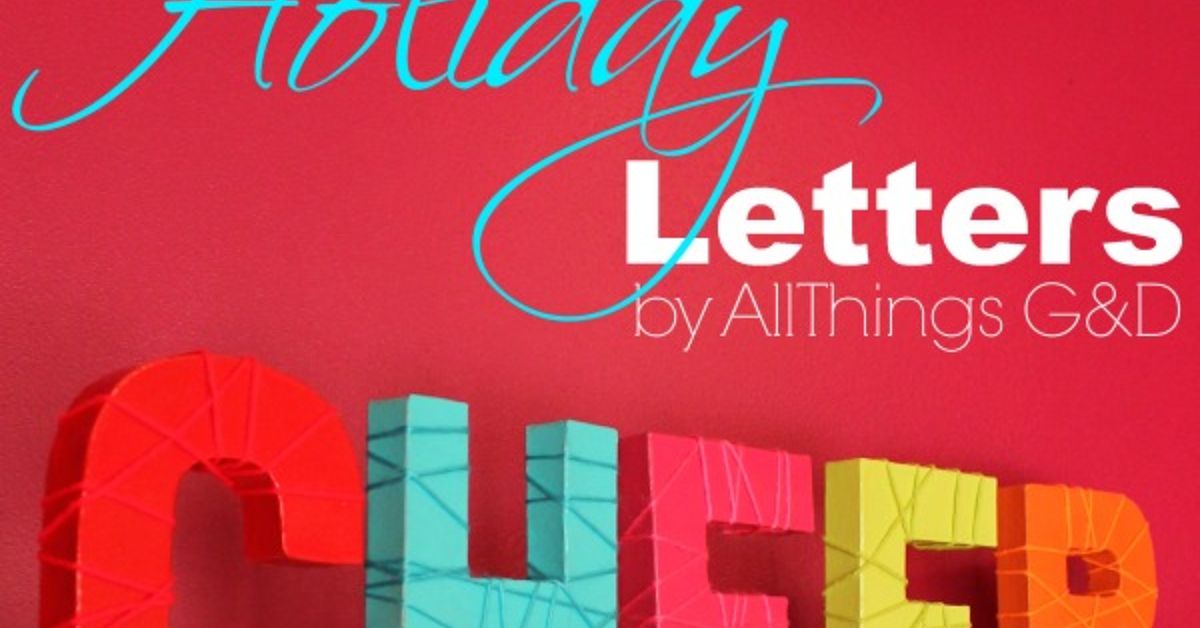
Some holiday decorations whisper, “I have excellent taste.” Others shout, “I spent my entire paycheck on glitter reindeer.” Yarn-wrapped holiday letters land beautifully in the middle: cozy, custom, affordable, and charming enough to make your mantel look like it has its own festive publicist. Whether you want to spell JOY, NOEL, MERRY, a family name, or one giant monogram that says “yes, this house belongs to someone who owns a glue gun,” this project is wonderfully beginner-friendly.
The best part? You do not need to knit, crochet, sew, or understand why yarn stores have so many shades of red. For these easy DIY yarn-wrapped holiday letters, you only need basic craft letters, yarn, scissors, and a little patience. The technique is simple: secure the yarn, wrap neatly, cover the tricky corners, and decorate the letters with small seasonal touches. The result is warm, textured holiday decor that works on shelves, entry tables, Christmas trees, wreaths, gift packages, and even office desks that need rescuing from fluorescent-light gloom.
This guide walks you through materials, step-by-step instructions, design ideas, mistakes to avoid, kid-friendly tips, and real-life crafting experience so your letters look handmade in the best possible waynot “I wrestled a sweater and lost.”
Why Yarn-Wrapped Holiday Letters Are So Popular
Yarn-wrapped letters have become a favorite DIY holiday craft because they combine three things people love in December: personalization, coziness, and not spending $87 on one tiny decoration. Yarn instantly softens plain cardboard, wood, or papier-mache letters, giving them a warm handmade texture. That makes them perfect for Christmas decorations, Hanukkah displays, winter decor, farmhouse-style mantels, Scandinavian-inspired shelves, and cheerful personalized gifts.
Unlike many holiday crafts, this one is easy to customize. Use chunky cream yarn for a snowy minimalist look, red and white yarn for a candy cane effect, green yarn with tiny pom-poms for a playful Christmas vibe, or metallic yarn for sparkle without the glitter explosion. You can make one initial as a stocking tag or wrap several letters to spell a complete holiday word.
Supplies You Need
You can find most supplies at craft stores, dollar stores, big-box retailers, or in the mysterious drawer where leftover ribbon goes to retire.
Basic Materials
- Cardboard, wooden, foam, or papier-mache letters
- Yarn in holiday colors or winter neutrals
- Hot glue gun or strong craft glue
- Scissors
- Felt, cardstock, or fabric scraps for covering awkward edges
- Ribbon, twine, or string if you plan to hang the letters
Optional Embellishments
- Mini pom-poms
- Tiny bells
- Faux greenery or small pine sprigs
- Mini ornaments
- Wooden beads
- Felt holly leaves
- Snowflake charms
- Small bows
- Battery-operated micro fairy lights
For beginners, medium-weight yarn is the easiest to control. Very thin yarn takes longer to cover the surface, while super chunky yarn can look adorable but may be bulky around corners. If this is your first attempt, choose a smooth acrylic or wool-blend yarn in one or two colors.
Choosing the Best Letters for Yarn Wrapping
The base letter matters more than you might think. Flat chipboard letters are lightweight and ideal for ornaments, garlands, and gift toppers. Papier-mache letters are great for shelf displays because they are sturdy but still easy to wrap. Wooden letters look polished and last longer, but they can be heavier, especially if you want to hang them. Foam letters are light and budget-friendly, though they may dent if handled roughly.
If you are spelling a word like JOY, PEACE, or NOEL, choose letters with a consistent height and thickness. For mantel displays, letters between 8 and 12 inches tall usually make a strong visual impact. For ornaments or gift tags, 3- to 5-inch letters work beautifully. For wreaths, choose one large initial or a short word so the finished design does not look crowded.
How to Make Easy DIY Yarn-Wrapped Holiday Letters
This project is simple, but neat wrapping makes all the difference. Put on a holiday playlist, pour something warm, and accept that at least one piece of yarn will stick to your sleeve. That is not a mistake; that is crafting weather.
Step 1: Plan Your Color Scheme
Before gluing anything, decide how you want the finished letters to look. A traditional Christmas palette might include red, green, white, and gold. A winter farmhouse look may use cream, gray, forest green, and natural twine. A playful kids’ craft version can include rainbow yarn, pom-poms, and bells. For a modern look, try white letters with black-and-gold accents or soft blush yarn with metallic ribbon.
If you are wrapping multiple letters, decide whether each letter will be one color or whether you want stripes. Stripes are charming, but they require more starts and stops. Solid colors are faster and look clean.
Step 2: Cover Difficult Areas First
Letters with inner cutouts, sharp angles, or curves can be tricky. Before wrapping the entire letter, cover awkward spots with small pieces of yarn, felt, or matching paper. For example, the inside triangle of an “A,” the center of an “O,” or the angled arms of a “K” may need extra attention.
Glue short yarn pieces across these sections first so the base does not show later. Think of it as putting on socks before boots. Not glamorous, but necessary.
Step 3: Secure the Yarn
Add a small dot of hot glue to the back of the letter and press the end of the yarn into it. Let it set for a few seconds. Always start on the back so the front remains clean. If kids are helping, use tacky craft glue instead of hot glue and allow more drying time.
Step 4: Wrap Slowly and Evenly
Begin wrapping the yarn around the letter, keeping each strand close to the previous one. Pull the yarn snugly, but not so tight that it bends cardboard or foam. The goal is smooth coverage, not a holiday-themed tourniquet.
For straight sections, wrapping is quick. For curves and corners, adjust the yarn angle as you go. Add tiny glue dots on the back every few inches to prevent slipping. Avoid using too much glue on the front, because dried glue can create shiny spots or bumps.
Step 5: Handle Corners Like a Pro
Corners are where yarn-wrapped letters test your patience. Instead of forcing one long strand to behave perfectly, use short sections. Wrap around the corner several times from different angles until the base is covered. If the shape still looks uneven, add a small bow, felt leaf, bell, or pom-pom later. Crafting rule number one: embellishments are decorations. Crafting rule number two: embellishments are also evidence concealment.
Step 6: Finish on the Back
When the letter is fully covered, cut the yarn and glue the end to the back. Press firmly until secure. Trim stray fibers if needed. If your letter will sit on a shelf, check the bottom to make sure bulky yarn does not make it wobble. If it leans slightly, add felt pads or a small cardboard support behind it.
Step 7: Add Holiday Embellishments
Now comes the fun part. Attach faux greenery to the corner of a letter, glue tiny bells along the edge, add a red velvet bow, or place mini pom-poms like ornaments. Keep embellishments balanced. One focal point usually looks more elegant than covering the entire letter until it resembles a holiday sweater that lost a bet.
Creative Yarn-Wrapped Letter Ideas
1. Classic “JOY” Letters
Wrap “J” in red yarn, “O” in cream yarn, and “Y” in green yarn. Add a tiny wreath or faux greenery to the “O” for a cheerful centerpiece. This works beautifully on a mantel, bookshelf, piano, or entryway table.
2. Cozy Neutral “NOEL” Display
Use ivory, oatmeal, gray, and soft gold yarn for a neutral winter look. Add wooden beads or dried orange slices nearby for natural texture. This style pairs well with farmhouse, cottage, Scandinavian, and minimalist holiday decor.
3. Monogram Stocking Tags
Wrap small initials and tie them to stockings with ribbon. Each family member gets a personalized tag, and you avoid the annual “Which stocking is mine?” debate. This is especially helpful when everyone owns a red stocking and no one remembers anything before coffee.
4. Yarn-Wrapped Gift Toppers
Small wrapped initials make thoughtful gift toppers. Tie one onto a wrapped present with twine or ribbon. After opening the gift, the recipient can reuse the letter as an ornament or desk decoration.
5. Holiday Garland Letters
Wrap small letters to spell “MERRY,” “PEACE,” or “LET IT SNOW,” then string them onto twine. Add felt balls, tassels, or mini clothespins between letters. Hang the garland across a mantel, window, doorway, or kids’ room wall.
6. Wreath Initial
Wrap one large family initial and attach it to a grapevine or evergreen wreath. Choose yarn that contrasts with the wreath so the letter stands out. A cream letter on greenery looks classic, while red or plaid-inspired yarn feels festive and bold.
Best Yarn Colors for Holiday Letters
The right yarn color can completely change the personality of your project. Here are a few combinations that work well:
- Traditional Christmas: red, green, white, gold
- Winter Wonderland: white, silver, pale blue, soft gray
- Rustic Farmhouse: cream, tan, burgundy, forest green
- Modern Glam: black, white, gold, champagne
- Candy Cane: red and white stripes
- Cozy Cabin: plaid ribbon accents, evergreen yarn, warm brown
- Kid-Friendly Fun: rainbow yarn, bright pom-poms, jingle bells
Variegated yarn, which changes color along the strand, can create a beautiful striped effect without switching yarns. It is a smart choice if you want visual interest but do not want to tie off a new color every three minutes.
Tips for a Cleaner, More Professional Finish
Use the Back as Your Control Center
Hide glue spots, yarn ends, knots, and overlaps on the back of each letter. The front should look smooth and intentional. The back can look like it has lived a full and complicated life. No one needs to know.
Do Not Rush the Corners
Sharp edges and curves take extra time. Use smaller yarn pieces, glue as needed, and rotate the letter often. If one section looks bulky, balance it with embellishments or wrap the opposite side a little fuller.
Match Yarn Weight to Letter Size
Small letters look best with thinner yarn. Large letters can handle chunky yarn. If the yarn is too thick for the letter, details may disappear. An “E” can become a fuzzy rectangle surprisingly fast.
Keep Tension Consistent
Uneven tension creates gaps or lumps. Try to pull the yarn with the same gentle pressure throughout the project. If gaps appear, push the strands together with your fingers before adding more glue.
Test Before Hanging
If your letters will hang on a tree, wreath, or wall, test the weight before final decorating. Add a loop of ribbon or twine to the back with strong glue, then let it dry completely. For heavier wooden letters, use small sawtooth hangers or adhesive hooks rated for the weight.
Kid-Friendly Version
Yarn-wrapped holiday letters can be a fun family craft, especially for children old enough to wrap and glue safely. Use cardboard letters, washable craft glue, blunt-tip scissors, and thicker yarn that is easier for small hands to manage. Pre-cut several yarn lengths so kids do not have to wrestle with the entire skein. Spoiler: the skein usually wins.
Let kids choose their own colors and decorations. Their letter may not look like a catalog photo, but it will have personality, which is better. Add their initials to bedroom doors, stockings, gift bags, or a family craft garland. For younger children, adults can apply glue while kids wrap the yarn around the letter.
Common Mistakes to Avoid
Using Too Much Glue
Hot glue is helpful, but too much can make the yarn stiff and lumpy. Use small dots on the back and edges instead of long glue lines across the front.
Skipping the Inner Edges
Letters like A, B, D, O, P, and R have interior spaces that need coverage. Wrap or line those areas first, or the base material may peek through.
Choosing Slippery Yarn
Some silky or metallic yarns slide around more than basic acrylic yarn. They can still look beautiful, but beginners may find them harder to control. If you use slippery yarn, glue more frequently on the back.
Overdecorating
A few embellishments look charming. Too many can hide the letter shape. Choose one main accent per letter or repeat a small detail across the whole word for a cohesive design.
Where to Display Yarn-Wrapped Holiday Letters
These letters are versatile enough to use all over the house. Place a wrapped “JOY” sign on the mantel with candles and greenery. Add a family initial to a holiday wreath. Use small letters as Christmas tree ornaments. Tie initials to stockings, baskets, or gift bags. Create a “MERRY” garland for a window. Set a large monogram on an entry table next to a bowl of ornaments or pinecones.
For parties, yarn-wrapped letters can label a hot cocoa bar, dessert table, kids’ craft station, or photo backdrop. Spell “COCOA,” “CHEER,” or “SNOW” and surround the letters with mugs, marshmallows, candy canes, and tiny lights. It is festive, practical, and much easier than explaining why someone put peppermint sticks in the gravy boat.
How to Store Yarn-Wrapped Holiday Letters
Store finished letters in a sturdy box with tissue paper or bubble wrap between them. Avoid crushing them under heavy ornaments or tangled light strands. If you added bells, greenery, or delicate bows, wrap those areas loosely. Keep the box in a dry place so cardboard or papier-mache bases do not warp.
For garlands, wrap the entire piece around a cardboard rectangle to prevent tangles. For ornaments, store each initial in a small paper bag or ornament divider. Label the box clearly so next year you are not digging through six bins muttering, “I know I made festive letters, and they know what they did.”
Budget-Friendly Crafting Tips
This project is easy to make on a small budget. Use leftover yarn from old knitting or crochet projects. Check thrift stores for yarn bundles, ribbon, and small decorations. Buy plain letters during craft-store sales. Look for holiday embellishments after the season when clearance bins become treasure chests for patient people.
You can also cut your own letters from recycled cardboard. Print large letter templates, trace them onto cereal boxes or shipping boxes, and glue layers together for thickness. The final result may be lighter than store-bought letters, which is useful for ornaments and garlands.
Experience Notes: What I Learned Making Yarn-Wrapped Holiday Letters
The first thing you learn when making easy DIY yarn-wrapped holiday letters is that the project looks almost suspiciously simple until you meet your first corner. Straight lines are relaxing. Curves are manageable. The inside of a letter “A,” however, can make you question your entire relationship with geometry. The trick is to stop trying to wrap every area with one continuous piece of yarn. Short sections are your friend. Glue small pieces across the awkward spots first, then wrap over them. Once I started treating tricky areas like mini projects instead of obstacles, the finished letters looked much cleaner.
Another useful lesson is that yarn texture matters. Smooth medium-weight yarn creates tidy lines and is easy to adjust. Chunky yarn gives a cozy, high-impact look, but it can swallow small letter details. Fuzzy yarn looks adorable from a distance, but it may blur the edges of the letter. Metallic yarn adds sparkle, though it tends to slip unless secured often. For a first project, I would choose a soft acrylic yarn in a solid color and save the fancy textures for accents.
Color planning also makes a big difference. One year, I tried wrapping each letter in a different bright color. Individually, they looked fun. Together, they looked like a holiday parade had collided with a craft cart. The next attempt used cream yarn for all the letters with red bows and tiny greenery accents. Much better. Repeating one color or one embellishment across the whole word makes the display feel intentional, even if every letter has its own little quirks.
Hot glue is helpful, but restraint is important. Too much glue creates hard bumps under the yarn. Small dots on the back are usually enough. I also learned to keep a wooden skewer or craft stick nearby to press yarn into hot glue instead of using fingers. This is especially wise if you enjoy having fingerprints.
If you plan to craft with kids, prepare the materials before starting. Cut yarn lengths, cover the table, and choose letters with simple shapes like I, L, T, C, or O. Kids enjoy wrapping, but they may wrap diagonally, loosely, or with full artistic rebellion. Let them. The charm of handmade holiday decor is that it does not look machine-made. A slightly lopsided initial on a stocking can become the decoration everyone remembers.
For display, shelf letters are easier than hanging letters. Hanging requires balance, especially with uneven shapes. A “J” or “Y” may tilt unless the ribbon loop is placed carefully. Before gluing the hanger permanently, hold the letter by the loop and see how it falls. Adjust until it hangs straight, then secure it.
The biggest practical takeaway is to make more than one letter at a time. Once the yarn, glue gun, scissors, and embellishments are out, it is efficient to create a batch. Make a mantel word, a few stocking initials, and extra gift toppers in one session. By the end, you will have cozy decorations, personalized packaging, and enough yarn fuzz on your sweater to prove you were very productive.
Most of all, this craft is forgiving. A gap can be covered. A bulky corner can become the perfect spot for a bow. A plain letter can turn into a keepsake with one small bell or handwritten tag. Yarn-wrapped holiday letters are not about perfection; they are about warmth, creativity, and making your home feel personal during the busiest season of the year.
Conclusion
Easy DIY yarn-wrapped holiday letters are a simple, affordable, and wonderfully customizable way to bring handmade warmth into your seasonal decor. With basic letters, yarn, glue, and a few festive embellishments, you can create mantel displays, ornaments, wreath accents, stocking tags, gift toppers, and garlands that feel personal and cozy. The technique is beginner-friendly, but small detailslike covering corners first, hiding glue on the back, choosing the right yarn weight, and keeping embellishments balancedhelp the final project look polished.
Whether your holiday style is rustic, modern, colorful, traditional, or “whatever survived the storage bin,” yarn-wrapped letters can fit right in. They are easy enough for family craft night, pretty enough for thoughtful handmade gifts, and flexible enough to reuse year after year. Best of all, they prove that a little yarn can do a lot of decorating magic.
Note: This HTML body is written as original, publication-ready web content in standard American English, with SEO tags placed at the end in JSON format as requested.