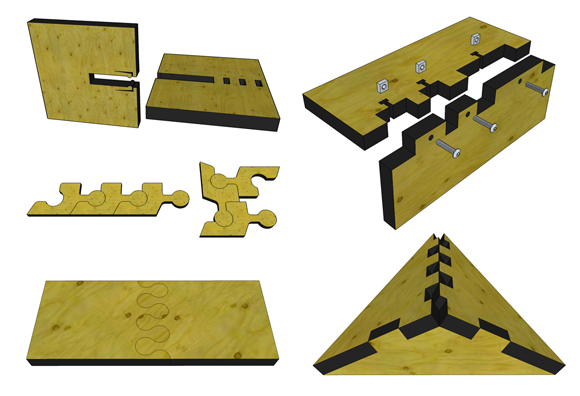
CNC panel joinery sounds like something a robot carpenter whispers before sunrise, but it is actually one of the most practical skills a modern maker can learn. At its simplest, CNC panel joinery is the art of cutting flat materialusually plywood, MDF, hardwood panels, acrylic, or sheet plasticso the pieces lock together with tabs, slots, laps, dados, wedges, or clever little details that make assembly feel suspiciously satisfying.
The idea behind Skill Builder CNC Panel Joinery – Make: is not to replace traditional woodworking joinery. Mortise-and-tenon, dovetails, dados, rabbets, and lap joints earned their reputations long before a router bit ever screamed across a spoilboard. The CNC version simply adapts those old ideas for digital fabrication. Instead of sneaking up on a fit with chisels and shoulder planes, you design the joint in CAD, account for the cutter, material thickness, and tolerance, then let the machine do the repetitive work without asking for a coffee break.
Done well, CNC panel joinery creates projects that are strong, repeatable, self-aligning, and sometimes completely demountable. Think flat-pack stools, modular shelves, tool totes, cabinetry prototypes, pop-up retail displays, speaker boxes, classroom furniture, and workshop jigs. Done poorly, it creates plywood spaghetti and a maker quietly pretending the design was “experimental.” Let’s avoid that second outcome.
What Is CNC Panel Joinery?
CNC panel joinery refers to joints made from flat sheet stock using a CNC router, laser cutter, or similar digital cutting machine. The pieces are designed to interlock, usually through 2D profiles cut all the way through the material. A tab on one panel fits into a slot on another. A half-lap lets two boards cross in the same plane. A wedge locks a shelf into a side panel. A finger joint turns a box corner into a row of mechanical teeth. It is woodworking, geometry, and mild wizardry sharing the same dust collector.
The “panel” part matters. These techniques are especially useful when working with sheet goods because a CNC router excels at cutting repeatable shapes from plywood or MDF. Instead of building a cabinet one board at a time, you can nest parts on a sheet, cut them, label them, and assemble them with predictable alignment. For makers, small shops, schools, and prototyping studios, that repeatability is gold.
Why CNC Joinery Is Different From Traditional Joinery
Traditional joinery is often three-dimensional. A craftsperson may cut a mortise into one board, shape a tenon on another, refine the shoulder, test the fit, pare a little, test again, and finally glue the joint. CNC panel joinery is more constrained but also more scalable. Most beginner-friendly CNC panel joints are cut from flat sheets using vertical toolpaths. That means the machine is excellent at profiles, pockets, slots, and repeatable curves, but it has one famous limitation: the tool is round.
A round router bit cannot create a perfectly sharp inside corner. If you cut a square slot with a 1/4-inch end mill, the internal corners will have a radius. Then a square-edged plywood tab tries to enter the slot and stops like it just remembered another appointment. This is where dogbone fillets, T-bone fillets, corner reliefs, and smart tolerancing enter the story.
The Core Problem: Round Bits Meet Square Tabs
Every CNC joinery lesson eventually arrives at the same little villain: the inside corner. The cutter leaves a rounded corner equal to its radius. A 1/4-inch bit leaves a 1/8-inch radius. A 6 mm bit leaves a 3 mm radius. That radius may be invisible on decorative curves, but in a tab-and-slot joint it can stop the mating panel from seating fully.
The solution is not to yell at the router. It is sensitive equipment and has already heard enough. Instead, designers add relief cuts. A dogbone fillet extends a small circular cut past the inside corner so the square tab can slide in. A T-bone fillet places the relief in a slightly different direction, often making the joint look cleaner from the outside. Some designers prefer “hidden” or “minimal” dogbones where the extra cut is placed so it is less visible after assembly.
For visible furniture, dogbones can look a little industrial. For shop furniture, prototypes, and flat-pack structures, they are practical and honest. For concealed joinery, they are often invisible once assembled. The key is to choose the relief style based on appearance, strength, tool size, and whether the joint will be seen by humans or only by the dust bunnies under your workbench.
Common CNC Panel Joint Types
Tab-and-Slot Joints
The tab-and-slot joint is the bread and butter of CNC panel joinery. One part has protruding tabs; the other has matching slots. It is simple, strong enough for many furniture and fixture projects, and excellent for self-alignment. Use it for shelves, dividers, ribs, small stools, signs, and assembly jigs.
Half-Lap and Cross-Lap Joints
A half-lap removes half the thickness from two crossing parts so they meet flush. CNC routers are great at this because pocketing operations can be controlled precisely. Cross-lap joints work well for grids, display stands, drawer dividers, and structural ribs. The trick is to measure actual stock thickness and adjust pocket depth so the final surface lands flush instead of becoming a tiny plywood speed bump.
Dado and Housing Joints
A dado, also called a housing joint in some contexts, is a slot or channel that receives another panel. CNC-cut dados are useful for cabinets, bookshelves, and box structures because they increase glue surface and improve alignment. A slightly loose dado can be helpful when glue is involved, because wood fibers swell and nobody enjoys a glue-up that turns into a wrestling match.
Finger Joints and Box Joints
Finger joints use alternating rectangular “fingers” to form corners. They are popular for boxes, drawers, enclosures, and small furniture components. When cut cleanly, they provide a lot of surface area and a pleasing mechanical look. For CNC routing, finger width should be large enough relative to the end mill diameter; tiny fragile fingers may look elegant in CAD and then snap off in real life like uncooked pasta.
Wedge and Keyed Joints
Wedge joints are useful when you want a strong assembly without permanent glue. A tab passes through a slot, and a wedge or key locks it in place. This is a favorite strategy for knock-down furniture, trade-show fixtures, and projects that need to travel flat. It also gives the project a satisfying “I built this, and yes, it comes apart” personality.
Material Choice: Plywood Is Wonderful, Annoying, and Still Worth It
Plywood is the superstar of CNC panel joinery because it is stable, available, strong for its weight, and sold in large sheets. It also lies about its thickness. Nominal 1/2-inch plywood is often not exactly 1/2 inch. Baltic birch, cabinet-grade plywood, construction plywood, MDF-core panels, and imported sheets can all vary. Even sheets from the same stack may have slight differences.
This matters because slot width depends on material thickness. If your CAD model assumes 0.500 inch stock and your plywood is actually 0.472 inch, your press-fit joint may rattle like loose change. If your material is thicker than expected, the joint may not assemble without sanding, mallets, prayer, or all three.
The best habit is simple: measure with calipers. Measure several spots on the sheet. Use the real number in your design or CAM allowances. For production work, make a small test coupon before cutting a whole sheet. A test coupon is cheaper than discovering twenty-eight slots are wrong after the machine has already performed its expensive little dance.
Tolerances: The Secret Sauce of Good CNC Joinery
Tolerance is the intentional difference between the designed size of one part and the mating size of another. In CNC panel joinery, it determines whether a joint is a tight press fit, a smooth slip fit, or a loose fit intended for glue.
For a press fit, slots are often very close to actual material thickness, sometimes with only a few thousandths of an inch of clearance depending on machine accuracy, material, humidity, and tool condition. For glue assembly, a little more clearance can help. For knock-down furniture, you may want the joint snug but not so tight that every assembly requires a rubber mallet and a dramatic soundtrack.
Do not rely on one universal number. A desktop CNC cutting MDF with a sharp bit behaves differently from a full-size router cutting cabinet plywood with a vacuum table. Bit deflection, runout, tool wear, chip evacuation, and even finishing passes can change the final fit. Test cuts are not optional; they are the polite conversation between your design and reality.
Dogbones, T-Bones, and Other Corner Reliefs
Dogbone fillets are the most recognized CNC joinery fix because they solve the square-tab-into-round-corner problem. They are typically sized around the tool diameter or slightly larger, ensuring the cutter actually clears the corner. If the relief is undersized, the mating tab still may not seat properly.
T-bone fillets can be cleaner in some layouts because the relief extends perpendicular to the side rather than diagonally through the corner. They are often easier to hide along an edge or inside a slot. Minimal dogbones can also reduce visual impact, but they require careful placement so the cutter removes just enough material.
Many CAM and CAD workflows include automated tools for dogbones. Vectric software has dogbone gadget workflows. Fusion users often rely on add-ins such as Nifty Dogbone or similar utilities. Some makers draw reliefs manually in CAD, which is fine for a simple stool but less charming when a project has eighty-seven slots and a deadline named “tomorrow.”
Design Workflow for CNC Panel Joinery
1. Start With the Assembly, Not the Sheet
Design the finished object first. Understand how the panels meet, where loads travel, which parts need to be visible, and which joints can be hidden. A CNC router can cut impressive shapes, but good joinery starts with structure, not decoration.
2. Measure the Material
Use calipers and enter the real sheet thickness into your model. Parametric CAD is especially helpful because you can define material thickness as a variable and update every tab, slot, dado, and pocket when the plywood tells the truth.
3. Choose the Fit
Decide whether the joint should be press-fit, slip-fit, glued, screwed, wedged, or demountable. A shop jig can be ugly and tight. A living-room bookshelf needs to be strong, square, and not look like it was assembled during a power outage.
4. Add Reliefs Where Needed
Add dogbones or T-bones to internal corners that receive square mating parts. Avoid adding them everywhere automatically if appearance matters. Corner reliefs should solve a mechanical problem, not decorate every slot like confetti.
5. Create a Test Coupon
Before cutting a full project, cut a small strip with several slot sizes. Try the actual panel in each slot. Label the results. This tiny piece of scrap can save hours of sanding and a surprising amount of emotional weather.
6. Plan Workholding
Tabs, clamps, vacuum, screws, double-sided tape, and spoilboard strategy all matter. A perfect joint design becomes useless if the part shifts during the final pass. Hold the sheet securely, avoid cutting into clamps, and leave enough onion skin or tabs to keep parts from becoming airborne plywood frisbees.
Specific Examples of CNC Panel Joinery in Action
A flat-pack stool can use two side frames connected by tabbed cross braces. Dogbone fillets let rectangular tabs seat fully in the slots. Wedges can lock the top in place, making the stool easy to disassemble for storage.
A shop tool tote can use finger joints at the corners, dado slots for dividers, and a tabbed handle panel. Since the tote will get abused, looks matter less than repeatability and strength. Glue plus mechanical interlock works well here.
A modular shelf system can use vertical side panels with repeated slots and horizontal shelves with tabs. If designed correctly, the shelves self-align during assembly. If designed incorrectly, the shelf becomes modern sculpture, which is a fancy way to say “not square.”
A trade-show kiosk benefits from keyed joints and wedges. The panels can travel flat, assemble quickly, and come apart without destroying the finish. This is where CNC panel joinery really shines: repeatable, portable, professional-looking structure from sheet stock.
Common Mistakes and How to Avoid Them
The first mistake is designing from nominal thickness instead of measured thickness. The second is forgetting dogbones. The third is using a bit too large for small details. The fourth is assuming the first full sheet will be perfect because the CAD model looked beautiful. CAD models are charming liars. Always test.
Another common mistake is over-tightening joints. A very tight press fit feels impressive during a dry test, but add glue and humidity and it can become impossible to assemble cleanly. If the project needs glue, leave enough room for glue to spread. If the project must be disassembled, avoid fits that damage the edge after two uses.
Designers also forget about grain direction and plywood face quality. Tabs cut across weak veneer or near voids may chip. Cheap plywood may work for prototypes but disappoint in finished furniture. MDF cuts consistently but lacks the layered strength and edge beauty of quality plywood. Acrylic can create beautiful panel joints but needs different feeds, speeds, and chip control.
Workshop Experience: What CNC Panel Joinery Teaches You the Hard Way
The first real lesson of CNC panel joinery is humility. You can spend an evening building a perfect parametric model, name every component like a responsible adult, and still be defeated by plywood that is 0.018 inch thinner than advertised. The machine did exactly what you asked. Unfortunately, what you asked was based on a fantasy sheet from the land of perfect lumber.
In practice, the best CNC joinery workflow starts with scraps. Before cutting a stool, shelf, or cabinet side, cut a tolerance comb: five or six slots with tiny increments. Test the actual material. Write the fit directly on the coupon with a marker. “Too tight,” “nice press,” “glue fit,” and “hotdog hallway” are all valid field notes, although only three of those should appear in a client file.
Dogbones are another experience-based decision. Beginners often hate how they look, especially on visible surfaces. Then they try to assemble square tabs into rounded slots and suddenly dogbones look like tiny engineering angels. The trick is placement. Put them on the hidden side when possible. Use T-bones when they align better with the design. For utilitarian shop projects, embrace the visible dogbone. It says, “Yes, this was CNC-cut, and yes, it fits.”
Workholding becomes more important as parts get smaller. A large cabinet side may stay calm with screws outside the cut area and a good vacuum table. Small dividers, wedges, or decorative tabs can break loose near the end of a profile cut. That is when parts chatter, edges burn, and the operator develops a sudden interest in stronger tabs. Leave enough holding tabs, use a finishing pass when appropriate, and do not make tiny loose parts unless you have a plan to keep them down.
Another underrated lesson is assembly order. CNC panel joinery can be self-aligning, but only if the parts can actually reach their final positions. A shelf may need to slide into side panels before a back panel locks everything together. Wedges may need clearance for a mallet. Dogbone orientation may matter if one face is visible. Dry-assemble the project before glue. Better yet, simulate the assembly in CAD and then perform a real-world dry fit because plywood, unlike software, has opinions.
Finishing also affects fit. Paint, polyurethane, veneer tape, and sanding can change dimensions. If a project will receive finish before assembly, design more clearance. If it will be assembled first, consider how glue squeeze-out and inside corners will be cleaned. A beautiful CNC joint can quickly become a crunchy glue fossil if finishing is treated as an afterthought.
Finally, CNC panel joinery rewards iteration. The first version proves the concept. The second version improves fit. The third version removes unnecessary material, hides reliefs, improves assembly order, and makes the project look intentional instead of merely functional. That is the joy of digital fabrication: once the design is tuned, you can cut another copy with confidence. The robot does not get bored, the slots stay consistent, and your future self gets to look clever.
Conclusion
Skill Builder CNC Panel Joinery – Make: is more than a clever maker topic; it is a practical doorway into digital woodworking. Once you understand tabs, slots, laps, dados, dogbones, tolerances, and material behavior, flat sheets become furniture, fixtures, jigs, enclosures, and prototypes. The magic is not only in the CNC machine. It is in the decisions before the cut: measuring the stock, choosing the right joint, adding corner relief, testing the fit, and planning assembly.
CNC panel joinery is forgiving enough for beginners and deep enough to keep professionals interested. It invites experimentation, rewards careful measurement, and occasionally reminds you that plywood has a sense of humor. Start with a simple joint, cut a test coupon, adjust your tolerances, and build from there. The result is cleaner assembly, better repeatability, and fewer moments where you stare at a half-built project wondering whether clamps can fix geometry. Spoiler: they cannot. But good CNC joinery can.