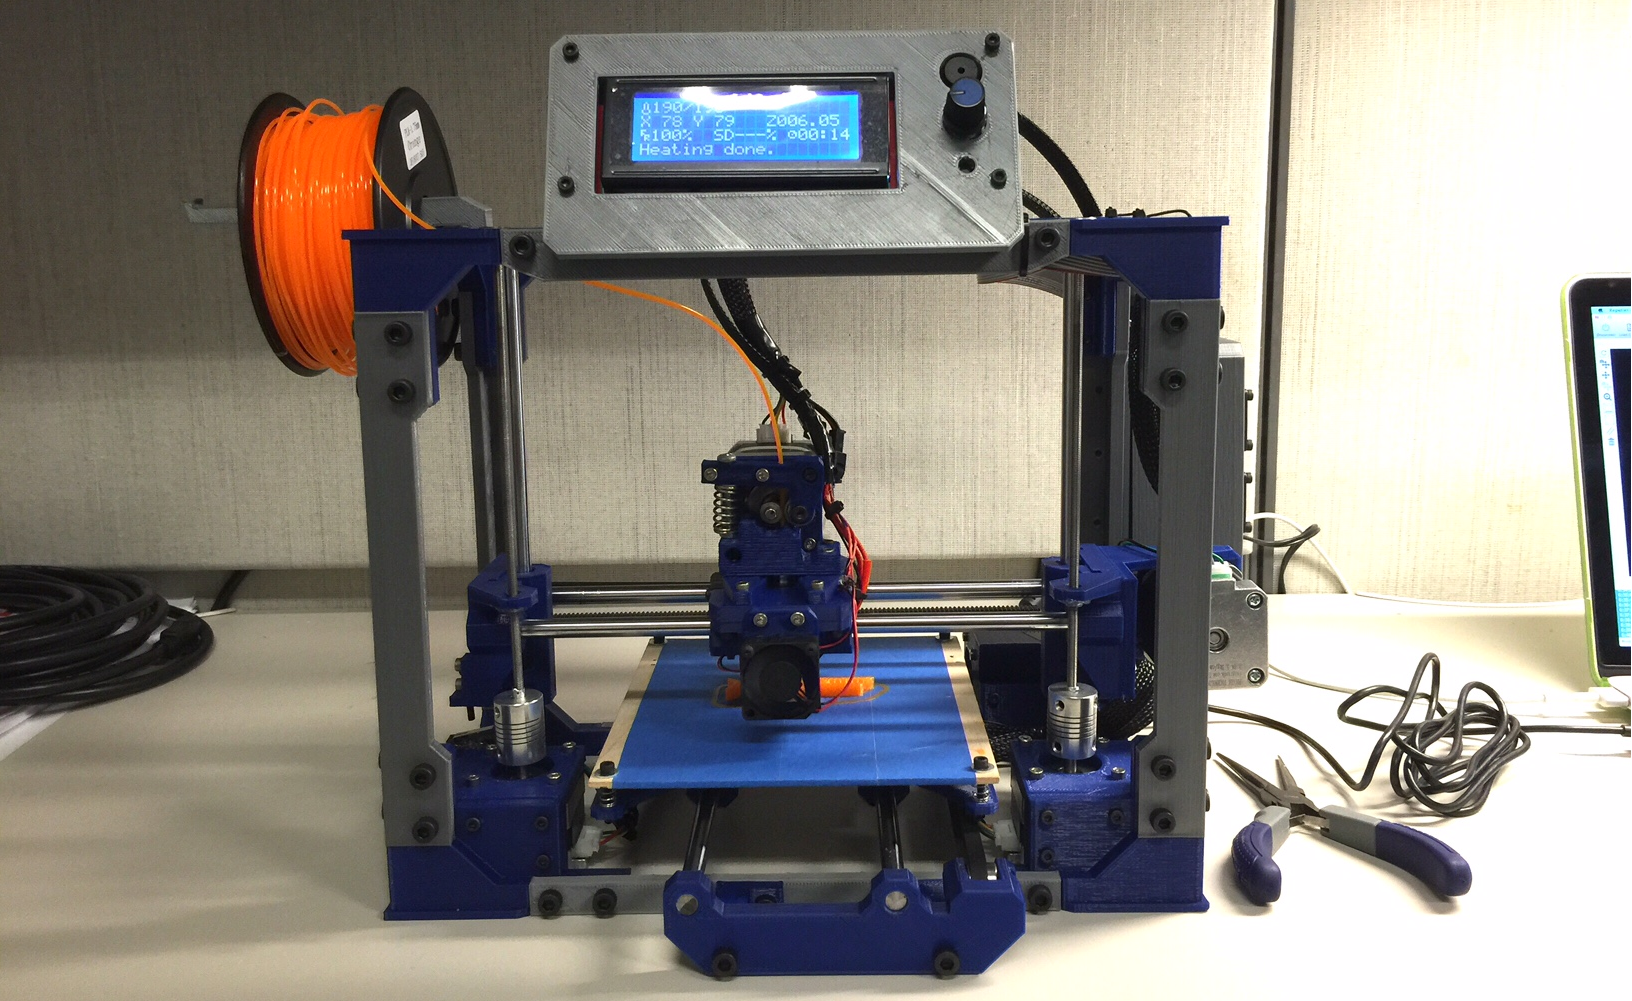
Every so often, a 3D printer comes along that feels less like a product and more like a dare. The MapleMaker Mini V2 is one of those machines. It looks at the classic RepRap dreamthe idea that a printer should be able to reproduce many of its own partsand says, “Hold my spool.” While plenty of DIY 3D printers include printed brackets, mounts, and odds-and-ends, the MapleMaker pushes the printable-parts philosophy much further by using a 3D printed frame and major printed components.
That is what makes the title “MapleMaker 3D Printer Is As Printable As They Get” feel so fitting. This is not just another desktop printer with a few decorative printed pieces. It is a compact, open-source, maker-friendly machine designed around accessibility, customization, and hands-on learning. In other words, it is the kind of printer that asks you to build a printer before you use the printer to build more printer. Yes, it is delightfully recursive. Yes, your workbench may start to resemble a tiny robot nursery.
For hobbyists, educators, tinkerers, and RepRap fans, the MapleMaker Mini V2 remains an interesting case study in how far printable 3D printer design can go. It is not fully self-replicatingmotors, electronics, rods, bearings, belts, fasteners, and hot-end hardware still have to come from the outside worldbut it gets impressively close to the spirit of a machine that can help create its own descendants.
What Is the MapleMaker Mini V2?
The MapleMaker Mini V2 is a compact RepRap-style DIY 3D printer created by Ryan Adams, known online as MiniMadRyan, through the MapleMaker Media project. Its main claim to fame is simple and bold: many of the parts required to build the machine are themselves 3D printable. The frame, major structural parts, mounts, enclosures, and numerous mechanical elements are designed to be printed rather than cut from plywood, aluminum extrusion, acrylic sheet, or metal plate.
The design was shared publicly through YouMagine, including printable files, CAD resources, firmware configuration materials, a build guide, and a bill of materials. That matters because a printable printer is only truly useful if builders can actually access the files, understand the assembly, and source the non-printable parts without solving a scavenger hunt worthy of a fantasy novel.
The MapleMaker Mini V2 features an 8 inch by 6 inch by 6 inch build volume, giving it enough space to print all of its own printable components. That detail is important. A machine that claims to be printable but cannot fit its own frame parts on the bed would be like a chef who cannot reach the stove. MapleMaker’s dimensions make the concept practical: the printer is small enough to be desk-friendly but large enough to reproduce its own printed body components.
The RepRap Idea: A Printer That Makes Printer Parts
To understand why MapleMaker is interesting, you have to understand the RepRap movement. RepRap stands for “replicating rapid prototyper,” and the larger goal was never merely to make another gadget for the garage. The idea was to create low-cost, open machines that could print a meaningful portion of their own components and spread manufacturing power from factories to individuals.
RepRap machines helped define the early culture of desktop 3D printing. They encouraged sharing design files, modifying hardware, publishing improvements, and treating printers as evolving platforms rather than sealed appliances. Instead of “do not open this box,” RepRap culture says, “open the box, improve the box, and maybe print a better box.”
The MapleMaker Mini V2 fits neatly into that tradition. It is not trying to hide its screws behind a sleek corporate shell. It invites inspection. It expects tinkering. It treats the builder as part of the design process. That is a major reason makers still talk about it: MapleMaker is not just printable; it is educational by design.
What Makes the MapleMaker So Printable?
Most desktop 3D printers have some printed pieces. A fan duct here, a cable clip there, maybe a decorative knob if the designer was feeling spicy. MapleMaker goes further. Its frame and major components are 3D printed, meaning the printed parts are not accessories; they are the machine’s skeleton.
This approach changes the building experience. Instead of ordering a rigid metal frame or cutting panels, the builder can print structural parts using another 3D printer. The complete printable set was reported to require under one kilogram of filament and to be printable in roughly 36 hours or less. For a machine that can reproduce most of its own visible body, that is surprisingly reasonable. It turns a spool of PLA or ABS into something much more ambitious than a phone stand shaped like a dragon.
The design also includes practical touches: simplified frame construction, printed electronics enclosures, LCD control support, revised extruder components, and printable bed elements. The project files include STL models and CAD resources, making it easier for builders to print, inspect, remix, or adapt the parts to their own needs.
Core Hardware and Electronics
Although the MapleMaker Mini V2 leans heavily on printed parts, it still depends on conventional 3D printer hardware. The design uses an E3D Lite6 hot end, a budget-friendly hot end built for reliable everyday printing with common materials such as PLA and ABS. It is a sensible match for a compact RepRap-style printer because it keeps costs under control while delivering solid extrusion performance for typical hobbyist use.
For motion and control, MapleMaker follows a familiar DIY 3D printer recipe: NEMA 17 stepper motors, belts, pulleys, bearings, rods, endstops, an Arduino Mega 2560, RAMPS 1.4 electronics, stepper drivers, an LCD panel, and Marlin firmware. This combination was common in the RepRap world because it was affordable, widely documented, and relatively easy for builders to understand.
Marlin firmware is especially important in this ecosystem. It has long been one of the most widely used open-source firmware platforms for desktop 3D printers. For a DIY project like MapleMaker, using familiar firmware means builders can find community knowledge, configuration examples, troubleshooting discussions, and upgrade ideas without needing to reverse-engineer a mystery controller from a printer that behaves like it was programmed by a haunted toaster.
Why Printable Frames Are Exciting
A 3D printed frame is not automatically better than aluminum extrusion or sheet metal. Let us not pretend plastic magically wins every engineering argument. Aluminum is stiffer. Steel is stronger. Injection-molded parts can be more consistent. But a printed frame offers something else: access.
With a printable frame, the barrier to experimentation drops dramatically. A builder can replace a broken piece by printing another one. A classroom can print components for student builds. A maker can modify a bracket, strengthen a corner, test a new mount, or redesign an enclosure without waiting for a custom-machined part. That is the beauty of printable hardware: the design is not frozen. It is more like bread doughmessy, flexible, and capable of becoming something better with enough kneading.
Printable frames also make the machine more approachable. When people can see how the printer is assembled, they can better understand motion systems, belt tensioning, motor placement, bed movement, hot-end mounting, wiring paths, and firmware behavior. For beginners, that is a powerful learning experience. For experienced makers, it is an invitation to customize.
Benefits of Building a MapleMaker-Style Printer
1. It Teaches the Whole Machine
Buying a fully assembled printer is convenient, but convenience sometimes hides the magic. Building a MapleMaker-style 3D printer teaches the builder how each part contributes to the final print. You learn why belt alignment matters, how frame rigidity affects surface quality, why cooling matters, and why firmware configuration is not just a menu of random numbers designed to ruin your afternoon.
2. It Encourages Repairability
Because many parts are printable, replacement is easier. If a printed mount cracks, you do not necessarily need to contact a manufacturer or wait for a proprietary part. You print a replacement, install it, and keep going. That repair-friendly spirit is one of the strongest arguments for open-source 3D printer design.
3. It Supports Customization
MapleMaker was designed as a platform that could evolve with the user. Want a different extruder mount? A revised enclosure? A new cable path? A modified fan duct? Printable architecture makes those changes more realistic. Instead of fighting the machine, you can collaborate with it.
4. It Keeps Costs More Flexible
A printer with a printable frame can reduce dependence on expensive manufactured panels or specialized structural parts. Builders still need to buy hardware and electronics, but printed components can help keep the project more affordable, especially for makers who already have access to a working printer.
Limitations: The Honest Part
MapleMaker is charming, clever, and very printablebut it is not magic. A highly printed structure comes with engineering trade-offs. Plastic parts can flex, creep, crack, warp, or behave differently depending on print settings, material choice, infill, wall thickness, and layer orientation. If the parts are printed poorly, the printer they create may inherit those flaws like a family recipe nobody wants to admit is mostly mayonnaise.
Structural stiffness matters in 3D printing. A frame that flexes can cause ringing, inconsistent layers, dimensional errors, and general print-quality weirdness. Builders need to print the parts carefully and assemble them with patience. Calibration is not optional. Belt tension, rod alignment, square corners, Z-axis smoothness, extruder grip, and bed leveling all matter.
There is also the self-replication caveat. MapleMaker can print many of its own parts, but it cannot print stepper motors, electronics, bearings, steel rods, nozzles, wires, power supplies, or fasteners. That is normal for RepRap-style machines. The dream is self-replication, but the practical reality is partial replication. Still, partial replication is meaningful. A printer that can produce much of its own body is more open, more repairable, and more educational than a sealed machine with mystery parts.
Who Is the MapleMaker Mini V2 For?
The MapleMaker Mini V2 is best suited for people who enjoy the build as much as the finished machine. If you want a printer that arrives fully tuned, prints a perfect benchy in 12 minutes, and asks no emotional commitment from you, a modern turnkey printer is probably the easier path. There is no shame in that. Sometimes you want a tool, not a weekend-long relationship with cable management.
But if you love open-source hardware, enjoy learning by assembly, teach STEM or maker classes, or want a printer that exposes the logic of desktop fabrication, MapleMaker is a fascinating project. It is especially appealing for educators because it makes the machine itself part of the lesson. Students do not just press “print.” They can study how printed components become the very frame that makes printing possible.
MapleMaker Compared With Modern Desktop 3D Printers
Modern desktop 3D printers have become faster, cleaner, more automated, and more consumer-friendly. Auto bed leveling, input shaping, enclosed designs, direct-drive extruders, filament sensors, and polished slicer profiles are now common. Compared with those machines, the MapleMaker Mini V2 feels more like a maker-lab project than a plug-and-play appliance.
That is not a weakness; it is the point. MapleMaker is valuable because it shows what a printable printer can be when the priority is openness and learnability. It may not compete with today’s fastest machines on speed or convenience, but it still wins points for transparency. You can see how it works. You can change how it works. You can print much of what makes it work.
In that sense, MapleMaker sits closer to the soul of desktop 3D printing than many sleek modern machines. It reminds us that 3D printers were not always black boxes with Wi-Fi passwords. They were once strange, noisy, glorious assemblies of rods, belts, firmware, and optimism.
Practical Tips Before Building a Highly Printable Printer
Choose the Right Material
PLA is easy to print and dimensionally friendly, but it can soften in hot environments. ABS can handle more heat but is harder to print without warping. PETG may be a useful middle ground for some parts, though builders should consider stiffness, creep, and fit. The best choice depends on the part, the printer used to make it, and the environment where the final machine will live.
Print Slowly and Accurately
Do not rush structural parts. A fast, sloppy print may save an hour and cost you days of troubleshooting later. Use enough perimeters, appropriate infill, strong layer adhesion, and proper cooling. If a frame piece looks suspicious on the print bed, it will look even more suspicious when it is holding a moving axis.
Dry Fit Before Final Assembly
Before tightening everything down, test-fit rods, bearings, screws, and printed mating surfaces. Printed holes may need cleanup. Edges may need light sanding. Some parts may need reprinting. This is normal DIY printer behavior, not a personal attack from the filament gods.
Respect Wiring and Power
Open-source does not mean “ignore electricity.” Use proper wiring practices, check polarity, secure cables, avoid loose connections, and treat the power supply with care. A neat electronics enclosure is not just pretty; it is safer and easier to troubleshoot.
Experiences With a Printer That Can Print So Much of Itself
Working with a MapleMaker-style printer changes how you think about 3D printing. With a normal printer, you often focus on output: miniatures, brackets, tool holders, toys, prototypes, replacement knobs, and the occasional object that exists mostly because someone on the internet said it was “impossible to print.” With a highly printable printer, the machine itself becomes the project. The printer is not just a tool sitting at the end of the workflow. It is part of the workflow, part of the lesson, and part of the story.
The first experience is usually curiosity. You look at the file set and realize that the frame is not a purchased rectangle of metal. It is a collection of printed pieces that will eventually become a rigid structure. That moment feels a little absurd in the best possible way. You are using one machine to create the bones of another machine. It is like building a bicycle out of parts made by another bicycle, except with more stepper motors and fewer scraped knees.
The second experience is humility. Printable parts are empowering, but they also reveal every weakness in your process. If your source printer is under-extruding, the new printer’s parts may be weak. If your cooling is poor, overhangs may sag. If your bed is not level, large structural pieces may come off slightly warped. A printable printer teaches that 3D printing is not only about design files; it is about process control. The quality of the child machine depends heavily on the quality of the parent machine.
The third experience is satisfaction. Once the frame starts coming together, the project becomes more than a pile of parts. The printed brackets line up. Rods slide into place. The electronics enclosure suddenly makes sense. The LCD has a home. The hot end looks less like a loose component and more like the business end of a real machine. Even before the first print, you get that rare maker feeling: “I built this, and it might actually work.”
The fourth experience is troubleshooting, because of course it is. DIY 3D printers have a way of turning tiny assumptions into dramatic plot twists. A belt may need better tension. A bearing may bind. A motor cable may be reversed. Firmware settings may need adjustment. The extruder may click because the filament path is not as smooth as expected. These moments can be frustrating, but they are also where the learning happens. A turnkey printer hides problems behind support tickets; a printable printer hands you a hex key and says, “Let’s figure this out.”
The final experience is perspective. After building or studying a printer like the MapleMaker Mini V2, you look at every other 3D printer differently. You notice which parts are printable, which parts are proprietary, which design choices support repair, and which ones seem built mainly to discourage curiosity. MapleMaker’s greatest value may not be only the machine itself, but the mindset it encourages: hardware should be understandable, repairable, adaptable, and shared. That is the little spark at the center of the RepRap idea, and MapleMaker carries it proudly.
Conclusion
The MapleMaker Mini V2 is a memorable example of what happens when the RepRap philosophy is taken seriously. It is compact, open, heavily printable, and designed for people who want to learn how a 3D printer truly works. Its 8 inch by 6 inch by 6 inch build volume, printed frame, major printed components, E3D Lite6 hot end, RAMPS electronics, Arduino control, and Marlin firmware make it a practical and educational DIY machine rather than a mere novelty.
It is not the fastest, stiffest, or most modern printer by today’s standards. It still depends on purchased electronics and hardware. It still demands careful printing, patient assembly, and calibration. But that is exactly why it remains interesting. The MapleMaker 3D printer is as printable as they get because it treats 3D printing not just as a manufacturing method, but as a design philosophy. It is a printer that teaches, repairs, reproduces, and invites improvement. In a world full of sealed boxes, that still feels wonderfully rebellious.