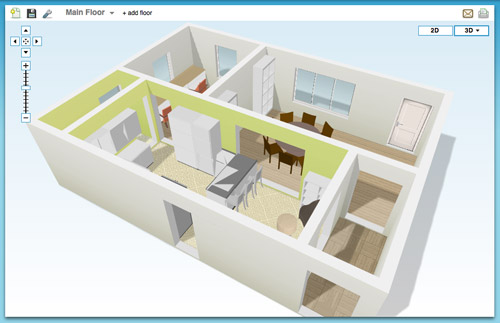
Planning a room used to be a sacred ritual: you measured once (wrong), bought a sofa (too big), and then performed the ancient ceremony of “shove it around the living room until everyone is mad.” Luckily, we live in the future nowone where you can build a surprisingly accurate 3D version of your space online, test layouts in minutes, and figure out whether your dining table will block the pantry before you’re eating cereal out of a mug for three months.
This guide walks through the best kinds of online 3D space-planning tools, what they’re good at, what they’re not, and how to use them like a proeven if the closest you’ve ever been to “design software” is rotating a couch in a shopping app.
Why Plan in 3D Instead of Just “Eyeballing It”?
3D planning tools solve the three biggest problems in home projects: scale, flow, and regret. In 3D, you can see the real footprint of furniture, check walking paths, and preview sightlines (like whether the TV will be mounted at “giraffe neck” height). Even basic tools let you:
- Confirm measurements so your new sectional doesn’t become a permanent hallway obstacle.
- Test multiple layouts quickly (without lifting anything heavier than your mouse).
- Visualize finishes and style so “cozy modern” doesn’t accidentally become “sad waiting room.”
- Share a plan with a partner, contractor, or designer without needing interpretive dance.
The Main Types of Online 3D Space-Planning Tools
Not all 3D planners are built the same. Some are made for casual room layouts, some for serious modeling, and some are basically “shopping with extra steps” (in a good way). Here’s how to pick the right category for your project.
1) Drag-and-Drop Room Planners (Best for Most People)
If your goal is to plan a bedroom refresh, rearrange a living room, or sanity-check furniture sizes, start here. These tools usually let you: create a floor plan in 2D, switch into a 3D view, drop in furniture, and do walkthroughs or snapshots.
- Planner-style room tools: Great for fast layouts, switching between 2D/3D, and experimenting with furniture arrangements.
- Visualization-first tools: Better when you care about decor, styling, and photo-like renders more than construction-level detail.
- Floor plan + walkthrough tools: Ideal when you want to “walk” the space in 3D and catch awkward tight spots.
The big advantage: the learning curve is gentle. The trade-off: hyper-precise architectural detailing isn’t the point. If you’re moving walls or designing a multi-story addition, you’ll want the pro-grade section below.
2) Browser-Based 3D Modeling (When You Want More Control)
These tools are for people who want to model custom furniture, built-ins, or more complex geometry. They’re also popular with DIYers and makers because you can “build it twice”once digitally, then in real life.
A browser-based 3D modeler can be perfect if you’re designing a built-in bookshelf, mapping a garage workshop, or trying to understand how a new layout will look at different angles. Expect more freedomand more buttons. The payoff is precision and flexibility.
3) Retailer Kitchen and Room Planners (When the Shopping List Matters)
If you’re planning a kitchen remodel or a cabinet-heavy project, retailer planners can be surprisingly useful. Their secret superpower is that the catalog matches real products. That means you’re not just placing a “generic cabinet”you’re placing that cabinet, with dimensions tied to actual inventory and pricing logic.
The limitation is obvious: these planners are designed to sell you their stuff. That’s not a dealbreakerjust keep it in mind if you’re mixing brands or sourcing from multiple places.
4) AR “View in Your Space” Tools (For Reality Checks, Fast)
Augmented reality tools are your quick gut-check: “Will this chair fit?” and “Is this lamp secretly the size of a small horse?” AR is especially handy when you’re deciding between a few pieces and need a scale preview in the actual room.
Some AR features let you place multiple items at once, which turns your phone into a mini design studio. The best use case is shopping: visualize, tweak, then buy with fewer surprises.
5) Mobile Measurement and Capture Tools (From Room to Plan)
If measuring is your personal nemesis, mobile capture tools can help. Many allow you to sketch rooms quickly, use templates, import a photo or plan to trace, and build a shareable floor plan. They’re popular with contractors, remodelers, and anyone who wants documentation that doesn’t live on a crumpled receipt.
What to Look for in a 3D Room Planner
Here’s the truth: the “best” tool depends on what you’re trying to decide. Use these criteria to pick something that fits your project (and your patience level).
Accuracy and Measurement Controls
The tool should make it easy to enter exact room dimensions, wall thickness (if needed), and the location of doors/windows. Bonus points if it supports snapping, dimension labels, and clean alignment.
2D-to-3D Switching
The sweet spot for most users is a tool that lets you draft in 2D and preview in 3D. You want to edit quickly in 2D, then “walk” the layout in 3D to catch pinch points.
Furniture and Materials Library
Libraries vary wildly. Some tools have big catalogs with branded products; others keep it simple with generic shapes. If you’re deciding between a loveseat and a sofa, generic is fine. If you’re trying to match a specific cabinet line or appliance size, branded catalogs matter.
Outputs and Sharing
Look for exports that match your next step: images for inspiration boards, PDFs for contractors, or links you can send to a spouse who needs evidence that “yes, the bigger rug actually makes the room feel bigger.”
Performance and Realism
Some web tools are lightweight and speedy. Others offer beautiful renders but can be demanding on your computer. If your laptop fan sounds like it’s preparing for takeoff, you may want a simpler planneror lower the realism settings.
A Practical Workflow That Works for Almost Any Tool
Whether you’re using a simple room planner or a full 3D modeler, this workflow keeps you from getting lost in the fun part (decorating) before the important part (fit and flow) is solved.
Step 1: Capture the Room Like a Sane Person
- Measure wall lengths, ceiling height, and any weird angles.
- Mark door swings and window positions (and note radiators, vents, outlets, columnsanything that steals space).
- Measure “pinch points” like hallways, between kitchen island and counters, and around bed sides.
Step 2: Build the Shell First
Create the empty room layout before you add a single sofa. If your shell is wrong, everything else will be wrong in a more expensive way.
Step 3: Place the Big Stuff
Start with large furniture: bed, sofa, dining table, major storage. Keep a simple rule: prioritize walking paths. Many designers aim for comfortable circulation zones (often roughly a few feet in key walkways), but your space and needs will varyespecially with kids, pets, or mobility concerns.
Step 4: Do a 3D Walkthrough
Walk it. Spin it. Look from sitting height, not just “bird hovering near the ceiling.” This is where you catch the stuff that feels fine on paper but weird in realitylike a chair that blocks a drawer, or a coffee table that turns every trip to the couch into a shin sacrifice.
Step 5: Layer in Style, Finishes, and Lighting
Once the layout is functional, then start the fun part. Test rug sizes, wall colors, wood tones, and lighting placement. If the tool supports snapshots, take a few “before/after” views so decisions don’t rely on memory (the most unreliable home design material).
Real-World Examples
Example 1: Redesigning a Small Living Room Without Making It Feel Smaller
A common goal: more seating, better TV placement, and less “everything is pushed against the walls like it’s scared.” A good drag-and-drop planner helps you test:
- Sofa orientation: floating vs. against a wall
- Rug sizing: the “too small rug island” problem is real
- Storage: whether a media console blocks walkways or vents
- Clearance: if you can open drawers, doors, and your own feelings
If you’re shopping, AR tools can validate scale quicklyespecially for items like coffee tables, accent chairs, and lamps that look “normal sized” online until they arrive and dominate the room like a friendly furniture kaiju.
Example 2: Planning a Kitchen Layout Before You Touch a Single Cabinet
Kitchens are where 3D planning pays off fast because clearance and workflow matter. Retailer kitchen planners are useful for:
- Setting room dimensions and locating doors/windows
- Dropping in cabinet runs and testing appliance placement
- Seeing how layout changes affect look and cost
Even if you’re not buying everything from one store, a retailer planner can be a solid “base model.” Once you have a workable layout, you can replicate it in a more flexible tool to test other finishes and furniture.
Example 3: Using AI Visualization Without Getting Catfished by Your Own Design
AI-assisted tools can generate styles and suggest layouts, sometimes from a photo or prompt. They’re great for inspiration and quick mockups, but treat them like a creative assistantnot a tape measure. Always confirm:
- Dimensions and scale (especially with doors, windows, and cabinetry)
- Whether suggested furniture sizes exist in real life
- Clearances for drawers, doors, and walking paths
Common Mistakes (and How to Avoid Them)
Forgetting Door Swings and Drawer Clearances
A layout can look perfect until you realize the refrigerator door hits the island, or the bedroom door can’t open fully because your dresser is living its best life in the wrong spot.
Planning Only for “Looks,” Not for Use
That gorgeous reading chair corner is less charming if it blocks the closet. Do a walkthrough and imagine daily routines: laundry baskets, kids backpacks, dog zoomies, and the fact that humans carry things.
Going Ultra-Realistic Too Early
Don’t spend an hour selecting the perfect shade of “moonlit oat latte” paint when you still haven’t confirmed the bed fits with nightstands. Nail the layout first. Decor second. Existential rug debate last.
Quick Tool-Matching Guide
- Just rearranging furniture? Use a drag-and-drop room planner with easy 2D/3D switching.
- Designing built-ins or custom projects? Use a browser-based 3D modeler.
- Planning a kitchen with real products? Use a retailer kitchen planner first, then refine elsewhere if needed.
- Shopping and worried about scale? Use AR “view in your space” features for quick validation.
- Need fast documentation from a real room? Use a mobile capture/measurement tool.
Conclusion: Your Best Room Design Decision Might Be “Try It in 3D First”
Online 3D space-planning tools make design decisions less stressful and more evidence-based. They help you avoid costly mistakes, test creative ideas quickly, and build confidence before you buy, move, or remodel. Start simple: model the room, place big furniture, do a walkthrough, and iterate. Once the layout works, then chase the aesthetic.
The goal isn’t perfectionit’s fewer surprises. And ideally, fewer bruised shins.
Field Notes: 3D Planning Experiences That Save Your Sanity (and Your Budget)
People tend to have the same three “aha” moments the first time they plan a space in 3D. The first is the scale shock: the sofa you swore was “medium-sized” turns out to be a luxury barge with throw pillows. In a 3D planner, that realization happens in 30 seconds, not after delivery day. It’s humbling, sure, but it’s also the cheapest lesson you’ll ever learn in home design.
The second aha moment is about flow. In your head, you can walk through walls. In a 3D walkthrough, your brain suddenly notices that the path from the couch to the kitchen is basically an obstacle course. This is where people start to appreciate boring-sounding details like clearance and door swings. Once you see it in 3D, you stop arguing about “vibes” and start asking the more important question: “Can we get past the coffee table while carrying a bowl of popcorn?” Real life has props.
The third aha moment is the power of iteration. Most folks assume you need one perfect plan. What actually works is making several “pretty good” options, then narrowing them down. A quick layout version, a “what if we float the sofa?” version, and a “what if we add storage here?” version often reveal the best answer. You’re not committingyou’re auditioning ideas. The best tools make it painless to duplicate a plan and try something slightly wild without consequences.
There’s also a funny emotional arc that shows up again and again. First you’re optimistic (“This will take ten minutes”). Then you become suspiciously obsessed with details (“Should the side table be 18 inches or 20?”). Then you discover lighting tools or finish libraries and vanish into a design wormhole. The trick is to set a rule: you only get to pick paint colors after the layout passes the “daily life test.” That means you can open doors, sit in chairs, pull out drawers, and walk paths without turning sideways like a crab.
One of the most practical takeaways: keep a tiny “reality kit” beside your digital plan. That kit can be painter’s tape for marking footprints, a measuring tape, and a note on your phone with the big dimensions (sofa length, rug size, dining table width). The magic happens when digital and physical agree. If your plan says the rug fits, tape it out. If the taped outline looks ridiculous, adjust the plan. You’re using 3D tools as a decision engine, not just a toy.
Finally, the best experience-related lesson is this: 3D planning is not about making your house look like a showroom. It’s about making your house work for you. The “perfect” layout on the internet might fail in your space because your doorway is narrower, your dog is larger, or your family owns approximately 900 shoes. When you plan in 3D, you’re building a custom answer to your real constraints. And that’s why the finished room feels goodit fits your life, not just your feed.