Let’s clear something up right away: real parrots already come with beaks (and they are extremely proud of them). This guide is about making a parrot beak propfor a costume, a classroom project, a puppet, a party mask, or that moment in life when you realize you absolutely need to become a macaw for Halloween.
The good news? You can build a convincing “hookbill” beak with basic craft supplies. The better news? You do not need to be an engineer, sculptor, or a bird who negotiates exclusively in sunflower seeds. You just need a plan, a few materials, and the willingness to embrace a little creative chaos.
Before You Build: What a Parrot Beak Actually Looks Like
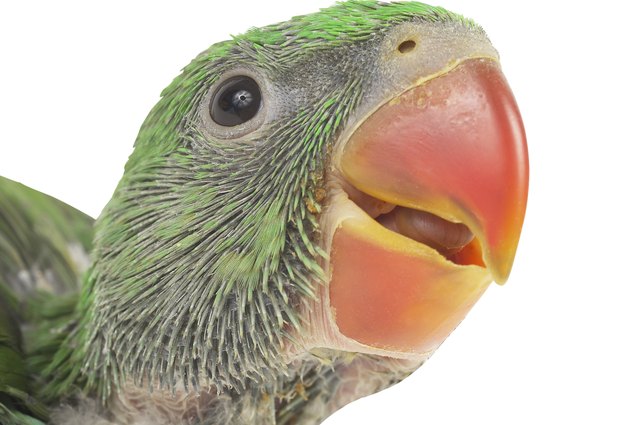
A parrot’s beak is basically nature’s multitool. Parrots use it to eat, climb, explore, and (politely) remind you that your snack is their snack now. The key visual features you’ll want to copy:
- Two-part structure: an upper beak and a lower beak that meet like curved tongs.
- The hook: the upper beak curves down in a strong arc (especially in macaws and cockatoos).
- A smooth, “horny” shell: the outside is keratinthink fingernails, but with attitude.
- The cere and nostrils: many parrots have a soft area near the base with visible nares (nostrils).
- Clean edges: the “cutting line” where the beaks meet should look crisp, not melted.
When you design your prop, decide what species vibe you want: a chunky macaw beak (big and bold), a smaller parakeet beak (cute and compact), or a dramatic fantasy parrot beak (because you’re the director now).
Choose Your Build Style (Pick the One That Matches Your Patience)
There are four reliable ways to make a parrot beak prop. All are beginner-friendlyjust with different “levels of extra.”
Option A: Felt Beak (Fast, Soft, Great for Hats)
Best for kids’ costumes, quick DIY, and anyone who prefers their crafts “non-stabby” and lightweight.
Option B: EVA Foam Beak (Crisp, Cosplay-Ready)
Best if you want sharp lines and a beak that looks “store-bought but cooler because you made it.”
Option C: Paper-Mâché Beak (Most Realistic Texture)
Best for masks and props that need a smooth, sculpted look with paintable detail.
Option D: Cardstock Beak (Classroom-Friendly, No-Sew)
Best for school projects, parties, and last-minute “I forgot this was due tomorrow” emergencies.
Materials Checklist (So You Don’t Start and Then Panic-Scroll)
Universal basics (works for all methods):
- Paper + pencil (for patterning)
- Scissors
- Ruler or measuring tape
- Glue (craft glue or hot gluehot glue needs extra caution)
- Elastic string or ribbon (if wearable)
- Acrylic paint + brush (or paint markers)
Method-specific add-ons:
- Felt beak: yellow/orange felt, stuffing (polyfill or cotton), needle/thread (optional)
- Foam beak: EVA foam sheets, foam-safe glue, optional heat-shaping tool (hair dryer on low works)
- Paper-mâché: masking tape, cardboard, paper strips, paste (flour/water or craft paste), sandpaper
- Cardstock beak: cardstock, hole punch, tape, optional printable templates
Safety note: If you’re under 18, get an adult for hot glue, sharp blades, and any heat-shaping. Crafting is supposed to be funnot a dramatic origin story for a bandage collection.
Method 1: Make a Felt Parrot Beak (The “Cute and Done” Build)
This method creates a plush beak that’s comfortable to wear and easy to attach to a beanie, headband, or hood. It’s also forgivingif your curve isn’t perfect, it still reads “parrot,” not “geometric tragedy.”
Step 1: Sketch a simple beak pattern
Draw a sideways “banana” shape for the upper beak and a smaller matching curve for the lower beak. For a kid-sized hat beak, the upper piece is often around 4–6 inches long. For teens/adults, try 6–8 inches. Keep the tip rounded unless you’re going for a very stylized macaw look.
Step 2: Cut two of each piece
Cut two upper pieces and two lower pieces from felt. Two layers give the beak thickness and stop it from looking like a floppy tortilla.
Step 3: Stitch or glue the edges
Put the two upper pieces together and stitch or glue around the edge, leaving the “back” open. Repeat for the lower beak. Turn them right-side out if you stitched. (If you glued, you already live dangerouslyrespect.)
Step 4: Stuff lightly and shape
Add a small amount of stuffing. You want structure, not a beak that looks like it’s storing emergency marshmallows. Pinch the top ridge slightly to create a natural beak line.
Step 5: Attach to your hat or mask base
Position the upper beak at the center front. Attach with strong glue or a few hand stitches. Then attach the lower beak just beneath it. Leave a small gap or overlap depending on the style you want.
Pro tip: Add a thin black line where the beaks meet using a marker or paint pen. Instantly more realistic.
Method 2: Make an EVA Foam Parrot Beak (Sharper, Cleaner, More “Wow”)
Foam is perfect if you want crisp edges and a beak that keeps its curve. The secret is patterning first, then building the curve gradually instead of forcing it in one dramatic moment.
Step 1: Pattern it like a simple 3D shape
Make a paper pattern for the upper beak in two halves: left and right. Add a center seam line (top ridge). The lower beak can be a smaller two-piece shape or a single folded piece.
Step 2: Cut foam and bevel edges
Cut your foam pieces. Then bevel the edges that will meet at the center seam (the top ridge). A bevel helps the seam close smoothly and look like one continuous curve.
Step 3: Shape the curve (gently)
Warm the foam slightly (hair dryer on low is safer than a high-heat tool). Bend it into a hook shape and hold until it cools. Repeat until the curve looks natural.
Step 4: Glue the center seam and reinforce
Glue the left and right halves together along the top ridge. Add a small foam strip inside as a “spine” if needed. Build the lower beak separately, then attach it under the upper beak.
Step 5: Seal and paint
Use a foam-safe sealer (or multiple thin coats of acrylic, letting it dry fully) before painting details. Paint your base color (yellow, orange, or black), then add shading near the base and a darker edge line where the beaks meet.
Comfort tip: If wearable, attach the beak to a lightweight mask base or a hat brim so it doesn’t pull on your face.
Method 3: Make a Paper-Mâché Parrot Beak (Classic, Sculptable, Surprisingly Strong)
Paper-mâché is the slow-cooker of crafting: it takes longer, but the result is satisfying and sturdy. If you want a beak with realistic volume and paintable texture, this is your method.
Step 1: Build a cardboard armature
Cut a simple beak “skeleton” from cardboard: one piece for the top curve and one for the bottom. Tape them together so the upper beak has a clear hook shape. This is your foundation.
Step 2: Bulk it out with tape
Use masking tape to thicken and smooth the beak shape. Focus on symmetry from the front: you want the tip centered, not drifting like it’s trying to escape the face.
Step 3: Add paper-mâché layers
Apply paper strips with paste in thin layers. Let dry completely, then repeat. Three to five layers usually gives a strong shell.
Step 4: Sand and refine
Once fully dry, sand gently to smooth bumps. Fill small dents with a bit of paper-mâché clay or lightweight filler if you have it.
Step 5: Paint and gloss
Prime if possible, then paint your colors. Many parrot beaks have a slight sheenfinish with a clear gloss coat (fully dried, low-odor products are best).
Method 4: Make a Cardstock Bird Beak Mask (Quick, Clean, Classroom-Friendly)
If you need a wearable beak fast, cardstock is your best friend. It’s light, cheap, and easy to decorate.
Step 1: Create a mask base
Cut a simple face mask shape from cardstock (or use a printable template). Make sure the eye holes are comfortable and not too close together.
Step 2: Make the beak with folded cardstock
Cut a diamond-like shape, score the fold lines, and fold into a 3D wedge that sticks out. Glue the fold seams, then attach the beak to the mask base.
Step 3: Add feathers and details
Layer feather-shaped paper pieces around the mask edges. Keep the beak area cleaner so it remains the star of the show. Add nostril dots and a darker “mouth line” where the beak opens.
Step 4: Attach elastic
Punch holes on each side and tie elastic or ribbon. Test fit and adjust before decorating too heavily.
Paint Like You Mean It: Color, Texture, and “Bird Realism” Tricks
Even a simple beak shape can look surprisingly realistic with smart paint choices:
- Gradient shading: Darker near the base, lighter toward the tip adds depth.
- Edge definition: A thin darker line where upper and lower beak meet helps it “read” instantly.
- Nostril placement: Place nares near the base, not halfway down the beak.
- Soft shine: Many beaks have a gentle gloss; a final clear coat can help (fully dry before wearing).
Want a macaw-style look? Go bold: bright base color, a slightly darker ridge line, and a clean, sharp silhouette. Want a cockatiel vibe? Smaller beak, softer curve, less dramatic hook.
Fit and Comfort (Because Looking Cool Shouldn’t Hurt)
A great parrot beak prop should be wearable for more than 45 seconds without regret. Keep these in mind:
- Vision first: Eye holes should be wide enough for walking, stairs, and candy acquisition.
- Weight balance: Attach heavy beaks to a hat or headband, not just a thin mask.
- Breathing space: Don’t block your nose; add small vents if the beak covers the mouth area.
- Skin safety: Avoid rough edges; line contact points with soft felt or foam.
If You Own a Real Parrot: A Quick, Important Reality Check
Sometimes people search “make a parrot’s beak” when they’re worried about an overgrown or damaged beak. A parrot’s beak is living tissue with nerves and blood supply. Do not attempt to trim, reshape, or “DIY-fix” a real bird’s beak at home. If something looks offovergrowth, cracks, flaking, misalignment, or trouble eatingan avian veterinarian is the right move.
What you can do at home is support healthy beak wear the safe way: provide appropriate chew toys, enrichment, and a balanced diet recommended for your speciesthen let a professional handle anything medical.
Conclusion: Your Beak, Your Rules (Just Keep It Safe and Fabulous)
Making a parrot beak prop is one of those projects that looks complicateduntil you realize it’s just shapes, structure, and paint. Start simple with felt or cardstock, level up to foam for crisp cosplay lines, or go paper-mâché if you want sculpted realism. Add a clean mouth line, smart shading, and a little shine, and you’ll have a beak that screams, “Yes, I am a majestic bird. Yes, I deserve snacks.”
Experience Section: What It’s Like to Make a Parrot Beak (The Real-World Moments People Don’t Warn You About)
Most first-time beak-builders have the same experience: the beak looks perfect in your head, and then your hands produce something that briefly resembles a cartoon submarine. That’s normal. Beaks are deceptively tricky because they’re simple shapes with very noticeable curvestiny changes in symmetry can make the tip drift left or right, and your eyes catch it immediately. A common “aha” moment is learning to check your beak from three angles: front view (symmetry), side view (hook curve), and bottom view (alignment). The bottom view is the sneaky one. People often forget it until the beak is already glued, and then they’re negotiating with reality.
Another classic moment happens with sizing. Many people make the beak too small at first because they’re worried it’ll feel huge. But parrotsespecially macaws and cockatoosare famously beak-forward. If you’re building a recognizable parrot silhouette, the beak needs enough volume to read clearly from a few feet away. A good workaround is creating a quick paper prototype and holding it up to your face in a mirror (or taking a photo). If it looks “subtle,” it might be too subtle. If it looks like it could open a coconut business, you’re close.
With felt beaks, the experience tends to be pleasantly low-stress. The soft material forgives imperfect curves, and the stuffing step is where everything magically starts to look right. People often discover that less stuffing looks better than more. Overstuffed beaks can look puffy or rounded in the wrong places. Light stuffing plus a firm pinch along the top ridge gives that clean “hookbill” line. And if your seam isn’t flawless? Congratulationsyou’ve invented “natural texture.”
Foam beaks are where confidence meets engineering. The first time you glue a center seam, you learn the value of patience, alignment, and not rushing while the glue sets. The best foam builds usually come from doing a quick “dry fit” (holding pieces together without glue), marking the seam, and then gluing in stages instead of all at once. People also report that the paint job makes or breaks the realism: even a perfect foam shape can look “toy-like” if it’s a flat color. A simple shadow near the base and a slightly darker mouth line instantly upgrades the look.
Paper-mâché beaks come with a different kind of experience: waiting. Dry time is the boss level. The upside is that paper-mâché lets you refine shape gradually. If your beak looks lumpy after the first layer, you don’t panic; you just add another thin layer and smooth it out. Many people end up loving this method because it feels like sculpting without needing fancy supplies. The biggest lesson is to build in thin layers, let it dry fully, and sand gentlyrushing leads to dents, fingerprints, and that one spot that never quite dries because it’s secretly three layers of wet paste pretending to be solid.
No matter which method you choose, most makers walk away with the same happy conclusion: a parrot beak is a “small project” that feels like a big transformation. The second you attach it to a hat or mask, the whole costume clicks into place. And when someone laughs and says, “That’s amazingdid you make that?” you get the best kind of craft reward: not just compliments, but the quiet confidence of knowing you can build weird, wonderful things on purpose.