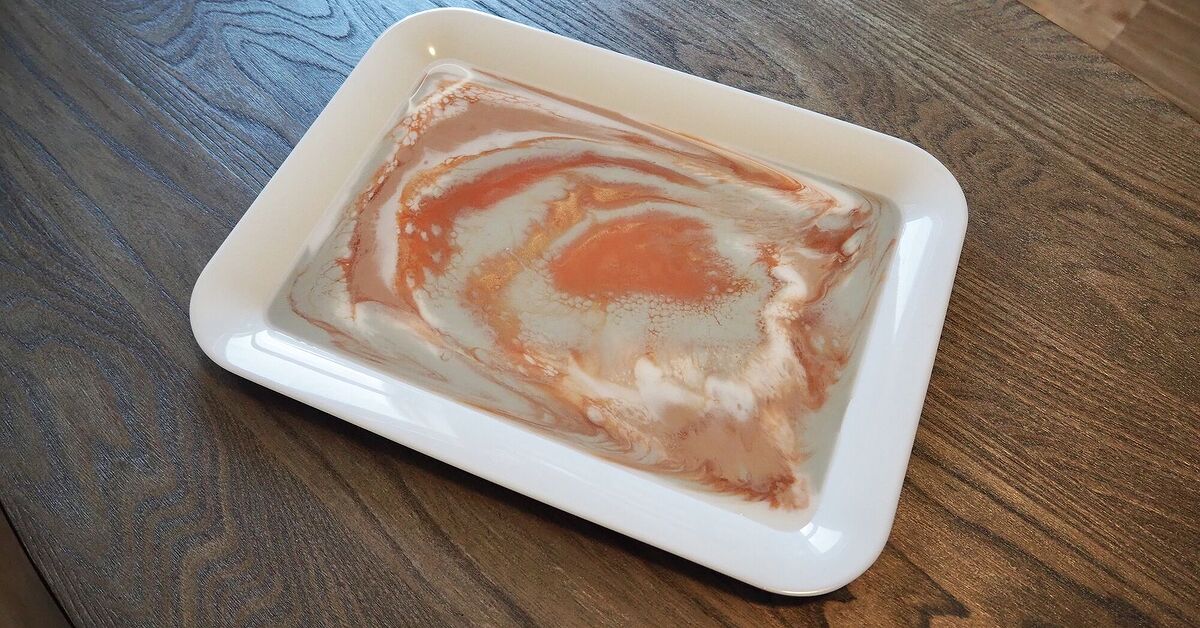
A decorative marbled resin serving tray is one of those DIY projects that makes people say, “You made that?” while secretly wondering whether you have a hidden workshop, a glamorous studio assistant, and perhaps a minor sponsorship from the marble industry.
The good news is that you do not need a quarry, a sculpture degree, or a dramatic Italian villa to create a tray with a luxe marble look. You need a sturdy tray base, the right tabletop epoxy resin, a few pigments, careful preparation, and enough patience to let resin cure without poking it every eleven minutes.
This marbled resin serving tray DIY creates a polished home accessory that can work on a coffee table, vanity, bar cart, entryway console, or dining table. Use it to organize candles, perfume bottles, cocktail supplies, remotes, flowers, coasters, or snacks served in dishes. The result can look like Carrara marble, smoky black stone, dreamy ocean quartz, or an abstract piece that makes guests nod thoughtfully even when they have no idea what they are looking at.
Why a Marbled Resin Serving Tray Is Worth Making
A serving tray has a useful superpower: it turns a collection of random objects into an intentional arrangement. A few candles, a vase, and a remote control can look like chaos on a coffee table. Put those same items on a handsome tray, and suddenly the room appears organized enough to host a design magazine photographer.
Resin gives a plain wooden tray a glossy, durable surface with depth that paint alone cannot easily create. The marble effect comes from layered color, soft veining, translucent movement, and tiny variations that imitate natural stone without requiring anyone to wrestle a 200-pound slab into the house.
This project is also flexible. You can start with an unfinished wood tray, a thrifted tray with a flat recessed center, or a simple tray made from plywood and trim. A rectangular tray is easiest for beginners, but round, oval, and square designs also work beautifully when the surface is level.
Materials and Tools for a DIY Marbled Resin Tray
Gather every supply before mixing the resin. Epoxy has a working time, which means it is not interested in waiting while you search the garage for a stir stick or suddenly remember that you own gloves.
Tray and Surface Materials
- A wooden tray with a flat recessed base, ideally unfinished or lightly finished
- Tabletop or art epoxy resin suitable for coating surfaces
- Compatible resin pigments, mica powders, resin paste, or alcohol inks approved for your resin system
- White pigment for the base color
- Gray, charcoal, taupe, navy, green, or black pigment for marble veins
- Optional metallic gold, brass, silver, or pearl mica powder
- Painter’s tape or sheathing tape
- Sandpaper in medium and fine grits
- Clean lint-free cloths or tack cloth
- Disposable mixing cups and stir sticks
- Small cups for separating colored resin
- Level
- Heat gun, used only according to the resin manufacturer’s directions
- Optional tray handles, screws, felt pads, and clear protective finish for the outer wood frame
Safety Supplies You Should Not Skip
- Nitrile gloves
- Safety glasses or splash goggles
- Long sleeves or protective clothing that can handle a little mess
- A well-ventilated workspace
- A respirator only when required by your product label or safety data sheet
- A drop cloth, cardboard, or plastic work covering
Uncured epoxy resin and hardener should be handled carefully. Keep the workspace away from children, pets, snacks, and anyone who believes “I’ll just touch it once” is a sensible hobby strategy. Read the label for your specific resin because mixing ratios, cure times, working times, and heat resistance vary by formula.
Choose the Right Tray Base
The best base for a decorative resin serving tray has a stable bottom and raised sides. A recessed wooden tray is particularly beginner-friendly because the lip helps contain the resin while it self-levels. Look for a tray with at least a shallow interior well so the resin does not wander over the edge like it is trying to escape a small country.
Choose hardwood, plywood, MDF, or a prebuilt craft tray designed for decorating. If using MDF or raw plywood, seal the surface well before your main resin pour. Porous materials can release air bubbles into the resin and create a finish that resembles fizzy soda rather than polished marble.
A tray around 12 by 16 inches is an excellent first project. It is large enough to create interesting veins but small enough to manage without mixing an intimidating amount of resin. Avoid deep-pour formulas for a shallow tray coating unless the manufacturer specifically recommends them for that application.
Prepare the Tray Before You Mix Resin
Sand and Clean the Surface
Lightly sand the tray’s interior base to remove shine, rough patches, loose fibers, or old finish. You do not need to sand it into sawdust confetti. The goal is a clean, lightly textured surface that gives the resin a reliable grip.
Vacuum or wipe away all dust, then use a lint-free cloth to remove remaining debris. Resin is very good at preserving details. Unfortunately, that includes dust, pet hair, glitter from an unrelated project, and one mysterious eyelash that appears exactly when you think the surface is perfect.
Protect the Edges and Underside
Apply painter’s tape beneath the tray edges and around any openings where resin could drip. If the tray has handles already attached, cover them carefully or remove them before pouring. Tape the underside of screw holes, knots, gaps, or seams so resin cannot seep through and create a surprise puddle underneath.
Place the tray on risers, cups, or small blocks so the bottom stays elevated. Then use a level in both directions. Resin naturally moves toward low spots, and even a slight tilt can turn your carefully planned marble design into a color migration documentary.
Seal Porous Wood First
For unfinished wood, apply a very thin seal coat of clear resin or another compatible sealer recommended by the resin manufacturer. Spread it across the interior surface and let it cure as directed. This step reduces outgassing bubbles and prevents the wood from greedily absorbing resin during the final pour.
After the seal coat cures, inspect the surface. Sand down any rough spots, wipe away dust, and make sure the tray is level again before moving forward.
Plan Your Marble Design Before the Resin Clock Starts
Natural marble is not made of evenly spaced stripes, perfect zigzags, or symmetrical lightning bolts. Its charm comes from irregular movement. Some veins are soft and cloudy; others are sharp, thin, and dramatic. A convincing marbled resin tray should feel layered rather than overly controlled.
Before mixing resin, sketch a loose plan on paper. For a classic white marble look, use an opaque white base with soft gray veins, a few charcoal accents, and optional metallic gold details. For a moodier tray, try charcoal with white and bronze veins. For a coastal version, mix translucent aqua, white, pearl, and deep blue.
Limit your main palette to two or three colors plus one accent. Too many colors can turn marble into a very expensive-looking puddle of confusion. A restrained color palette usually creates the most elegant resin art tray.
How to Mix Resin Correctly for a Serving Tray
Every epoxy system has its own mixing instructions. Some use equal parts resin and hardener by volume, while others use different ratios. Do not guess, improvise, or add extra hardener because you are hoping the tray will cure faster. Resin chemistry does not respond well to motivational speeches.
Measure each part exactly as directed by the manufacturer. Pour the components into a clean mixing cup and stir slowly, scraping the sides and bottom as you work. Slow mixing helps reduce bubbles. For extra reliability, transfer the mixture into a second clean cup and stir again. This “two-cup method” helps prevent unmixed material from hiding along the sides or bottom of the first cup.
Once the resin is completely blended, divide it into smaller cups. Leave most of the resin white or clear depending on your design. Tint smaller portions with gray, charcoal, pearl, or metallic pigments. Use pigment sparingly and only use colorants compatible with your resin system. Overloading resin with color can interfere with curing and make the surface look cloudy or soft.
Step-by-Step: Create the Marbled Resin Effect
Step 1: Pour the Main Base Layer
Pour most of the white or lightly tinted resin into the center of the tray. Use a spreader or stir stick to gently guide it toward the corners. Let it level naturally as much as possible. The goal is a smooth, even base, not a workout routine for your wrist.
Reserve a small amount of the white resin for softening veins later. This little reserve can save a design that begins to look too dark or too dramatic.
Step 2: Add Soft Color Clouds
Drizzle small amounts of pale gray, pearl, or translucent resin across the white base. Keep the drizzles loose and irregular. Imagine the soft shadowing in natural stone rather than drawing a road map across the tray.
Use a stir stick, toothpick, or small palette knife to lightly pull sections of color through the base. Avoid stirring everything together. The goal is movement, not mud.
Step 3: Build the Marble Veins
Use your darkest resin color sparingly. Draw one or two main veins that travel across the tray in a wandering path. Make sections thicker and sections thinner. Let a vein fade, split, curve, or disappear at the edge. Natural-looking marble has personality; it does not stand at attention.
Create smaller branches from the main vein using a toothpick or thin stir stick. Pull a few tiny gray branches outward, then soften selected sections with white resin. This creates depth and helps the dark lines look embedded rather than simply painted on top.
Step 4: Add Metallic Details Carefully
If you are using gold or brass mica, add it like jewelry, not wallpaper. A narrow metallic line beside one major vein can make the tray look luxurious. Too much metallic pigment can overwhelm the marble effect and make the tray resemble a geode that has been promoted to nightclub manager.
Use a toothpick to place thin metallic accents along only part of a vein. Allow some metallic sections to break apart naturally. Imperfection is your friend here.
Step 5: Pop Surface Bubbles
Let the tray sit briefly so bubbles rise to the surface. Then use a heat gun in quick, gentle passes from a safe distance, following the manufacturer’s directions. Do not hold heat in one place. Excessive heat can distort the resin, push pigments too aggressively, or create new problems that require vocabulary not suitable for a family craft blog.
Inspect the surface again after a few minutes. Remove visible dust or bubbles with a toothpick only while the resin is still workable.
Let the Resin Cure Without Interference
Cover the tray with a clean box, plastic storage bin, or dust shield that does not touch the wet surface. This keeps dust, insects, and curious fingerprints away while the resin cures.
Leave the tray on a level surface at the temperature range recommended by the resin manufacturer. Most tabletop resins need at least a full day before light handling and additional time before reaching their final hardness. Resist the urge to test the surface repeatedly. A resin tray does not cure faster because you check it every ten minutes with the determination of a detective in a mystery series.
Once cured, remove the tape and inspect the edges. If you find a rough drip, sand it lightly with fine sandpaper. Add felt pads beneath the tray to protect furniture. Attach handles after curing if you removed them earlier, or leave the tray handle-free for a clean, minimalist look.
How to Finish and Style Your Marbled Resin Tray
A resin tray can be stunning even before it holds anything, but styling gives it a purpose. Use it as a coffee table organizer with coasters, a small candle, and a stack of books. Place it on a vanity to collect perfume bottles and jewelry dishes. Turn it into a bar cart accessory for cocktail napkins, glasses, and a small bowl of citrus.
For an entryway, add a small vase, keys, sunglasses, and a catchall dish. In a bathroom, use the tray beneath soap dispensers, a candle, and a folded hand towel. The glossy marble surface makes ordinary objects look a little more intentional, which is handy when the objects include things like TV remotes and a half-empty packet of mints.
Common Marbled Resin Tray Problems and How to Fix Them
The Resin Is Still Sticky
Sticky resin usually comes from an inaccurate mix ratio, incomplete mixing, cool temperatures, moisture contamination, or incompatible additives. Follow your resin manufacturer’s troubleshooting guidance. Soft or uncured areas often need to be removed rather than covered with another layer.
There Are Too Many Bubbles
Bubbles often come from mixing too fast, pouring onto unsealed wood, cold resin, or applying resin too thickly. Warm the room only within the manufacturer’s recommended range, mix slowly, seal porous surfaces first, and use a gentle heat pass to release surface bubbles.
The Marble Looks Muddy
This happens when colors are mixed too aggressively. For the next attempt, use fewer colors, create fewer veins, and stop stirring sooner. Marble needs contrast and empty space. White resin is not wasted space; it is the quiet part that makes the veins look dramatic.
The Veins Look Too Harsh
Soften selected lines with a little white or translucent resin. You can also lightly drag a clean toothpick across the vein to blur sections while keeping a few sharp edges. Variation makes the pattern feel more natural.
Care Tips for a Decorative Resin Serving Tray
Clean the finished tray with a soft damp cloth and mild soap when needed. Avoid abrasive scrubbers, harsh cleaners, bleach, and strong solvents. Do not place extremely hot cookware directly on the resin surface, and do not leave the tray in intense direct sunlight for long periods unless the resin manufacturer specifically rates it for outdoor UV exposure.
Use coasters beneath sweating glasses, especially during long gatherings. Resin is durable, but it is not indestructible. A tray that holds a bowl of popcorn, cocktails, or candles will have a much easier life than one asked to perform as a cutting board, baking sheet, and hot skillet landing zone all in the same afternoon.
Hands-On Experience: Lessons From Making Marbled Resin Trays
The biggest surprise for many first-time resin makers is that the actual pour is only part of the project. The preparation may feel less glamorous than swirling metallic veins, but it determines whether the final tray looks polished or looks like it survived a tiny weather event. A level work surface, clean tray base, sealed wood, and organized supplies are the quiet heroes of this DIY.
One recurring lesson is that resin rewards restraint. The first instinct is often to add more gray, more black, more sparkle, more veins, and then perhaps one more “tiny” accent line. But the most convincing marble trays usually have generous areas of calm color. A white base with one dramatic charcoal vein and two faint gray branches often looks far more expensive than a tray covered in twenty competing patterns.
Color also changes more than people expect after resin is poured. A pigment that looks pale in a cup can become darker once it pools in a deeper section. Metallic powders can spread farther than expected, especially when heat is applied. It helps to make small test swatches on scrap wood, plastic, or silicone before committing to a full tray. Those mini tests are not wasted resin; they are inexpensive insurance against creating a tray that accidentally matches a 1990s bowling alley carpet.
Timing matters just as much as color. If you create veins immediately after pouring, they may spread softly into the base. If you wait until the resin begins to thicken, the veins may hold sharper edges. Neither method is wrong. The best choice depends on whether you want airy Carrara-style movement or bold, graphic stone lines. Watching resin change during its working window teaches you more than memorizing a dozen tutorials.
Another useful experience is learning when to stop. Resin art invites tinkering because the surface looks fascinating while it is wet. However, every extra drag of a toothpick blends colors further. Once the marble design looks balanced, step back, take a photo, and leave it alone for a few minutes. A camera view often reveals whether one corner needs a small adjustment or whether your brain is simply trying to invent more work.
Dust control deserves respect, too. A simple cardboard box used as a curing tent can protect a resin tray from floating fibers, pet hair, and airborne particles. It is an unglamorous solution, but so is sanding a mysterious fuzzy speck out of a glossy surface the next day. Experienced makers learn that a clean curing area is much more valuable than an elaborate collection of specialty tools.
Finally, the most satisfying part of a marbled resin serving tray DIY is that every finished tray becomes a usable piece of decor. It is not merely a craft project that sits in a closet waiting for compliments. It can organize a living room, elevate a bar cart, make a vanity feel calmer, or become a handmade gift. Even tiny imperfections often become part of its character. Natural marble has veins, variation, and unexpected marks. Your resin version should be allowed to have a little personality, too.
Final Thoughts
Making a decorative marbled resin serving tray is a practical way to combine art and organization. With careful measuring, thoughtful safety habits, a level surface, and a light hand with pigment, you can transform a simple tray into a polished home accessory that looks custom-made.
Start with a small design, keep your color palette focused, and let the marble pattern stay imperfect. The goal is not to make a tray that looks machine-printed. The goal is to make something that feels like stone, shines like glass, and earns its place on your table long after the resin has cured.