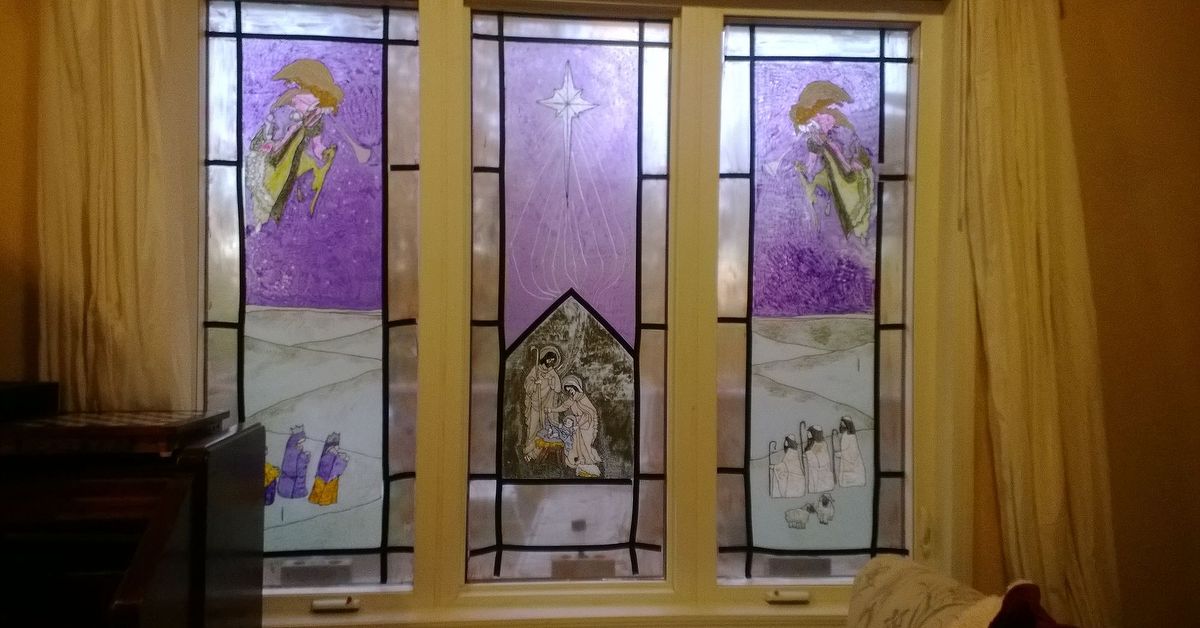
There is something magical about a sunlit Christmas window. Ordinary glass suddenly glows with ruby reds, evergreeold. Traditional stained glass requires specialized tools, sharp materials, and considerably more confidence than most of us possess before our second cup of cocoa. Clear contact paper offers a wonderfully forgiving shortcut.
This Christmas stained glass window craft uses tissue paper or cellophane trapped between layers of transparent adhesive film. The finished pieces look like cheerful holiday suncatchers, yet they are inexpensive, lightweight, and simple enough for children to help create. Better still, there is no wet glue sliding down the window and no glitter permanently joining the household ecosystem.
The basic technique appears in many tissue-paper suncatcher projects: arrange translucent paper on sticky contact paper, cover it with another clear layer, and trim or frame the design. The sealed “sandwich” contains small pieces and helps the decoration stay intact for hanging, storing, and reusing. Why Clear Contact Paper Works So Well
Clear contact paper is a transparent or nearly transparent self-adhesive covering sold in rolls. Its peel-away backing often includes a printed grid, which is surprisingly helpful when you are trying to cut two matching rectangles while a child asks whether reindeer prefer carrots or cookies.
Unlike ordinary paper, the film allows daylight to pass through. Thin tissue paper softens and colors that light, creating the glowing mosaic effect associated with stained glass. Contact paper is also repositionable during careful application, and products intended for smooth surfaces generally work best when the surface is clean and dry. his project also works as process art. A child can compare colors, plan patterns, overlap shapes, and decide when the design feels complete. Cutting, pinching, placing, and pressing paper can exercise small hand muscles, while open-ended art encourages expression and problem-solving rather than demanding one “correct” ornament. Materials and Tools
Essential Supplies
- Clear self-adhesive contact paper
- Colored tissue paper, gift tissue, or transparent cellophane
- Black construction paper or cardstock for frames and leading
- Scissors
- Pencil, ruler, and black marker
- Low-tack painter’s tape or removable clear tape
- A clean, flat work surface
Optional Extras
- Printable Christmas templates
- A craft knife and cutting mat for adults making detailed frames
- Ribbon or yarn for hanging individual suncatchers
- Paper punches for stars, circles, or snowflakes
- Metallic tissue paper used sparingly
- Sequins or biodegradable glitter sealed inside the contact paper
- White tissue paper for frosted highlights
Choose non-bleeding tissue paper when possible. Some heavily dyed tissue can transfer color if it becomes damp, so keep wet hands, spray cleaners, and enthusiastic juice cups away from the worktable. Cellophane creates brighter, sharper color, while tissue paper produces a softer cathedral-window glow. Combining both materials gives the design more depth.
Prepare the Window and Workspace
Decide whether you want a removable suncatcher taped to the glass or a large design assembled directly in the window opening. For most families, the removable version is easier. It can be made flat on a table, corrected without performing acrobatics, and stored after the holidays.
Clean the glass with a mild solution suitable for your window, then dry it completely with a lint-free cloth. Window manufacturers commonly recommend mild soap and water and caution against abrasive tools that may scratch glass. If your window has a special coating, consult its care instructions before placing adhesive material directly on it. ext, cut the tissue paper into pieces ranging from about one-half inch to one inch. Squares are fastest, but triangles, diamonds, curved scraps, and narrow strips make the window look more handcrafted. Put each color in a shallow bowl or muffin tin. This small act of organization prevents the classic craft-table event known as “every red square is now on the floor.”
How to Make a Christmas Stained Glass Window
Step 1: Choose a Holiday Design
Start with a simple silhouette such as a Christmas tree, ornament, bell, candle, star, stocking, snowman, wreath, angel, or gingerbread house. Bold shapes are easier to recognize from across the room. For a first project, try a 10-by-14-inch Christmas tree divided into several triangular sections.
Draw or print the outline on ordinary white paper. Add a few interior lines to imitate the dark lead strips in real stained glass. Avoid making too many tiny compartments. Five to twelve sections usually provide enough visual interest without turning family craft night into an architectural internship.
Step 2: Cut the First Sheet of Contact Paper
Cut a piece of clear contact paper at least one inch larger than the finished design on every side. Place it backing-side down over the template.
Peel away only half of the backing at first, fold the loose backing underneath, and secure the exposed film to the table with painter’s tape. Working gradually reduces curling and keeps sleeves, hair, and unrelated paper scraps from joining the artwork.
Step 3: Create the Colored Mosaic
Place tissue-paper pieces onto the sticky surface. Keep most pieces inside the template outline and overlap their edges slightly so sunlight does not reveal large empty gaps.
Use red and pink for ornament details, several greens for a tree or wreath, yellow for stars and candle flames, and pale blue or white for snow. Traditional Christmas colors are reliable, but there is no law against a turquoise tree or a purple angel. The Christmas craft police have the season off.
Leave narrow clear spaces between some pieces if you want a sparkling, airy look. For a denser faux stained glass effect, cover nearly every exposed area.
Two layers of tissue create a darker color. Overlapping yellow and blue can suggest green, while red over yellow produces a warm orange. Test combinations on a scrap because tissue-paper dyes do not always behave like a perfect classroom color wheel.
Step 4: Add Black “Leading”
Cut thin strips of black cardstock, roughly one-quarter inch wide, and place them over selected seams. These strips imitate the metal leading that separates pieces of traditional stained glass.
Alternatively, draw the lines with a black permanent marker on the outside of the contact paper after the project has been sealed. Paper strips provide a stronger traditional appearance, while marker lines are faster and easier for intricate patterns.
For an especially clean result, create a black paper frame with an open center matching your silhouette. Make two identical frames, one for the front and one for the back. A one-half-inch to three-quarter-inch border is sturdy enough for most medium-size designs.
Step 5: Seal the Artwork
Cut a second sheet of contact paper the same size as the first. Peel back two or three inches of its liner. Align that exposed edge with one side of the mosaic, sticky side facing the tissue paper.
Press gently, then pull away the backing a little at a time while smoothing the clear film across the design. Use the side of your hand, a soft cloth, or an old gift card wrapped in fabric to push trapped air toward the edges.
Tiny bubbles are not a disaster. Most become nearly invisible once the window is glowing. Large wrinkles are easier to fix immediately by slowly lifting the top film and smoothing it down again.
Step 6: Trim and Frame the Design
Cut around the holiday silhouette, or leave the artwork rectangular for a traditional window-panel look. Attach matching black frames to the front and back with a glue stick, double-sided tape, or narrow pieces of contact paper.
To create a hanging ornament, position the ends of a ribbon loop between the frame layers before pressing them together. A hole punch can also be used, although the surrounding area should be reinforced with clear tape to prevent tearing.
Step 7: Mount It in the Window
Use small rolls of removable clear tape, low-tack mounting squares approved for glass, or transparent thread attached to a suction-cup hook. Place the finished art where it receives daylight but does not interfere with locks, handles, blinds, curtains, or emergency exits.
Stand back and inspect the design from both inside and outside. A piece that looks pleasantly chaotic on the table often becomes wonderfully jewel-like in sunlight. This is one of those rare crafts that improves dramatically when viewed from six feet away, which is reassuring for everyone involved.
Christmas Stained Glass Design Ideas
Classic Christmas Tree Window
Use three shades of green tissue for the branches, brown for the trunk, and tiny circles of red, blue, and gold for ornaments. Add a yellow star at the top and white scraps along the branch edges to suggest snow.
Geometric Ornament Trio
Cut three large circles and divide each into diamonds, stripes, or wedges. Limit each ornament to two or three colors so the set feels coordinated. Black paper caps and thin ribbon lines complete the design.
Nativity-Inspired Star Panel
Create a deep blue rectangular panel with a large gold star and smaller white stars. A simple dark silhouette along the lower edge can suggest a quiet nighttime scene without requiring dozens of tiny cuts.
Candy-Cane Border
Make alternating red and white diagonal sections around the outer edge of a larger panel. Fill the center with a wreath, greeting, snowflake, candle, or Christmas tree. The striped border makes even a basic central shape look finished.
Modern Winter Palette
Christmas stained glass does not have to be red and green. Try navy, icy blue, white, silver, and lavender for a calm winter window. Use angular shapes and generous clear spaces for a contemporary look.
How to Make a Full-Window Display
For a large window, avoid creating one enormous sheet. Large pieces of contact paper are harder to align and more likely to trap wrinkles. Instead, divide the display into separate panels.
For example, create six square suncatchers arranged in two rows. Each square could feature a tree, ornament, star, candle, snowflake, or wrapped gift. Leave equal gaps between the panels so the entire arrangement looks intentional.
You can also build a border around the window using repeated stars or colored rectangles. A central wreath or Christmas tree then becomes the focal point. Repetition makes a display feel coordinated even when several children have contributed pieces in very different styles.
Troubleshooting Common Problems
The Contact Paper Keeps Curling
Tape the corners to the table and expose the adhesive in sections rather than removing the entire backing at once. Store the roll flat beneath a few books before crafting if it has a particularly dramatic personality.
The Tissue Paper Sticks in the Wrong Place
Lift it with tweezers or the tip of a dry craft stick. Do not worry if a thin fragment remains. Layer another color over it and call the result “intentional texture,” a phrase that has rescued artists for centuries.
The Finished Piece Looks Cloudy
Matte contact paper naturally diffuses light. For greater clarity, choose a glossy transparent covering. Excessive layers of pale tissue can also create a milky appearance, so use only one layer in areas where brightness matters.
There Are Too Many Air Bubbles
Apply the second sheet slowly from one edge, smoothing as you go. If a bubble is trapped near an edge, gently lift and reapply that section. Avoid puncturing the film while it is on a window because sharp tools and glass are not a festive partnership.
The Decoration Falls Off the Glass
Clean and dry the mounting area, then use a removable tape or hanger intended for smooth glass. Heavy cardstock frames may need two attachment points along the top. Large panels are often more reliable when divided into smaller sections.
The Colors Look Too Dark
Reduce overlapping layers, add clear spaces, or replace dark tissue with brighter colors. Test the project against the actual window before sealing it. A shaded north-facing window may require lighter colors than a sunny south- or west-facing window.
Safety, Storage, and Reuse
Adults should handle craft knives and make complicated interior cuts. Give younger children blunt-tip scissors appropriate for their skill level, supervise small decorative pieces, and keep long ribbons away from toddlers. The project is low-mess, but it still deserves sensible craft precautions.
At the end of the season, remove mounting tape slowly. Wipe the artwork with a dry or barely damp cloth. Do not soak it because moisture may enter the cut edges and stain the tissue paper.
Store each panel flat between sheets of clean paper or thin cardboard. Avoid folding it, and keep it away from radiators, attics, and other hot areas that may warp the film or soften the adhesive.
Label the storage sleeve with the year and maker’s name. A slightly lopsided star becomes considerably more precious five Christmases later when you remember exactly whose small hands placed every blue square.
What I Learned From Making Christmas Stained Glass Windows
The first time I made a clear-contact-paper Christmas window, I treated it like a precision project. I measured every border, cut identical tissue squares, and tried to make the paper strips line up like the windows of a grand old church. The result was tidy, respectable, and about as relaxed as a tax form wearing a Santa hat.
The second version was made with children. The green tissue wandered outside the tree outline. One ornament was larger than the tree trunk. A patch of purple appeared because someone insisted that Santa’s workshop absolutely has purple windows.
When we held it up to the afternoon sun, that imperfect panel looked far more alive than my carefully controlled one. The overlapping scraps created unexpected colors, and the irregular shapes caught the light in ways I could not have planned.
That experience changed how I prepare the activity. I now cut the materials in advance but avoid pre-arranging them. I offer a limited palette for each panelusually four main colors plus white and yellowso the finished window feels harmonious without restricting every creative decision.
I also make the black frame before the children begin. A strong border visually organizes even the wildest mosaic, much like a picture frame can persuade a refrigerator drawing that it belongs in a gallery.
I learned to expose only part of the contact paper at a time. Removing the entire backing looked efficient, but it invited cuffs, elbows, tissue piles, and occasionally a sleeve to become part of the composition. Half-sheet exposure gives children plenty of working room while keeping the other half protected. When the first section is full, another strip can be uncovered.
Another lesson involved scale. Tiny tissue squares can produce beautiful detail, but they frustrate younger makers and take much longer than expected. Pieces around three-quarters of an inch are a useful middle ground. They are easy to pinch, small enough to form curves, and large enough that the project visibly progresses.
For toddlers or preschoolers, larger torn pieces are even better. Older children and adults can add narrow strips, punched stars, detailed patterns, and layered shading afterward.
Lighting matters too. A design judged under overhead room light may seem dull or overly dark. I now keep a scrap of clear contact paper nearby as a test card and hold color combinations against the actual window.
Strong afternoon sunlight can make deep reds and blues look spectacular. A shaded window benefits from brighter tissue, fewer overlaps, and more open space. Testing first takes less than a minute and can prevent an entire design from resembling a colorful but strangely gloomy cloud.
The best practical discovery was to make several medium panels instead of one enormous sheet. Small sections are easier to seal without wrinkles, easier to store, and easier to replace if one gets damaged.
A row of three ornaments, four snowy squares, or a collection of individual stars can fill a window just as effectively as one giant scene. Separate panels also allow several people to contribute without negotiating ownership of the same sticky rectanglea seasonal miracle in its own right.
Finally, I stopped trying to hide every bubble. A few small bubbles and creases disappear when daylight passes through the artwork. What remains visible is the color, the shared work, and the cheerful change it brings to an ordinary room.
The goal is not to counterfeit a museum window. It is to make December sunlight feel a little more festive.
Conclusion
Making Christmas stained glass windows with clear contact paper is simple enough for a family afternoon yet flexible enough for detailed adult crafting. Begin with a bold template, place translucent tissue on the sticky film, add dark leading, seal the mosaic beneath a second layer, and mount it where natural light can perform the final bit of artistry.
The materials are inexpensive, the technique is forgiving, and the finished decorations store flat for another season. Most importantly, every panel can carry the personality of its maker. Perfect symmetry is optional. Joyful color is not.
Note: Test any adhesive on an inconspicuous area first, follow the care guidance for your particular window, and provide age-appropriate adult supervision when children use scissors or small decorative pieces.