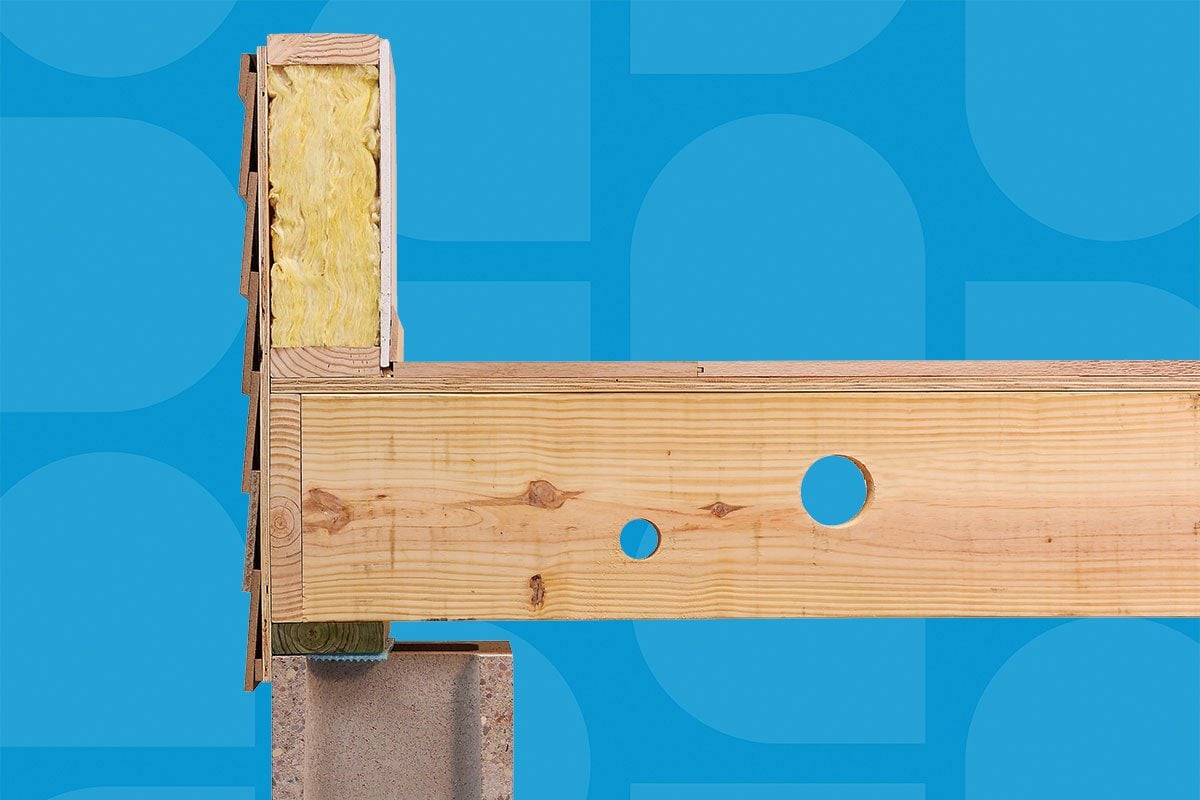
Running cable, PEX, or a small drain line through a floor system can make a renovation look professional. It can also turn one enthusiastic afternoon with a drill into an expensive structural repair. This guide explains how to drill through floor joists safely, including solid-sawn lumber, engineered I-joists, LVL members, and open-web floor trusses. The key is identifying the framing, locating its safe zones, and checking the rules before the bit starts spinning.
Why Hole Location Matters
A loaded joist bends: its top is mainly compressed, its bottom is mainly stretched, and the vertical center carries less bending stress. That is why a centered round hole in solid lumber is usually less harmful than a bottom-edge notch. Shear is also high near supports, so engineered I-joist charts specify minimum distances from bearings and cantilevers. “It looks centered” is not an engineering calculation, even when said confidently beside a very large hole saw.
First, Identify the Floor Framing
Solid-Sawn Lumber Joists
Traditional joists are single pieces of lumber, commonly labeled 2×8, 2×10, or 2×12. Their typical actual depths are 7 1/4, 9 1/4, and 11 1/4 inches. The one-third hole rule applies to these members.
Engineered I-Joists
An I-joist has top and bottom flanges connected by a thin OSB or plywood web. Holes may be permitted in the web, but only where the manufacturer’s chart allows them. Never drill, notch, or trim either flange; those flanges are structural muscle, not convenient pipe shelves.
LVL, PSL, LSL, and Glulam Members
These products often serve as beams, headers, or heavily loaded members. Do not apply ordinary joist rules. Find the product label and obtain manufacturer or engineering guidance before drilling.
Open-Web Floor Trusses
Floor trusses provide open spaces for utilities. Do not cut or drill chords, webs, connector plates, or strongbacks. If a pipe does not fit, reroute it or obtain an engineered modification. A sawzall is not an authorized design professional.
Solid-Lumber Joist Hole and Notch Rules
For a typical solid-sawn floor joist under common International Residential Code provisions, use these limits:
- The diameter of a bored hole must not exceed one-third of the joist’s actual depth.
- The edge of the hole must remain at least 2 inches from the top edge, bottom edge, any other hole, and any notch.
- A notch away from the joist end must be no deeper than one-sixth of the joist depth and no longer than one-third of the joist depth.
- Notches are prohibited in the middle third of the span.
- An end notch must not exceed one-fourth of the joist depth.
The middle-third prohibition applies to notches, not to properly sized round holes. Center holes vertically whenever practical.
| Nominal joist | Typical actual depth | One-third maximum | Practical maximum bit size |
|---|---|---|---|
| 2×8 | 7 1/4 inches | About 2.42 inches | 2 3/8 inches |
| 2×10 | 9 1/4 inches | About 3.08 inches | 3 inches |
| 2×12 | 11 1/4 inches | 3.75 inches | 3 3/4 inches |
Measure the member itself. Older homes may contain full-dimension lumber, doubled joists, repairs, or unusual loading. Nominal labels do not replace a tape measure.
Rules for Drilling Engineered I-Joists
Do not use the one-third rule on an I-joist. Locate the manufacturer and series printed on the web, then use that product’s current hole chart. It specifies hole size, distance from supports, remaining web, and spacing between openings.
Follow these universal habits even though the exact dimensions vary:
- Cut only the web and never touch the top or bottom flange.
- Use factory knockouts for small wires when their instructions permit it.
- Keep large holes outside marked or charted no-hole zones near bearings.
- Round the corners of rectangular openings; do not leave sharp saw cuts that can concentrate stress.
- Do not overcut beyond the marked outline with a reciprocating saw.
- Keep the required clear web between multiple holes.
If the label is missing, pause. Flange color and depth are not reliable identification methods.
Tools and Safety Gear
Gather a tape measure, square, marker, work light, inspection camera, sharp auger or self-feed bits, hole saws, a drill with a side handle or anti-kickback clutch, and approved nail plates. A right-angle drill fits between joists better than a full-size tool held sideways like a stubborn suitcase.
Wear eye and hearing protection, use a stable platform, and keep loose items away from the bit. Large cutters can bind violently, so use low speed and two hands. Inspect both sides for cables, pipes, fasteners, and hardware. De-energize or shut off nearby systems when appropriate, but never assume an unknown cavity is safe.
How To Drill Through Floor Joists Step by Step
1. Plan the Entire Route
Mark the start, destination, bends, slope, and every member crossed. Cable and PEX are flexible; drains need continuous slope and enough vertical room to remain inside every allowable zone.
2. Confirm Permits and Trade Requirements
Electrical, plumbing, mechanical, fireblocking, and inspection rules may apply. Verify permits, cable limits, pipe supports, drain slope, and rated-assembly requirements before covering the work.
3. Measure and Mark the Safe Zone
For solid lumber, calculate one-third of actual depth and mark lines 2 inches from the top and bottom. Keep the complete hole between them. For an I-joist, transfer dimensions directly from the manufacturer’s chart and note whether distance is measured to the hole edge or center.
4. Check for Hidden Utilities
Trace visible services and use a scanner only as a secondary check. When access is limited, inspect through an existing opening with a borescope. Avoid blind drilling with long flexible bits; they reach hidden places and hidden hazards equally well.
5. Select the Smallest Practical Hole
Provide enough clearance to pull the cable or pipe without abrasion, but do not oversize the opening “for future possibilities.” Follow bundling, sleeve, and expansion requirements.
6. Drill Square and Under Control
Use low speed with hammer mode off. Start gradually, keep the bit square, and clear chips so it does not bind. For a large solid-lumber hole, drill until the pilot emerges and finish from the opposite side when accessible. On an I-joist, use the approved cutting method and never nick a flange.
7. Smooth and Protect the Opening
Remove sharp edges, add required bushings or sleeves, and support cables and pipes independently. A hole edge is not a hanger.
8. Add Nail Plates Where Required
Protect cables or pipes close to a framing face with approved steel plates. A common threshold is 1 1/4 inches from the nearest edge, but local electrical and plumbing rules control.
9. Inspect Before Closing the Ceiling
Photograph the route with measurements visible, verify clearances, and obtain required inspections. The photos may prevent a future recessed-light installer from meeting your water line.
Common Mistakes To Avoid
- Measuring from the hole center instead of its edge: The 2-inch clearance for solid lumber is measured to the edge of the hole.
- Using nominal lumber dimensions: A 2×10 is usually only 9 1/4 inches deep.
- Notching the bottom for convenience: Bottom-edge notches can damage the joist’s tension zone and are prohibited in the middle third.
- Applying solid-lumber rules to engineered wood: I-joists, LVL, and trusses require product-specific guidance.
- Making a string of touching holes: Adjacent holes need the required solid material between them.
- Drilling doubled or header joists without review: Multiple members often support openings, bearing walls, tubs, or concentrated loads.
- Inventing a repair: Random plywood, construction adhesive, and a heroic quantity of screws do not automatically restore capacity.
When To Call a Structural Engineer or Manufacturer
Call a professional when a hole exceeds prescriptive limits, affects an engineered beam, restricted zone, cantilever, doubled member, bearing wall, stair opening, masonry, heavy tub, or damaged framing. After accidental damage, stop, photograph the span, record labels and measurements, and keep the area open. Use a manufacturer or engineered repairdo not hide the problem and hope the subfloor develops amnesia.
Experience-Based Lessons From Real-World DIY Scenarios
The Route Is Usually More Important Than the Bit
A common beginner move is drilling the first joist as soon as a route appears. Three joists later, a duct, beam, or stair header blocks the path, leaving legal holes that lead nowhere. Map the full runincluding the final turn into the panel or fixturebefore drilling. Ten quiet minutes with a flashlight and tape measure can prevent an hour of work and several decorative structural openings.
Templates Beat Repeated Mental Arithmetic
For a row through solid 2x10s, make a cardboard template showing the safe vertical zone and centerline. It prevents gradual drift caused by measuring each hole from an uneven floor. Verify every member, but use the template to spot knots, nails, old holes, or pipes before committing the bit.
A Right-Angle Drill Still Deserves Respect
Compact drills create false confidence. A self-feed bit that catches a nail can rotate the tool faster than a wrist can negotiate. Use a stable stance, side handle, low gear, and a position that sends kickback away from your face. Stop when the sound changes. A dull bit adds heat, splintering, and vocabulary unsuitable for a family renovation blog.
Engineered Joist Labels Are Worth the Search
On I-joist floors, clean the web until the product stamp is readable. The correct chart may allow a large hole yet require it to be several feet from a support. Product identification turns guesswork into layout. If no label can be found, contact the supplier, manufacturer, or engineer rather than choosing the chart for the closest-looking joist.
Leave Evidence for the Next Person
Before insulation and drywall hide the work, take wide photos and close-ups with measurements. Years later, someone can locate a pipe, avoid a cable, or explain the modification without opening the ceiling. Good DIY work remains understandable to the next electrician, plumber, inspector, or homeowner who inherits the building’s mysteries.
Stopping Early Is a Skilled Decision
Hesitation can be productive. If a joist is doubled, the span is unusual, the opening is near a support, or an engineered member was already altered, stop and document it. One technical call can prevent a repair costing far more than the project. DIY confidence comes from a verified plan, not a bigger drill.
Conclusion
Safely drilling through floor joists is a layout job before it is a power-tool job. Identify the framing, apply the correct rules, choose the smallest practical opening, protect concealed utilities, and inspect the work before closing it up. Solid-sawn joists follow prescriptive size and clearance limits, while engineered I-joists, beams, and floor trusses demand product-specific instructions. Measure twice, verify the chart once more, and then drill. Your floor will remain quiet, strong, and pleasantly uninterested in becoming the main character of your renovation.