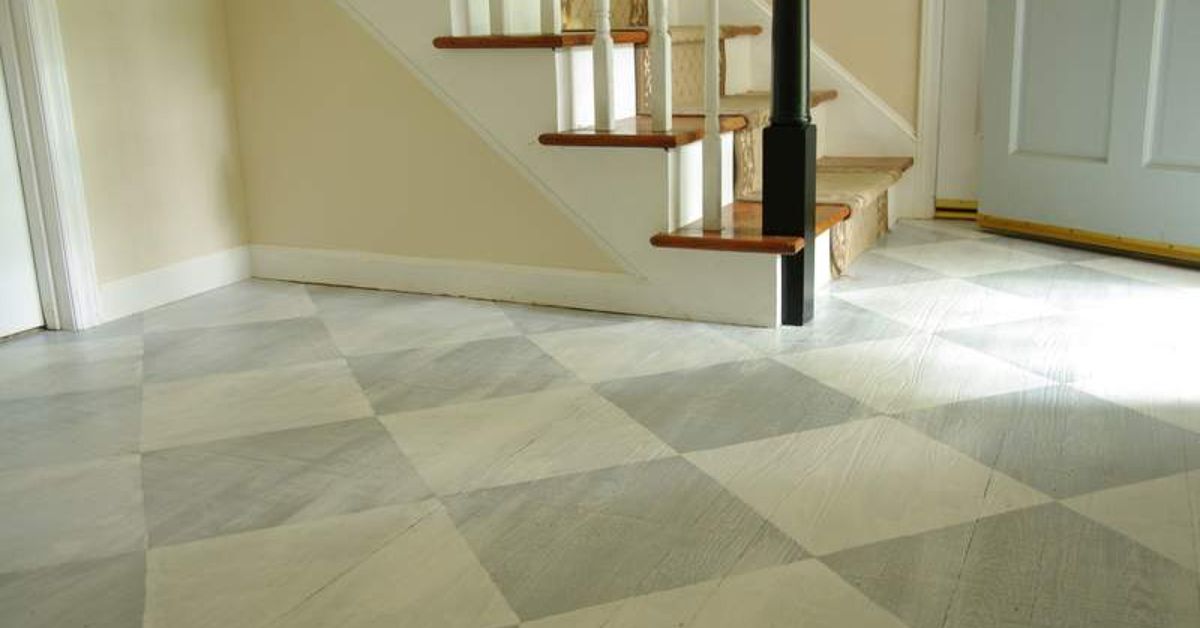
Old hardwood floors have a personality problemin the best possible way. They creak, dip, show scars from chairs, pets, parties, and that one mysterious stain nobody in the family wants to discuss. When the boards are too worn for a perfect refinish but too charming to cover with vinyl, a painted whitewashed checkerboard can turn “tired floor” into “designer moment.” It is budget-friendly, highly customizable, and dramatic without yelling across the room.
A whitewashed checkerboard floor is softer than the classic black-and-white diner look. Instead of high-contrast squares, it uses pale white, cream, gray, greige, or washed wood tones to create a breezy pattern that still lets the age of the hardwood show through. Think cottage kitchen, coastal mudroom, farmhouse hallway, vintage pantry, or a sunroom that wants to look like it casually summers in Maine.
This guide explains how painted old hardwood floors in a whitewashed checkerboard work, when they make sense, how to plan the pattern, what materials to use, and how to avoid common DIY mistakes. Spoiler: the tape is not the hard part. The hard part is patience. The floor knows when you are rushing.
Why Paint Old Hardwood Floors Instead of Replacing Them?
Painting hardwood floors is often a smart solution when the boards are structurally sound but cosmetically challenged. If the floor has deep stains, uneven patches, previous repairs, mismatched boards, or a finish too thin to sand again, paint can create a unified surface without the cost and disruption of replacement.
Whitewashed checkerboard floors are especially useful in older homes because they celebrate imperfection. A tiny gap between boards, a soft dip near the doorway, or a faint nail mark does not ruin the effect. In fact, those details can make the floor look more authentic. A brand-new floor pretending to be old can feel like a costume. An old floor wearing a painted checkerboard is simply dressing for the occasion.
Compared with installing stone, ceramic, or luxury vinyl tile, painting is usually less expensive and less invasive. You do not have to raise thresholds, remove heavy flooring, or commit to a permanent tile pattern. If the style changes in five or ten years, the floor can be repainted. That flexibility is one reason painted floors keep returning in American home design trends.
What Makes a Whitewashed Checkerboard Different?
A traditional checkerboard floor is bold, graphic, and often high contrast. A whitewashed checkerboard is quieter. The pattern is still visible, but the colors look weathered, airy, and layered. Instead of pure white and jet black, popular combinations include white and warm gray, ivory and mushroom, soft cream and pale taupe, chalk white and natural wood, or white stain and diluted gray paint.
The whitewashed effect can be created in several ways. Some homeowners paint a solid base coat, then paint alternate squares in a second pale tone. Others thin paint slightly to let wood grain peek through. Another approach is to use a white stain or color wash on one set of squares and a subtle gray or beige wash on the other. The right method depends on the condition of the floor and how much wood character you want to preserve.
If the hardwood has beautiful grain, a translucent wash may be best. If the floor has old stains, patches, or filler marks, a more opaque porch-and-floor paint may hide flaws better. The goal is not to make the floor look like a plastic sheet printed with squares. The goal is to make it look like it has always belonged there, even if it was born last weekend after three coffees and a roll of painter’s tape.
Best Rooms for a Painted Checkerboard Hardwood Floor
Whitewashed checkerboard floors can work in many spaces, but they shine in rooms where charm matters more than formality. Kitchens, breakfast nooks, mudrooms, laundry rooms, enclosed porches, powder rooms, pantries, craft rooms, and cottage-style bedrooms are all strong candidates.
In a kitchen, a pale checkerboard adds movement without overwhelming cabinets and countertops. In an entryway, it gives guests a cheerful first impression. In a laundry room, it turns a practical space into somewhere you might actually enjoy folding towels. No promises, but the floor will try.
For large open-plan rooms, scale becomes more important. Tiny squares can look busy, while oversized squares can feel elegant and calm. In small spaces, diagonal checkerboards can visually widen the room. In narrow hallways, squares aligned with the walls often feel cleaner and easier to lay out.
Before You Start: Check the Condition of the Floor
Paint is decorative, not structural. Before painting old hardwood floors, inspect the boards carefully. Look for loose planks, active water damage, soft spots, deep rot, cupping, major splintering, or movement underfoot. If the floor bounces like a trampoline, paint will not fix it. It will simply give the trampoline a charming pattern.
Repair loose boards, countersink raised nails, fill large holes, and sand sharp edges. Minor cracks and gaps are normal in old hardwood and can be left alone if they fit the rustic look. Wider holes may need wood filler, but remember that filler can accept paint differently than wood. Test first whenever possible.
Homes built before 1978 may contain lead-based paint in existing floor coatings, trim, or nearby surfaces. If you suspect lead, use a proper lead test kit or hire a certified professional before sanding. Sanding unknown old coatings without testing can create hazardous dust. This is one area where “winging it” is not charming; it is just dusty and dangerous.
Choosing Colors for a Whitewashed Checkerboard
The best whitewashed checkerboard colors are soft, low-contrast, and compatible with the home’s existing palette. A floor takes up a large visual area, so colors that look subtle on a paint chip may appear stronger once repeated across the room.
Classic Soft White and Pale Gray
This is the safest combination for a clean, timeless look. Use a warm white if the room has wood cabinets, brass hardware, or creamy walls. Use a cooler white if the room already leans blue, charcoal, or modern coastal.
Ivory and Greige
Ivory and greige create a warmer, older-house feeling. This pairing is excellent for farmhouse kitchens, vintage cottages, and rooms with natural linen, butcher block, or aged brass.
Whitewash and Natural Wood
If the floor has attractive grain, consider leaving one set of squares close to the natural wood tone and washing the alternate squares in white. This creates a checkerboard that feels handmade and less painted. It also hides wear beautifully because the wood is already part of the design.
Cream and Dusty Blue-Gray
For a coastal or Swedish-inspired room, cream and faded blue-gray can be gorgeous. Keep the blue muted so the floor does not look like a nursery rug that escaped and hardened.
Pick the Right Paint and Finish
Floors take more abuse than walls. They deal with shoes, furniture, pet claws, dropped utensils, muddy boots, and the occasional dramatic entrance. Use paint designed for floors, porches, patios, or high-traffic surfaces. Regular wall paint may look pretty at first but often scuffs quickly under daily use.
A low-luster, satin, or matte finish is usually better for whitewashed checkerboard hardwood floors than high gloss. Glossy paint can be slippery and may highlight every dent and uneven board. Satin provides a practical balance: washable, durable, and not too shiny.
For the protective topcoat, many DIYers choose water-based polyurethane or a water-based floor finish over light paint because it is less likely to amber than oil-based polyurethane. Always test the topcoat over your chosen paint colors before sealing the whole floor. A finish that looks clear in the can can still warm, cloud, or slightly change pale colors.
Tools and Materials You May Need
- Vacuum and damp mop
- Degreasing cleaner or wood-safe floor cleaner
- Medium-grit and fine-grit sandpaper
- Wood filler for larger holes
- Painter’s tape designed for delicate surfaces
- Measuring tape, pencil, chalk line, or laser level
- Primer suitable for wood floors
- Porch-and-floor paint or floor-rated enamel
- Small angled brush and foam roller
- Water-based polyurethane or clear floor finish
- Knee pads, because your knees did not sign up for this
How to Paint Old Hardwood Floors in a Whitewashed Checkerboard
Step 1: Clean Like You Mean It
Remove furniture, rugs, dust, and any sticky residue. Old floors often hide wax, oil, polish, and mystery grime. A clean surface helps primer and paint bond properly. After cleaning, let the floor dry completely. Moisture trapped under paint can cause peeling, bubbling, or a finish that behaves like it has unresolved issues.
Step 2: Sand to Dull the Surface
You do not always need to sand down to bare wood. In many cases, the goal is to scuff the old finish so primer can grip. Use medium-grit sandpaper to dull glossy areas, then follow with a finer grit for a smoother surface. Vacuum thoroughly and wipe away dust. Paint and sanding dust are not friends.
Step 3: Prime the Floor
Primer improves adhesion and helps create an even base. Cut in around edges with a brush, then roll the rest of the floor, working toward the exit so you do not trap yourself in the corner like a DIY raccoon. Let the primer dry according to the product directions.
Step 4: Paint the Base Color
Apply the lighter color first, usually the white or ivory shade. Two thin coats are better than one thick coat. Thick paint can dry unevenly, show roller marks, and take longer to cure. Allow each coat to dry fully before continuing.
Step 5: Plan the Checkerboard Layout
Measure the room and decide on square size. Common sizes range from 12 inches to 24 inches, but the best choice depends on the room. Smaller rooms often look good with 12- to 16-inch squares. Larger rooms can handle 18- to 24-inch squares.
Start from the center of the room or from a strong visual line, such as the main doorway, a fireplace, or a long cabinet run. Dry-mark the pattern before taping. You want to avoid ending with a tiny awkward sliver of a square along the most visible wall. That little sliver will stare at you forever.
Step 6: Tape the Squares Carefully
Use painter’s tape to mark the squares that will remain the base color. Press the tape edges firmly but gently. On uneven old boards, paint can bleed under the tape, so consider sealing tape edges with a thin coat of the base color before applying the second color. Once dry, paint the alternate squares. This trick helps create cleaner lines.
Step 7: Create the Whitewashed Effect
For an opaque checkerboard, roll or brush the second pale color into the exposed squares. For a washed look, use a thinned paint mixture or stain-like product and wipe back excess with a rag. Work in small sections so the wash does not dry before you blend it. Keep the effect consistent but not robotic. A little variation makes the floor look aged and natural.
Step 8: Remove Tape at the Right Time
Remove painter’s tape while the final coat is still slightly wet or according to the tape manufacturer’s directions. Pull slowly at an angle. If paint starts lifting, stop and score the edge lightly with a utility knife. This is not the moment for speed. This is the moment for breathing like a person defusing a tiny decorative bomb.
Step 9: Seal the Floor
Once the paint is fully dry, apply a clear protective floor finish. Use thin, even coats and follow the recommended drying and recoat times. Two to three coats are common for interior painted floors, but high-traffic areas may need extra protection. Test the clear finish first, especially over white or cream paint.
Step 10: Let It Cure
Dry and cured are not the same. A floor may feel dry within hours but still need days or even longer to harden fully. Avoid rugs, heavy furniture, and dragging objects until the finish has cured. Use felt pads under furniture legs. Your future floor will thank you in silence, which is how floors communicate.
Design Tips for a Better-Looking Checkerboard
Checkerboard floors look simple, but the best ones are carefully considered. First, think about scale. Large squares feel calmer and more elegant; small squares feel playful and busy. Second, decide whether the pattern should run straight with the walls or on a diagonal. A diagonal layout can make a room feel wider, but it requires more measuring and produces more partial squares at the edges.
Third, consider a border. A painted border around the room can make the pattern look intentional and finished, especially in older homes where walls may not be perfectly square. A border also helps hide uneven edge cuts in the layout. Old houses rarely believe in right angles. They prefer jazz.
Finally, match the floor’s mood to the room. A soft white and gray checkerboard works well with shaker cabinets, marble-look counters, beadboard, and open shelving. A cream and taupe checkerboard pairs nicely with warm woods, antique furniture, and woven textures. For a modern look, keep the palette very restrained and let the pattern provide the visual interest.
Common Mistakes to Avoid
The first mistake is skipping prep. Paint failure usually begins before the paint can is even opened. Grease, wax, dust, and glossy finishes can prevent proper adhesion. The second mistake is choosing wall paint instead of floor paint. Wall paint is not made for footsteps, chair legs, or dogs who believe the hallway is a racetrack.
The third mistake is rushing drying times. If you tape over paint that is not dry enough, the tape can pull it up. If you seal too soon, trapped moisture can cloud the finish. If you place rugs too early, the finish can stick, dent, or discolor.
The fourth mistake is using too much contrast in a room that already has strong patterns. A checkerboard floor is a statement. If the wallpaper, curtains, backsplash, and rug are also shouting, the room may start to feel like a design committee meeting with no chairperson.
The fifth mistake is expecting perfection. Painted old hardwood floors will age. They may chip in high-traffic spots. They may develop scuffs. That is not necessarily failure; it can be part of the charm. A whitewashed checkerboard should look lived in, not shrink-wrapped.
Maintenance: How to Keep Painted Floors Looking Good
Clean painted hardwood floors gently. Sweep or vacuum regularly to remove grit that can scratch the finish. Use a damp mop, not a soaking wet one. Avoid harsh cleaners, abrasive pads, ammonia-heavy products, and steam mops unless the floor finish manufacturer says they are safe.
Add felt pads under furniture, use mats near exterior doors, and lift furniture instead of dragging it. In kitchens, a washable runner near the sink can protect the area most likely to see water and dropped utensils. In mudrooms, use a tough entry mat to catch sand and grit before it reaches the painted surface.
Keep leftover paint and topcoat labeled for future touch-ups. Include the brand, color formula, sheen, and date. When small chips happen, lightly sand the area, touch up the color, and reseal the spot. Maintenance is easier when you are not trying to remember whether the floor was “Cloudy Oatmeal,” “Fog Whisper,” or “Historic Beige-ish Panic.”
Cost and Time Expectations
The cost of painting old hardwood floors in a whitewashed checkerboard depends on room size, product quality, repair needs, and whether you already own tools. For a small room, DIY materials may include primer, two paint colors, tape, rollers, sandpaper, cleaner, and a clear topcoat. It is often far less expensive than new tile or hardwood replacement, especially if the existing boards are usable.
Time is the bigger investment. Even a small room can take several days because of cleaning, sanding, priming, painting, taping, pattern work, sealing, and curing. The hands-on work may be manageable, but drying time stretches the project. Plan around the room being out of service. If it is your only kitchen, prepare meals ahead or become emotionally ready for sandwiches.
Real-Life Experience: What This Project Feels Like From Start to Finish
Painting old hardwood floors in a whitewashed checkerboard is one of those projects that looks relaxed in photos and oddly athletic in real life. The finished room may whisper “effortless cottage charm,” but the process involves kneeling, measuring, crawling, remeasuring, and questioning whether your house was built by people who disliked straight lines on principle.
The first experience most DIYers have is surprise. Old floors are dirtier than they look. Once the rugs are gone and the furniture is out, every scratch, paint drip, stain, and old repair introduces itself. This stage can feel discouraging, but it is actually where the project begins to make sense. A natural refinish might highlight every flaw. A whitewashed checkerboard gathers those flaws into a pattern and gives them a job.
The second experience is the layout puzzle. Choosing square size sounds easy until you realize one wall is slightly longer than the other, the doorway is not centered, and the most visible sightline is from the hall, not the middle of the room. The best advice is to mark the pattern with pencil or chalk before opening the paint. Stand in every doorway. Look from the kitchen, the hallway, and the spot where people naturally enter. The layout should please the eye from real life, not just from a diagram.
The third experience is learning that white is not just white. A bright white can look crisp in a can but icy on the floor. A cream can look soft in daylight but yellow at night. A pale gray can turn blue beside warm wood cabinets. Testing colors directly on the floor is not optional; it is the difference between “beautifully aged” and “why does my kitchen look cold?” Paint several sample squares and view them morning, afternoon, and evening.
The fourth experience is tape anxiety. Everyone wants razor-sharp lines, but old hardwood has seams, grain, dents, and small ridges. Some bleeding is possible. The trick of sealing tape edges with the base color helps, but the healthiest mindset is to aim for clean, not factory-perfect. A handmade checkerboard on old wood should have a little soul. If one line wobbles slightly, nobody will notice once the furniture is backunless you point to it at every dinner party, which you must not do.
The fifth experience is the waiting. Waiting for primer. Waiting for paint. Waiting for the second color. Waiting for the clear coat. Waiting before moving furniture. Waiting before rugs. This project rewards the person who can walk away. Rushing the cure time is how chair legs leave dents and rugs leave marks. The floor may look finished, but it still needs time to toughen up.
The final experience is satisfaction. A whitewashed checkerboard can completely change how a room feels. It brightens dark corners, adds pattern without clutter, and gives old hardwood a second life. It also changes how you see imperfections. Scratches become patina. Slight unevenness becomes character. The room feels more personal because it is personal. You measured it, painted it, sealed it, and probably apologized to your knees afterward.
That is the real appeal of painted old hardwood floors in a whitewashed checkerboard. The project is practical, but it is also emotional. It says the house does not need to be perfect to be beautiful. Sometimes it just needs cleaning, sanding, soft color, and a pattern brave enough to turn age into style.
Conclusion
Painted old hardwood floors in a whitewashed checkerboard are a clever way to rescue worn boards, brighten a room, and add timeless pattern without installing new flooring. The look works because it balances structure and softness: the checkerboard brings rhythm, while the whitewashed palette keeps everything relaxed and livable.
Success depends on preparation, patience, and smart product choices. Clean thoroughly, sand enough for adhesion, use floor-rated paint, test your colors, plan the layout carefully, and protect the finished design with a clear topcoat. The result will not be a flawless showroom floorand that is exactly the point. It will be a floor with charm, history, and a little wink of personality.
If your old hardwood floors are too imperfect to refinish but too lovely to hide, a whitewashed checkerboard may be the sweet spot. It is affordable, stylish, forgiving, and full of character. In other words, it is the rare DIY project that lets an old floor keep its stories while finally giving it a better outfit.
Note: This article synthesizes practical guidance from reputable U.S. home improvement, paint, flooring, and interior design resources, including professional recommendations on floor preparation, paint selection, checkerboard layout, sealing, safety, and maintenance.