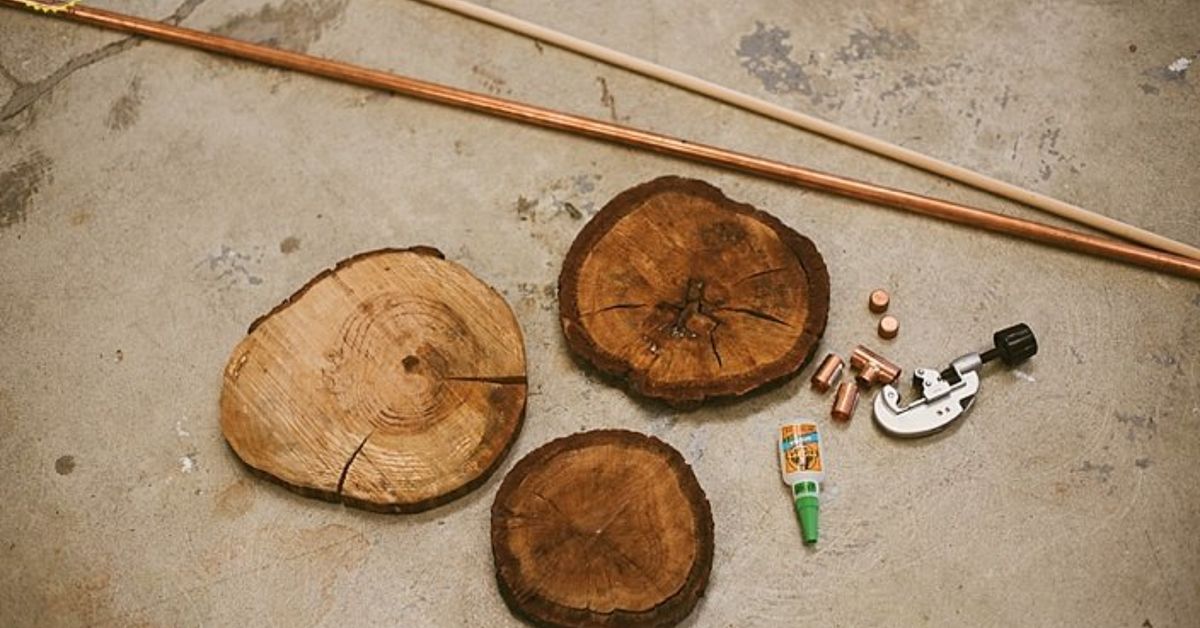
A dessert stand has one very important job: make cookies, cupcakes, brownies, and cake look like they arrived with a tiny red carpet. This DIY copper and wood slice dessert stand does exactly that, while also giving your table a warm rustic-meets-modern look. The wood slice brings the woodland charm, the copper adds a polished glow, and together they say, “Yes, I made this,” without saying, “I spent my entire weekend crying into sandpaper.”
This project is ideal for weddings, birthdays, baby showers, holiday dessert bars, brunch spreads, or any moment when a regular plate feels too emotionally flat. It is also beginner-friendly if you measure carefully, use the right adhesive, and resist the urge to build a dessert tower tall enough to require city permits.
In this guide, you will learn how to choose the right wood slice, prepare and seal it safely, cut and clean copper pipe, assemble a sturdy pedestal, style the stand beautifully, and maintain it so it stays charming long after the last cupcake has mysteriously disappeared.
Why Make a Copper and Wood Slice Dessert Stand?
The appeal of a wood slice cake stand is easy to understand. It feels handmade, natural, cozy, and special. Add copper, and suddenly the project gets a little more refined. Copper has that warm metallic shine that works with farmhouse decor, boho parties, modern tablescapes, woodland weddings, and even minimalist kitchens that pretend they do not love dessert.
Unlike many store-bought cake stands, a DIY version can be customized. You can choose a thick rustic wood round with bark for a woodland look, a smoother sanded slice for a modern style, or a darker stained finish for a more dramatic dessert display. The copper pedestal can be short and subtle or slightly taller for more table presence.
Another benefit is cost. A handcrafted dessert stand with natural wood and metal details can be expensive in stores. Making your own lets you control the budget while getting a custom piece that looks boutique instead of bargain-bin. The secret is not rushing the prep work. A good dessert stand is not just pretty; it must be level, clean, stable, and safe for serving.
Materials You Will Need
Before you begin, gather everything in one place. This prevents the classic DIY situation where one hand is covered in glue and the missing sandpaper is somehow in another room.
- One large wood slice, about 10 to 14 inches wide, for the top
- One smaller wood slice or round wood base, about 6 to 8 inches wide
- One piece of 1/2-inch or 3/4-inch copper pipe, cut to 4 to 6 inches long
- Two matching copper end caps or fittings
- Food-safe wood finish, such as cutting board oil, butcher block oil, mineral oil and beeswax, or a fully cured food-safe finish
- Heavy-duty epoxy or polyurethane adhesive suitable for bonding wood and metal
- 220-grit sandpaper, plus 120-grit sandpaper for rough areas
- Clean cloths or paper towels
- Pencil and ruler
- Painter’s tape
- Optional: wood feet, felt pads, or rubber bumpers
- Optional: lemon and salt or copper polish for brightening the copper
Tools You Will Need
- Copper tubing cutter
- Deburring tool or metal file
- Drill with a bit sized for shallow recesses, if desired
- Clamps or heavy books for pressure while the glue cures
- Safety glasses
- Work gloves
A tubing cutter is strongly recommended because it creates a cleaner, squarer cut than a random saw from the garage. Copper edges can be sharp after cutting, so deburring is not a fancy extra step. It is the difference between “beautiful handmade stand” and “why is there a tiny metal fang under this cupcake display?”
Choosing the Best Wood Slice
The best wood slice for a DIY dessert stand is dry, solid, flat, and thick enough to resist warping. Look for a slice that is at least 3/4 inch thick, though 1 inch or more is better for a sturdy top. The surface should not wobble when placed on a flat table. A little natural unevenness is charming; a rocking surface is not charming when it is holding a cake with emotional value.
Fresh Wood vs. Store-Bought Wood Slices
Freshly cut wood can crack as it dries, especially if it dries too quickly. Store-bought craft wood slices are often easier because they are usually pre-dried and ready for sanding. If you use a slice from your yard, let it dry thoroughly before sealing. Avoid pieces with active insects, soft spots, mold, or deep splits.
If the bark is loose, remove it or reinforce the edge only for decorative use. Bark looks beautiful, but crumbs love bark like it is a luxury hotel. For food serving, it is smart to place desserts on cupcake liners, doilies, parchment, a cake board, or small plates rather than directly on bark.
Food Safety: Can Desserts Touch the Wood?
For dry desserts such as wrapped candies, cookies, cupcakes in liners, and pastries on parchment, a sealed wood slice is generally practical for display. For frosted cakes, sticky bars, fruit tarts, or anything moist, use a cake board, parchment paper, or a food-safe liner between the dessert and the stand.
Wood used for serving should be cleaned, dried, and maintained properly. Do not soak the stand, do not run it through the dishwasher, and do not use it as a cutting board for raw meat or vegetables. This project is for displaying sweets, not performing dinner surgery.
Use finishes specifically labeled for cutting boards, butcher blocks, salad bowls, or food-contact surfaces, and follow the manufacturer’s drying or curing instructions. Some finishes are food-safe only after they are fully cured, which means “dry to the touch” may not be enough. Read the label. The label may not be exciting, but neither is ruining a cake with uncured finish.
Step-by-Step Tutorial: DIY Copper and Wood Slice Dessert Stand
Step 1: Sand the Wood Slices
Start with the top wood slice. Sand the upper surface with 120-grit sandpaper if it is rough, then move to 220-grit for a smoother finish. Sand with the grain where possible and soften the edges just enough to remove splinters. Repeat the process on the smaller base.
Wipe away dust with a slightly damp cloth and let the wood dry completely. Do not trap moisture under oil, wax, or finish. Moisture is the sneaky villain of wood projects, right after “I measured once and drilled anyway.”
Step 2: Decide Whether to Keep the Bark
If the bark is clean, tight, and decorative, you can leave it for a rustic look. Scrub the bark gently with a dry brush to remove dirt or loose bits. If the bark crumbles easily, remove it. A clean exposed edge can still look beautiful, especially after oiling.
Step 3: Mark the Center Points
Turn the large wood slice upside down and mark the center. Do the same on the smaller base. A simple method is to measure across the widest part, mark the halfway point, rotate the slice, and mark again. Where the lines cross is your approximate center.
Because natural wood slices are not perfect circles, visual balance matters as much as mathematical perfection. Set the copper pipe on the center mark and look at it from several angles. If it looks slightly off, adjust before gluing. Dessert stands are very honest objects; they reveal bad alignment immediately.
Step 4: Cut the Copper Pipe
Measure a 4- to 6-inch length of copper pipe. A shorter pedestal is sturdier and better for heavy cakes. A taller pedestal looks elegant but should be reserved for lighter desserts or a wider base.
Place the tubing cutter around the pipe at your mark. Tighten it just enough to score the copper, rotate the cutter around the pipe, then tighten slightly every few rotations until the pipe separates. Avoid over-tightening at the beginning because it can deform the pipe.
Step 5: Deburr and Clean the Copper
After cutting, use a deburring tool or metal file to smooth the inside and outside edges. Wipe away metal dust. If the copper is dull or fingerprinted, clean it with mild soap and water, dry it thoroughly, and polish it if desired.
For a natural shine, a little lemon and salt can help brighten unlacquered copper. Rinse and dry immediately after cleaning. Copper can tarnish over time, which is not a flaw. It is patina, also known as “character” when you are feeling poetic and “oxidation” when you are feeling scientific.
Step 6: Test the Layout Before Gluing
Dry-fit the stand before opening the adhesive. Place the base on a flat surface, set the copper pipe in position, and balance the top slice above it. Check height, proportion, and stability.
A good rule is to keep the base at least half the diameter of the top. For example, if the top is 12 inches wide, use a base around 6 inches wide or larger. If the top wood slice is very heavy, make the base wider and the copper pedestal shorter.
Step 7: Create Shallow Recesses for Extra Stability
This step is optional but helpful. Drill a shallow recess in the underside of the top slice and the top side of the base, sized to fit the copper cap or pipe end. Do not drill all the way through. The goal is to create a small seat that helps the copper stay centered while the adhesive cures.
If you do not want to drill, you can still assemble the stand using a strong adhesive and careful alignment. Painter’s tape can help mark the placement and reduce messy glue spread.
Step 8: Glue the Copper to the Base
Mix the epoxy or prepare your adhesive according to the product directions. Apply a modest amount to the copper fitting or pipe end and position it at the center of the base. Press firmly. Wipe away excess adhesive before it hardens.
Let this first joint set enough that the copper stays upright. Rushing this step is how dessert stands become abstract sculpture.
Step 9: Attach the Top Wood Slice
Apply adhesive to the upper copper fitting or pipe end. Carefully lower the top wood slice onto the copper support, lining up the center mark. Place a level on top if you have one. If not, step back and check the silhouette from multiple sides.
Add gentle weight on top, such as a heavy book protected with parchment or a cloth. Do not use so much weight that the pipe slides or the glue squeezes out completely. Let the stand cure for the full time recommended by the adhesive manufacturer, often up to 24 hours.
Step 10: Seal or Condition the Wood
Once the structure is cured, apply your food-safe finish. For oil finishes, rub a generous layer into the wood with a clean cloth, let it absorb, and wipe away excess. For a wax blend, buff lightly after it sets. For a film finish labeled food-safe after curing, follow the exact drying and curing schedule.
Apply finish to the top, bottom, and edges. Finishing all sides helps the wood react more evenly to humidity changes, reducing the risk of warping.
Design Variations
Two-Tier Dessert Stand
Use one larger wood slice on the bottom and a smaller one on top, connected with a copper pipe pedestal. This is perfect for cupcakes, macarons, mini cheesecakes, or holiday cookies. Keep the top tier light and centered.
Modern Minimalist Stand
Remove the bark, sand the edge smooth, and use a clear matte finish. Pair it with bright copper for a clean modern-rustic look. This version works beautifully on white tables, marble counters, and neutral dessert bars.
Wedding Dessert Table Stand
Make several stands in different heights, but keep each one stable and modestly sized. Grouping three stands creates visual interest without requiring one risky tower. Add greenery around the bases, not on the food surface.
Holiday Dessert Stand
Use the stand for gingerbread cookies, peppermint bark, pumpkin cupcakes, or mini pies. Copper looks especially good with fall colors, evergreen garlands, and candlelight.
Styling Ideas for a Dessert Table
A rustic dessert stand shines when it is part of a balanced table. Place taller items toward the back and smaller treats near the front. Use the copper and wood stand as the focal point, then support it with simple plates, linen napkins, and small bowls.
For a wedding or shower, try cupcakes with ivory frosting, small flowers tucked safely around the base, and a soft linen runner. For a birthday, add colorful macarons or frosted sugar cookies. For Thanksgiving, pile the stand with mini pumpkin muffins and let the copper glow do half the decorating work.
Do not overload the stand. Heavy layer cakes should sit on a wide, low stand with a strong base. If you are serving a tall cake, place it on a cake board first, then set the board on the wood slice. The stand should elevate the dessert, not audition for a structural engineering exam.
Cleaning and Maintenance
After use, remove crumbs with a dry cloth. Wipe the wood with a damp cloth and a little mild soap if needed, then dry immediately. Never soak the stand. Never put it in the dishwasher. Never leave it in a sink while you “deal with it later,” because later has a way of becoming tomorrow.
Reapply food-safe oil or board conditioner whenever the wood looks dry. For occasional copper cleaning, use a soft cloth and a gentle copper cleaner or natural lemon-and-salt method. Keep acidic cleaners away from the wood finish as much as possible, and dry the copper thoroughly to prevent water spots.
Store the stand in a dry place with airflow. Avoid direct sunlight for long periods, which can fade wood and speed uneven drying. If the top develops a slight wobble over time, inspect the adhesive joints before using it again.
Common Mistakes to Avoid
Using Wet or Green Wood
Wood that has not dried properly may crack, shrink, or warp after assembly. Choose dry wood slices or allow fresh slices to season before sanding and sealing.
Skipping the Deburring Step
Cut copper can have sharp edges. Smooth every cut edge before assembly. It looks better, feels safer, and helps fittings seat more cleanly.
Making the Stand Too Tall
A tall pedestal may look dramatic, but it can become unstable. For most dessert displays, 4 to 6 inches of lift is enough. The cupcakes do not need a penthouse.
Using the Wrong Finish
Not every wood stain, varnish, or craft sealer is appropriate for serving surfaces. If food may touch the wood, use a finish intended for food-contact surfaces and allow it to cure completely.
Serving Wet Foods Directly on the Wood
Moist desserts can stain or soften the finish. Use parchment, liners, cake boards, or plates for frosted, sticky, or juicy foods.
Real-World Experience: What This Project Teaches You
The first thing you learn while making a DIY copper and wood slice dessert stand is that natural materials do not care about your perfect Pinterest vision. A wood slice may look round in the store, then reveal at home that it has one proud little hump on the surface. That does not mean the project is ruined. It means you are working with real wood, not a factory-stamped plastic disk pretending to have a personality.
The best experience comes from slowing down during preparation. Sanding feels boring for the first few minutes, then oddly satisfying once the surface starts to soften. You run your hand over the wood, find one rough patch, sand again, and suddenly the slice feels less like a chunk of tree and more like something worthy of lemon bars. This is the stage where the project starts to feel handmade in the good way, not handmade in the “please do not look too closely” way.
Copper is just as fun, but in a different way. Cutting copper pipe with a tubing cutter is one of those small DIY skills that makes you feel more capable than the project technically requires. The tool rotates, the line deepens, and then the pipe separates with a clean little pop. It is extremely satisfying. It also teaches patience because tightening the cutter too aggressively can bend the pipe. Copper rewards steady hands and punishes drama. Honestly, relatable.
Assembly is where most beginners get nervous, and that is fair. You are bonding metal to wood, aligning two uneven natural surfaces, and hoping the final stand does not lean like it has heard shocking gossip. Dry-fitting helps. Marking the centers helps. Letting the base joint set before adding the top helps even more. The project becomes much easier when you stop treating glue like magic and start treating it like a material that needs pressure, time, and clean surfaces.
The biggest lesson is stability. A dessert stand can be beautiful, but if it wobbles, nobody will care how charming the bark is. Keep the base wide, the copper pedestal modest, and the top balanced. Test the stand with something low-risk before placing a special cake on it. A bag of flour or a stack of plates can reveal wobble without sacrificing dessert. This is called wisdom, and sometimes wisdom looks like putting pantry items on a homemade cake stand at 11 p.m.
Finally, this project changes how you see table styling. Once you make one stand, you start noticing height, texture, and layers everywhere. Cookies look better elevated. Cupcakes look more festive. Even a simple grocery-store bundt cake gets promoted from “snack” to “centerpiece.” The stand becomes more than a craft project. It becomes a reusable hosting tool, a conversation starter, and possibly the reason your friends assume you have your life together. Let them believe it.
Conclusion
A DIY copper and wood slice dessert stand is the rare craft that is practical, beautiful, affordable, and surprisingly impressive. With a dry wood slice, a short piece of copper pipe, food-safe finish, strong adhesive, and patient assembly, you can create a dessert display piece that looks custom without requiring advanced woodworking skills.
The key is balance: rustic wood with polished copper, natural texture with clean construction, and pretty presentation with smart food-safety habits. Use liners or cake boards when needed, keep the stand dry, refresh the finish, and polish the copper when you want extra shine. Whether you use it for cupcakes, cookies, wedding desserts, brunch pastries, or one very proud chocolate cake, this handmade stand gives your sweets the stage they deserve.