Note: This article is prepared as publication-ready HTML and synthesized from publicly available electronics, optics, and chemistry information without inserting source links.
Most of us think we know what glows in the dark: toy stars stuck to a bedroom ceiling, emergency signs, novelty stickers, and maybe that one suspiciously radioactive-looking Halloween skeleton in the garage. But a homebrew phosphorescence detector takes that familiar childhood magic and gives it a proper lab coat. Instead of simply asking, “Can I see it glow?” the device asks a better question: “Does this object keep emitting light after ultraviolet excitation, and if so, how fast does that glow fade?”
That distinction matters. Human eyes are charming instruments, but they are also lazy, noisy, and easily fooled by bright UV reflections, room light leaks, and wishful thinking. A homemade detector built around a dark chamber, ultraviolet LEDs, photodiodes, analog amplification, and a microcontroller can catch afterglow events that vanish in microseconds or milliseconds. In other words, it can spot the glow before your eyeballs have even finished saying, “Wait, was that something?”
The project is a wonderful example of kitchen-table science meeting serious electronics. It begins with everyday curiosityfoods, plastics, minerals, paper, fabrics, and household products can all behave strangely under UV lightand then marches straight into the deep end of photodiode capacitance, transimpedance amplifiers, signal noise, ADC resolution, and optical shielding. Fun? Absolutely. Simple? Only in the same way a cat is “simple” until it knocks a glass off the counter while maintaining eye contact.
What Is A Homebrew Phosphorescence Detector?
A homebrew phosphorescence detector is a DIY instrument designed to measure faint light emitted by a material after it has been excited by another light source, usually ultraviolet light. The core idea is easy to describe: place a sample in a light-tight chamber, blast it briefly with UV LEDs, turn the LEDs off, and measure any lingering afterglow with a sensitive light detector.
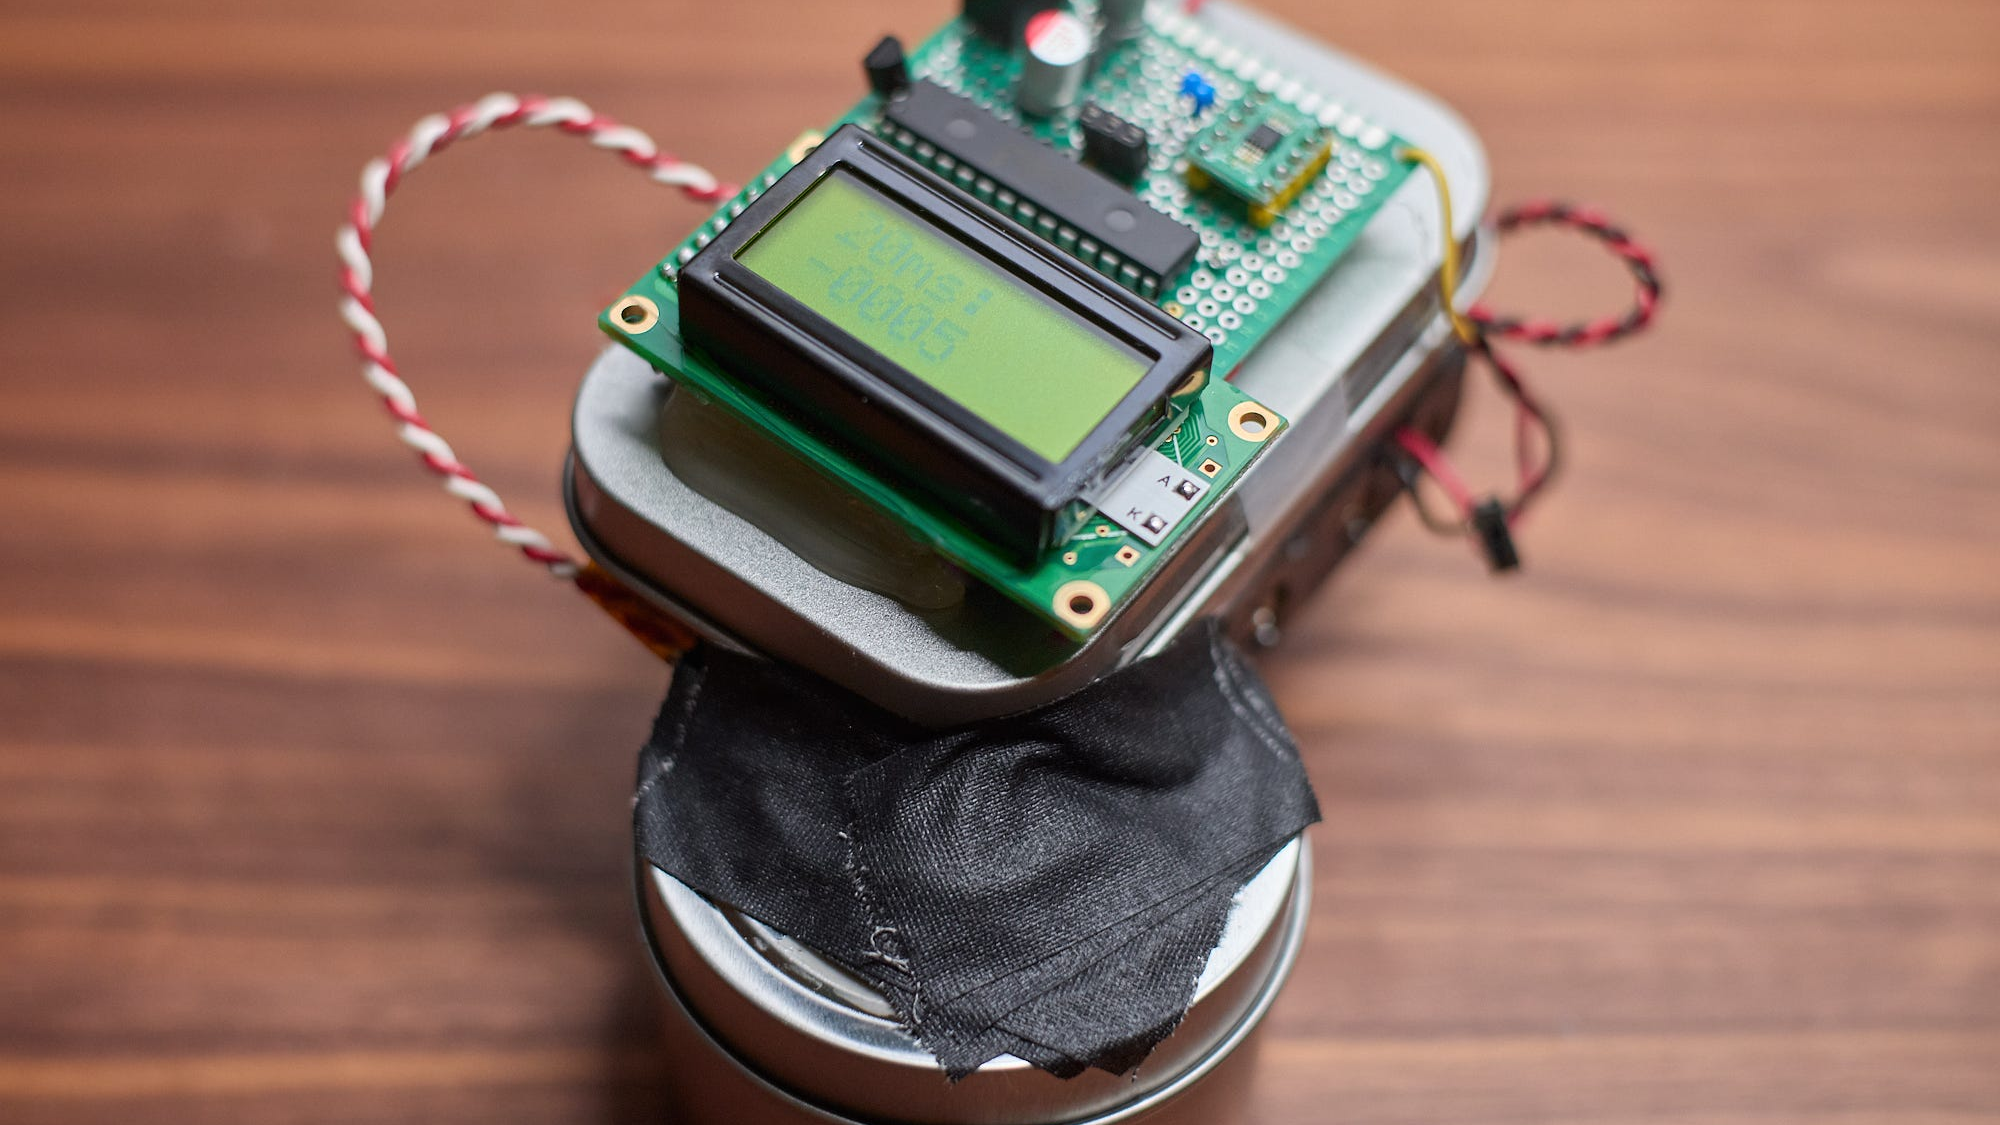
The “homebrew” part does not mean crude. In fact, the most interesting versions of this project use techniques that would feel familiar in a small optics lab. A photodiode converts incoming light into current. A transimpedance amplifier converts that tiny current into a measurable voltage. A microcontroller coordinates the timing of UV pulses and sensor readings. An analog-to-digital converter records the signal so the decay curve can be displayed, logged, or compared across samples.
The result is not merely a yes-or-no glow test. It is a miniature measurement system that can reveal how strongly an object emits light, how quickly that emission fades, and whether the effect is visible, barely visible, or completely hidden from the naked eye.
Phosphorescence vs. Fluorescence: The Glow Timing Problem
To understand why this detector is so clever, we need to separate two glowing cousins: fluorescence and phosphorescence.
Fluorescence happens when a material absorbs energy, often from UV light, and quickly re-emits part of that energy as visible light. It usually stops almost immediately when the excitation source is removed. This is why tonic water glows blue under a UV lamp but does not continue shining after the lamp is switched off.
Phosphorescence is the slower, more dramatic relative. A phosphorescent material stores some absorbed energy in longer-lived excited states and releases it over time. That delay can last fractions of a second, several seconds, minutes, or even longer depending on the material. This is the science behind glow-in-the-dark stars and safety signs.
The tricky part is that many materials do not glow long enough or brightly enough for a casual observer to notice. Some may show a measurable afterglow for only a few hundred microseconds. Others may fade so quickly that they look non-phosphorescent to the eye while still producing a clean signal on a detector. That is the whole charm of this project: it gives everyday objects a chance to confess their secret glow under interrogation.
How The DIY Detector Works
1. A Light-Tight Chamber Keeps The World Out
The first requirement is darkness. Not “the room lights are off” darkness, but “the detector is not accidentally measuring the refrigerator LED, the window, your phone screen, or the smug reflection from a shiny spoon” darkness. A metal tin, small enclosure, or painted box can become a test chamber if it blocks external light and prevents UV leakage.
Inside the chamber, the sample sits where it can be exposed to UV LEDs and viewed by the photodiode. The geometry matters. If the sensor sees too much direct UV reflection, the measurement may be dominated by glare instead of afterglow. If the sample is too far from the detector, the signal may be too weak. Good mechanical design here is not glamorous, but it is the difference between “scientific instrument” and “box full of lies.”
2. UV LEDs Charge The Sample
Ultraviolet LEDs are commonly used because UV photons carry enough energy to excite many fluorescent and phosphorescent compounds. A common design may use near-UV LEDs around 365 nm or 385 nm. These wavelengths are popular because they are widely available and can excite many household materials without relying on more dangerous UV-C sources.
The detector briefly turns the LEDs on to excite the sample. Then it turns them off and immediately begins measuring. Timing is everything. If the sensor waits too long, fast afterglow may already be gone. If it measures too early, the photodiode and amplifier may still be recovering from the bright excitation pulse.
3. Photodiodes Turn Faint Light Into Current
A photodiode is the detector’s electronic eye. When photons hit it, the diode produces a tiny current proportional to the light level. That current can be extremely small, especially when measuring weak phosphorescence from ordinary household items.
Choosing the photodiode involves a practical trade-off. A larger photodiode catches more light, which improves sensitivity, but it also tends to have higher capacitance, which slows response. A smaller photodiode responds faster but captures fewer photons, so the amplifier has to work harder. A homebrew phosphorescence detector lives right in the middle of this argument, trying to be fast enough for short-lived glow and sensitive enough for faint samples.
4. The Transimpedance Amplifier Does The Heavy Lifting
The current from a photodiode is too small to feed directly into most microcontrollers. That is where a transimpedance amplifier, often called a TIA, enters the stage wearing a cape. A TIA uses an operational amplifier and a feedback resistor to convert photodiode current into voltage.
This sounds simple, but fast low-noise photodiode amplification is one of those engineering tasks that politely says “hello” and then steals your weekend. The feedback resistor sets gain, but higher gain can reduce bandwidth and make the circuit more sensitive to noise. The photodiode’s capacitance can destabilize the amplifier. The op-amp must be fast enough, quiet enough, and happy with the chosen supply voltage. Layout matters. Shielding matters. Grounding matters. Even nearby household lighting can inject unwanted signals if the analog front end is not protected.
That is why the best homebrew builds tend to place the amplifier close to the sensor, use short leads, separate noisy digital circuits from sensitive analog sections, and shield the front end inside metal. It is not overkill. It is survival.
Why Measuring Afterglow Is Harder Than It Looks
The detector is chasing a signal that is faint, fast, and surrounded by distractions. Several problems appear almost immediately.
First, the excitation light is bright compared with the afterglow. When the UV LEDs are on, reflected light can flood the sensor. After the LEDs turn off, the circuit needs to recover quickly enough to measure what happens next.
Second, the power supply can misbehave. High-current UV LEDs may cause tiny voltage dips or ripple. If the analog reference or amplifier bias shares that same noisy rail, the detector may amplify power-supply drama instead of sample phosphorescence. Nobody wants to publish a graph titled “The Mysterious Glow of My Cheap Wall Adapter.”
Third, photodiodes themselves have response quirks. A photodiode signal is not always a perfect instant-on, instant-off event. Charge carriers generated outside the depletion region can contribute slower diffusion current after the light source has been removed. That lingering response can mimic weak afterglow unless the software compensates for it.
Finally, household radio-frequency interference can sneak into high-gain circuits. Long wires behave like antennas. Digital switching edges create noise. Fluorescent lights, LED drivers, and nearby electronics can add bumps and spikes. A detector that wants to measure tiny light levels has to be a bit antisocial: short wires, shielding, filtering, and careful timing are its preferred social circle.
Everyday Objects That May Surprise You
The best part of a homebrew phosphorescence detector is the scavenger hunt. Once the instrument works, the whole house becomes a sample library.
Glow-In-The-Dark Plastics
Commercial glow-in-the-dark toys often use phosphors such as zinc sulfide or strontium aluminate compounds. Zinc sulfide has a classic greenish glow but may fade relatively quickly. Strontium aluminate materials can be brighter and longer lasting. A detector can show not just whether the object glows, but how steeply the brightness falls after excitation.
Powdered Milk And Gelatin
Some food products can produce unexpected afterglow. Powdered milk and gelatin have been observed in DIY testing to show measurable phosphorescent behavior, although typically far weaker than purpose-made glow materials. The effect may be faint enough that it is only visible in total darkness or for a brief moment after UV exposure.
This is where the detector becomes more than a novelty. To the naked eye, powdered milk is mostly an ingredient that exists to make emergency pantry shelves feel responsible. Under careful measurement, it becomes a photophysical suspect with a tiny afterglow signature.
Minerals And Gemstones
Minerals are famous for unusual optical behavior. Some fluoresce vividly under UV light; others may show delayed emission. Ruby, for example, owes its red color and fluorescence to chromium ions in aluminum oxide. Depending on the sample and excitation conditions, mineral specimens can produce striking signals. A homebrew detector can help compare stones that look nearly identical in normal light but behave very differently after excitation.
Paper, Detergent, And Fabrics
Many white papers and laundry products contain optical brighteners. These compounds absorb ultraviolet light and emit visible blue light, making materials appear whiter and brighter. This is mostly fluorescence rather than phosphorescence, but it is still a useful lesson: not every glow is afterglow. A good experiment distinguishes between light emitted only during UV exposure and light that continues after the UV source is removed.
Tonic Water, Vitamins, And Cooking Oils
Tonic water glows because quinine fluoresces under UV. Riboflavin, also known as vitamin B2, can glow yellow-green. Olive oil and other kitchen substances may show fluorescence due to naturally occurring compounds. Again, these are excellent classroom-style demonstrations, but a phosphorescence detector adds a stricter test: does the glow continue after the UV goes dark?
What The Decay Curve Tells Us
A detector’s real prize is the decay curve. This graph shows brightness over time after excitation stops. A strong phosphorescent material may begin with a high signal and fade gradually. A weak or short-lived sample may drop sharply. A material with multiple emission pathways may show a curve with several slopes instead of one clean exponential falloff.
For DIY purposes, the decay curve helps sort objects into practical categories. Some are bright enough for visible glow. Some are measurable but not eye-visible. Some produce only fluorescence during excitation and no meaningful afterglow. Some produce signals that are probably artifacts caused by sensor recovery, reflection, or noise.
That last category is important. Good measurement is not about forcing the universe to be interesting. It is about letting boring results be boring. Almond butter that does not phosphoresce is still useful data. It simply means almond butter has chosen a quiet life, and honestly, who can blame it?
Safety Notes For UV Experiments
Ultraviolet light deserves respect. Even when using near-UV LEDs rather than UV-C lamps, users should avoid looking directly into UV sources or exposing skin unnecessarily. UV radiation can be invisible or dim-looking while still posing risks to eyes and skin. A closed chamber, interlock switch, protective eyewear rated for the wavelength in use, and sensible operating habits are all wise additions.
Do not use open UV-C disinfection lamps for casual experiments. UV-C can injure eyes and skin quickly, and many consumer devices lack adequate safety features. For a homebrew phosphorescence detector, the goal is controlled excitation, not recreating a tiny tanning salon for powdered milk.
Why This Project Matters
The homebrew phosphorescence detector is appealing because it combines curiosity with discipline. It begins as a playful question about hidden glow but quickly becomes a lesson in measurement science. The builder has to think about optics, chemistry, electronics, timing, noise, shielding, software filtering, and data interpretation.
It also shows why instruments matter. Our senses are wonderful, but they are not neutral. We see bright things more easily than dim things. We miss events that happen too fast. We confuse fluorescence with phosphorescence. A simple detector extends perception beyond the limits of human vision and turns “I think I saw something” into “Here is the signal, here is the timing, and here is the decay.”
That is the spirit of great DIY science. It does not require a million-dollar laboratory. It requires a question, a test method, enough humility to debug your own assumptions, and maybe a metal candy tin that has been promoted to scientific equipment.
Conclusion
A homebrew phosphorescence detector looks for the glow in everyday objects by doing what eyes cannot: measuring faint, short-lived afterglow immediately after UV excitation. It turns common materials into test samples and transforms a dark box into a small optical laboratory. Along the way, it teaches a surprisingly rich set of lessons about photoluminescence, photodiodes, transimpedance amplifiers, ADC sampling, signal noise, UV safety, and experimental design.
For hobbyists, educators, makers, and science-curious families, the project is more than a glowing gadget. It is a reminder that the ordinary world is full of hidden behavior. Powdered milk, gelatin, minerals, plastics, paper, and fabrics may all have optical secrets waiting for the right tool to reveal them. Some objects shine brightly. Some whisper briefly. Some refuse to perform. All of them make the experiment better.
Personal Experience: What Building Or Using A Glow Detector Teaches You
The first thing you learn from a project like a homebrew phosphorescence detector is that darkness is not as dark as you think. A room that feels pitch black to your eyes may still be a carnival for a photodiode. A tiny crack around the lid, a power indicator LED, or a phone screen across the table can sneak into the data and make a harmless household object look like it is auditioning for a science-fiction movie. The practical lesson is simple: before testing exotic samples, test the box. Close it empty. Take baseline readings. Wiggle the lid. Turn nearby lights on and off. The detector will tell you whether your “dark chamber” is actually dark or just emotionally committed to the idea.
The second lesson is that electronics has a sense of humor, and it is not always kind. You may expect the first working circuit to produce clean, beautiful decay curves. Instead, it may produce spikes, hum, slow settling, or a suspicious signal that appears only when the washing machine is running. This is where the project becomes genuinely educational. You start shortening wires, improving grounds, shielding the amplifier, separating LED power from analog power, and adding filtering. Each improvement feels small, but together they turn the instrument from a nervous squirrel into a useful detector.
Testing everyday objects is the reward. Glow-in-the-dark plastic is the easy win, the sample you use when you need reassurance that the detector is not just a very complicated paperweight. Then come the kitchen tests. Powdered milk, gelatin, oils, spices, vitamins, and paper labels all become candidates. Some give visible fluorescence under UV but no afterglow. Some show a faint tail after the light switches off. Some do absolutely nothing, which is scientifically valid but emotionally rude.
One of the most enjoyable parts is comparing what your eyes think with what the detector records. A bright fluorescent object can look impressive while the UV is on, then vanish instantly when the lamp turns off. Another object may seem dull but leave a measurable afterglow. That difference trains you to stop trusting dramatic appearances and start trusting timing. In a world full of shiny distractions, that is not a bad life skill.
The project also encourages careful note-taking. Write down the sample, UV exposure time, distance, LED wavelength, room conditions, and detector settings. Otherwise, you will eventually discover a weird glow, fail to record the details, and spend the next afternoon muttering at a jar of pantry powder like it owes you money. Good experiments are repeatable experiments.
Most of all, using a phosphorescence detector changes the way you look at ordinary things. A plastic toy, a mineral chip, a sheet of printer paper, or a spoonful of gelatin becomes a possible optical story. The detector does not make the world magical; it proves the magic was already there, hiding below the threshold of casual vision.