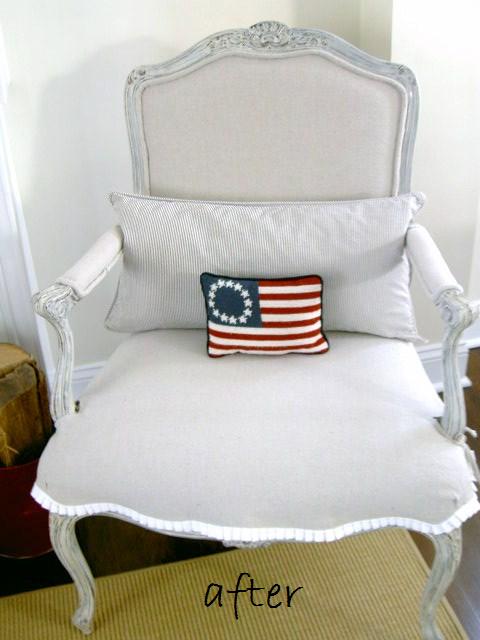
Every home has one: the armchair that has survived movie nights, coffee spills, pets with strong opinions, and that one guest who sits like they are testing furniture for a demolition company. It may be faded, scratched, slightly wobbly, or wearing upholstery that looks like it remembers dial-up internet. The good news? You do not need to send it to furniture retirement. With a smart plan, a few low-cost materials, and a little patience, an easy armchair makeover for $30 can turn a tired chair into a charming, comfortable accent piece.
This guide focuses on a practical, budget-friendly armchair refresh rather than a full professional reupholstery job. Think cleaning, tightening, painting exposed wood, refreshing fabric, adding trim, and using affordable fabric or slipcover tricks. The goal is not perfection that belongs in a museum. The goal is a chair that looks intentional, feels cleaner, works with your room, and does not make guests ask, “Was this rescued from a haunted porch?”
Why a $30 Armchair Makeover Is Totally Possible
A full upholstery service can cost hundreds of dollars, especially if the chair has complex curves, deep tufting, springs, piping, and multiple cushions. A DIY armchair makeover is different. You are using low-cost improvements to create the biggest visible change. The secret is choosing the right chair and the right makeover method.
The best candidates are structurally sound chairs with cosmetic problems. If the frame is sturdy, the seat still supports weight, and the chair only looks outdated, stained, scratched, or boring, you are in business. If the frame is cracked, the springs are broken, or the cushion has collapsed into pancake territory, your $30 may disappear faster than snacks at a family gathering.
Before You Start: Inspect the Armchair Like a Pro
Before buying anything, inspect the chair carefully. Wiggle the arms, legs, and back. Sit down slowly and listen for creaks, pops, or dramatic sounds that suggest the chair is auditioning for a horror movie. Tighten visible screws, check the underside, and look for loose staples, torn dust cover fabric, or exposed foam.
Next, identify the material. A fabric armchair, wood-arm chair, cane chair, faux-leather chair, and velvet chair all need different treatment. Fabric upholstery should be checked for cleaning codes when possible. A “W” code usually means water-based cleaning is acceptable. “S” means solvent-based cleaner only. “W-S” allows either method. “X” means vacuum only or professional cleaning. When the tag is missing, test any cleaner on a hidden area first.
The $30 Budget Breakdown
Here is a realistic budget for a simple armchair makeover. Prices vary by store, location, coupons, and what you already own, but this plan keeps the project lean and beginner-friendly.
| Item | Estimated Cost | Purpose |
|---|---|---|
| Thrifted fabric, drop cloth, curtain panel, or remnant | $8-$12 | Seat cover, cushion wrap, or back panel refresh |
| Paint sample, chalk-style paint, or spray paint | $5-$8 | Refresh exposed wood, legs, or trim |
| Sandpaper or sanding sponge | $3-$5 | Prep glossy or scratched surfaces |
| Staples, fabric glue, or upholstery tacks | $4-$6 | Secure fabric and finish edges |
| Trim, ribbon, cord, or nailhead-style detail | $4-$6 | Hide staples and add personality |
| Optional cleaner or baking soda | $0-$4 | Remove odors and surface grime |
This budget assumes you already have basic tools such as scissors, a screwdriver, a cloth, and possibly a staple gun. If you do not own a staple gun, borrow one, rent one, or choose a no-sew slipcover method using fabric ties, safety pins hidden underneath, or fabric glue in low-stress areas.
Step 1: Deep Clean Before You Decorate
Never makeover dirt. That is not design; that is camouflage. Start by vacuuming the armchair thoroughly with a brush attachment. Get into seams, under the cushion, around buttons, and along the arms. If the chair smells musty, sprinkle baking soda lightly over fabric areas, let it sit for 20 to 30 minutes, then vacuum again.
For water-safe upholstery, mix a tiny amount of mild dish soap with warm water, dampen a microfiber cloth, and blot stains gently. Do not soak the fabric. Too much moisture can create water rings, loosen adhesives, or encourage mildew inside the cushion. For solvent-only fabrics, use an appropriate upholstery solvent and work in a ventilated area. Always spot-test first because fabric dye can be a drama queen.
Step 2: Tighten, Patch, and Stabilize
A makeover should improve function as well as style. Flip the chair carefully and tighten screws or bolts. If a wooden joint is slightly loose, a small amount of wood glue can help, but clamp it firmly and let it dry before using the chair. Replace missing floor glides or add felt pads to protect floors.
If the underside dust cover is torn, trim away dangling fabric or replace it with inexpensive black fabric, landscape fabric, or a sturdy scrap. This small fix makes the chair look cleaner from every angle. It also prevents loose threads from hanging down like the chair has grown a beard.
Step 3: Refresh the Wood or Legs
Paint is one of the cheapest ways to transform an old armchair, especially if it has exposed wooden arms, legs, or trim. Lightly sand glossy wood with a sanding sponge so the paint can grip. Wipe away dust with a damp cloth and let the surface dry. For dark, slick, or stained wood, primer helps the finish last longer.
Choose a color that works with your room. Black makes an old chair look modern. Warm white gives a cottage feel. Deep green or navy adds a designer look without the designer invoice. For a vintage effect, use chalk-style paint and lightly distress raised edges after it dries. For a cleaner modern finish, use satin or semigloss paint and apply thin coats rather than one gloopy coat that looks like frosting gone wrong.
Step 4: Give the Seat a Fabric Facelift
If your armchair has a removable seat cushion, this is the easiest part. Remove the cushion, wrap it with new fabric, pull the fabric tight, and secure it underneath with staples or fabric-safe adhesive. Keep the pattern straight and smooth the fabric from the center outward. Corners should be folded neatly, almost like wrapping a gift for someone who notices corners.
If the cushion is attached, you can still refresh it. Cut a piece of fabric large enough to cover the seat with several inches of extra material on all sides. Tuck it deeply into the cracks between the seat, arms, and back. Secure the excess underneath where possible. For a temporary renter-friendly solution, use upholstery pins or hidden safety pins under the cushion line.
Step 5: Use Paint or Dye Carefully on Upholstery
Painting fabric can work, but it is not always the best solution. Smooth, tightly woven upholstery usually responds better than thick velvet, chenille, or heavily textured fabric. If you choose fabric paint, use thin layers and let each coat dry fully. A fabric medium can help keep the finish more flexible. Heavy paint can make upholstery feel stiff, crunchy, or like sitting on a painted cracker.
Fabric dye is another option, but it works best when changing a lighter fabric to a darker color. Dye usually cannot turn a dark chair into a pale beige beauty. For a $30 makeover, fabric wrapping, a partial slipcover, or a decorative throw often gives a softer and more reliable result.
Step 6: Add Trim for a Finished Look
Trim is the magic trick of budget furniture makeovers. It hides staples, uneven fabric edges, and small sins committed in the name of creativity. Use braided cord, ribbon, nailhead trim, bias tape, or even a narrow strip of contrasting fabric. Attach it with fabric glue, hot glue in low-touch areas, or upholstery tacks.
Place trim along the bottom edge of the seat, around the arms, or where new fabric meets old upholstery. Keep it simple. Too much trim can make the chair look like it joined a parade. One or two clean lines are usually enough to make the makeover look polished.
Step 7: Style the Chair So It Looks Intentional
After the hands-on work is complete, style the chair. Add a small pillow, a throw blanket, or a nearby side table. A pillow is especially useful if the back fabric is still original but the seat has been updated. It creates visual balance and makes the makeover look planned rather than patched.
Think about contrast. A neutral chair can handle a patterned pillow. A patterned chair often looks better with a solid throw. If the chair is bold, keep surrounding decor calm. If the chair is plain, let accessories bring the personality. This is the part where your chair stops looking “rescued” and starts looking “curated.” Very fancy. Very budget. Very satisfying.
Common Mistakes to Avoid
Skipping the Cleaning Step
Dust, body oils, and old stains can interfere with paint, glue, and fabric placement. Cleaning first gives every other step a better chance of success.
Choosing Fabric That Is Too Thin
Thin fabric may show the old pattern underneath or wear quickly. Look for sturdy cotton, canvas, denim, upholstery remnants, curtain panels, or drop cloth fabric.
Forgetting About Pattern Direction
Stripes, florals, and geometric prints must be aligned before stapling. Crooked fabric can make the whole chair look dizzy.
Using Too Much Paint
Thick coats chip, drip, and dry slowly. Thin coats are smoother, stronger, and more professional-looking.
Expecting Professional Upholstery for $30
This is a cosmetic refresh, not a full rebuild. Know the difference and your project will feel successful instead of stressful.
Easy Design Ideas for a $30 Armchair Makeover
For a farmhouse look, use a canvas drop cloth for the cushion, paint the legs warm white, and add a striped pillow. For a modern look, choose black paint for the frame and a solid neutral fabric for the seat. For a boho look, use a patterned curtain panel, add tassel trim, and place a textured throw over one arm.
If you love vintage style, keep some of the chair’s age visible. Lightly distressed arms, antique brass tacks, and floral fabric can make the piece feel charming rather than old. If you prefer minimalist style, avoid busy patterns and choose clean lines, matte paint, and one simple pillow.
When Not to DIY the Armchair
Some chairs are better left to professionals or skipped entirely. Avoid DIYing a chair with a broken frame, severe mold, pest damage, crumbling foam, or strong odors that remain after cleaning. Also think twice before painting or altering valuable antiques. A $30 makeover is wonderful for thrift-store finds, hand-me-downs, and forgotten corners. It is less wonderful when it accidentally destroys a collectible piece.
Experience Notes: What Actually Happens During a Budget Armchair Makeover
The first thing you learn during an armchair makeover is that chairs have more crumbs than seems scientifically possible. Even a chair that looks clean can hide dust, popcorn, pet hair, and mysterious tiny objects in the seams. Vacuuming slowly makes a huge difference. It also gives you time to understand the chair’s construction before you start pulling, painting, or stapling.
The second lesson is that fabric choice matters more than most beginners expect. A beautiful thin fabric may look amazing in your hand, but once stretched over old upholstery, it can reveal every bump, shadow, and pattern underneath. Heavier cotton, canvas, or upholstery remnants are much more forgiving. A curtain panel from a clearance bin can be a secret weapon because it often provides plenty of fabric for a low price.
Another real-world discovery: corners are where confidence goes to be tested. The flat parts of a cushion are easy. The corners require folding, refolding, muttering, and possibly making a cup of coffee before trying again. The best approach is to pull the center of each side first, staple or secure it, then work gradually toward the corners. This keeps the fabric smoother and prevents one side from stealing all the tension.
Painting the legs or arms can feel like a small detail, but it often creates the biggest “before and after” effect. Scratched brown wood can make a chair look heavy and dated. A fresh coat of black, cream, sage, or navy can instantly modernize it. The key is patience. Sand lightly, clean the dust, use thin coats, and let the paint dry. Touching paint too early is how fingerprints become part of the design, whether you invited them or not.
Budget projects also teach creativity. If you do not have enough fabric to cover the whole chair, cover only the seat and use a coordinating pillow on the back. If the arms are worn, drape a throw blanket over one side. If staples show, add trim. If the cushion still looks a little flat, add a plump pillow and call it layered styling. Interior designers do this all the time; they just say it with more confidence.
The most satisfying part is that the chair becomes personal. It is not just furniture anymore. It is the piece you rescued, cleaned, argued with, improved, and finally placed proudly in the room. A $30 armchair makeover will not always be flawless, but it can be charming, functional, and full of character. Best of all, every time someone compliments it, you get to say, “Thanks, I did it myself,” which is basically the DIY version of a trophy.
Conclusion
An easy armchair makeover for $30 is about smart upgrades, not expensive perfection. Clean the chair thoroughly, fix small structural issues, refresh exposed wood with paint, use affordable fabric where it matters most, and finish the edges with trim. The project works best when you choose a sturdy chair with cosmetic flaws and focus your budget on high-impact changes.
Whether your style is farmhouse, modern, vintage, colorful, or “I found this chair and believed in it,” a budget armchair makeover can give old furniture a second life. It saves money, reduces waste, and adds a custom piece to your home. Plus, it gives you an excellent excuse to walk around saying, “I upholster now,” even if you mostly stapled fabric while hoping for the best.
Note: This article is designed for web publishing and synthesizes practical DIY guidance from real furniture cleaning, upholstery, painting, and home-improvement best practices. Prices are approximate and may vary by store, location, and materials already available at home.