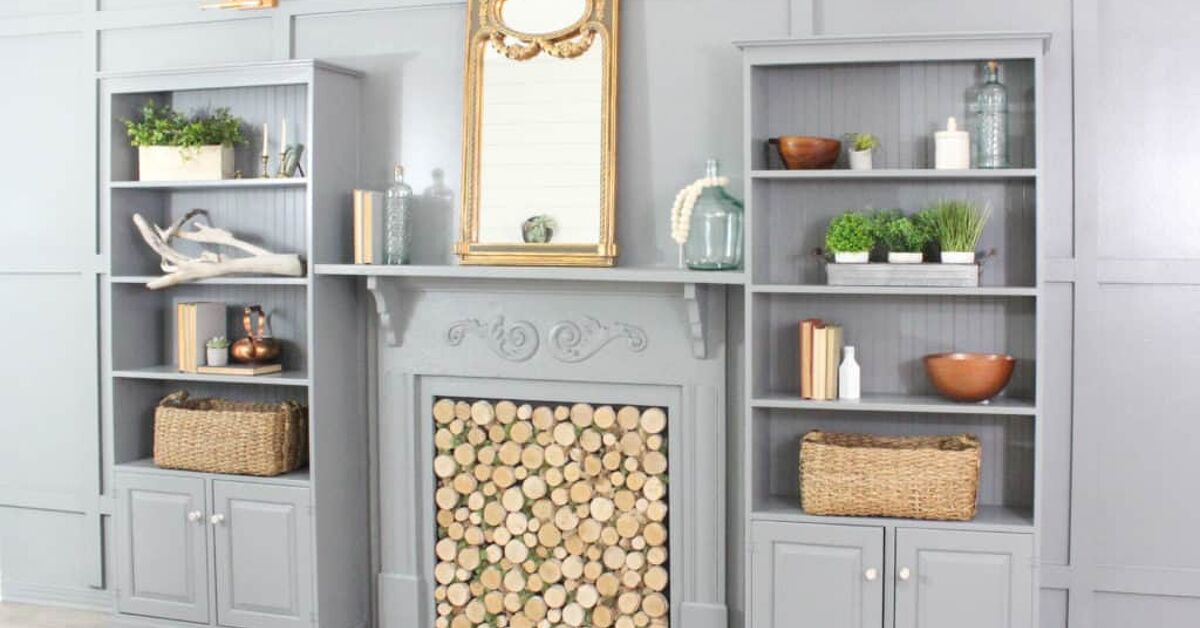
Note: This article is written for publication and blends practical DIY guidance, design inspiration, and real-world project experience for homeowners who want a custom-looking built in bookshelf wall without hiring a full millwork crew.
Why a DIY Feature Wall of Built In Bookshelves Is Worth the Sawdust
A DIY feature wall of built in bookshelves is one of those home projects that makes guests pause, tilt their heads, and say, “Wait, was this always here?” That is the magic trick. A good built in bookshelf wall looks original to the house, even if yesterday the same wall held one lonely outlet, a pile of tangled charger cords, and a decorative basket pretending to have a purpose.
Built in bookshelves are more than a place to store novels, photo albums, board games, baskets, speakers, keepsakes, and that one candle you are “saving for company.” They create architecture. They frame a room. They turn a blank wall into a focal point with storage, style, and personality. Whether you are building around a fireplace, flanking a window, filling a home office wall, or upgrading a living room, a bookshelf feature wall can make a basic space feel layered, intentional, and custom.
The best part? You do not always need to build every inch from scratch. Many homeowners create a high-end look by combining stock cabinets, ready-made bookcases, plywood, trim, crown molding, baseboards, paint, and clever caulk work. The result can look like custom cabinetry, but the process is more approachable than traditional furniture making. In other words, you can get the “old library in a charming brownstone” effect without needing a secret inheritance or a woodworking degree.
Planning Your Built In Bookshelf Feature Wall
Before buying lumber, sketch your wall. Measure the width, height, depth, baseboard height, outlet locations, ceiling slope, window trim, vents, and anything else that could interfere with the build. This is where the project is won or lost. A built in wall should look balanced, not like three bookcases got nervous and huddled in a corner.
Start by deciding how the feature wall should function. Do you need deep lower cabinets for hidden storage? Open shelves for books and display pieces? A center section for a TV? A desk? A reading bench? A dry bar? A library ladder? Dream boldly, then let your tape measure gently bring everyone back to reality.
Common Built In Bookshelf Layouts
Wall-to-wall bookshelves work beautifully in living rooms, dens, bedrooms, and offices. This layout creates the most dramatic feature wall and gives you maximum storage.
Fireplace built ins use bookshelves on both sides of a fireplace or mantel. The goal is symmetry, although asymmetrical shelves can look modern when designed intentionally.
Window seat built ins combine shelving with a bench under a window. This is ideal for a cozy reading nook and gives you bonus storage below the seat.
Bookcase entertainment walls place the TV in the center with shelves around it. This works best when cord management and ventilation are planned early.
Office built ins may include a desk, file drawers, printer storage, closed cabinets, and open display shelves. This design is especially useful for remote work spaces that need to look polished on video calls.
Materials and Tools You May Need
Your material list depends on whether you build from plywood, hack ready-made bookcases, or combine cabinets and shelving. Many DIYers use 3/4-inch plywood for sturdy cabinet boxes and shelves, 1x boards for face frames, MDF or primed pine for trim, and stock base cabinets for the lower section. Ready-to-assemble bookcases can also work well when they are securely anchored and finished with trim.
Typical Materials
- Ready-made bookcases, stock cabinets, or 3/4-inch plywood
- 1×2, 1×3, or 1×4 boards for face frames and trim
- Baseboard, crown molding, and decorative molding
- Wood glue, screws, brad nails, and construction adhesive
- Shims for leveling uneven floors and walls
- Caulk, wood filler, primer, and paint
- Shelf pins or fixed shelf supports
- Wall anchors or screws long enough to reach studs
- LED picture lights, puck lights, or strip lighting if desired
Helpful Tools
- Tape measure and pencil
- Level or laser level
- Stud finder
- Miter saw or circular saw
- Drill and driver bits
- Brad nailer or hammer and finish nails
- Clamps
- Sander or sanding block
- Caulk gun
- Paint brush, roller, or sprayer
A laser level is not mandatory, but it can save your sanity. Walls and floors are rarely perfectly square. Houses settle. Drywall bows. Ceilings wave. A feature wall exposes every tiny crooked line, so patience and shims are your new best friends.
Step-by-Step Guide: How to Build a DIY Feature Wall of Built In Bookshelves
Step 1: Measure Twice, Then Measure the Wall That Lied to You
Measure the wall width at the top, middle, and bottom. Measure the height on the left, center, and right. Do not assume all numbers match. If your house is older, the wall may have more personality than your favorite aunt. Use the smallest measurement when planning tight-fitting sections, and leave room for trim to cover small gaps.
Mark studs with painter’s tape. Built in bookshelves must be secured to framing, especially if they hold heavy books or climb toward the ceiling. Safety is not the glamorous part of the project, but neither is explaining why your bookshelf tried to become a coffee table.
Step 2: Choose the Base
The lower section determines the visual weight of the feature wall. Stock base cabinets are a popular option because they provide closed storage and a finished structure. You can also build a platform from 2x4s and plywood, then place bookcases or custom shelf boxes on top.
If you are using ready-made cabinets, set them in place and level them with shims. Secure them to studs and to each other. Add a plywood countertop or a finished wood surface above the cabinets. This creates a clean transition between hidden storage below and open shelves above.
Step 3: Build or Install the Shelf Towers
For a from-scratch build, create vertical bookshelf boxes from plywood or 1x boards. Each unit usually includes two side panels, a top, a bottom, and shelves. Fixed shelves add strength, while adjustable shelves give flexibility for tall books, baskets, speakers, and decorative objects.
If you are using pre-made bookcases, remove flimsy backing if needed and reinforce the units. Place them on the base, check for level and plumb, then attach them to wall studs. The secret to making basic bookcases look built in is not the bookcase itself; it is the trim, face frame, paint, and careful alignment.
Step 4: Add Face Frames for a Custom Look
Face frames are the front boards that cover raw shelf edges, seams, and gaps between units. They make separate pieces look like one continuous built in wall. Use straight boards, cut carefully, and attach them with wood glue and brad nails. A wider vertical stile between bookcase sections can create a substantial custom millwork look.
This is also where proportions matter. Thin trim can look delicate and modern, while thicker trim feels traditional and substantial. If your room already has chunky baseboards or crown molding, echo that scale so the bookshelves feel like part of the house.
Step 5: Install Baseboard and Crown Molding
Baseboard helps the lower cabinets or shelf base blend with the room. Crown molding at the top hides gaps near the ceiling and makes the wall look finished. If your ceiling is uneven, crown molding is basically a tiny architectural cape that hides the drama.
Cut trim with a miter saw and test-fit pieces before nailing. Fill nail holes, caulk seams, and sand rough spots. These finishing details separate “weekend project” from “custom built in bookshelves that came with the house.”
Step 6: Handle Outlets, Cords, and Lighting
If your wall has outlets, do not bury them behind permanent cabinetry without a plan. You may need an electrician to move outlets, add new ones, or install lighting safely. For entertainment walls, run cords through cable management channels or behind removable panels. For shelf lighting, consider picture lights, puck lights, or LED strips installed before painting.
Lighting gives built in bookshelves depth. It highlights books, art, ceramics, plants, and family photos. Even simple battery-operated picture lights can make the wall feel designed instead of merely constructed.
Step 7: Prime, Paint, and Let the Caulk Earn Its Keep
Primer is especially important if you are painting raw wood, MDF, or laminate bookcases. Choose a durable interior paint finish such as satin, semi-gloss, or enamel-style cabinet paint. White built ins are classic, but deep green, navy, charcoal, mushroom, warm beige, and even soft pink can turn a bookshelf wall into a statement.
For a seamless look, paint the shelves, trim, wall behind the shelves, and cabinets the same color. For contrast, use wallpaper or beadboard on the back panels. Small-pattern wallpaper often works better inside shelf openings than oversized prints because the design remains readable in tight spaces.
Design Ideas That Make Built In Bookshelves Feel Expensive
Paint Everything One Color
Color drenching is one of the easiest ways to make DIY built ins look intentional. When the shelves, trim, and surrounding wall share the same color, the entire feature wall reads as architecture rather than furniture.
Mix Open and Closed Storage
Open shelves are beautiful, but not everything in life deserves a spotlight. Board games, printer paper, tangled cords, craft supplies, pet toys, and mystery remotes are happier behind doors. Lower cabinets or baskets keep visual clutter under control.
Add Wallpaper or Beadboard Backs
A patterned or textured back panel creates depth and personality. Wallpaper can make a bookshelf feel playful, elegant, or dramatic, while beadboard adds cottage charm. Paintable textured panels are also forgiving if your wall is not perfectly smooth.
Use Adjustable Shelves
Adjustable shelves are practical because your storage needs change. Today you may display paperbacks and framed photos. Next year you may need room for oversized cookbooks, baskets, or a suspiciously large collection of vintage cameras. Shelf pin holes provide flexibility without rebuilding the unit.
Build Around the Room’s Best Feature
A built in bookshelf wall works beautifully around fireplaces, windows, doorways, beds, and desks. Framing an existing feature makes the project feel natural. It also helps solve awkward wall space that would otherwise become a parking lot for random furniture.
How to Style Built In Bookshelves Without Creating Visual Chaos
Once the paint dries, the temptation is to fill every inch immediately. Resist. A bookshelf needs breathing room. Start with books, then layer in art, framed photos, baskets, plants, ceramics, boxes, and personal objects. The goal is collected, not crammed.
Try mixing vertical rows of books with horizontal stacks. Place a small object on top of a stack. Use larger pieces instead of dozens of tiny trinkets. Repeat colors across shelves so the wall feels cohesive. Leave a few empty spaces so the eye can rest. Yes, empty space counts as design. It is not laziness; it is visual sophistication wearing sweatpants.
Simple Shelf Styling Formula
- Start with books in different orientations.
- Add one larger object per shelf section.
- Layer framed art or photos toward the back.
- Use baskets for hidden storage.
- Repeat two or three colors throughout the wall.
- Step back often and edit.
Common Mistakes to Avoid
Skipping the Studs
Built ins must be anchored securely. Books are heavy. A full bookshelf wall can carry serious weight, so attach the structure to studs whenever possible. Use proper fasteners and do not rely on drywall alone for major support.
Ignoring Shelf Sag
Long shelves can bow under weight. Use thicker material, add front trim for stiffness, shorten spans with vertical dividers, or choose stronger plywood. If you own many hardcovers, design for real weight, not imaginary minimalist books that all weigh three ounces and match the room.
Forgetting About Baseboards and Crown
Existing trim affects how your built ins sit against the wall. Remove baseboards behind the unit or build around them intentionally. At the ceiling, crown molding can hide gaps and create a finished look.
Painting Too Soon
Do not rush sanding, caulking, filling nail holes, and priming. Paint magnifies sloppy prep. A smooth finish begins before the first coat ever touches the wood.
Budget Tips for a DIY Built In Bookshelf Wall
A custom bookshelf wall can be expensive when hired out, but DIY gives you control over the budget. Ready-made bookcases are often the most affordable starting point. Stock cabinets can save time on the base. Plywood offers strength and customization at a moderate cost. MDF trim paints beautifully and is usually less expensive than stain-grade hardwood.
Spend money where it shows: straight trim, quality paint, sturdy shelf material, attractive hardware, and lighting. Save where you can: hidden framing, simple cabinet boxes, basic shelves, and secondhand decor. A built in feature wall does not need to be extravagant to look polished. It needs good proportions, clean lines, secure installation, and thoughtful finishing.
Best Rooms for a Built In Bookshelf Feature Wall
Living Room
A living room bookshelf wall can frame a TV, fireplace, sofa, or art piece. It adds warmth and storage while making the room feel complete.
Home Office
Built ins in a home office create a professional backdrop and provide storage for books, files, supplies, and equipment. Add closed cabinets below to hide the less photogenic parts of productivity.
Bedroom
Bookshelves around a bed can act like a custom headboard wall. Add sconces, cabinets, and display shelves for a cozy boutique-hotel feeling.
Dining Room
A dining room built in can store dishes, glassware, serving pieces, cookbooks, and bar accessories. Glass doors or reeded inserts can make the design feel elevated.
Kids’ Room or Playroom
Lower shelves keep books and toys accessible. Closed bins help hide chaos when cleanup time becomes a negotiation worthy of a courtroom drama.
Real-Life Experience: Lessons From Building a DIY Feature Wall of Built In Bookshelves
The biggest lesson from a DIY feature wall of built in bookshelves is that the project is not one giant task. It is a parade of small tasks wearing a trench coat. Measuring is one task. Leveling is another. Cutting filler strips is another. Caulking seams is another. Painting inside shelf corners is another. By the end, you will know your wall more intimately than any human should know drywall.
One practical experience many DIYers share is that the wall will not be square, even if it looks innocent. The floor may dip near one corner. The ceiling may slope slightly. The side wall may bow. This is normal. The solution is not panic; it is shims, filler strips, trim, and patience. Build the structure level and plumb, then use finish materials to make the room’s imperfections disappear.
Another real-world tip is to dry-fit everything before committing. Set cabinets in place. Place bookcases or shelf boxes on top. Tape out trim lines. Step back. Take photos. A design that looks balanced on paper may feel too heavy once it is in the room. Photos are helpful because they reveal awkward proportions faster than your eyes do in the moment.
Painting is also more time-consuming than expected. Built ins have corners, undersides, shelf edges, face frames, cabinet doors, trim seams, and tiny shadow lines that seem to multiply at night. If you can paint some components before installation, do it. After installation, use a high-quality brush for corners and a small roller for flat areas. A paint sprayer can create a beautiful finish, but only if you are prepared for serious masking and ventilation.
Caulk is the quiet hero of the project. A thin bead along trim seams makes separate pieces look unified. However, too much caulk can look messy, so apply it carefully and smooth it with a damp finger or tool. Fill nail holes with wood filler, sand them flat, and prime repaired spots before the final paint coat. These tiny steps are the difference between “I built this myself” and “I built this myself, and now I will casually mention it to every visitor.”
Styling the shelves after construction can be surprisingly emotional. You are not just filling storage; you are deciding what deserves to be seen. Books you love, family photos, travel souvenirs, handmade pottery, framed art, plants, baskets, and heirlooms all tell a story. A built in bookshelf wall becomes a visual autobiography. Try not to style it all in one afternoon. Place the big items first, live with them for a few days, then adjust. The best shelves feel collected over time, not attacked by a decor aisle.
Finally, expect the project to change how the room feels. A blank wall can make furniture seem like it is floating. A built in feature wall gives the space an anchor. It adds vertical interest, storage, texture, and a sense of permanence. Even a budget-friendly version made from stock cabinets and bookcases can feel custom when it is measured carefully, trimmed properly, painted beautifully, and styled with restraint. The room becomes warmer, smarter, and more personal. And yes, you may find yourself standing in the doorway admiring it for no reason. That is not vanity. That is the official victory lap of DIY.
Conclusion
A DIY feature wall of built in bookshelves is one of the most rewarding upgrades you can make to a home. It combines storage, design, craftsmanship, and personality in one hardworking wall. With careful measuring, secure anchoring, smart material choices, and patient finishing, even basic bookcases or stock cabinets can become a custom-looking focal point.
The key is to plan for both beauty and function. Decide what you need to store, how the shelves should relate to the room, and what style best fits your home. Then use trim, paint, lighting, and thoughtful shelf styling to bring everything together. Whether your goal is a cozy library wall, a polished home office backdrop, or a living room feature that finally makes sense of an empty wall, built in bookshelves can deliver charm, order, and just enough drama to make your tape measure feel famous.