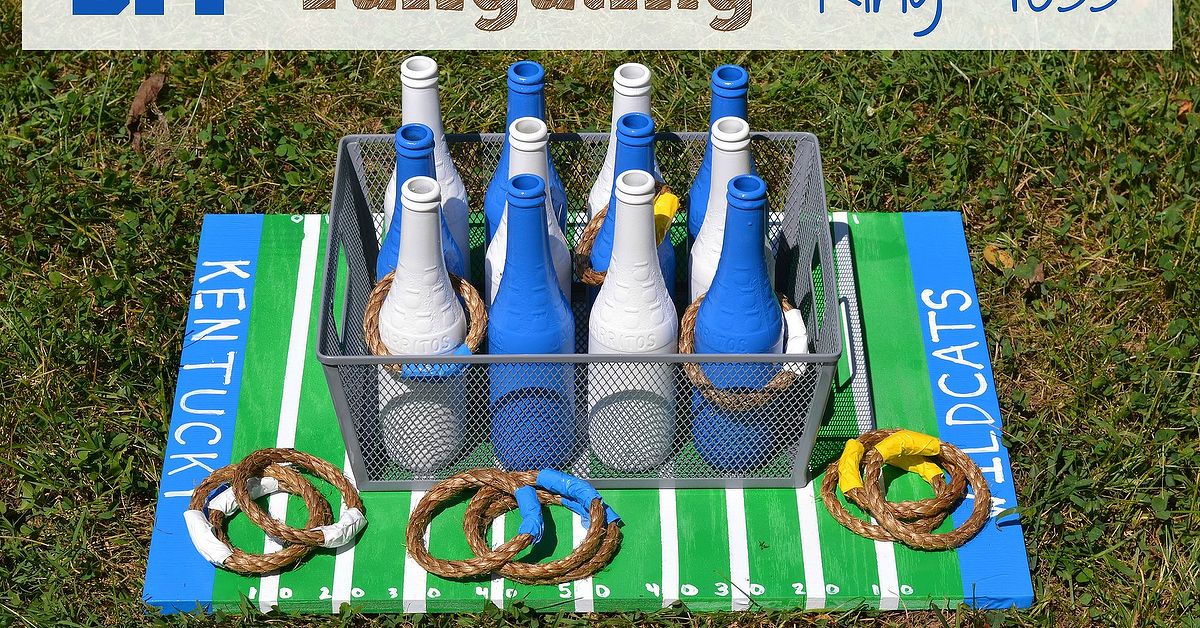
Every great tailgate needs three things: good snacks, comfortable chairs, and at least one game that makes people shout “Ohhh!” even when absolutely nothing dramatic has happened. That is where a DIY tailgating ring toss game comes in. It is portable, inexpensive, easy to customize with team colors, and friendly enough for kids, grandparents, competitive uncles, and that one friend who suddenly becomes an Olympic-level ring toss analyst after two practice throws.
Ring toss is one of the best DIY tailgate games because it does not require a giant playing field, complicated rules, or athletic skills beyond “stand here and toss that.” You can build it from basic wood, dowels, rope, screws, paint, and a little patience. The finished game fits in a trunk, sets up quickly in a parking lot or backyard, and can be styled for football season, baseball watch parties, Fourth of July cookouts, camping weekends, school events, or neighborhood block parties.
This guide walks you through how to make a sturdy, good-looking, travel-ready ring toss game for tailgating. You will learn what materials to buy, how to size the board, how to make rope rings, how to score the game, and how to avoid turning your beautiful project into a splinter festival. Let’s build something that says, “Yes, I am handy,” without requiring you to own a workshop the size of a small aircraft hangar.
Why a DIY Ring Toss Game Is Perfect for Tailgating
A tailgate game has a special job. It needs to be fun, but not fussy. It should be sturdy, but not so heavy that carrying it from the car feels like training for a strongman competition. It should welcome all ages, yet still create just enough competition for people to keep score with suspicious intensity.
A homemade ring toss game checks every box. Unlike some large lawn games, it can be compact. Unlike games with tiny pieces, it is easy to track. Unlike games that require a perfectly flat lawn, it works on grass, pavement, packed dirt, or a patio. And unlike certain games that turn into hour-long tournaments, ring toss lets people jump in for a quick round between burgers, kickoff, halftime, or cleanup.
Benefits of Making It Yourself
Buying a ready-made game is easy, but building one gives you control over the size, weight, colors, scoring layout, and durability. You can paint it in team colors, stencil numbers on the board, add a carrying handle, or make the pegs removable so the whole thing packs flat. You also get the quiet satisfaction of saying, “I made that,” while casually pretending you did not spend ten minutes looking for the measuring tape that was already in your hand.
Materials and Tools You Will Need
This project can be built in a simple wooden cross style, a rectangular board style, or a folding travel style. For tailgating, the best version is a portable wooden ring toss board with five pegs: one in the center and four around it. That layout is easy to understand, quick to score, and compact enough for storage.
Recommended Materials
- One 18-inch by 18-inch plywood panel or pine board, about 1/2 inch to 3/4 inch thick
- One 3/4-inch wood dowel, cut into five 6-inch to 8-inch pegs
- Wood glue
- Five wood screws, if you want extra peg strength
- Sandpaper in medium and fine grit
- Primer, exterior paint, stain, or clear protective finish
- Rope, plastic tubing, or ready-made rings
- Colored tape for wrapping ring joints
- Painter’s tape, number stencils, or vinyl decals
- Optional: small handle, rubber feet, storage bag, or hinge hardware
Helpful Tools
- Tape measure
- Pencil
- Drill and drill bits
- Saw for cutting dowels
- Clamps
- Paintbrush or foam brush
- Safety glasses
If younger builders are helping, keep them involved with measuring, painting, sanding by hand, or choosing colors. Cutting and drilling should be handled by an experienced adult or done under close supervision. Tailgating fun is the goal; surprise emergency room field trips are not part of the design plan.
Step 1: Choose the Best Size for Your Tailgate Setup
For a backyard-only game, you can go big. For a portable tailgate ring toss game, smaller is smarter. An 18-inch square board is a sweet spot: large enough to feel like a real game, but small enough to slide into the trunk next to the cooler, folding chairs, and the bag of chips everyone claims they did not open early.
If you want a lighter game, use 1/2-inch plywood. If you want a sturdier board that feels more premium, use 3/4-inch plywood or pine. Round boards also look great, especially for a carnival-style design, but square boards are easier to cut, mark, and pack.
Step 2: Mark the Peg Layout
Use your tape measure and pencil to mark the center of the board. Then mark four more peg locations around it: one near the top, one near the bottom, one on the left, and one on the right. Keep each outer peg at least 3 inches from the edge so the wood remains strong and the rings have room to land.
A simple layout looks like this:
- Center peg: highest point value
- Top peg: medium-high value
- Left and right pegs: medium value
- Bottom peg: easiest target, lowest value
This arrangement gives beginners a fair chance while still rewarding precision. It also prevents the dreaded “everybody aims at the same peg and argues for twelve minutes” problem.
Step 3: Cut and Sand the Pegs
Cut your dowel into five equal pegs. A length of 6 inches works well for a compact game, while 8 inches gives a larger target and makes the game easier for kids. After cutting, sand the ends until smooth. Slightly rounding the top edges helps rings slide on cleanly and gives the game a more finished look.
Sanding matters more than people think. A tailgate game gets handled, packed, unpacked, bumped, dropped, and carried around. Smooth edges protect hands, bags, car interiors, and anyone who insists on walking barefoot near the setup. Do not skip this step unless you enjoy hearing the phrase, “I think I got a splinter.”
Step 4: Drill the Peg Holes
Choose a drill bit that matches the diameter of your dowels. Drill shallow holes at your marked locations, going deep enough to seat each peg securely but not all the way through the board unless you plan to screw from the bottom. For a 3/4-inch dowel, a matching 3/4-inch bit gives a snug fit.
If you want extra strength, drill pilot holes from the underside of the board and drive screws up into the base of each peg after gluing. This is useful for travel games because tailgate gear tends to experience the mysterious physics of being thrown into a trunk at an awkward angle.
Step 5: Glue and Secure the Pegs
Add wood glue into each hole, insert the dowel pegs, and wipe away excess glue. Make sure the pegs stand straight. If one peg leans like it is listening to gossip, adjust it before the glue sets. Let the glue dry according to the product instructions.
For a heavy-use game, reinforce the pegs with screws from underneath. This makes the board more durable and helps the pegs survive repeated rounds, car rides, and enthusiastic players who celebrate a successful toss by picking up the whole board like a trophy.
Step 6: Paint, Stain, or Seal the Board
Once the glue is dry, lightly sand the board again and remove dust with a clean cloth. Then apply primer and paint, stain, or a clear protective finish. For outdoor use, choose products suitable for exterior projects. A protective topcoat helps guard the wood against moisture, sunlight, dirt, and the occasional splash from a soda can that was definitely “not placed too close to the game.”
Design Ideas for Tailgating
- Paint the board in your team colors.
- Stencil point values beside each peg.
- Add yard-line markings for a football theme.
- Use stars, stripes, or vintage lettering for a classic picnic style.
- Add glow-in-the-dark tape for evening games.
- Paint each peg a different color for quick scoring.
Let the paint and finish cure fully before packing or playing. If the surface still feels tacky, wait longer. Nobody wants a custom ring toss board that permanently smells like fresh paint and collects grass like a lint roller.
Step 7: Make the Rings
Rope rings are traditional, affordable, and easy to customize. Cut five to ten pieces of rope, each about 16 to 20 inches long, depending on how large you want the rings. Bring the ends together to form a circle and wrap the joint tightly with colored tape. Use different tape colors for different teams.
If you want a cleaner finish, you can use heat-shrink tubing, strong cloth tape, or rope whipping. Plastic tubing also works well because it naturally forms a round shape and can be joined with a small connector. For younger players, use larger rings. For adults who claim they are “just warming up” after missing six times, use smaller rings.
Step 8: Create Easy Tailgate Rules
Simple rules keep the game moving. Set a tossing line about 6 to 10 feet from the board. Kids can stand closer, while confident adults can move farther back. Each player tosses five rings per round. Add the points from every ring that lands fully around a peg. First player or team to reach 21 wins.
Sample Scoring System
- Center peg: 5 points
- Top peg: 4 points
- Left peg: 3 points
- Right peg: 3 points
- Bottom peg: 2 points
You can also play “exactly 21,” where a player must land on 21 without going over. This adds strategy and usually creates the kind of dramatic final round normally reserved for sports movies and people trying to parallel park under pressure.
Step 9: Make It Portable
A tailgate game should travel well. Add a small handle to one side of the board, attach rubber feet underneath, or store the rings in a drawstring bag stapled or tied to the board. If you want removable pegs, drill holes that fit the dowels snugly but do not glue them in. Then store the pegs separately and assemble the game on-site.
For an even more compact design, build two narrow boards that hinge together like a book. The pegs can face inward for storage, and the rings can tuck inside. Just make sure the hinge screws do not interfere with the peg holes.
Step 10: Set Up a Safe Playing Area
Choose a flat area away from grills, traffic lanes, coolers, tent stakes, and food tables. Keep the tossing direction clear so missed rings do not land in someone’s plate. Rope rings are soft, but nobody wants surprise coleslaw seasoning delivered by airborne game equipment.
For pavement, place the board on a small outdoor mat or add rubber feet to reduce sliding. For grass, press the board down gently so it sits level. If the ground is uneven, move the game rather than trying to invent a complicated fairness rule involving slopes, wind, and emotional damage.
Best Variations for a DIY Tailgating Ring Toss Game
1. Bottle Ring Toss
Use clean glass or plastic bottles as targets inside a crate. This gives the game a vintage carnival look. Plastic bottles are better for family events and travel because they are lighter and safer. Add sand or small stones inside to keep them upright.
2. Football Field Ring Toss
Paint the board green with white yard lines. Make the center peg the “touchdown” target and assign bonus points for landing multiple rings in one round. This version is perfect for football tailgates and watch parties.
3. Glow Ring Toss
Add glow tape to the pegs or use glow bracelets as rings for evening events. This is especially fun after sunset, when ordinary tailgate games disappear into the darkness and everyone starts using phone flashlights like amateur detectives.
4. Team Color Tournament Set
Make two boards and two sets of rings in different colors. Set the boards apart and let teams play head-to-head. This setup feels more like cornhole but takes less space and costs less to build.
5. Kid-Friendly Pool Noodle Ring Toss
For younger kids, make oversized rings from pool noodles and use taller foam-covered targets. It is soft, colorful, and forgiving. It also gives kids a game they can enjoy without adults constantly saying, “Careful, careful, careful,” like a broken safety alarm.
Common Mistakes to Avoid
Using Pegs That Are Too Short
Short pegs make the game frustrating because rings bounce off too easily. Aim for pegs tall enough to catch rings cleanly but not so tall that the game becomes too easy.
Skipping the Protective Finish
A bare wood board may look nice at first, but outdoor conditions can stain, warp, or roughen it. A clear coat, exterior paint, or outdoor stain helps the game last longer.
Making Rings Too Light
Very light rings are hard to control, especially in wind. Rope has enough weight to toss well while still being soft and easy to pack.
Overcomplicating the Rules
Tailgates are social. Keep rules simple so people can join quickly. Save the 14-page rulebook for board game night.
How to Store and Maintain Your Game
After each event, wipe down the board and rings. Let everything dry before storing it. Keep the game indoors or in a dry garage when not in use. If the board gets scratched, lightly sand the spot and touch up the paint or finish. If a rope ring frays, replace it or rewrap the joint with fresh tape.
At the start of each season, check the pegs for looseness. Add a little wood glue or tighten screws if needed. A five-minute tune-up can keep your homemade ring toss game looking sharp through many tailgates, cookouts, and backyard tournaments.
Budget Breakdown
One of the biggest advantages of a DIY ring toss set is cost. If you already own basic tools, the materials are usually budget-friendly. Scrap wood can reduce the price even more. A simple version may cost about the same as a few stadium snacks, which is impressive considering stadium snacks sometimes require a small financial strategy meeting.
- Plywood or pine board: low to moderate cost
- Dowel rod: inexpensive
- Rope: inexpensive
- Paint or stain: varies depending on brand and finish
- Optional handle, feet, or decals: small add-on cost
If you want a polished gift-quality game, spend more on better wood, premium finish, and custom lettering. If you want a quick weekend game, use leftover materials and keep the design simple.
Experience-Based Tips for a Better DIY Tailgating Ring Toss Game
The best lessons about a DIY tailgating ring toss game usually appear after the first real outing. On the workbench, everything seems perfect. The board is painted, the rings are tidy, the pegs are straight, and you feel like a craft-show champion. Then you arrive at the tailgate and discover that the wind has opinions, the parking lot is not level, and your cousin has developed a throwing technique best described as “confident chaos.” That is when small design choices start to matter.
First, weight matters. A board that is too light can slide around on pavement or tip slightly on grass. You do not need to build a wooden anvil, but a little heft helps the game feel stable. If your board is thin plywood, consider adding rubber feet or a second layer of wood underneath. Rubber feet are especially useful because they reduce sliding and protect the painted surface from rough concrete.
Second, ring size changes everything. Large rings make the game friendly and casual. Small rings make it competitive and, depending on your group, mildly dramatic. A smart tailgate setup includes two ring sizes: bigger rings for kids and beginners, smaller rings for adults or tournament rounds. This keeps the game fun instead of turning it into a public demonstration of everyone’s hand-eye coordination history.
Third, color coding is not just decorative. When several people are playing, matching ring colors to teams saves confusion. Red versus blue, black versus gold, green versus whiteanything works as long as the colors are easy to tell apart. Painted pegs also help with scoring. If the center peg is worth five points, make it stand out. People are less likely to argue when the board is clearly labeled, although someone will still try. It is tradition.
Fourth, always pack a small repair kit. A few strips of tape, a mini tube of wood glue, spare rope rings, and a small screwdriver can rescue the game if something loosens during transport. Tailgating gear gets bumped, stacked, dropped, and occasionally sat on by someone looking for a chair. A tiny repair kit keeps one loose peg from ending the tournament early.
Fifth, set the game up before the crowd gets too comfortable. Once food is out and chairs are open, people tend to settle in. Place the ring toss board in a visible area early, put the rings beside it, and write the rules on a small card or chalkboard. A game that is ready to play gets used. A game still packed in the trunk becomes “that thing we meant to set up.”
Finally, embrace house rules. Some groups like first to 21. Others prefer five rounds and highest score wins. Some add bonus points for landing three rings in a row. The best rule is the one that keeps people laughing, moving, and coming back for another round. That is the real magic of a homemade tailgate game: it is not just wood, rope, and paint. It is a reason for people to gather, cheer, tease each other gently, and create the kind of small memory that somehow becomes “remember that game?” years later.
Conclusion
A DIY Tailgating Ring Toss Game is simple to build, easy to transport, and surprisingly addictive once the scoreboard gets involved. With a wooden board, a few dowel pegs, rope rings, and a splash of team spirit, you can create a custom game that works for tailgates, backyard parties, family gatherings, camping trips, and holiday cookouts. The project is approachable for beginners, flexible for creative builders, and durable enough for repeat use when properly sanded, painted, and stored.
The secret is to keep the design practical. Choose a portable size, make the pegs sturdy, use rings with enough weight, label the scoring clearly, and protect the wood with an outdoor-friendly finish. Add smart details like a handle, rubber feet, removable pegs, or team-colored rings, and your homemade game will feel far more polished than its budget suggests.
Best of all, ring toss brings people together without requiring complicated instructions or athletic heroics. It gives everyone a chance to play, laugh, compete, and celebrate tiny victories. Build it once, pack it often, and do not be surprised when it becomes the unofficial MVP of your tailgate.
Note: Always follow tool safety instructions, wear eye protection when cutting or drilling, and supervise children around tools, small parts, and game equipment.