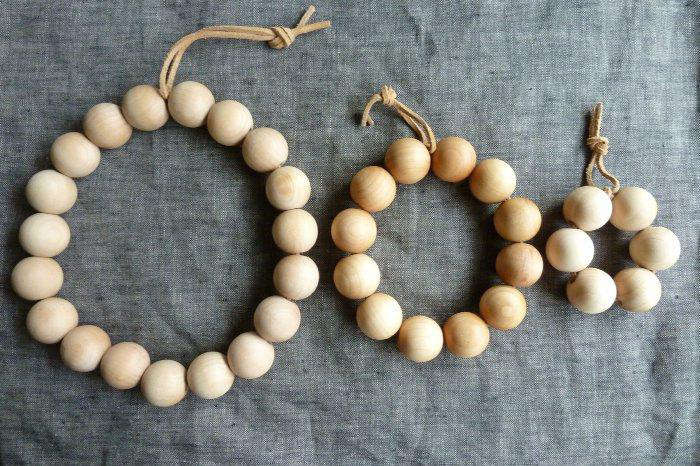
A wooden bead trivet is one of those rare DIY projects that looks like it wandered out of a boutique kitchen store, glanced at the price tag, and said, “Absolutely not. We can make this at home.” Inspired by the simple, Scandinavian-leaning charm of the wooden bead trivet from A Merry Mishap, this project turns humble unfinished beads and sturdy cord into a practical kitchen accessory that is warm, minimal, and surprisingly giftable.
The best part? You do not need a garage full of tools, a degree in woodworking, or the emotional stamina required to assemble flat-pack furniture at 11 p.m. You need beads, cord, scissors, a little patience, and perhaps a cup of coffee strong enough to supervise the knots.
This guide walks through how to make a DIY wooden bead trivet, how to choose materials, how to size it for your kitchen, how to finish the wood safely, and how to avoid the tiny mistakes that can turn a charming handmade hot pad into a wobbly bead pancake. We will also look at why wooden trivets remain popular: they protect surfaces, add natural texture, and look good enough to leave on the counter instead of hiding in the drawer of forgotten spatulas.
What Is a Wooden Bead Trivet?
A wooden bead trivet is a heat-protective mat made by stringing round wooden beads together into a flexible ring, coil, or cluster. It sits between a hot pot, teapot, baking dish, or serving bowl and your countertop or table. The round beads create small pockets of air underneath cookware, helping reduce direct heat transfer while giving the piece a sculptural, handmade look.
The version associated with A Merry Mishap became loved because of its quiet beauty. It does not shout for attention. It does not arrive covered in glitter. It simply sits there, all natural wood and clean lines, looking like the kind of kitchen object owned by someone who remembers to water herbs before they become crispy little regrets.
Why This DIY Wooden Bead Trivet Still Works Today
Trends move fast, but natural materials have staying power. Wood beads fit beautifully into modern farmhouse, Japandi, Scandinavian, boho, rustic, and minimalist kitchens. A wooden bead trivet can soften a stone countertop, warm up a white kitchen, or bring texture to an open shelf without looking overly decorated.
Functionally, it is also useful. Trivets help protect tables and counters from heat marks, condensation, and scratches. A bead trivet is especially handy for teapots, coffee carafes, casserole dishes, small Dutch ovens, and serving bowls. It is not meant to replace heavy-duty commercial heat protection for extremely hot cast iron straight from a blasting oven, but for everyday kitchen use, it is a practical and attractive helper.
Materials You Will Need
This project is wonderfully low-drama. No sawdust clouds. No clamps. No mysterious hardware pieces left over at the end.
- Unfinished round wooden beads, preferably 3/4 inch to 1 inch wide
- Strong cord, such as leather cord, cotton cord, hemp cord, or waxed braided cord
- Scissors
- Large needle or tape-wrapped cord end for easier threading
- Food-grade mineral oil or a food-safe wood conditioner, optional
- Clean cloth for wiping and finishing
Choosing the Right Beads
For a trivet, bead size matters. Tiny beads may look cute, but they can create a lower, less stable surface. Larger beads, especially around 1 inch, create better airflow and a sturdier base. Unfinished natural wood beads are the classic choice because they are simple, affordable, and easy to customize.
Look for beads with smooth holes and consistent sizing. If the bead holes are rough, the cord may fray. If the beads vary wildly in size, the finished trivet may wobble like a nervous café table. A little variation is charming. Too much variation is a dinner-table obstacle course.
Choosing the Best Cord
The cord should be strong enough to handle tension and flexible enough to form a circle or cluster. Leather cord gives the trivet a polished look, while cotton or hemp cord feels more relaxed and natural. Waxed cord can be easier to thread and knot securely.
Avoid thin thread that may snap under pressure. Also avoid stretchy cord unless you are intentionally making a decorative piece rather than a working trivet. Heat, weight, and time are not gentle teachers.
How Many Wooden Beads Do You Need?
The number of beads depends on the size and shape you want. For a simple circular trivet using 1-inch beads, 16 to 24 beads can create a small ring suitable for mugs, teapots, or small bowls. For a larger trivet, you may want 30 to 45 beads, either in a larger circle or in multiple connected rings.
A good beginner size is a 7- to 8-inch trivet. That size works well under medium serving dishes without becoming so large that it takes over your table like it pays rent.
Step-by-Step DIY Wooden Bead Trivet Tutorial
Step 1: Plan Your Shape
Lay the wooden beads on a table before stringing them. Try a single circle, a double ring, or a flexible cluster. The original A Merry Mishap-inspired look is clean and simple, so do not overthink the design. The beauty comes from the natural material and repetition of the bead shape.
If you are making your first wooden bead trivet, start with a single ring. Once you understand the tension and knotting, you can make larger versions or nested sets.
Step 2: Cut the Cord
Cut a length of cord longer than you think you need. A generous cord length makes knotting easier. For a small ring, start with about 30 inches. For a larger or double-ring trivet, use 45 to 60 inches. Running out of cord three beads from the finish line is a special kind of crafting heartbreak.
Step 3: Thread the Beads
String the beads one by one, keeping them snug but not painfully tight. If your cord end frays, wrap it with a small piece of tape to create a temporary needle. You can also use a large-eye needle if the bead holes allow it.
As you thread, check that the beads sit evenly. Natural wood beads may have subtle differences, so rotate any awkward beads until the trivet lies flatter.
Step 4: Test the Size
Before tying the final knot, curve the strand into a circle and place a pot lid or bowl on top. This helps you judge whether the trivet is large enough. The cookware should sit comfortably without tipping. If the trivet looks too small, add more beads. If it looks like a wooden necklace for a giant, remove a few.
Step 5: Tie a Secure Knot
Pull the cord ends together and tie a firm double knot or surgeon’s knot. The knot should hold the beads close enough to maintain shape but not so tight that the circle buckles. Tuck the knot into a bead hole if possible. This creates a cleaner finish and keeps the knot from rubbing against the table.
If you want a hanging loop, leave one cord end slightly longer, tie it into a loop, and trim the excess. A hanging loop makes storage easier and lets the trivet double as wall decor.
Step 6: Finish the Wood
You can leave the beads unfinished for a pale, natural look. If you want a richer tone, apply a light coat of food-grade mineral oil or a food-safe wood conditioner with a clean cloth. Let the beads absorb the oil, then wipe away any excess. This can deepen the color and help keep the wood from drying out.
Some older DIY examples used kitchen oils for color contrast, but for long-term care, food-grade mineral oil is a better choice because it does not go rancid the way some cooking oils can. Think of it as skincare for wood, minus the tiny expensive jar and dramatic marketing claims.
Design Variations to Try
Natural Minimalist Trivet
Use unfinished beads and natural cord. This version works in almost any kitchen and is the closest to the quiet, organic style that made the A Merry Mishap-inspired trivet so appealing.
Two-Tone Wood Bead Trivet
Lightly oil some beads and leave others unfinished. Alternate the shades for a subtle stripe or create a darker center ring. This gives the trivet depth without turning it into a circus act.
Painted Accent Beads
Paint just a few beads with non-toxic craft paint for a modern accent. Black, white, sage green, navy, or terracotta can look especially stylish. Keep painted beads away from direct food contact, and remember that paint may not handle heat as well as bare wood.
Nested Trivet Set
Make three rings in different sizes. Use the smallest for mugs, the medium for teapots, and the largest for serving dishes. Nested trivets look beautiful stacked on a shelf or hanging from hooks.
Safety Tips for Using a Wooden Bead Trivet
A DIY wooden bead trivet is useful, but it is still wood and cord. Use common sense when placing very hot cookware on it. Avoid direct contact with open flames, stovetop burners, broilers, or cookware that is scorching hot from prolonged high-temperature cooking.
Before using the trivet with a heavy pot, test it with a room-temperature pan. Make sure the pot sits flat and stable. If the trivet rolls, spreads, or tilts, tighten the cord or adjust the bead pattern. A trivet should protect the table, not launch soup into a new zip code.
Do not soak the trivet in water. Wood can swell, crack, or roughen when exposed to too much moisture. Wipe spills quickly with a damp cloth and dry it thoroughly. If the cord becomes loose over time, retie it or replace it.
How to Clean and Maintain Your Wooden Bead Trivet
For everyday cleaning, wipe the trivet with a slightly damp cloth. If needed, use a tiny amount of mild dish soap, then wipe again with clean water and dry immediately. Let it air-dry fully before storing.
Every few months, check the beads. If they look dry or faded, apply a small amount of food-grade mineral oil, let it soak in, and wipe away extra oil. This simple habit helps preserve the wood’s appearance and keeps the beads from becoming brittle.
Never place a wooden bead trivet in the dishwasher. Dishwashers are basically tiny weather systems full of heat, water, and detergent. Wood does not enjoy that vacation.
Why This Project Makes a Great Gift
A DIY wooden bead trivet is inexpensive, personal, and useful. That combination is surprisingly hard to find. Many handmade gifts are sweet but end up in a drawer because nobody knows what to do with them. A trivet, on the other hand, has a clear job. It protects surfaces, looks good on the table, and can be used all year.
Pair it with a tea towel, a jar of homemade cocoa mix, a small cast iron skillet, or a favorite recipe card. For housewarming gifts, make a set of three. For holiday gifts, tie the trivet with linen ribbon and add a tag that says “handmade,” which is the socially acceptable way of saying, “I made this with love and only complained twice.”
Common Mistakes and How to Avoid Them
Using Weak Cord
Thin string may look delicate, but it can stretch, fray, or break. Choose cord that feels sturdy in your hands. If you can snap it easily, it is not trivet material.
Making the Trivet Too Tight
A tight circle may curl upward instead of lying flat. Leave just enough flexibility for the beads to settle naturally.
Skipping the Stability Test
Always test the finished trivet with cookware before using it at dinner. A handmade trivet should feel stable under weight. If it shifts too much, adjust the bead count or knot tension.
Using the Wrong Finish
Decorative stains, paints, and sealers may not be appropriate near heat or food. If you plan to use the trivet in the kitchen, choose simple natural wood or a food-safe conditioner.
Styling Ideas for Your Kitchen
Leave the trivet beside a kettle for a tea station look. Hang it from a peg rail with wooden spoons and linen towels. Stack two or three on an open shelf beside ceramic bowls. Use it under a small plant pot to bring texture to a windowsill. The natural bead shape works well with stoneware, glass, cast iron, and woven baskets.
For a modern kitchen, keep the beads pale and the cord neutral. For a cozy farmhouse kitchen, use darker wood tones. For a boho kitchen, mix bead sizes or add a small tassel to the hanging loop. Just keep the tassel away from hot cookware, because decorative fringe and heat are not best friends.
My Experience Making and Using a Wooden Bead Trivet
The first time I made a wooden bead trivet, I underestimated two things: how satisfying it is to thread wooden beads and how quickly a simple project can make you feel like a person who has their life together. There is something calming about the repetition. Bead, slide, bead, slide, pause to admire progress, wonder if this is what inner peace feels like.
I started with unfinished 1-inch beads and cotton cord because I wanted a soft, natural look. At first, I pulled the cord too tightly, and the trivet curled like it was trying to become a bracelet. After loosening the tension and adding two more beads, it settled into a flat circle. That small adjustment made a big difference. The lesson: let the beads breathe. A wooden bead trivet is not a race. It is more like convincing a group of tiny wooden planets to orbit politely.
The second thing I learned is that size matters more than expected. A small trivet looks adorable under a mug, but it may not support a wide casserole dish. My favorite version ended up being about 8 inches across. It works under a teapot, a medium saucepan, and a serving bowl of roasted vegetables. It also looks good sitting on the counter, which is important because any object that lives in plain sight should earn its visual rent.
I also tried finishing one trivet with food-grade mineral oil. The oil warmed the color of the beads and made the wood grain more noticeable. The unfinished version looked airy and pale, while the oiled version felt richer and more rustic. Both were attractive, but the oiled trivet looked slightly more polished, like it had put on a clean shirt before guests arrived.
In daily use, the wooden bead trivet performed best with teapots, warm serving bowls, coffee presses, and dishes that were hot but not extreme. For very heavy cookware straight from a high oven, I preferred using a thicker commercial trivet or doubling up protection. That does not make the bead trivet less useful. It simply means every kitchen tool has a lane. A wooden bead trivet is excellent for everyday serving and table protection, not for proving it can survive a volcanic Dutch oven.
Cleaning was easy as long as I handled spills quickly. A damp cloth removed most marks. When a bit of sauce found its way between the beads, I used a small brush, wiped the area, and let the trivet dry flat. I would not soak it, and I definitely would not put it in the dishwasher unless I wanted to create modern art titled “Regret with Beads.”
The project also turned out to be a surprisingly good gift. Handmade kitchen items can be tricky because people have different tastes, but natural wood is friendly. It does not demand a color scheme. It does not clash with stainless steel, marble, butcher block, or ceramic. Wrapped with a linen towel, the trivet looked thoughtful without trying too hard.
What I like most is that this DIY project feels useful and beautiful at the same time. It is not just decor pretending to have a job. It actually helps at the table. It protects surfaces, adds texture, and brings a handmade detail into the kitchen. And unlike some DIY projects, it does not require three weekends, a power tool, or a recovery nap.
Conclusion
The DIY wooden bead trivet from A Merry Mishap remains popular because it captures the best kind of craft project: simple materials, practical function, and a finished result that looks far more expensive than it is. With unfinished wooden beads, strong cord, and a few careful knots, you can create a stylish kitchen trivet that protects surfaces and adds natural warmth to your home.
Whether you keep it minimal, add a two-tone finish, create a nested set, or make several as handmade gifts, this project is approachable for beginners and satisfying for experienced makers. It proves that good design does not always need complicated instructions. Sometimes it just needs wooden beads, a smart knot, and the confidence to say, “Yes, I made that.”