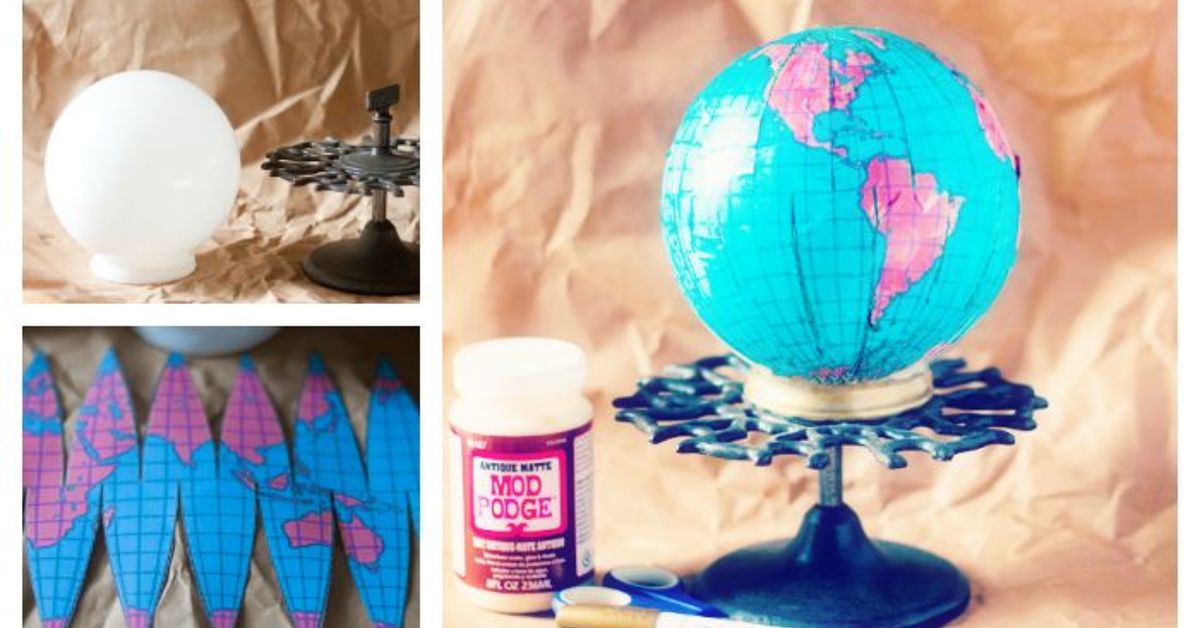
A dusty light globe at the thrift store may not look like the beginning of a stylish hoething that once illuminated a dentist’s waiting room in 1987. But give that round glass or acrylic shade a closer look. Its shape is already perfect, its price is usually pleasantly low, and it is one creative afternoon away from becoming a handmade world globe.
This DIY world globe project transforms an old light fixture globe into decorative map art using paint, paper, decoupage medium, and a little patience. You can create a vintage classroom globe, a modern black-and-gold accent, a colorful children’s room decoration, or a personalized travel map marked with places you have visited.
The project does not require advanced artistic skills. The real secret is planning how a flat map will fit onto a curved surface. Once that puzzle is solved, the rest is cleaning, painting, gluing, smoothing, and resisting the temptation to touch everything before it dries.
Why a Thrift Store Light Globe Makes an Excellent World Globe
Round light shades are surprisingly useful craft blanks. Unlike foam balls, they already have a smooth surface and often include a flat opening that prevents them from rolling across the table every time you put down your paintbrush.
Repurposing a thrift store light globe also gives an unwanted object a second life. Older ceiling globes, pendant shades, and flush-mount light covers are frequently inexpensive because they no longer match current lighting styles. Their decorative potential, however, has not expired.
A frosted white globe is especially convenient because it provides an opaque background for paint or decoupage. Clear glass can also work, although it may require primer or an interior base coat. Acrylic globes are lighter and less fragile, making them practical for children’s rooms, classrooms, or homes where decorative objects occasionally encounter curious cats.
Choosing the Right Light Globe at the Thrift Store
Look for a nearly spherical shape
The globe does not have to be mathematically perfect. Slightly flattened shades can still create attractive decorative globes. However, avoid shapes with deep ridges, heavy texture, or sharp angles if you plan to apply a paper map. Smooth curves are much easier to paint and decoupage.
Inspect the surface carefully
Hold the globe up to the light and check for cracks, chips, or stress lines around the opening. Small scratches can disappear beneath paint, but cracks may spread while you are cleaning or handling the piece. Run a finger carefully around the rim to make sure there are no sharp edges.
Decide whether you want glass or acrylic
Glass feels substantial and often gives the finished globe a more polished appearance. Acrylic is easier to transport, drill, mount, and display. To identify the material, tap it gently with a fingernail. Glass generally produces a sharper sound, while acrylic sounds softer and feels warmer to the touch.
Check the size
A globe between 8 and 14 inches in diameter is manageable for most first-time projects. Smaller globes require detailed cutting, while very large globes demand more paper, more paint, and more workspace. They also become difficult to hide from family members who ask why an unfinished planet has occupied the dining table for four days.
Materials and Tools
- One thrift store light globe or round light shade
- Dish soap and warm water
- Microfiber cloth or lint-free towel
- Rubbing alcohol
- Fine-grit sanding sponge, optional for acrylic
- Primer made for glass or plastic, depending on the globe
- Acrylic craft paint or multi-surface paint
- Foam brushes and small detail brushes
- Printed world map, globe gore template, or continent outlines
- Scissors or a craft knife
- Decoupage medium
- Soft brayer, silicone scraper, or clean fingers for smoothing
- Painter’s tape
- Pencil, chalk pencil, or paint marker
- Clear matte, satin, or gloss sealer
- A bowl, ring stand, wooden base, or repurposed lamp base
- Gloves, eye protection, and suitable respiratory protection when using aerosol products
Choose Your Globe-Making Method
There are three practical ways to turn the shade into a world globe. Your best choice depends on the finish you want and how much detail you are willing to tackle.
Method 1: Apply printed globe gores
Traditional globes are covered with long, tapered map sections called gores. They resemble surfboards, flower petals, or orange-peel segments. Because each strip narrows toward the poles, it can wrap around a sphere with less wrinkling than a rectangular world map.
This method produces the most recognizable geographic detail. Search for a printable public-domain globe gore template, or create your own by dividing a world map into 12 to 18 vertical sections. Print a low-resolution test copy before using your best paper so you can adjust the scale.
Method 2: Trace and paint the continents
Painting is ideal for a modern or minimalist DIY globe. Print continent silhouettes, cut them out, and use them as stencils. You can also transfer the outlines with graphite paper or trace them onto tissue paper before positioning them on the sphere.
This approach does not need to be cartographically perfect. A decorative globe can simplify small islands and complicated coastlines. Nobody is likely to inspect your version of the Aleutian Islands with a magnifying glass during dinner.
Method 3: Make a collage globe
Instead of reproducing a conventional map, cover the globe with pieces of vintage atlases, road maps, sheet music, travel brochures, book pages, stamps, or patterned tissue paper. Overlap the pieces to create an intentionally layered surface.
A collage globe is the most forgiving option because wrinkles, seams, and irregular edges become part of the design. It is also an excellent way to use damaged maps that are no longer suitable for framing.
How to Make a DIY World Globe Step by Step
Step 1: Remove all lighting hardware
If the globe is still attached to a lamp or fixture, unplug it before touching any hardware. Remove the bulb, socket assembly, screws, clips, and metal fittings. This tutorial is primarily intended for creating a non-electrified decorative globe.
Do not reuse wiring that is cracked, brittle, scorched, loose, or incomplete. Any fixture that has produced sparks, shocks, smoke, or repeated circuit problems should be inspected by a qualified professional rather than converted through casual DIY electrical work.
Step 2: Wash and degrease the globe
Wash the shade with warm water and a small amount of dish soap. Remove dust, cooking residue, nicotine film, sticker adhesive, and mysterious thrift-store grime. Rinse thoroughly and allow it to dry.
Wipe the surface with rubbing alcohol and a lint-free cloth immediately before painting or decoupaging. Avoid touching the cleaned surface with bare fingers because skin oils can interfere with adhesion.
Step 3: Test your materials
Apply a small amount of primer, paint, or decoupage medium near the opening where it will be less visible. Let it dry according to the manufacturer’s directions. Confirm that the coating bonds properly and does not cause clouding, peeling, or damage.
This test is especially important with plastic shades because different plastics respond differently to solvents and aerosol coatings.
Step 4: Create the ocean background
For a painted design, apply a compatible primer if needed. Follow with two or more thin coats of your chosen ocean color, allowing each coat to dry before adding another. Thin layers usually produce a smoother finish than one enthusiastic coat that begins migrating south under the force of gravity.
Classic blue works well, but it is far from your only option. Try matte black with gold continents, cream with muted green land, deep navy with copper details, or dusty aqua for a vintage look.
If using spray paint, work outdoors or in a properly ventilated area. Protect the surroundings from overspray, wear appropriate protective equipment, and follow the product label for distance, temperature, drying time, and compatible surfaces.
Step 5: Measure and position the map
Measure the globe’s circumference at its widest point. Wrap a flexible measuring tape around the center or use a piece of string and measure the string afterward. Also measure from the top opening, over the widest point, to the corresponding position on the bottom.
Print the map at a scale that allows the sections to overlap slightly. Position the first gore along an imaginary line of longitude. Temporarily hold it in place with removable tape, then arrange the remaining sections around the globe before gluing anything.
Expect to trim the points near the top and bottom. Even professional-looking templates may need adjustments because thrifted light globes are not always perfectly spherical.
Step 6: Attach paper sections gradually
Apply a thin, even layer of decoupage medium to a small area of the globe. Place one map section onto the adhesive, beginning near the center and smoothing outward toward the ends. Use gentle pressure to push out trapped air.
Do not soak ordinary printer paper. Too much liquid can stretch it, blur ink, or produce bubbles. Work with one section at a time and wipe away excess adhesive before it dries.
If a wrinkle develops, lift the paper carefully while the adhesive is still wet and reposition it. For stubborn curves, make tiny relief cuts along the paper edge so the sections can overlap without forming a large fold.
Step 7: Paint or refine the geography
After the paper or base coat has dried, improve the design with a small brush or paint marker. Define coastlines, add island groups, strengthen borders, or correct areas where two map sections did not meet cleanly.
You can add latitude and longitude lines with a flexible ruler, narrow painter’s tape, or a strip of paper used as a guide. Keep the lines subtle. Too many heavy markings can make the globe look less like elegant decor and more like it is preparing for an extremely complicated math exam.
Step 8: Personalize the globe
Mark places you have visited with tiny dots, stars, pins, painted hearts, or initials. Add a different symbol for destinations you hope to visit. A family globe could show birthplaces, previous homes, memorable vacations, and long-distance relatives.
For a wedding or anniversary gift, connect two hometowns with a curved painted line. For a child’s room, add animals, airplanes, ships, or small illustrated landmarks. A travel-themed globe can include short handwritten dates without turning the entire project into a crowded passport page.
Step 9: Seal the finished surface
Allow all paint and adhesive to dry completely. Brush or spray on a compatible clear sealer in thin coats. Matte sealer creates a soft vintage appearance, satin provides a gentle sheen, and gloss gives the colors more intensity.
Do not assume that two products will work together simply because both labels contain the word “clear.” Test the sealer first. Some coatings can react with paint, printed ink, or plastic.
Step 10: Add a stand
The simplest display stand is a wooden napkin ring, small bowl, curtain ring, or circular metal base. Paint it to coordinate with the globe and add felt pads underneath to protect furniture.
For a more traditional appearance, repurpose the base from an old lamp, candleholder, trophy, or plant stand. Secure the globe only after deciding whether you want it permanently attached or removable. A removable globe is easier to transport and repair.
Design Ideas for Different Decorating Styles
Vintage library globe
Use warm cream oceans, faded green and tan continents, dark brown outlines, and a walnut-colored base. Lightly distress selected areas with diluted brown paint, but stop before the globe looks as though it has personally survived every expedition since 1492.
Modern black-and-gold globe
Paint the sphere matte black and use metallic gold for simplified continents. Mount it on a black, brass, or natural wood ring. This version looks especially effective on office shelves and dark bookcases.
Colorful children’s globe
Assign each continent a different bright color and keep the borders bold. Add friendly labels, clouds, animals, and transportation icons. Use a lightweight acrylic shade and display it securely out of reach of very young children.
Personal travel memory globe
Use neutral colors for the map and brighter markers for personal destinations. Small numbered dots can correspond to a travel journal, photo album, or framed list of favorite trips.
Common Problems and How to Fix Them
The paper wrinkles around the poles
Trim the pointed ends, add small relief cuts, or divide the map into more sections. Narrower gores conform to curved surfaces more easily than wide pieces.
The paint scratches off
The surface may not have been fully cleaned, or the paint may not be suitable for the material. Remove loose paint, clean the area, test a compatible primer, and repaint with thin coats.
The map ink smears
Some home printer inks react with wet adhesive. Seal a test print with a compatible clear spray before decoupaging, or use a laser print when possible. Always test first because sealers can also alter ink colors.
Visible seams make the globe look uneven
Turn the seams into part of the design. Outline longitude lines over them, add a controlled antique glaze, or cover awkward joins with painted borders. Strategic design choices are often just mistakes wearing nicer clothes.
Conclusion
Making a DIY world globe from a thrift store light globe is an affordable way to combine upcycling, map art, and personalized home decor. The project can be as simple as painted continent silhouettes or as detailed as a traditionally decoupaged globe made from narrow map gores.
Success depends less on expensive supplies than on careful preparation. Choose an undamaged shade, clean it thoroughly, test every coating, work in thin layers, and give adhesives enough time to dry. Most importantly, let the shape and history of the thrifted object influence the design. A few irregularities often make the finished piece feel handmade rather than mass-produced.
Once it is displayed on a shelf, desk, mantel, or reading-room table, the former light shade will no longer resemble outdated hardware. It will look like a small planet that somehow wandered into a thrift store and left wearing a much better outfit.
Experience Notes: What This Project Teaches You
Projects like this tend to begin with a burst of confidence. The globe is round, the map is printed, and decoupage looks suspiciously similar to spreading glue in elementary school. Then the first paper section touches the curved surface, and the project politely explains that a sphere has opinions.
The most valuable lesson is to test the map with ordinary paper before using decorative prints. A template that looks correct on a computer screen may be too wide, too short, or poorly aligned with the opening of a particular light shade. A five-minute test fitting can prevent an hour of scraping wet paper from glass.
Another common discovery is that narrower map sections are easier to control. Wide pieces cover the surface quickly, but they also create more wrinkles. Dividing the world into additional gores means more seams, yet those seams are usually less noticeable than large creases. The process feels slower at first and faster by the end because fewer sections need to be removed and redone.
Applying less adhesive is another experience-based improvement. Beginners often assume that more decoupage medium produces a stronger bond. On thin paper, excess moisture can cause stretching, tearing, bubbles, and ink problems. A smooth, moderate coat is usually easier to manage. Keeping a damp cloth nearby also prevents adhesive from drying on your hands, tools, and every unrelated object within a three-foot radius.
Drying time changes the quality of the final result more than most decorative tricks. Paper that appears secure after 20 minutes may still contain moisture underneath. Adding paint or sealer too soon can trap that moisture and create cloudy patches. Leaving the globe alone overnight may feel unproductive, but sometimes the most advanced crafting technique is simply going to bed.
The project also demonstrates the value of correcting problems creatively instead of pursuing absolute perfection. A rough seam can become a longitude line. A small tear can disappear beneath a painted island, label, airplane, or compass rose. Slightly mismatched map sections can be blended with an antique glaze. These adjustments often add character that a flawless factory-made globe would not have.
Choosing the stand can be surprisingly important. A beautiful sphere placed directly on a shelf may still look unfinished. Testing several basesa wooden ring, black bowl, brass candleholder, or repurposed lamp parthelps determine whether the globe should feel playful, vintage, industrial, or elegant. Photographing each option with a phone makes comparison easier.
Finally, the project changes how you shop secondhand. Once you have transformed one discarded light globe, the lighting aisle no longer contains only lighting. It contains bowls, planters, sculptures, terrariums, display domes, and planets waiting for paint. That shift in perspective is one of the best parts of upcycling: you stop seeing an object only as what it used to be and start seeing what its shape allows it to become.
Note: This project is safest when the thrifted globe is converted into non-electrified decor. Anyone retaining or rebuilding the lighting function should use undamaged, properly rated components, preserve required ventilation, follow all product and fixture instructions, and consult a qualified electrician when wiring condition or compatibility is uncertain.