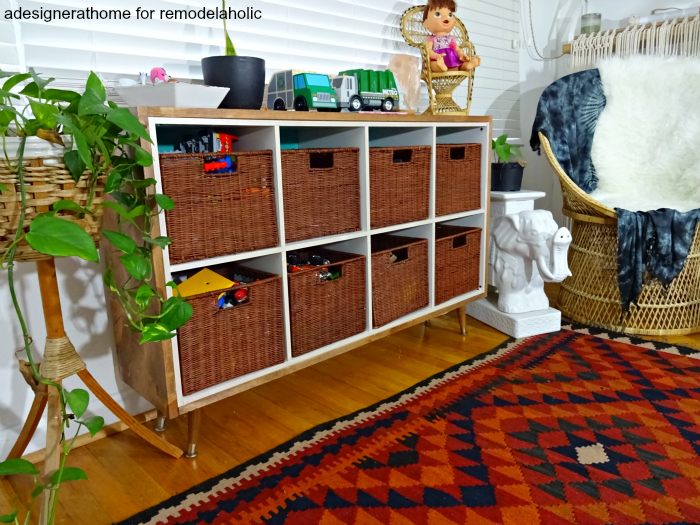
The IKEA Kallax cube shelf is practical, affordable, and capable of swallowing an impressive amount of household clutter. Visually, however, it can sometimes feel a little too familiar. You recognize it immediately: clean squares, simple finish, and the unmistakable look of furniture assembled with an Allen key and optimism.
This easy IKEA hack transforms a basic Kallax into a warmer, more substantial piece of furniture by wrapping its exterior in real wood. The finished shelf can resemble a custom console, modern bookcase, record cabinet, entryway organizer, or compact media unit. Better yet, the project does not require rebuilding the Kallax or possessing the woodworking skills of someone who casually owns six different routers.
The beginner-friendly method below uses thin hardwood plywood panels attached to the top and sides of an assembled shelf. Wood veneer edge banding hides exposed plywood edges, while stain and a protective clear coat create a polished, furniture-grade appearance.
Why a Wood-Wrapped Kallax Looks So Much Better
Kallax shelves already have a strong geometric shape. Adding natural wood does not fight that design; it simply gives it more depth, texture, and visual weight. The wood grain softens the flat factory finish, while the thicker-looking exterior makes the unit appear more expensive.
The contrast is especially attractive when a white Kallax is wrapped with walnut, oak, birch, or maple. A black-brown unit paired with medium-toned oak creates a moodier, modern look. You can also use pale plywood with a clear matte finish for Scandinavian style or apply a darker stain for a midcentury-inspired console.
IKEA currently lists the familiar two-by-two Kallax at approximately 30 1/8 inches wide, 30 1/8 inches high, and 15 3/8 inches deep. The unit uses particleboard and fiberboard components with a lightweight honeycomb paper filling, so it is better to attach a decorative skin than to treat the original panels like solid lumber. Always measure your assembled shelf before cutting because tiny variations become surprisingly dramatic when two pieces are supposed to meet at a clean corner.
Project Overview
Skill level: Beginner to intermediate
Estimated working time: Four to six hours, excluding drying and curing
Typical total project time: One weekend
Estimated material cost: About $45 to $120, depending on wood species, finish, and whether you already own the tools
The simplest version wraps the left side, right side, and top. An optional bottom panel can create a complete wood frame, but it is usually unnecessary when the shelf sits directly on the floor or an underframe.
Materials and Tools
Materials
- One assembled IKEA Kallax cube shelf
- One sheet of 1/4-inch hardwood plywood
- Real wood veneer edge banding that matches the plywood
- Contact cement or another adhesive approved for wood veneer and sealed furniture surfaces
- 120-, 180-, and 220-grit sandpaper
- Wood stain, optional
- Pre-stain wood conditioner, recommended for pine, birch, maple, or other blotch-prone woods
- Clear polyurethane or water-based protective topcoat
- Painter’s tape
- Clean lint-free cloths
- Wood filler, optional
- Anti-tip wall anchoring hardware
Tools
- Tape measure
- Pencil and straightedge
- Circular saw with a fine-tooth blade, track saw, or table saw
- Utility knife
- Sanding block or random-orbit sander
- J-roller, wallpaper seam roller, or firm rubber roller
- Household iron for pre-glued edge banding
- Edge-band trimmer or sharp utility knife
- Safety glasses, hearing protection, and a dust mask
Measure and Create the Cut List
Do not cut the wood using online dimensions alone. Assemble the Kallax, place it on a level surface, and measure the actual height, width, and depth in several places.
Use the following formulas, where W is the measured width, H is the height, D is the depth, and T is the thickness of the plywood:
- Left side panel: H × D
- Right side panel: H × D
- Top panel: W + twice the plywood thickness × D
- Optional bottom panel: Same size as the top panel
Making the top slightly wider allows it to cover the upper edges of both side panels. This creates a simple waterfall-style wrap without requiring difficult miter cuts.
Before cutting expensive hardwood plywood, make templates from cardboard or inexpensive hardboard. Test-fit the templates against the shelf and confirm that the top will overlap the sides correctly. This five-minute rehearsal can prevent a very fashionable piece of walnut plywood from becoming an equally fashionable collection of coasters.
How to Make a Wood-Wrapped Kallax Cube Shelf
Step 1: Cut the Wood Panels
Mark the cut lines on the back of the plywood. Support the entire sheet on rigid foam insulation or several evenly spaced boards so it cannot sag during cutting.
For cleaner cuts, place painter’s tape over the cut line and score the veneer lightly with a sharp utility knife. A fine-tooth blade and a clamped straightedge guide will also reduce wandering and splintering. When using a circular saw, orient the plywood according to the blade and tool instructions so any minor tear-out appears on the less visible face. Scoring the top veneer before cutting is a widely used technique for limiting chips along the cut line.
Step 2: Test-Fit Everything
Place the side panels against the Kallax without adhesive. Then position the top panel across them. Check the front alignment, back alignment, and corner joints.
Label the panels discreetly on the back: left, right, top, front, and back. Wood grain can look completely different when rotated, and discovering that one side runs vertically while the other appears to be fleeing horizontally is best done before glue enters the conversation.
Step 3: Sand the Wood
Sand the visible faces with 120-grit paper, followed by 180-grit and then 220-grit for a smooth finish. Work with the grain and soften sharp corners very lightly. Do not aggressively round the edges because the panels still need to meet cleanly.
Remove dust between grits with a vacuum and lint-free cloth. Thorough sanding helps stain absorb more evenly and reduces the scratches that become painfully obvious after the first coat of finish. Established woodworking guidance generally recommends beginning around 120 grit and progressing through finer grits while sanding with the grain.
Step 4: Apply Edge Banding
Apply matching wood veneer edge banding to any plywood edge that will remain visible. For this project, that usually means the front edges of the side panels and top panel.
Cut each strip slightly longer than necessary. Center it over the plywood edge and activate the adhesive with an iron according to the manufacturer’s directions. Press firmly with a wood block or roller while the adhesive cools. Trim the excess from the sides and ends, then sand gently.
Edge banding is one of the easiest ways to make plywood look like solid wood. Other common options include filling the layered edge or covering it with a narrow face board, but veneer banding creates the lightest and cleanest result for a Kallax wrap.
Step 5: Stain and Seal the Panels
Finishing the wood before attaching it to the shelf protects the Kallax from accidental stain marks and makes it easier to coat every edge neatly. Leave the back face unfinished wherever adhesive will be applied.
Test the stain on an offcut first. The same color can appear honey-gold on oak, orange on pine, and unexpectedly purple-brown on certain plywood veneers. For soft or porous wood, use pre-stain conditioner to reduce blotching. Apply stain with a brush or clean cloth, let it penetrate according to the label, and wipe away the excess.
After the stain dries, add two or three thin coats of a clear protective finish. Lightly sand between coats when required. Matte and satin finishes usually create a more natural furniture appearance than high gloss. Minwax and Rust-Oleum both emphasize testing color, preparing the wood properly, stirring rather than shaking finishes, and allowing each coat to dry before recoating.
Step 6: Prepare the Kallax Surface
Empty the shelf and wipe the exterior with a damp cloth and mild cleaner. Allow it to dry completely. Lightly scuff only the areas that will receive adhesive using fine sandpaper. You are not attempting to remove the finish; you are simply reducing its slickness.
Vacuum the dust and wipe the surface clean. Protect the front edges and interior cubbies with painter’s tape.
Because Kallax exterior panels include lightweight internal construction rather than solid wood throughout, avoid driving random long screws or nails into them. A properly bonded decorative skin distributes contact across a broad surface and avoids depending on questionable fastener locations.
Step 7: Attach the Side Panels
Read the adhesive label completely before beginning. Contact cement is particularly effective for veneer projects, but it bonds quickly and offers little opportunity for repositioning.
Apply a smooth, even coat to both mating surfaces if required by the product instructions. Allow the adhesive to become tacky. Lay several thin wooden dowels or narrow spacer strips across the Kallax side, position the panel accurately, and remove the spacers one at a time. Press the panel down from the center toward the edges.
Roll the entire surface firmly in multiple directions. Pay special attention to the perimeter and corners. Repeat on the opposite side. DAP’s veneer instructions similarly call for coating the appropriate surfaces, allowing the adhesive to reach the correct tack, positioning carefully, and pressing the veneer with a roller.
Step 8: Attach the Top Panel
Once both side panels are secure, dry-fit the top again. Confirm that its overhang is equal on each side and that its front edge aligns with the side panels.
Apply the adhesive and use spacers to lower the top into position gradually. Roll it firmly. Remove painter’s tape before any squeezed-out adhesive fully hardens, following the cleanup directions on the product label.
If a tiny seam remains at one corner, fill it with color-matched wood filler or wax. Avoid smearing filler across a wide area because it may absorb finish differently from the surrounding veneer.
Step 9: Let the Shelf Cure and Anchor It
Allow the adhesive and finish to cure fully before loading the shelf. Dry-to-touch and fully cured are not the same thing. A surface can feel ready while still being soft enough to collect basket-shaped impressions.
Return the shelf to its final location and secure it to the wall with suitable anti-tip hardware. Added wood slightly increases the unit’s weight, but it does not eliminate tip-over risk. The U.S. Consumer Product Safety Commission recommends anchoring shelving and other furniture, keeping heavy objects low, and avoiding arrangements that encourage children to climb.
Optional Upgrades
Add a Raised Base
A wood plinth or compatible metal underframe can lift the shelf off the floor and make it resemble a small credenza. Keep the base wide and stable, attach it only at structurally appropriate points, and continue using a wall anchor.
Install Doors or Drawers
Kallax inserts can hide charging cables, office supplies, toys, and other belongings that do not improve merely because they are arranged inside a square. Mix open cubes with closed storage to keep the design balanced.
Create a Record-Storage Console
The square compartments are popular for vinyl storage. Place heavier collections in the lower cubes, verify the unit’s published load guidance, and avoid placing a turntable on top until the adhesive and clear finish have fully cured.
Add a Contrasting Back Panel
Attach thin plywood, beadboard, cane webbing, or painted hardboard to selected cubes. A dark green, charcoal, or muted blue backing can make pale oak look especially rich.
Common Mistakes to Avoid
Cutting Before Measuring the Assembled Shelf
Nominal dimensions are useful for planning, not precision joinery. Measure the actual unit and use templates whenever possible.
Applying Stain After Installation
Staining installed panels makes it easier to mark the Kallax finish, walls, floors, and any nearby pet that makes an unfortunate investigative decision.
Forgetting the Grain Direction
Choose the grain orientation before cutting. Vertical grain emphasizes height, while horizontal grain makes a low console look longer.
Using Too Much Adhesive
More adhesive does not automatically produce a better bond. It can create ridges beneath thin veneer, squeeze out around edges, and extend curing time. Follow the label coverage rate.
Skipping Ventilation
Cutting, sanding, staining, and adhesive work should be performed in a well-ventilated area. Use appropriate eye, hearing, and respiratory protection. The EPA recommends isolating remodeling work and exhausting pollutants outdoors when practical, while OSHA guidance emphasizes eye protection around flying particles, dust, and chemical splashes.
Real-World Experience: What This IKEA Hack Is Actually Like
The finished project looks simple, but the experience is less about difficult carpentry and more about patience. The first stage often feels suspiciously unproductive because most of the time is spent measuring, checking, rotating panels, and staring at the shelf from several angles. That is normal. Accurate preparation is what separates a polished wood-wrapped Kallax from a Kallax wearing three pieces of lumber like an oversized costume.
The most important practical lesson is that walls, floors, furniture, and plywood sheets are rarely as perfectly square as they appear. A panel can fit beautifully at the front and reveal a narrow gap at the back. Before cutting, check each side of the shelf in more than one location. When a small discrepancy appears, position the cleanest joint where it will be seen most often and leave the less-perfect edge toward the wall.
Choosing the wood is usually the most enjoyable part. Oak is forgiving, widely available, and easy to coordinate with contemporary furniture. Walnut veneer creates a dramatic transformation but costs more and shows scratches more readily during construction. Birch has a clean, pale appearance, although dark stains can become uneven without conditioner. Maple feels modern but can also resist uniform staining. For a first project, oak plywood with a clear satin topcoat is difficult to dislike.
Applying the first side panel is typically the most stressful moment. Contact adhesive has a reputation for introducing itself politely and then refusing all negotiation. Spacer sticks make the process far more manageable. They allow you to align the panel before any large surface touches the shelf. Once the front edge is correct, remove one spacer, press that section, and continue gradually toward the back.
The project also teaches how much difference edge details make. Before edge banding, the wrap may look like an obvious plywood addition. After the layered edges disappear, the same shelf suddenly reads as a solid, intentional piece. Trimming edge banding requires a light touch. Cutting too deeply can damage the face veneer, while sanding aggressively can round the corner. Small passes produce a cleaner result than attempting one heroic slice.
Another common surprise is how long finishing takes compared with cutting. The panels may require only a few minutes each to cut, but sanding, conditioning, staining, drying, sealing, and curing can stretch across two days. Rushing the finish usually creates more work. Dust settles in wet polyurethane, fingerprints appear in soft topcoats, and baskets leave marks when returned too early. Giving the panels an extra night to cure is less exciting, but it is considerably more exciting than refinishing the top.
Once installed, the wood wrap changes how the Kallax behaves visually in a room. The original unit tends to disappear as functional storage. The wrapped version becomes furniture. It can anchor an entryway, warm up a home office, or make inexpensive storage feel appropriate beside higher-end pieces. The strongest styling approach is restraint: use a few baskets, books, ceramics, and one plant rather than filling every cube with small decorative objects.
Maintenance is simple. Dust with a soft cloth, clean spills promptly, and avoid soaking the wood or the original shelf. Felt pads under decorative objects protect the topcoat. After several months, the most vulnerable locations are usually the front corners, where baskets and vacuum cleaners make regular contact. A leftover stain marker or small jar of matching finish makes minor touch-ups easy.
Ultimately, this is a satisfying project because the starting point remains inexpensive and recognizable, but the final result feels personal. It is an approachable introduction to plywood, veneer, staining, edge banding, and furniture finishingall without requiring you to build a square shelving unit from scratch and discover halfway through that squares are surprisingly complicated.
Conclusion
A wood-wrapped Kallax cube shelf is one of those rare IKEA hacks that delivers a major visual upgrade without demanding major structural changes. Thin hardwood plywood creates warmth and texture, edge banding disguises the plywood construction, and a carefully chosen stain helps the shelf coordinate with the rest of the room.
The key is not speed. Measure the assembled unit, test-fit every panel, finish the wood before installation, use adhesive according to its directions, and allow adequate curing time. Those small decisions produce cleaner joints, stronger adhesion, and a result that looks less like a weekend experiment and more like custom furniture.
Note: Product dimensions, materials, adhesives, finishes, and safety recommendations may change. Confirm current manufacturer instructions before cutting or applying any product, work with adequate ventilation, wear suitable protective equipment, and anchor the finished shelf securely to the wall.