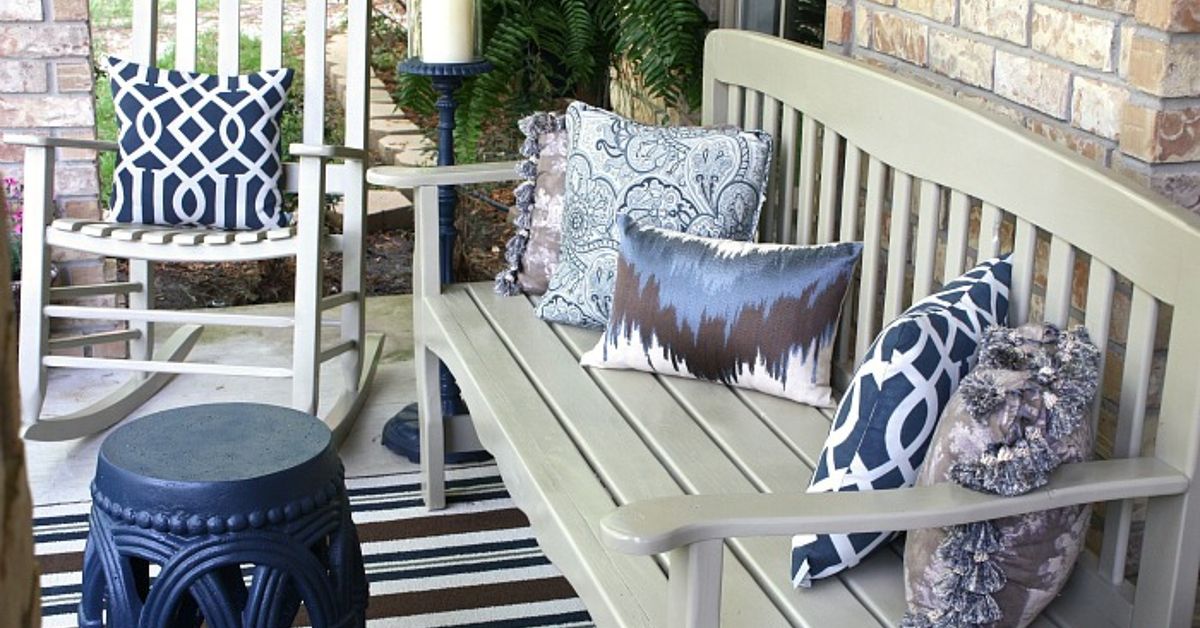
Your front porch does not need a five-figure makeover, a celebrity designer, or a truckload of suspiciously expensive “artisan” planters to look charming. Sometimes all it really needs is a can of spray paint, a free Saturday, and the willingness to look at a tired old chair and say, “You. You still have potential.”
If your outdoor furniture is faded, chipped, rusty, scratched, or stuck in a color best described as “landlord beige,” spray paint can be one of the fastest and most affordable ways to bring it back to life. A smart front porch revamp can make your home feel more polished, more welcoming, and much more intentional without replacing every chair, table, or bench you own.
The secret is not just spraying and hoping for the best. Good results come from proper prep, the right type of paint, decent weather, and enough patience to resist laying it on like frosting. In other words, the glow-up is absolutely possible, but it starts before the first coat ever leaves the can.
Why Spray Painting Outdoor Furniture Works So Well
Spray paint is practically built for furniture makeovers. It gives even coverage, gets into curves and hard-to-reach corners, and works especially well on metal, wicker, resin, and other surfaces that are annoying to paint with a brush. For front porch furniture, that matters. Outdoor pieces tend to have slats, bends, mesh panels, decorative scrolls, and all kinds of detail that can turn brush painting into a small personal crisis.
When done correctly, spray painting outdoor furniture also helps you:
- refresh your porch without buying new pieces
- cover faded or mismatched finishes
- protect metal from further rusting
- update the style of your front entry on a budget
- create a more cohesive color palette for your porch decor
That means your old wrought iron bistro set, wicker chair, or plastic side table can stop looking like leftovers from three different yard sales and start looking like part of the same design plan.
Before You Start: Know What Material You’re Painting
Not all outdoor furniture should be treated the same. One of the biggest reasons DIY paint jobs fail is simple: people use the wrong paint or skip the prep required for that specific material.
Metal Outdoor Furniture
Metal is one of the best candidates for spray paint, especially wrought iron, aluminum, and steel patio furniture. If there is rust or peeling paint, remove the flaky stuff first, smooth rough spots, and use a primer or paint system intended for metal and exterior use.
Wood Outdoor Furniture
Wood can also be spray painted beautifully, but it needs a clean, dull, dry surface. Bare wood or worn wood generally benefits from primer, especially if you want better adhesion and more even color.
Plastic or Resin Furniture
Plastic patio chairs and resin side tables are common on front porches because they are lightweight and weather-resistant. The catch is that plastic can reject ordinary paint like a cat rejects bath time. Choose a spray paint specifically labeled for plastic or multi-surface bonding.
Wicker and Rattan-Style Pieces
Spray paint is a lifesaver here because wicker has so many nooks and crannies. The key is cleaning thoroughly, drying completely, and spraying from multiple angles with light coats so the finish does not clump or pool in the weave.
Supplies You’ll Want on Hand
A successful front porch revamp starts with a simple setup. You do not need a Hollywood prop department, but you do need a few essentials.
- spray paint rated for exterior use
- spray primer, if needed for your material
- drop cloth or cardboard
- mild soap and water
- microfiber cloths or lint-free rags
- fine- to medium-grit sandpaper or sanding sponge
- wire brush for rusted metal
- painter’s tape and plastic sheeting for areas you want to protect
- gloves, eye protection, and a mask or respirator suitable for paint fumes
That last item is not optional if you are spraying in a garage or semi-enclosed area. Fresh air matters. Your porch makeover should end with prettier furniture, not a headache and questionable life choices.
How to Spray Paint Outdoor Furniture Step by Step
1. Pick the Right Day
Weather can make or break a spray paint project. Choose a dry day with little wind, moderate temperatures, and lower humidity. If it is too humid, the paint may dry slowly or cure poorly. If it is windy, overspray will go everywhere except where you want it. If rain is coming soon, your furniture may become a sticky monument to impatience.
Morning or late afternoon often works best. Midday blazing sun can heat the surface too much, causing the paint to flash dry before it levels properly.
2. Clean the Furniture Thoroughly
Dirt, pollen, mildew, oils from hands, and chalky residue can all interfere with adhesion. Wash the furniture with mild soap and water, scrub away grime, and rinse well. Let it dry completely before moving on.
This is the part many people rush, and it shows. Paint does not magically hide dirt. It just seals it in with confidence.
3. Remove Loose Paint, Rust, and Rough Areas
If you are painting metal patio furniture, use a wire brush or sandpaper to remove rust and any flaking finish. For wood or previously painted surfaces, lightly sand rough patches and glossy areas so the new finish has something to grip. For wicker, be gentle but thorough. You want to remove loose debris without shredding the texture.
4. Wipe Away Dust
After sanding, wipe everything down with a clean cloth or tack cloth. Dust left on the surface turns into grit under the finish, and nobody wants a chair that feels like sandpaper in reverse.
5. Tape Off Anything You Don’t Want Painted
Protect cushions, hardware, straps, glass inserts, and nearby porch surfaces. Overspray travels farther than people think, and it is especially fond of landing on things you forgot to cover.
6. Prime When Needed
Primer is especially useful for bare wood, rust-prone metal, major color changes, and problem surfaces. If the furniture is metal and rusted, use a rust-inhibiting primer. If it is wood, a bonding primer helps the topcoat stick better. If your spray paint is an all-in-one formula for the right surface, you may be able to skip a separate primer, but read the label instead of trusting your optimism.
7. Shake the Can Like You Mean It
Shake the spray paint for the full time directed on the label, usually one to two minutes. This helps the pigment and propellant mix properly and reduces the chance of clogs, sputters, or uneven color.
8. Spray Light, Even Coats
Hold the can at the recommended distance, usually around 6 to 10 inches from the surface depending on the product. Start spraying slightly before the edge of the furniture, sweep across in a steady motion, and release after you pass the edge. Overlap each pass slightly.
This is the golden rule: use multiple light coats instead of one heavy coat. Heavy coats cause drips, runs, tacky surfaces, and that lumpy look that says, “I got impatient around coat one.” Thin coats dry better, look smoother, and last longer.
9. Spray From Different Angles
For mesh, wicker, ornate ironwork, or slatted furniture, spray from several angles to reach hidden areas. Turn the piece as needed and do not forget undersides and backs if they will be visible on the porch.
10. Let It Dry and Cure Properly
Dry to the touch is not the same as fully cured. Even if the paint feels dry within an hour, give the furniture more time before placing cushions on it, stacking pieces, or putting it into heavy use. The label will tell you when it is safe to handle and when the finish reaches maximum durability.
Best Color Ideas for a Front Porch Revamp
The right color can make your porch feel crisp, cozy, coastal, modern, or farmhouse-inspired without changing anything else. A few winning options include:
- Black: timeless, clean, and forgiving
- White: bright and classic, though less forgiving of dirt
- Deep green: rich, earthy, and great with plants
- Navy blue: polished and porch-friendly
- Warm gray: modern without feeling cold
- Muted sage or soft blue: ideal for cottage-style porches
If your front door is bold, let the furniture play a supporting role. If your door is neutral, the furniture can bring the personality. Just aim for a palette that makes the porch feel connected instead of chaotic.
Common Spray Paint Mistakes to Avoid
Skipping Prep
Paint sticks best to a clean, dry, properly prepared surface. No shortcut beats that.
Using the Wrong Product
Exterior-rated spray paint matters. Surface-specific formulas matter. Plastic is not metal. Wicker is not wood. The label is your friend.
Painting in Bad Weather
Humidity, wind, direct blazing sun, and surprise rain are all troublemakers.
Applying Coats Too Heavily
If the paint starts sagging, dripping, or looking glossy and thick in spots, that is your sign to back off.
Touching It Too Soon
Freshly painted furniture loves fingerprints almost as much as toddlers love white walls. Let it cure.
How to Make the Finish Last Longer
Once your outdoor furniture looks amazing, a little maintenance goes a long way.
- Keep furniture clean by wiping off pollen, dirt, and bird-related nonsense regularly.
- Touch up scratches before they turn into peeling or rust.
- Use furniture covers or move pieces under shelter during harsh weather.
- Consider a clear exterior sealer for added protection on suitable surfaces.
- Store lightweight pieces indoors or in a shed during off-season months when possible.
A front porch revamp is not just about the first reveal. It is about keeping that “wow, this looks so much better” feeling for more than two weekends.
Is Spray Painting Outdoor Furniture Worth It?
Absolutely, especially when the furniture is structurally sound but cosmetically rough. Spray painting can turn a rusty chair set, faded rocker, or tired side table into something that feels fresh and intentional again. It is one of the rare DIY projects that delivers visible results quickly, does not require elite carpentry skills, and can genuinely improve curb appeal.
It is also satisfying in a very specific way. There is something deeply enjoyable about taking a porch piece that looked one thunderstorm away from retirement and giving it a second act. Suddenly the entire entry feels more inviting. Add a new doormat, a couple of planters, maybe a pillow or two, and your front porch starts looking like the kind of place where people actually sit and drink lemonade instead of just stepping over shoe boxes on the way inside.
Porch-Painting Experience: What a Real Front Porch Revamp Actually Feels Like
The first time I tried to spray paint outdoor furniture for a front porch revamp, I made the classic rookie mistake: I was wildly more excited about color than preparation. I had a tired metal chair, a small side table, and a vision. In my head, I was one can of paint away from a magazine-worthy porch. In reality, I was about twenty minutes away from discovering that porch pollen, old rust, and impatience can team up like cartoon villains.
I started too fast. I wiped the chair down, but not thoroughly enough. I skipped some sanding because the surface “looked fine,” which is the DIY version of “this should be okay” right before something is absolutely not okay. Then I sprayed a heavy first coat because I wanted instant transformation. The result was not elegant. It was drippy, uneven, and somehow both glossy and sad.
That experience taught me something useful: spray painting outdoor furniture is easy, but only after you respect the process. The next day, I slowed down. I scrubbed everything properly, let it dry, sanded the rusted spots, wiped off the dust, and used lighter passes. The difference was dramatic. Instead of a gloopy mess, the chair started looking smooth and intentional. The side table finally matched. The porch looked brighter before I had even finished decorating it.
Another lesson came from color choice. At first, I thought I should go with something loud and trendy. But once I stood on the porch and looked at the front door, brick tone, railing color, and planters, I realized the furniture needed to support the space, not audition for its own reality show. I chose a deep satin black for the metal pieces and added color with cushions and flowers instead. That one decision made the whole porch feel more put together and much easier to update by season.
I have also learned that spray painting wicker or textured furniture takes a little humility. You cannot bully wicker into looking smooth with one thick coat. You have to go from multiple angles, take your time, and accept that hidden creases will reveal themselves at the most annoying moment. But once those details are covered properly, wicker can look fantastic. It gains this crisp, refreshed look without losing its character.
One of the best parts of a front porch revamp is how much emotional mileage you get out of relatively little money. A few cans of exterior spray paint can make old furniture feel chosen again instead of tolerated. Suddenly, the porch becomes a place you want to use. You start noticing how nice it feels in the evening. You sit outside more. You add a lantern. Then maybe a plant. Then maybe another plant because apparently one successful DIY project can convince you that you are now the sort of person who maintains decorative ferns.
What sticks with me most is that the makeover changed more than the furniture. It changed the mood of the entrance. The house felt cared for. Guests noticed. I noticed. And unlike some larger home projects that drain your wallet and your spirit, this one delivered a visible payoff quickly. So yes, a front porch revamp with spray paint is practical. But it is also weirdly uplifting. Sometimes giving an old chair a second chance gives your whole porch, and maybe your weekend, a second chance too.
Conclusion
If you want a budget-friendly way to improve curb appeal, spray painting outdoor furniture is one of the smartest upgrades you can make. The formula is simple: clean thoroughly, prep the surface, use the right exterior spray paint, work in light coats, and let the finish cure before you rush the reveal. Do that, and even weathered porch furniture can look fresh, polished, and ready for another season outside.
A successful front porch revamp does not always begin with buying something new. Sometimes it begins with seeing the old stuff differently, plus a drop cloth, a little patience, and several satisfying passes of spray paint.