Learning how to adjust bass in Audacity is one of those audio-editing skills that sounds technical until you actually do it. Then it feels a little like seasoning soup: add too little and nobody notices; add too much and suddenly your podcast intro sounds like a nightclub hiding under a blanket.
Audacity gives you several practical ways to increase bass, reduce boomy low-end rumble, warm up thin audio, or make music feel fuller. The easiest method is the Bass and Treble effect, which behaves much like the bass and treble controls on a home stereo. For more control, Filter Curve EQ and Graphic EQ let you target specific frequency areas. That means you can boost the good bass, reduce the muddy bass, and avoid turning your audio into a fog machine with speakers.
This guide explains how to adjust bass in Audacity in five clear steps. It also covers practical settings, common mistakes, examples for music and voice, and a hands-on experience section at the end for anyone who wants real-world editing advice instead of “just slide the thingy until it sounds good.” Although, to be fair, listening carefully is still half the battle.
What Does “Bass” Mean in Audacity?
Before touching any sliders, it helps to understand what bass actually is. In audio editing, bass usually refers to the low-frequency range of a sound. Sub-bass often lives around 20 Hz to 60 Hz, while the main bass range is commonly around 60 Hz to 250 Hz. This is where kick drums, bass guitars, deep synths, warm male voices, and low room rumble often sit.
When people say an audio file needs “more bass,” they usually mean it sounds thin, weak, or lacking warmth. When they say it has “too much bass,” they usually mean it sounds muddy, boomy, muffled, or like someone recorded the track from inside a laundry basket during spin cycle.
Why Adjust Bass in Audacity?
Adjusting bass is useful for many types of projects. A podcast may need less low-end rumble so voices sound clearer. A music track may need a small bass boost to feel fuller. A voiceover may need warmth without becoming muffled. An old recording may need low-frequency cleanup before export.
Audacity is popular because it is free, flexible, and surprisingly powerful once you know where the right tools are hiding. The key is not to boost bass blindly. Strong low frequencies can eat up headroom, create clipping, and make the final export sound distorted on phones, earbuds, laptop speakers, car stereos, or that one mysterious Bluetooth speaker your cousin brings to every picnic.
How to Adjust Bass in Audacity: 5 Steps
Step 1: Import Your Audio and Make a Backup
Open Audacity and import your audio file by going to File > Import > Audio, or simply drag the file into the Audacity window. Audacity can work with common formats like WAV, AIFF, MP3, FLAC, and others depending on your setup.
Before editing, make a backup. You can duplicate the track inside Audacity by selecting it and choosing Edit > Duplicate, or you can save a copy of the original file somewhere safe. This gives you a clean version to return to if your bass experiment becomes a small earthquake.
Next, listen to the audio from beginning to end. Do not skip this step. Bass problems are often different in different sections. The intro may be thin, the chorus may be heavy, and the spoken part may have a low hum from air conditioning. Use headphones or decent speakers if possible, but also check the audio on small speakers later. Bass that sounds amazing on headphones can disappear completely on phone speakers.
Step 2: Select the Audio You Want to Adjust
To adjust the entire file, click the track panel on the left side of the waveform or press Ctrl + A on Windows or Command + A on Mac. To adjust only part of the audio, click and drag over the waveform to highlight the section you want.
This matters because bass changes are applied to the selected audio. If only the chorus needs more punch, select only the chorus. If a podcast guest has a boomy microphone but the host sounds fine, select the guest’s track or section instead of treating everything the same. Audio editing is not soup after all; sometimes each ingredient needs its own seasoning.
After selecting the section, play it once more and ask a simple question: do you need more bass, less bass, or cleaner bass? These are not the same. More bass adds weight. Less bass removes boom. Cleaner bass often means reducing the muddy low-mid area while keeping the useful low end.
Step 3: Use Bass and Treble for Quick Bass Adjustment
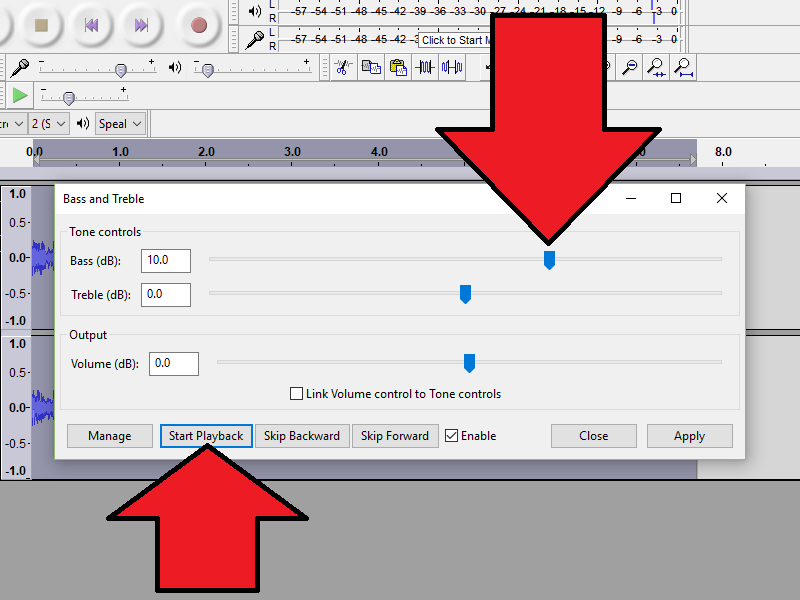
The simplest way to adjust bass in Audacity is to use the Bass and Treble effect. Go to Effect > EQ and Filters > Bass and Treble. In some Audacity versions or layouts, the menu wording may vary slightly, but the effect is part of Audacity’s built-in audio effects.
Inside the Bass and Treble window, you will see controls for bass, treble, and volume. Start with a small bass adjustment. A boost of +2 dB to +4 dB is often enough for a thin music track or voice recording. If you go straight to +10 dB, congratulations: you may have invented the audio equivalent of putting five pillows over a kick drum.
Use the Preview button before applying the effect. Preview lets you hear the change without committing immediately. If the sound becomes warmer and fuller, you are moving in the right direction. If it becomes muddy, boomy, or distorted, reduce the bass boost or lower the volume control inside the effect.
For reducing bass, try settings like -2 dB to -6 dB. This can help when a recording has too much low-end energy, especially from proximity effect, wind noise, desk vibration, or an overexcited microphone that thinks every voiceover should sound like a movie trailer.
Step 4: Use Filter Curve EQ or Graphic EQ for More Control
The Bass and Treble effect is fast, but it is broad. If you want more control, use Filter Curve EQ or Graphic EQ. These tools let you boost or cut specific frequency areas instead of changing the low end as one big chunk.
To use Filter Curve EQ, select your audio and go to Effect > EQ and Filters > Filter Curve EQ. This tool lets you shape a curve across the frequency spectrum. For a gentle bass boost, try raising the curve slightly around 80 Hz to 150 Hz. Keep the boost modest, often around 2 dB to 3 dB. This can add body without burying the rest of the mix.
To reduce muddiness, try cutting slightly around 200 Hz to 300 Hz. This range can add warmth, but too much of it can make audio sound cloudy. A small cut of -2 dB to -4 dB can sometimes make the bass feel clearer, even though you are technically reducing part of the low-frequency area.
Graphic EQ is another friendly option. It uses sliders for frequency bands, similar to a hardware equalizer. Go to Effect > EQ and Filters > Graphic EQ. To increase bass, raise the lower-frequency sliders gently. To reduce bass, lower them. The advantage is that sliders are easy to understand visually. The disadvantage is that it can tempt you to make a dramatic smiley-face curve. Resist the smiley-face curve unless your goal is “1998 car stereo in a parking lot.”
Step 5: Check for Clipping, Normalize, and Export
After adjusting bass, listen carefully and watch the waveform. Bass boosts increase overall energy and can push the audio too close to 0 dB, which may cause clipping. Clipping happens when audio peaks exceed the available digital limit, creating harsh distortion. In simple terms: the sound runs out of ceiling and bumps its head.
If the audio sounds distorted after boosting bass, undo the effect and apply a smaller boost. You can also reduce the track gain or use Effect > Volume and Compression > Amplify with a negative value to lower the level. As a final step, use Normalize to set a safe peak level, such as -1 dB or -2 dB. Normalizing near the end of the workflow helps prepare the file for export while leaving a little headroom.
When the bass sounds balanced, export the file by choosing File > Export Audio. Use WAV or AIFF if you need a high-quality file for further editing. Use MP3 if you need a smaller file for sharing, publishing, or uploading. Remember that saving an Audacity project is not the same as exporting a finished audio file. The project file keeps your edit session; the exported file is what you publish or send to other people.
Best Bass Settings in Audacity for Different Audio Types
For Podcasts and Voiceovers
For spoken voice, the goal is usually clarity, not nightclub power. If a voice sounds thin, try a gentle bass boost around 100 Hz to 150 Hz. If a voice sounds boomy, reduce around 120 Hz to 250 Hz. If there is rumble from traffic, air conditioning, desk bumps, or handling noise, consider a high-pass filter to reduce very low frequencies that do not help speech.
A good podcast voice should feel present and comfortable, not like it is trying to narrate a movie trailer from inside a cave. Small EQ moves are usually better than big ones. A 2 dB adjustment may sound boring on paper, but boring is often what professionals call “not ruining the audio.”
For Music Tracks
For music, bass depends on the arrangement. A dance track may need strong low-end power, while an acoustic song may only need warmth. If the track lacks weight, boost gently around 60 Hz to 120 Hz. If the bass guitar or kick drum feels hidden, try a small boost around the instrument’s strongest area. If the entire mix sounds muddy, reduce around 200 Hz to 350 Hz.
Always compare before and after. Louder often sounds better at first, even when it is not actually better. Match the output volume when possible so you are judging tone, not just loudness. Your ears are smart, but they are also easily bribed by volume.
For Old Recordings
Old recordings can have rumble, hum, uneven tone, or weak low end. Start by cleaning obvious problems before boosting bass. If the recording has low-frequency noise, boosting bass will also boost the noise. In that case, reduce rumble first, then add warmth carefully.
For cassette transfers, vinyl recordings, or archived speech, use small adjustments and listen on multiple systems. Old recordings often have character, and the goal is usually restoration, not plastic surgery. You want the audio to sound better, not like it came back from vacation with a completely different personality.
Common Mistakes When Adjusting Bass in Audacity
Boosting Too Much
The most common mistake is adding too much bass. A big boost may sound exciting for five seconds, then tiring after a full track. Excess bass can mask vocals, reduce clarity, and cause distortion during export or playback.
Ignoring the Low-Mid Range
Many beginners boost bass when they actually need to cut low mids. The 200 Hz to 350 Hz range can make audio sound boxy or muddy. Reducing that area slightly can make the real bass feel tighter and cleaner.
Editing Without Headroom
Bass uses a lot of energy. If your audio is already close to 0 dB, boosting bass can create clipping. Lower the track level before EQ if needed. Then normalize near the end.
Trusting One Playback Device
Do not make final bass decisions using only one pair of headphones or one speaker. Test on earbuds, laptop speakers, phone speakers, and car audio if possible. If the bass works on several systems, you are closer to a reliable result.
Pro Tips for Better Bass in Audacity
First, make small changes. A professional-sounding bass adjustment often uses subtle boosts and cuts rather than dramatic moves. Second, use Preview and Undo generously. Audacity makes it easy to compare options, so there is no need to marry the first setting you try.
Third, listen in context. A bass boost that sounds great when soloed may overpower the full mix. Fourth, leave headroom. Peaks around -1 dB or -2 dB are safer than pushing everything to the edge. Finally, learn the difference between warmth, punch, boom, and mud. Warmth is pleasant fullness. Punch is controlled impact. Boom is too much low-end resonance. Mud is what happens when clarity goes on vacation and forgets to leave a note.
Experience Notes: What I Learned Adjusting Bass in Audacity
The first real lesson from adjusting bass in Audacity is that bass is emotional. People do not ask for “a 3 dB lift at 100 Hz.” They say things like “make it warmer,” “give it more power,” or “why does my voice sound like it was recorded in a cardboard submarine?” Audacity can solve many of these problems, but only when you translate those feelings into frequency decisions.
In practical editing, I have found that the best results usually come from doing less than expected. For example, when a voice recording sounds thin, it is tempting to add a big bass boost. But a large boost often brings up mouth noise, desk vibration, and room resonance. A smaller boost around 100 Hz to 150 Hz, combined with a tiny cut around 250 Hz, can make the voice sound fuller without turning it muddy.
Music editing teaches another lesson: bass needs space. If a track has kick drum, bass guitar, synth pads, and low piano notes all fighting for the same area, boosting the entire low end may make the problem worse. In Audacity, using Filter Curve EQ to make focused adjustments is usually better than pushing the Bass slider too far. Sometimes the secret to stronger bass is not adding more bass; it is removing clutter around it.
Another useful experience is to check bass at lower volume. Loud playback can trick your ears. At high volume, bass often feels impressive even if it is poorly balanced. At lower volume, problems become clearer. If the track still has warmth and definition quietly, the bass is probably healthier. If it disappears completely, you may need more upper-bass presence. If it still booms, you probably need a cut.
One of the most helpful habits is exporting test versions. Make one version with a small bass boost, one with a stronger boost, and one with a low-mid cut. Listen to them away from the editing screen. The screen can influence your opinion because you start “seeing” the EQ instead of hearing it. Audio does not care how pretty your curve looks. It only cares how it sounds.
For podcasts, I usually prefer controlled warmth over dramatic bass. A clear voice builds trust. A boomy voice sounds tiring, especially through earbuds. For music, I aim for bass that supports the song instead of showing off. Bass should feel like a good foundation, not like a downstairs neighbor learning drums at midnight.
The final lesson is simple: always compare before and after. Audacity makes it easy to apply effects, but your ears need a reference point. If the edited version sounds better, clearer, and balanced across different speakers, you did the job. If it only sounds louder, undo and try again. Bass adjustment is not about winning a volume contest. It is about making the audio feel right.
Conclusion
Knowing how to adjust bass in Audacity gives you more control over the mood, clarity, and power of your audio. The five-step process is simple: import and back up your file, select the audio, use Bass and Treble for quick edits, use Filter Curve EQ or Graphic EQ for precision, then check clipping, normalize, and export.
The best bass adjustments are usually subtle. Add just enough low-end warmth to support the audio, remove mud where needed, and always listen on more than one playback device. Audacity may be free, but with careful EQ decisions, it can help you produce audio that sounds polished, balanced, and ready for the web.