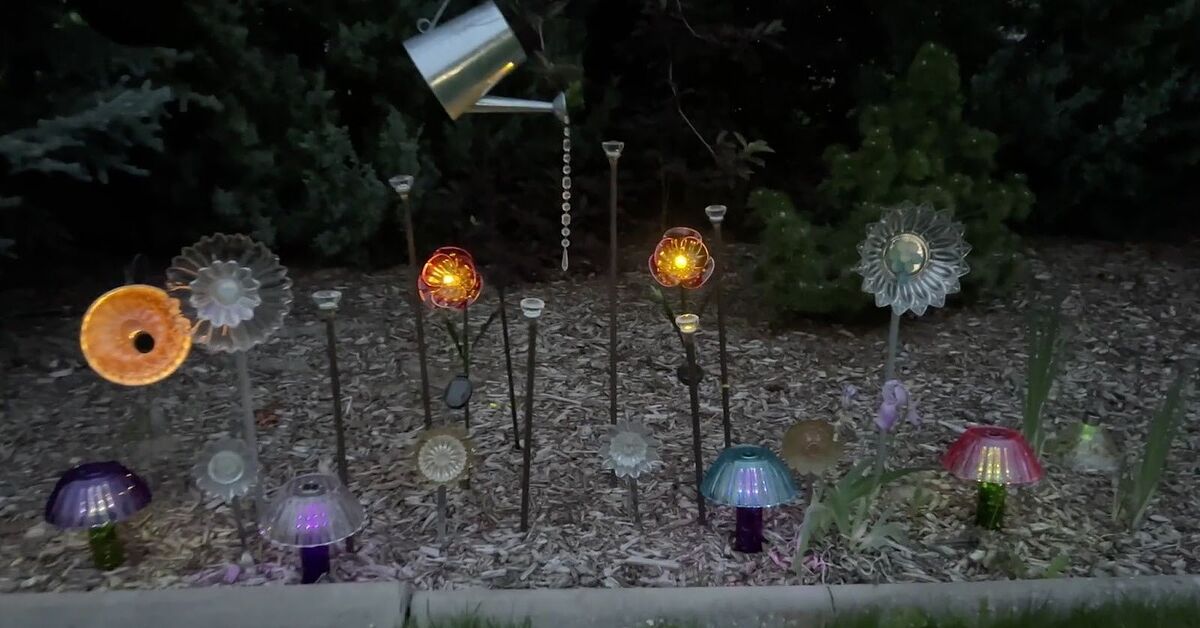
A garden path should do more than politely connect the patio to the tomatoes. It should invite people to wander, slow down, and feel as though they have accidentally entered a tiny storybook village where the mushrooms have excellent taste in lighting. That is exactly why solar light mushrooms have become such a charming choice for homeowners who want outdoor path lighting that feels magical, practical, and wonderfully low-maintenance.
Solar mushroom lights are decorative outdoor lights shaped like small fungi, usually placed along walkways, flower beds, patios, lawns, and garden borders. During the day, their solar panels collect sunlight and store energy in rechargeable batteries. At night, the lights turn on automatically, creating a soft glow that can guide your steps, highlight plants, and make your yard look like it has been professionally sprinkled with fairy dust. No wiring trench, no electrician, no dramatic battle with extension cords. Just sunlight, stakes, and a little imagination.
In this guide, you will learn how to choose solar mushroom garden lights, where to place them, how to style them without making your yard look like a glowing toy aisle, and how to keep them working season after season. Whether your garden path is a formal stone walkway, a casual gravel trail, or a “please do not step on the basil” route through raised beds, adorable solar light mushrooms can brighten the way with personality.
Why Solar Light Mushrooms Work So Well for Garden Paths
The best garden lighting balances beauty, safety, and restraint. Solar light mushrooms check all three boxes. They add gentle visibility to walking areas, bring playful character to the landscape, and avoid the heavy installation requirements of wired landscape lighting. Because most solar path lights are self-contained, you can move them around until the arrangement feels right. This is perfect for gardeners, because gardeners are legally required to change their minds at least twelve times per season.
Unlike bright floodlights, mushroom-shaped solar lights are usually designed for ambiance. Many models give off a warm white glow or soft colored light rather than intense illumination. That makes them ideal for garden paths, where you often need guidance rather than stadium-level brightness. The goal is to see where you are walking, not interrogate the hydrangeas.
They Are Easy to Install
Most solar mushroom lights use ground stakes. You simply press the stake into the soil, position the cap or cluster, switch the light on, and let the sun do the charging. This makes them especially useful for renters, beginner gardeners, and homeowners who want a weekend upgrade without turning the yard into a construction zone.
They Add Whimsy Without Taking Over
Classic path lights can look elegant, but solar mushrooms bring softness and fun. Their rounded caps blend naturally with cottage gardens, woodland paths, children’s play areas, fairy gardens, and informal backyard landscapes. They look especially charming near mossy stones, ferns, hostas, ornamental grasses, creeping thyme, and low-growing flowers.
They Can Lower Outdoor Lighting Costs
Solar garden lights use sunlight instead of drawing electricity from your home. That means they can add evening atmosphere without increasing your electric bill. They also tend to use LED bulbs, which are efficient and well suited for outdoor lighting. For homeowners who want a small but satisfying eco-friendly garden upgrade, solar mushroom lights are an easy place to start.
How Solar Mushroom Garden Lights Actually Work
A solar mushroom light has a few basic parts: a small solar panel, a rechargeable battery, an LED light source, a sensor, and the decorative mushroom housing. The solar panel collects sunlight during the day. That energy charges the battery. When the sensor detects darkness, the LED turns on automatically. When morning arrives, the light switches off and begins charging again.
The important thing to remember is that solar lights are only as good as the sunlight they receive. A mushroom light placed under a dense maple tree may look adorable at noon, but by 9 p.m. it may glow with the emotional commitment of a tired firefly. For the best results, place solar panels where they receive several hours of direct sunlight each day.
Choosing the Best Solar Light Mushrooms for Your Path
Not all solar mushroom lights are created equal. Some are tiny accent lights meant purely for decoration. Others are brighter path lights that can help define a walkway. Before buying, think about how you want the lights to perform and how you want the garden to feel after sunset.
Look for the Right Brightness
For garden path lighting, softer is usually better. A gentle glow of about 10 to 50 lumens per light is often enough for ambiance and basic path guidance. Small decorative mushroom lights may be lower, sometimes around only a few lumens, which is charming for flower beds but not ideal as the only lighting for steps or uneven walkways.
Use brighter solar lights near entry points, stairs, driveway edges, and areas where people actually need to see their footing. Use softer mushroom lights along garden borders and curved paths where the main goal is mood. In short, let practical lights do the serious work and let the mushrooms be the cute supporting cast.
Choose Warm White for a Cozy Glow
Warm white lighting usually looks best in gardens because it flatters plants, stone, wood, and soil. It creates a cozy atmosphere without making the yard feel cold or commercial. Color-changing mushroom lights can be fun for parties, Halloween, birthdays, or children’s garden areas, but for everyday curb appeal, warm white tends to look more timeless.
Check Weather Resistance
Outdoor solar lights should be built for rain, dew, wind, and changing temperatures. Look for weather-resistant materials and a clear outdoor rating. Many garden lights advertise water resistance, but the quality can vary. If your area gets heavy rain, snow, or intense summer heat, prioritize sturdier construction, sealed battery compartments, and durable stakes.
Consider Replaceable Batteries
Rechargeable batteries do not last forever. A good solar mushroom light becomes more useful when the battery can be replaced instead of forcing you to throw away the entire fixture. Before purchasing, check whether replacement batteries are available and easy to access. Future you will appreciate this tiny act of wisdom.
Think About Shape, Scale, and Color
Solar light mushrooms come in many styles: realistic brown caps, red-and-white fairy tale caps, frosted glass mushrooms, multicolor LED clusters, and sleek modern versions. Choose a style that matches your garden personality. A woodland path may love earthy mushroom lights. A playful cottage garden may welcome red caps. A modern landscape may look better with simple frosted mushroom shapes and warm light.
Where to Place Solar Mushroom Lights Along a Garden Path
Placement makes the difference between “enchanted garden path” and “someone dropped glowing gumdrops in the yard.” Start by walking your path during the day and noting curves, steps, plant borders, and dark corners. Then imagine how people will move through the space at night.
Stagger Lights Instead of Creating a Runway
One of the easiest design tricks is to stagger lights on alternating sides of the path. This creates a softer, more natural rhythm than placing lights directly across from each other. Straight rows can look formal, but they can also make a garden path feel like a tiny airport landing strip. Staggered placement feels more relaxed and organic.
Space Them Based on Brightness
For many pathway lights, spacing of about 5 to 8 feet works well. Small decorative mushroom lights may need to be closer together if you want a continuous glow. Brighter lights can be spaced farther apart. Instead of obsessing over a ruler, test the lights at dusk. Your eyes will quickly tell you where the dark gaps are.
Highlight Curves and Turns
Curved paths are perfect for solar mushroom lights. Place them near bends to gently guide the eye forward. This adds movement and mystery, especially when the path disappears behind shrubs or ornamental grasses. A few glowing mushrooms around a curve can make guests wonder what comes next, even if the answer is simply “the compost bin.”
Use Clusters for a Natural Look
Real mushrooms rarely grow in perfectly spaced military formation. Try clustering three to five solar mushroom lights near a boulder, tree base, bench, birdbath, or flower bed. Clusters feel more natural and create little pockets of glow. This technique works beautifully in woodland gardens and shaded-looking areas, as long as the solar panel itself still gets enough sun.
Design Ideas for a Magical Mushroom-Lit Garden Path
Solar mushroom lights are flexible. They can be cute, elegant, quirky, or subtle depending on how you use them. The secret is to pair them with the right garden elements and avoid overdoing it. A few mushrooms are whimsical. Fifty blinking mushrooms may look like the lawn is trying to communicate with space.
Create a Fairy Garden Border
For a playful look, tuck small solar mushrooms among miniature plants, creeping groundcovers, pebbles, and tiny garden ornaments. This works especially well near a short stepping-stone path or a child-friendly garden corner. Use warm light for a gentle storybook effect, or add a few colored caps for a cheerful accent.
Frame a Cottage Garden Walkway
Cottage gardens already celebrate abundance, softness, and charm. Solar mushroom lights fit naturally among lavender, daisies, salvia, foxgloves, catmint, and roses. Place them slightly behind the front edge of the bed so the glow appears to rise from the plants instead of sitting stiffly on the path.
Soften a Modern Path
If your garden path is made of concrete pavers, black gravel, or clean-lined stone, choose simple mushroom lights in frosted glass or neutral tones. Place them sparingly at corners, near low grasses, or beside sculptural plants. The contrast between modern hardscape and organic mushroom shape can feel surprisingly sophisticated.
Brighten a Woodland-Style Garden
Mushroom lights look especially at home near ferns, hostas, moss, pine needles, and natural stone. Use earthy designs and warm white LEDs to mimic the glow of hidden lanterns. If the area is too shady for charging, choose a set with a separate solar panel that can be placed in a sunnier spot while the mushrooms sit along the path.
Smart Installation Tips for Better Performance
Installing solar mushroom lights is simple, but a few small details can dramatically improve performance. Before pushing stakes into the ground, turn the lights on and charge them in full sun for a full day. This helps the batteries start strong.
Next, soften hard soil with water before inserting stakes. Pushing plastic stakes into dry, compacted ground can crack them. If the soil is stubborn, make a pilot hole with a garden trowel or metal rod. Never hammer the light head directly unless you enjoy buying replacement mushrooms.
Angle solar panels toward the strongest sunlight. In many U.S. gardens, that means open southern exposure when possible. Keep panels away from deep shade, overhanging branches, dense shrubs, and places where fallen leaves collect. Even a cute little mushroom needs breakfast, and sunlight is breakfast.
How to Maintain Solar Mushroom Lights
Solar mushroom lights are low-maintenance, not no-maintenance. Dust, pollen, bird droppings, algae, and fallen leaves can block the solar panel and reduce charging. Wipe panels regularly with a soft damp cloth. For stubborn grime, use mild soap and water, then dry the panel gently.
Check the lights after storms. A heavy rain can tilt stakes or splash mud onto panels. In winter, shorter days and cloudy weather may reduce nightly run time. This is normal. If lights become very dim after months of use, inspect the battery compartment for corrosion and consider replacing rechargeable batteries if the model allows it.
During lawn mowing or edging, temporarily remove lights near grass borders. Solar mushrooms are charming, but they do not win arguments with lawn equipment. Store delicate glass lights indoors during severe freezes, hurricanes, or heavy snow if the manufacturer recommends it.
Safety, Wildlife, and Good Neighbor Lighting
Outdoor lighting should help people move safely without flooding the neighborhood with unnecessary brightness. Use mushroom lights to mark edges, curves, and transitions, but add stronger lighting where there are steps, steep slopes, or uneven surfaces. Decorative lights should not be the only safety lighting for risky areas.
Also consider wildlife. Artificial light at night can affect insects, birds, and nocturnal pollinators. The most garden-friendly approach is to use low-level, warm, targeted lighting and avoid leaving unnecessary lights blazing all night. Solar mushroom lights are often softer than security floodlights, but a yard packed with dozens of bright LEDs can still become excessive.
If your lights have timers, dimming modes, or motion settings, use them. Let the garden enjoy some darkness after bedtime. Your plants, pollinators, neighbors, and anyone who likes seeing stars will silently applaud.
Common Mistakes to Avoid
Using Too Many Lights
More lights do not always mean a better garden. Too many fixtures can flatten the landscape and remove the mystery that makes nighttime gardens beautiful. Start with fewer lights than you think you need. Add more only where the path feels too dark.
Placing Solar Panels in Shade
A mushroom light may look perfect under a shrub, but if the panel gets no sun, the glow will disappoint you nightly. For shaded paths, choose lights with remote solar panels or place decorative mushrooms where the panel has access to direct light.
Mixing Too Many Colors
Colored solar mushroom lights can be delightful, but too many colors can make a garden look chaotic. For everyday use, choose one main color temperature, preferably warm white. Save flashing or multicolor modes for parties and holidays.
Ignoring Scale
Tiny mushrooms can disappear beside wide paths or large shrubs. Oversized mushrooms can overwhelm a narrow walkway. Match the fixture size to the path width, plant height, and viewing distance. A small path needs small accents. A long driveway border can handle larger clusters.
Budget-Friendly Ways to Upgrade the Look
You do not need an expensive landscape design plan to make solar mushroom lights look intentional. Try placing them near natural materials like river rocks, mulch, bark, and stone edging. Add low plants around the base to soften the stakes. Repeat the same mushroom style throughout the path for consistency.
You can also mix solar mushroom lights with other subtle outdoor lighting. For example, use mushroom lights along the flower bed, one warm lantern near a bench, and a soft spotlight on a small tree. This layered approach creates depth. The path becomes useful, the plants become visible, and the mushrooms bring the charm.
Best Places to Use Solar Mushroom Lights
Solar mushroom lights are especially effective along front walkways, backyard garden paths, side-yard passages, patio edges, raised bed borders, pond paths, and children’s garden spaces. They also work well around seating areas where you want gentle light rather than bright task lighting.
For front yards, choose tasteful warm white mushrooms and use them sparingly. For backyards, you can be more playful. Around vegetable gardens, place them along main walking paths rather than inside beds where you may need to dig, weed, or harvest. Around ponds or water features, use outdoor-rated lights and keep electrical components safely positioned according to the manufacturer’s directions.
Seasonal Styling Ideas
In spring, tuck mushroom lights among emerging bulbs and fresh mulch. In summer, let them glow through fuller perennials and ornamental grasses. In fall, pair them with pumpkins, mums, and copper-toned leaves for a cozy harvest look. In winter, use them along evergreen borders or near bare branches where the glow can create shape and shadow.
Holiday styling can be fun, too. Red mushroom caps feel cheerful near Christmas greenery. Warm white mushrooms look lovely with simple wreaths and lanterns. For Halloween, colored mushroom lights can add a spooky-but-cute glow without terrifying the mail carrier.
Experience-Based Tips: What Actually Works in a Real Garden
After using solar mushroom lights in a garden path setting, the first lesson is simple: test before committing. It is tempting to push every stake into the ground immediately and declare victory. But the garden changes after sunset. A spot that looks balanced in daylight may create a strange dark gap at night. Place the lights loosely first, wait until evening, and walk the path from both directions. You will notice where the eye naturally travels, where the shadows feel too heavy, and where one extra mushroom would make the scene feel complete.
The second lesson is that warm light almost always looks better than bright white light. Cool white LEDs can make a garden feel chilly, especially around stone, mulch, and dense greenery. Warm white light gives plants a softer texture and makes the path feel welcoming. It also photographs better, which matters if you enjoy sharing garden updates online. Nobody wants their cozy backyard path to look like a supermarket freezer aisle.
The third lesson is that grouping works better than perfect spacing in casual gardens. Along a formal front walkway, evenly spaced lights may look clean and polished. But in a flower garden, clusters are more charming. Three mushrooms near a fern, two beside a stepping stone, and five around a small birdbath can look more natural than a strict line. This makes the lights feel like part of the landscape rather than decorations placed on top of it.
Another real-world tip: keep mushroom lights away from fast-growing plants. A tiny solar light placed beside a young salvia in April may be completely swallowed by June. The plant will look fabulous, but the solar panel will not be amused. Leave enough breathing room around each panel, and trim nearby foliage when needed. If you love lush planting, use remote-panel solar lights so the panel can charge in a sunny opening while the decorative mushrooms glow from within the greenery.
It also helps to think about maintenance from the beginning. Place lights where you can easily remove them before mowing, edging, or heavy mulching. If your path borders grass, leave a small buffer so the mower does not clip the stakes. If your lights sit in mulch, check them after rain because splashback can dirty the panels. A quick wipe every week or two can noticeably improve brightness.
Finally, remember that the prettiest garden lighting leaves room for darkness. The shadows between lights are not a failure; they are part of the design. Darkness gives the glowing mushrooms contrast. It makes the path feel deeper and more mysterious. Instead of trying to illuminate every inch, light the moments that matter: the first step, the curve, the bench, the flower bed, the little corner where the garden suddenly feels like it has secrets.
Conclusion
Adorable solar light mushrooms are one of the easiest ways to brighten a garden path with charm, safety, and personality. They are simple to install, inexpensive to operate, and flexible enough for cottage gardens, woodland paths, modern landscapes, patios, and playful backyard spaces. The key is to choose weather-resistant lights, give the solar panels enough sun, use warm and gentle illumination, and place each mushroom with intention.
Think of them as tiny landscape storytellers. By day, they add shape and whimsy among your plants. By night, they guide footsteps, highlight curves, and create a soft glow that makes even a short garden path feel special. With the right spacing, maintenance, and restraint, solar mushroom garden lights can turn an ordinary walkway into a magical little trailno electrician, fairy godmother, or suspiciously musical woodland creatures required.