Your computer feels sluggish. Browser tabs are multiplying like rabbits. A video call, spreadsheet, and photo editor are fighting for attention. Before blaming your internet provider, your processor, or Mercury retrograde, check your computer’s memory.
Random access memory, better known as RAM, temporarily holds the information your computer needs right now. Checking it can tell you how much memory is installed, how much is currently available, which programs are using it, whether your memory is running at the expected speed, and whether a module may be failing.
This guide explains how to check RAM on Windows and Mac using built-in tools. It also shows you how to interpret memory statistics, test for hardware errors, and decide whether you actually need an upgrade.
What Is RAM, and Why Should You Check It?
RAM is your computer’s short-term workspace. When you open an application, load a document, join a video conference, or visit a website, the computer places actively needed data in RAM because it can be accessed much faster than data stored on an SSD or hard drive.
When available RAM becomes scarce, the operating system begins compressing data or moving less-active information to the storage drive. Windows calls this paging or virtual memory, while macOS reports storage-based overflow as swap usage. Modern SSDs are fast, but they are still no substitute for sufficient physical memory. Heavy swapping can make an otherwise capable computer feel as though it has stopped to contemplate its life choices.
Common Reasons to Check Computer Memory
- Your computer becomes slow when several applications are open.
- Programs freeze, close unexpectedly, or display low-memory warnings.
- You want to confirm that newly installed RAM is recognized.
- You need to compare your computer with software system requirements.
- You are planning a memory upgrade and need the capacity, speed, or slot information.
- You are troubleshooting random restarts, blue screens, or startup failures.
Remember that RAM and storage are different. A computer with a 1 TB SSD does not have 1 TB of RAM. Storage keeps files when the computer is turned off; RAM holds active data while the computer is running.
How to Check RAM on Windows 11 or Windows 10
Windows provides several ways to inspect memory. The best method depends on whether you need a simple capacity figure, live usage information, module specifications, or a hardware test.
Method 1: Check Installed RAM in Windows Settings
This is the fastest method when you only need to know the total amount of installed memory.
- Press Windows + I to open Settings.
- Select System.
- Scroll down and select About.
- Look under Device specifications.
- Find the line labeled Installed RAM.
You may see something such as “16.0 GB” or “16.0 GB installed, 15.7 GB usable.” A small difference between installed and usable memory is usually normal because some RAM may be reserved for hardware, firmware, or integrated graphics.
The same general path works in Windows 10. However, Microsoft ended regular support for Windows 10 on October 14, 2025, so users still running it should also review their upgrade or extended-support options.
Method 2: Check RAM Capacity, Speed, and Usage in Task Manager
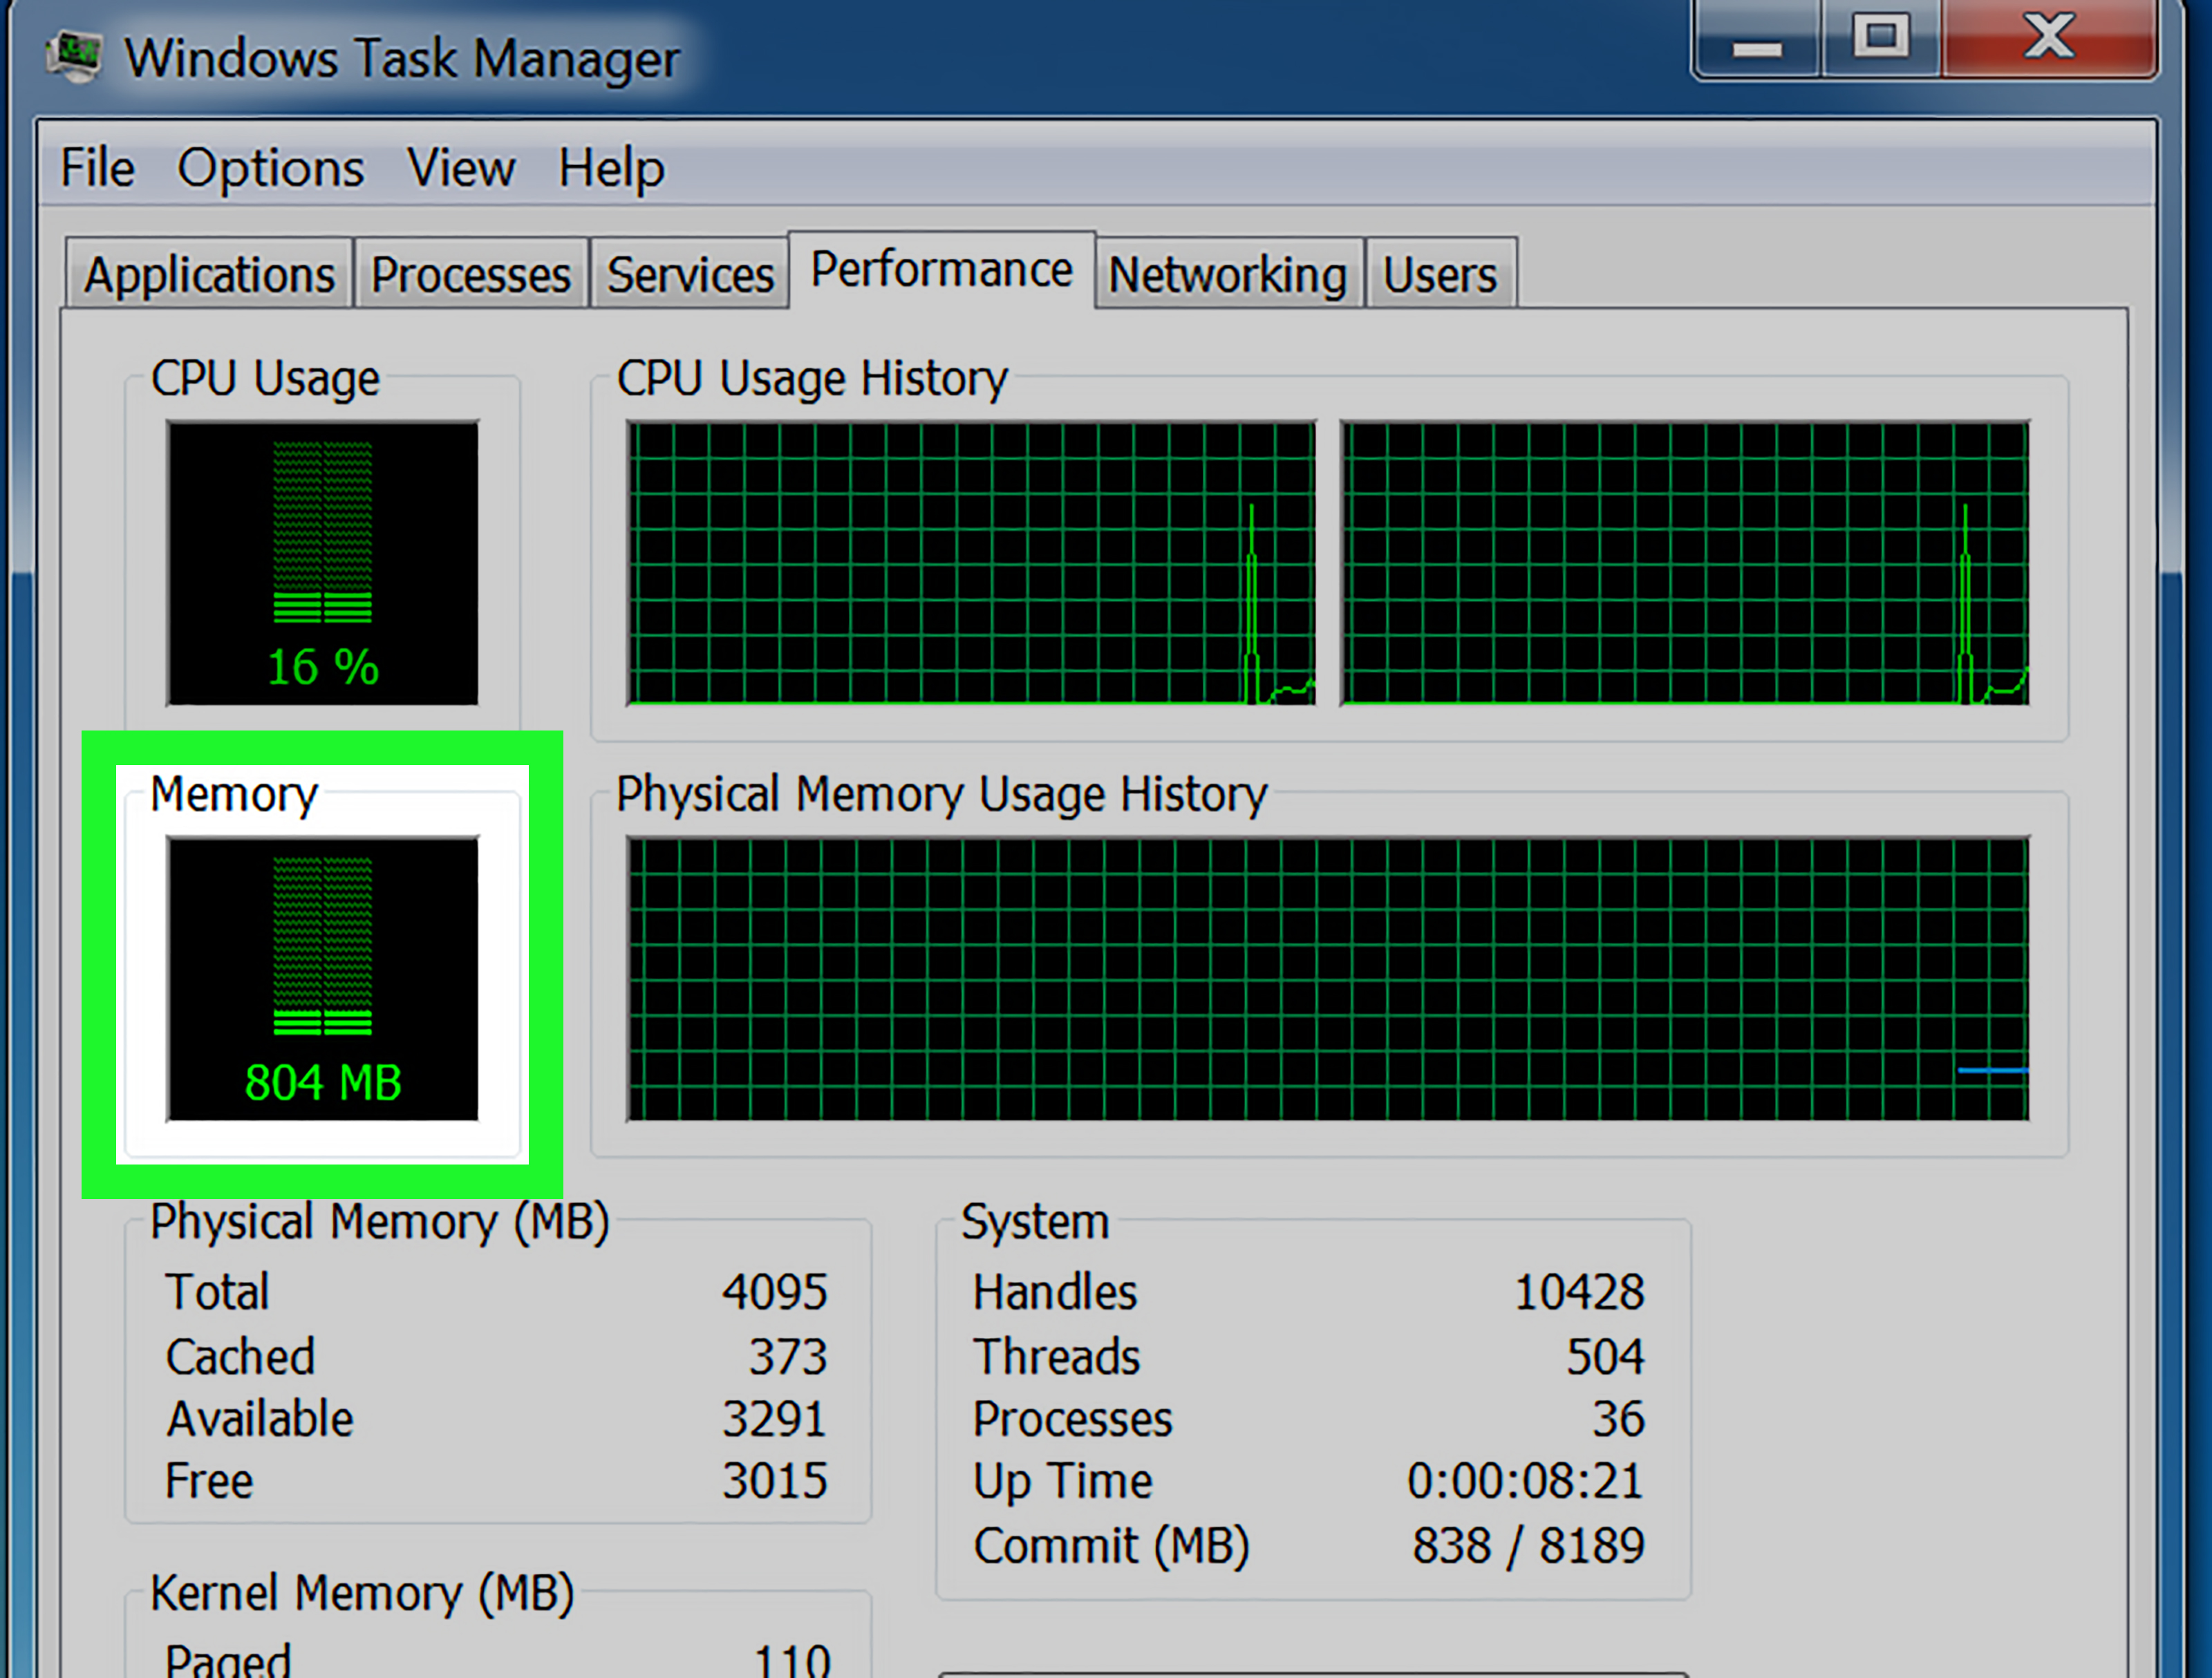
Task Manager is the most useful built-in option for everyday troubleshooting because it combines live usage data with basic hardware details.
- Press Ctrl + Shift + Esc.
- Select Performance in the left sidebar.
- Select Memory.
The large number near the upper-right corner shows your total recognized RAM. Depending on the computer, the page may also show:
- In use: Memory currently being used by Windows, applications, and drivers.
- Available: Memory that can be assigned to applications without heavy paging.
- Committed: Memory Windows has promised to processes, backed by RAM or the page file.
- Cached: Memory holding reusable data for faster access.
- Speed: The operating data rate reported for the memory.
- Slots used: The number of occupied memory slots reported by the firmware.
- Form factor: Commonly DIMM for desktops or SODIMM for laptops.
- Hardware reserved: RAM set aside for firmware or devices.
To identify memory-hungry programs, switch to Processes and click the Memory column. Windows will sort applications by current RAM consumption. Do not immediately terminate every process with a large number beside it. Web browsers, creative applications, games, virtual machines, and development tools may legitimately use several gigabytes.
Method 3: Use Windows System Information
System Information separates installed physical memory from the amount currently available to Windows.
- Press Windows + R.
- Type
msinfo32. - Press Enter.
- Select System Summary if it is not already selected.
- Locate the memory entries in the right pane.
Important entries include:
- Installed Physical Memory (RAM): The physical capacity detected in the computer.
- Total Physical Memory: The amount available for Windows to manage.
- Available Physical Memory: Memory that can currently be allocated.
- Total Virtual Memory: Physical memory plus page-file capacity.
- Available Virtual Memory: Currently unused committed capacity.
If Installed Physical Memory is significantly higher than Total Physical Memory, investigate hardware-reserved memory, firmware settings, integrated graphics allocation, operating-system limitations, or a poorly seated module.
Method 4: Check Individual RAM Modules With PowerShell
PowerShell is useful when you need module-level information such as capacity, manufacturer, part number, speed, and physical slot.
- Right-click the Start button.
- Select Terminal or PowerShell.
- Run the following command:
Each row normally represents one physical memory device. For example, two rows showing 8 GB each indicate a total of 16 GB installed across two modules.
The values are obtained from information supplied by the computer’s firmware. Some manufacturers leave fields blank or report generic information, so an empty manufacturer or unusual slot name does not automatically indicate defective RAM.
What About Command Prompt and WMIC?
Older tutorials frequently recommend commands beginning with wmic memorychip. They may still work on some systems, but WMIC has been deprecated and may not be installed or enabled on newer Windows configurations. PowerShell’s Get-CimInstance command is the more dependable modern choice.
How to Check RAM on a Mac
Mac users can check installed memory through About This Mac or System Information, while Activity Monitor provides the best view of real-time memory performance.
Method 1: Use About This Mac
- Click the Apple menu in the upper-left corner.
- Select About This Mac.
- Look for the memory amount in the hardware summary.
You can also open System Settings, choose General, and then select About. The page displays your Mac model, processor or chip, memory, serial number, and macOS version.
On Apple silicon Macs, the value may be described as Memory or Unified Memory. Unified memory is shared efficiently among the CPU, GPU, and other components. It is part of the system architecture and generally cannot be upgraded after purchase.
Method 2: Open the Detailed System Report
- Open System Settings.
- Select General.
- Select About.
- Click System Report.
A faster shortcut is to hold the Option key while opening the Apple menu, then choose System Information.
On compatible Intel-based Macs with separate memory modules, the Memory section may display slot size, type, speed, and status. On Apple silicon systems, the total memory is generally shown in the Hardware Overview because the memory is integrated rather than installed in conventional user-accessible slots.
Method 3: Check Live Memory Usage in Activity Monitor
- Press Command + Space to open Spotlight.
- Type Activity Monitor.
- Open the application.
- Select the Memory tab.
The table shows how much memory each process is using. Click the Memory column to place the largest consumers at the top.
The summary below the process list includes:
- Physical Memory: Total installed memory.
- Memory Used: RAM currently allocated.
- App Memory: Memory consumed by applications and their processes.
- Wired Memory: System memory that must remain in RAM.
- Compressed: Data compressed to create more usable memory.
- Cached Files: Reusable data stored in otherwise available RAM.
- Swap Used: Storage space currently acting as an overflow area for RAM.
The most important indicator is the Memory Pressure graph. Green means macOS is serving current memory demands efficiently. Yellow indicates increasing pressure, and red indicates that available memory resources are under substantial strain.
Method 4: Check Mac Memory With Terminal
To display the installed memory in Terminal, open Terminal through Spotlight and run:
For the raw memory capacity in bytes, run:
To convert bytes to gigabytes, divide the result by 1,073,741,824. Terminal commands are especially useful when collecting system information remotely or adding hardware checks to a support script.
How to Interpret Your RAM Results
Installed RAM Versus Usable RAM
Usable memory is often slightly lower than installed memory. A system with 16 GB installed might report approximately 15.5 GB to 15.8 GB usable because a portion is reserved for firmware or hardware.
A very large discrepancy deserves investigation. For example, if 16 GB is installed but only 8 GB is usable, possible causes include an improperly seated module, an unsupported configuration, a firmware setting, a defective slot, or unusually large hardware reservations.
High RAM Usage Is Not Automatically a Problem
Modern operating systems try to use otherwise idle RAM for caching. Empty memory provides no performance benefit merely by sitting there looking pristine. Cached data can usually be released quickly when another program needs space.
Focus on responsiveness, available memory, memory pressure, and swap activity rather than a single percentage. A computer using 75% of its RAM while remaining responsive may be healthier than one using 55% while constantly swapping data to a slow drive.
RAM Speed and Configured Speed
A memory module may advertise one maximum speed while operating at a lower configured speed. This can happen because of processor limits, motherboard limits, mixed modules, firmware defaults, or disabled performance profiles.
Do not change XMP, EXPO, or other firmware memory settings unless the computer and memory officially support them. An aggressive memory profile can produce crashes even when the computer appears stable during light use.
Slots Used and Upgradeability
“Two of four slots used” usually means you may have room to add modules. However, Task Manager and firmware data are not infallible. Some laptops contain soldered memory plus one physical slot, and some systems report nonexistent or unavailable slots.
Before purchasing RAM, confirm the exact computer or motherboard model, maximum supported capacity, DDR generation, module form factor, supported speeds, and recommended slot arrangement. Manufacturers such as Dell, HP, Lenovo, Kingston, and Crucial recommend checking the model documentation or a validated compatibility tool rather than buying memory based only on capacity.
How to Test RAM for Hardware Errors
Checking capacity tells you what the operating system recognizes. A diagnostic test helps determine whether the memory can reliably store and retrieve data.
Run Windows Memory Diagnostic
- Save your work and close all applications.
- Press Windows + R.
- Type
mdsched.exe. - Press Enter.
- Select Restart now and check for problems.
The computer will restart and test its memory. Press F1 during the diagnostic if you need to choose a more thorough Extended test, and press F10 to apply the selection.
Windows normally displays a result after you sign back in. If the notification disappears, open Event Viewer and search for entries associated with MemoryDiagnostics-Results. A detected error should be taken seriously, although additional testing may be needed to identify which module or slot is responsible.
Run Apple Diagnostics
Disconnect unnecessary external devices before starting. Keep the keyboard, mouse, display, Ethernet connection, and power connection attached when required.
On an Apple silicon Mac:
- Shut down the Mac.
- Press and hold the power or Touch ID button.
- Release it when startup options appear.
- Press and hold Command + D.
On an Intel-based Mac:
- Turn on the Mac.
- Immediately press and hold D.
- If that does not work, restart and try Option + D.
Apple Diagnostics checks internal hardware and displays reference codes when it detects a potential problem. It does not diagnose every software conflict or every intermittent memory fault, so passing the test does not prove that every crash is imaginary.
How Much RAM Do You Need?
Memory requirements vary more by workload than by job title. Someone who writes documents may need less memory than someone who edits 4K video, even if both have the impressive title of “Senior Person Who Clicks Things.”
- 8 GB: Suitable for basic browsing, email, streaming, and light office work, but multitasking may be limited.
- 16 GB: A practical general-purpose capacity for office work, studying, moderate gaming, and everyday multitasking.
- 32 GB: Helpful for professional creative applications, software development, large spreadsheets, newer games, and virtual machines.
- 64 GB or more: Common in demanding workstations used for high-resolution video, engineering, scientific workloads, large datasets, and multiple virtual machines.
You probably need more RAM when memory pressure regularly reaches yellow or red, Windows consistently has very little available memory, swap usage grows heavily during normal work, or closing one major application immediately restores performance.
More RAM will not fix every slow computer. A nearly full storage drive, overheating processor, failing SSD, malware, background synchronization, outdated software, or weak CPU can create similar symptoms.
Real-World Experiences: What Checking RAM Actually Reveals
In practical troubleshooting, the most valuable RAM check is rarely the fanciest one. I usually begin with the simplest question: does the operating system recognize the amount of memory that should be installed? That basic comparison has exposed more problems than elaborate benchmark charts.
One common scenario involves a desktop that was upgraded from 8 GB to 16 GB but still reports only 8 GB in Windows Settings. In cases like this, the problem is often physical rather than mysterious. A memory module may not be fully seated, the motherboard may require the modules to be installed in specific paired slots, or one module may be incompatible. Powering off the computer, consulting the motherboard manual, and reinstalling the modules in the recommended slots can solve the issue immediately.
Another frequent experience is the “my RAM is always full” complaint. Task Manager might show 70% or 80% usage, which looks alarming until the workload is examined. A browser with 40 tabs, a video meeting, an image editor, cloud synchronization, and several background utilities can legitimately consume most of 16 GB. If the computer remains responsive and a reasonable amount of memory is still available, the number alone is not evidence of failure.
The opposite can also happen. A computer may show only moderate overall usage while one misbehaving application steadily consumes more memory. Sorting the Processes page by Memory and watching it for several minutes can reveal a program whose usage rises without falling. Restarting that application may temporarily fix the slowdown, while updating or reinstalling it addresses the underlying memory leak.
On Macs, the Memory Pressure graph is generally more informative than obsessing over “free” memory. I have seen users worry because macOS had filled most of their unified memory with applications and cached files, yet the graph remained green and swap usage stayed low. That is normal resource management, not a digital emergency. By contrast, repeated yellow or red pressure during an ordinary workday is meaningful, especially when accompanied by beach balls, delayed application switching, or rapidly increasing swap usage.
Creative workloads provide another useful example. A Mac or PC may feel perfectly fast during email and browsing but struggle when editing large photos, rendering video, compiling a project, or running virtual machines. Checking memory while the demanding task is active produces far more useful information than checking immediately after startup. A quiet desktop tells you very little about peak workload requirements.
Hardware diagnostics matter most when symptoms are unpredictable. Random blue screens, corrupted files, installation failures, unexplained restarts, and crashes affecting unrelated applications can point toward unstable memory. A quick diagnostic may find an obvious error, but intermittent faults sometimes appear only after extended testing or when modules are tested individually. Overclocked memory should also be returned to its default configuration before assuming a component is defective.
The biggest lesson is to combine several observations. Check installed capacity, watch live usage during the actual workload, examine available memory or memory pressure, review swap behavior, and run a hardware test when crashes are involved. One statistic can mislead you; a pattern usually tells the truth.
Conclusion
To check your computer’s memory on Windows, start with Settings for installed capacity and Task Manager for live usage, speed, slots, and form factor. Use System Information or PowerShell when you need additional hardware details. On a Mac, About This Mac and System Information show the installed memory, while Activity Monitor reveals whether macOS is handling your workload efficiently.
Do not judge memory health by percentage alone. Consider available memory, memory pressure, swap activity, application behavior, and whether the computer remains responsive. When unexplained crashes or startup problems occur, run Windows Memory Diagnostic or Apple Diagnostics before purchasing replacement hardware.
Checking RAM takes only a few minutes, costs nothing, and can save you from buying an upgrade your computer does not needor help you discover the upgrade it has been quietly begging for.