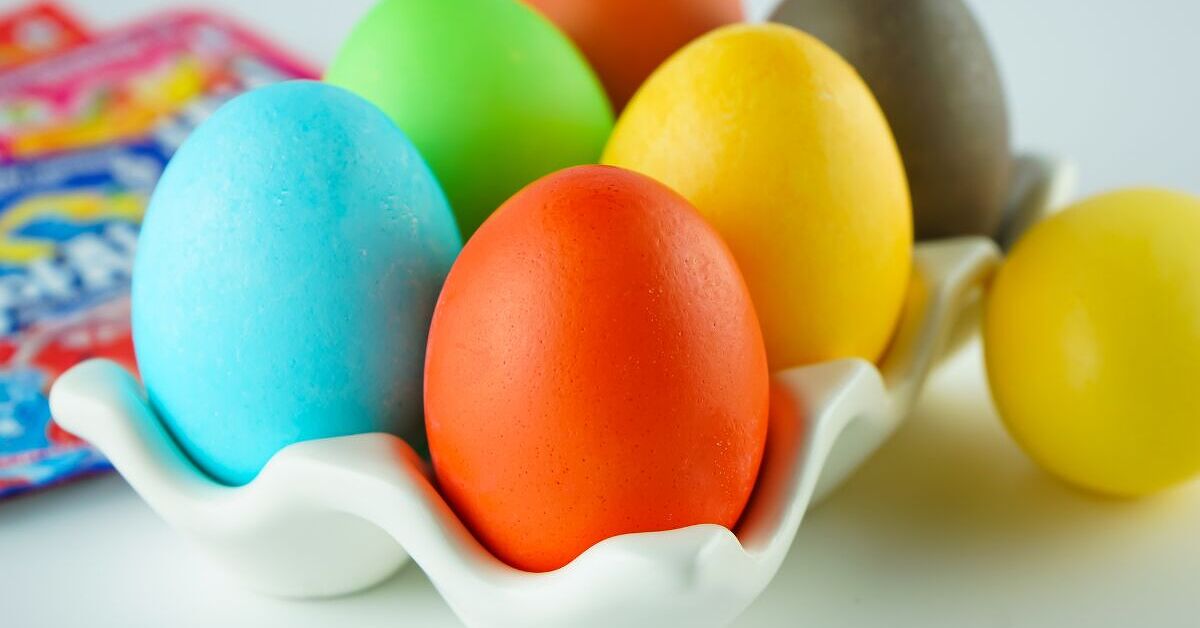
If you have ever opened a packet of Kool-Aid and thought, “This could probably stain something forever,” congratulations: you have already understood the basic science behind Kool-Aid Easter eggs. This cheerful little drink mix is colorful, fragrant, inexpensive, and surprisingly effective as an Easter egg dye. Even better, it does not require a fancy store-bought dye kit, a chemistry degree, or a kitchen that smells like a vinegar factory having an emotional breakdown.
Learning how to dye Easter eggs with Kool Aid is one of the easiest ways to make bright, kid-friendly, budget-friendly Easter eggs at home. The process is simple: mix unsweetened Kool-Aid powder with water, soak cooled hard-boiled eggs, let them dry, and admire your fruity little masterpieces. The colors can be bold, pastel, speckled, swirled, or layered depending on the flavors you use and how long the eggs sit in the dye bath.
This guide walks you through the full process, including supplies, color ideas, step-by-step instructions, troubleshooting tips, food safety, and real-life experience notes from the kind of Easter egg session where someone inevitably turns their fingers blue and calls it “art.”
Why Use Kool-Aid to Dye Easter Eggs?
Kool-Aid egg dyeing is popular because it is easy, affordable, and delightfully nostalgic. Many Easter egg dye kits rely on dye tablets, water, and vinegar. Kool-Aid works a little differently because most unsweetened drink mix packets already contain color and acid, usually citric acid. That acidity helps the dye cling to the calcium-rich eggshell, which is why you can often skip the vinegar entirely.
Another bonus is the smell. Traditional egg dyeing can leave the kitchen smelling like someone pickled the Easter Bunny’s basket. Kool-Aid dye, on the other hand, fills the room with cherry, lemon, orange, grape, or blue raspberry aromas. It is still a craft project, not a beverage station, but at least your nose gets invited to the party.
Main Benefits of Kool-Aid Easter Egg Dye
- Low cost: One packet usually dyes several eggs.
- Simple ingredients: You mainly need Kool-Aid, water, and eggs.
- No strong vinegar smell: Kool-Aid already contains acid, so vinegar is usually optional.
- Kid-friendly process: The steps are easy enough for supervised children.
- Bright colors: Flavors like cherry, orange, lemonade, and blue raspberry can produce beautiful shades.
- Creative flexibility: You can dip, layer, speckle, stripe, or marble the eggs.
Supplies You Need
Before you start dyeing Easter eggs with Kool Aid, gather everything in one place. This saves you from doing the classic craft-project shuffle: one hand holding a wet egg, the other frantically searching for paper towels.
Basic Supplies
- Hard-boiled eggs, fully cooled
- Unsweetened Kool-Aid packets in assorted flavors
- Small bowls, mugs, or cups
- Water, preferably warm or room temperature
- Spoons, tongs, or a wire whisk for dipping
- Paper towels or a drying rack
- A covered work surface, such as newspaper, parchment paper, or a washable tray
- Disposable gloves, optional but highly recommended for anyone who dislikes rainbow fingertips
Optional Decorating Tools
- Rubber bands for striped eggs
- White crayons for wax-resist designs
- Stickers for shapes and patterns
- Painter’s tape or washi tape
- Markers for adding faces, dots, or names after dyeing
- Vegetable oil for marbled effects
Best Kool-Aid Flavors for Egg Dyeing
Not every Kool-Aid flavor behaves the same way on eggshells. Some produce bold, clear colors, while others turn out softer, moodier, or a little mysterious. That mystery can be charming, but it is less charming when you expected spring lavender and got “storm cloud in a puddle.”
Flavor and Color Guide
- Cherry: Bright red or pink-red
- Tropical Punch: Red-orange or rosy coral
- Orange: Clear orange
- Lemonade: Pale yellow
- Blue Raspberry Lemonade: Blue or aqua
- Green Apple: Light green
- Grape: Purple-gray or muted lavender, depending on the egg and soaking time
- Pink Lemonade: Soft pink
For the brightest Easter eggs, start with white eggs. For richer, earthier colors, try brown eggs. Brown eggs can create deeper jewel tones, especially with red, orange, and blue dyes. The final shade will be warmer and less pastel, which can look surprisingly elegantlike the eggs shop at a tiny artisan boutique and own linen napkins.
How to Dye Easter Eggs With Kool Aid: Step-by-Step
This basic Kool-Aid egg dye recipe is simple and reliable. You can adjust the water amount for lighter or darker colors, but the classic method uses one packet of unsweetened Kool-Aid per small cup of water.
Step 1: Hard-Boil and Cool the Eggs
Start with clean, hard-boiled eggs. Let them cool completely before dyeing. Warm eggs may sweat or create uneven dye marks, and they are harder for children to handle safely. If you plan to eat the eggs later, keep food safety in mind from the beginning: refrigerate cooked eggs until you are ready to decorate, and do not leave them out for long periods.
Step 2: Protect Your Work Area
Kool-Aid can stain hands, counters, towels, and anything else brave enough to stand nearby. Cover your table with newspaper, parchment paper, a plastic tablecloth, or a rimmed baking sheet. If children are helping, assume the dye will travel. It has ambition.
Step 3: Mix the Kool-Aid Dye
Pour one packet of unsweetened Kool-Aid into a small bowl, mug, or cup. Add about 2/3 cup to 1 cup of water and stir until the powder dissolves. Use less water for stronger colors and more water for softer shades. Warm water helps the powder dissolve quickly, but it does not need to be boiling.
Most Kool-Aid egg dye recipes do not require vinegar because the drink mix already contains citric acid. However, if your colors look too pale, you can add a small splash of white vinegar to strengthen the dye bath. Use a light hand; too much acid may create uneven spots or make the shell feel rough.
Step 4: Dip the Eggs
Use a spoon, tongs, or a wire whisk to lower one egg into each dye cup. A whisk works especially well for kids because the egg sits inside the wire loops like a tiny VIP passenger. Let the egg soak for about 5 to 10 minutes. For deeper color, leave it a little longer and check every few minutes.
Step 5: Remove and Dry
Lift the egg carefully and place it on a drying rack, paper towel, or egg carton. Avoid rubbing the wet egg because the color can smear before it sets. Let the eggs dry fully before adding stickers, marker details, or another layer of dye.
Step 6: Add Designs or Second Dips
Once the first color dries, you can dip part of the egg into another color for a two-tone look. Hold the egg halfway in the dye for a split-color effect, or dip only the bottom third for an ombré design. You can also wrap rubber bands around the egg before dyeing to create stripes, then remove them after the egg dries.
Creative Kool-Aid Easter Egg Ideas
Plain dyed eggs are beautiful, but Kool-Aid gives you plenty of room to play. These ideas are easy enough for beginners and fun enough that adults may suddenly become very serious about “just one more egg.”
Striped Kool-Aid Eggs
Wrap rubber bands around a cooled egg before dipping it into the dye. The bands block color from reaching parts of the shell, leaving white stripes behind. After the egg dries, remove the bands. For extra color, dip the striped egg into a second Kool-Aid dye bath.
Wax-Resist Eggs
Draw designs on the eggshell with a white crayon before dyeing. The wax resists the dye, so your drawings appear after the egg is colored. Try names, flowers, dots, zigzags, bunnies, or extremely questionable chicken portraits.
Speckled Eggs
For a speckled look, dip a toothbrush into concentrated Kool-Aid dye and gently flick the bristles toward a dry egg. Do this over a protected tray unless you want your backsplash to celebrate Easter until July.
Marbled Kool-Aid Eggs
Add a few drops of vegetable oil to the dye cup and swirl lightly. Dip the egg through the oily dye mixture. The oil prevents some areas from absorbing color evenly, creating a marbled effect. Let the egg dry carefully because oily eggs can be slippery little escape artists.
Layered Sunset Eggs
Start with lemonade or orange dye, let the egg dry, then dip only part of it into cherry or tropical punch. The result can look like a tiny sunset. Blue raspberry over lemonade can create greenish areas, while cherry over blue can produce purple tones.
Troubleshooting Common Problems
Kool-Aid Easter eggs are easy, but a few things can go sideways. Fortunately, most problems are simple to fix.
Problem: The Color Is Too Light
Use less water, add another packet of Kool-Aid, or let the egg soak longer. White eggs usually show color more clearly than brown eggs, especially with yellow and pink dyes.
Problem: The Egg Looks Blotchy
Blotches can happen if the egg is greasy, wet, or handled too much while drying. Wash and dry eggs before dyeing, and let them cool completely. After dipping, place them gently on a rack and resist the urge to polish them like tiny bowling balls.
Problem: Grape Looks Gray
Grape Kool-Aid often creates a muted purple-gray rather than a bright violet. If you want a clearer purple, try dipping first in blue raspberry, letting the egg dry, and then briefly dipping it in cherry or pink lemonade.
Problem: The Dye Stains Hands
Wear gloves, use spoons or whisks, and keep a damp cloth nearby. If hands are stained, wash with soap and water first. A paste made from baking soda and a little water can help lift stubborn color, but scrub gently.
Can You Eat Easter Eggs Dyed With Kool-Aid?
Yes, you can eat Easter eggs dyed with Kool-Aid if they were handled safely, the shells are not cracked, and the eggs did not sit out too long. Kool-Aid is a food product, but safe dye does not automatically mean safe egg. The bigger issue is time, temperature, and cleanliness.
Hard-boiled eggs should not be left at room temperature for more than two hours. If the room is very warm, the safe window is shorter. Refrigerate dyed eggs if you plan to eat them. If eggs were used in an outdoor hunt, placed on the ground, handled by many people, or left unrefrigerated too long, treat them as decorations rather than snacks.
Food Safety Tips
- Use clean, uncracked eggs.
- Wash hands before and after handling eggs.
- Keep hard-boiled eggs refrigerated before and after dyeing.
- Do not eat eggs that have been unrefrigerated for more than two hours.
- Do not eat eggs with cracked shells if dye or dirt may have reached the inside.
- Use plastic eggs for outdoor hunts if the weather is warm or the hunt will last a long time.
White Eggs vs. Brown Eggs: Which Works Better?
White eggs are the easiest choice if you want classic bright Easter colors. The white shell acts like a blank canvas, so cherry looks red, orange looks orange, and blue raspberry has a good chance of looking like it came from an Easter basket instead of a science lab.
Brown eggs create a different effect. The tan shell deepens the color and gives the finished eggs a warmer, more natural look. Blue may turn teal, red may look burgundy, and yellow may become golden. If you like rustic Easter decor, farmhouse baskets, or colors that whisper instead of shout, brown eggs are worth trying.
How Long Should Eggs Soak in Kool-Aid Dye?
Most eggs need 5 to 10 minutes in Kool-Aid dye. A quick dip creates a pale pastel shade. A longer soak creates stronger color. For very deep shades, you can leave eggs in the dye for 15 minutes or more, checking often. However, extremely long soaking may make some shells look uneven, especially if the dye is very concentrated.
If you are dyeing eggs with children, set a timer. Otherwise, someone will ask “Is it ready yet?” every 14 seconds, and suddenly Easter becomes a test of emotional endurance.
Do You Need Vinegar With Kool-Aid Egg Dye?
Usually, no. One reason Kool-Aid works so well as Easter egg dye is that unsweetened drink mix contains acid along with food coloring. That acid helps the dye bond to the eggshell. Traditional food coloring dye baths often use vinegar because vinegar lowers the pH of the water and helps color stick more effectively. Kool-Aid brings some of that acidity to the cup already.
Still, vinegar can be useful if your dye looks weak. Add 1 teaspoon of white vinegar to the dye cup, stir, and test one egg. Do not add too much, because stronger acid is not always better. It can make the shell surface react unevenly, which may lead to streaks or bubbles.
Cleanup Tips After Dyeing Eggs
Kool-Aid dye is fun until it meets a white countertop, a favorite shirt, or the child who promised to be “super careful.” Wipe spills quickly with a damp cloth. For nonporous surfaces, mild dish soap and warm water usually work. For stubborn spots, try a baking soda paste and gentle rubbing.
For clothing, rinse the stain with cool water as soon as possible and use a stain remover before washing. Avoid drying stained fabric with heat until the stain is gone, because heat can set color. For hands, soap and water may be enough, but baking soda paste can help with lingering color.
Experience Notes: What It Is Really Like to Dye Easter Eggs With Kool-Aid
The first thing you notice when dyeing Easter eggs with Kool-Aid is the smell. Instead of the sharp vinegar scent that usually announces “Easter crafting has begun,” the kitchen smells like a fruit punch stand at a school carnival. Cherry is bold, orange is cheerful, and blue raspberry smells like childhood made a dramatic entrance wearing sunglasses.
In real-life use, the process feels more relaxed than using traditional dye tablets. There is no waiting for tablets to fizz, no guessing whether the vinegar ratio is right, and no tiny wire egg dipper bending at the worst possible moment. You tear open a packet, stir it into water, and the color appears immediately. Kids love this part because each cup looks like a magic potion. Adults love it because the project costs very little and does not require a special trip to the craft aisle.
The best results usually come from setting up several cups at once. Cherry, orange, lemonade, blue raspberry, and green apple make a bright, spring-like palette. Grape can be unpredictable, but that is not always bad. Sometimes it turns smoky lavender, sometimes gray-purple, and sometimes something best described as “moody dinosaur.” If perfection is the goal, test one egg first. If fun is the goal, let grape be grape and give it a name.
One practical lesson: dry the eggs carefully. The color can look gorgeous when the egg comes out of the cup, but wet dye smudges easily. A cooling rack works better than a flat paper towel because the egg touches less surface area. If you use an egg carton, remember that wet dye may pool where the egg sits. That can create darker spots, which may be either a problem or a design feature depending on how confidently you explain it.
Another experience-based tip is to use a whisk for younger kids. Open the loops slightly, slide the egg inside, and let the child lower the whisk into the dye. It gives them more control and reduces the odds of an egg dropping into the cup like a cannonball. Spoons work too, but they require steadier hands. Tongs are useful for adults, though they can leave marks if squeezed too hard.
Layering colors is where the project becomes especially fun. A lemonade egg dipped halfway into blue raspberry can turn green along the overlap. Orange dipped into cherry becomes warmer and deeper. Pink lemonade over blue can create a soft purple if you are patient. The key is letting the first color dry before adding the second. Wet-on-wet dipping can look muddy, and while mud is natural, it is not usually the Easter vibe people are chasing.
The biggest surprise is how much personality each egg develops. Some come out smooth and bright. Others have freckles, streaks, pale patches, or dramatic little dye clouds. That handmade look is part of the charm. Store-bought perfection is nice, but Kool-Aid Easter eggs feel playful and personal. They look like something made at a kitchen table with laughter, sticky fingers, and at least one person asking if the dye is drinkable. For the record: once it has had eggs in it, no. Absolutely not. The Easter Bunny would like everyone to make wise choices.
If you want a low-stress Easter craft, this method is a keeper. It is colorful enough for kids, simple enough for beginners, and flexible enough for creative adults. Plus, the supplies are easy to find, the cleanup is manageable if you prepare your surface, and the finished eggs look festive in baskets, on brunch tables, or tucked into the refrigerator where everyone can admire them before turning them into egg salad.
Conclusion
Dyeing Easter eggs with Kool-Aid is a bright, budget-friendly, and wonderfully simple twist on a classic holiday tradition. With just unsweetened Kool-Aid packets, water, cooled hard-boiled eggs, and a little patience, you can create colorful Easter eggs without relying on a boxed dye kit. The built-in acidity of the drink mix helps the color cling to the shell, while the fruity scent makes the whole project feel more like a party and less like a vinegar experiment.
For best results, use white eggs for vibrant shades, brown eggs for richer earthy tones, and let each egg dry fully before adding extra designs. Keep food safety in mind if you plan to eat the eggs, and refrigerate them promptly after decorating. Whether you go classic, striped, speckled, marbled, or wildly experimental, Kool-Aid Easter eggs are proof that a little packet of powder can bring a lot of springtime joy.