Note: This guide is written for homeowners and renters who want to diagnose a humming fluorescent light safely. Basic cleaning, tube replacement, and visual inspection are usually DIY-friendly. Anything involving fixture wiring, ballast replacement, melted sockets, burning smells, or uncertain electrical work should be handled by a licensed electrician.
A humming fluorescent light is one of those tiny household problems that slowly becomes a full-time roommate. At first, it is just a soft buzz above the garage workbench. Then it becomes the soundtrack of your laundry room, kitchen, basement, or office. Before long, you are standing under the fixture wondering whether the light is broken, haunted, or simply practicing for a career as an angry refrigerator.
The good news: fluorescent light humming usually has a practical cause. Most often, the sound comes from the ballast, the component that starts the lamp and regulates current after the tube is lit. Older magnetic ballasts are famous for humming because their internal metal parts can vibrate as electricity passes through them. Loose fixture parts, aging tubes, failing starters, poor lamp contact, and worn lamp holders can make the noise louder.
The better news: many fixes are simple. Sometimes the solution is as easy as reseating the tube, tightening a loose cover, replacing an old fluorescent lamp, or swapping a failing starter. In other cases, the real cure is replacing an old magnetic ballast with a quieter electronic ballast or upgrading the fixture to LED. This article explains how to fix fluorescent light humming in 9 practical steps, with safety first and guesswork last.
Why Fluorescent Lights Hum
Fluorescent lamps do not work like old incandescent bulbs. A fluorescent tube needs a controlled electrical current to start and stay lit. That job belongs to the ballast. Without a ballast, the lamp could draw too much current and damage itself. In older fixtures, the ballast is often magnetic. Magnetic ballasts can produce an audible hum because the internal core and windings vibrate slightly during operation.
A little hum from an old fluorescent fixture can be normal, especially in garages, workshops, basements, storage rooms, and older commercial spaces. But a loud buzz, new vibration, flickering, delayed start, dim tube, burnt smell, or unusually hot fixture is not something to ignore. Those symptoms can point to a failing ballast, bad lamp connection, worn socket, or overheating component.
Think of the fixture as a small team: tube, ballast, starter, sockets, cover, and housing. If one member of the team gets loose or tired, the whole thing may start complaining audibly. Your goal is to identify whether the humming is harmless vibration, an aging lamp, a loose part, or a component that needs replacement.
Before You Start: Safety Comes First
Before touching any fluorescent fixture, turn off power at the circuit breaker whenever you plan to remove covers, tubes, or inspect internal components. Do not rely only on the wall switch if you will be working inside the fixture. Use a non-contact voltage tester when possible, and avoid working on a fixture if you are unsure whether it is energized.
Also remember that fluorescent tubes contain a small amount of mercury. Handle tubes carefully, avoid twisting them aggressively, and never force a lamp that does not want to move. If a tube breaks, ventilate the area, keep people and pets away, and clean it up carefully according to safe mercury-bulb cleanup practices. This is not the moment to attack the floor with a vacuum like you are in a cleaning commercial.
Helpful Tools and Supplies
- Step ladder or stable platform
- Non-contact voltage tester
- Screwdriver
- Work gloves and eye protection
- Replacement fluorescent tubes of the correct type
- Replacement starter, if your fixture uses one
- Replacement ballast, if needed and compatible
- Dry cloth or soft brush for dust removal
- Painter’s tape and marker for labeling wires if a professional ballast replacement is planned
How to Fix Fluorescent Light Humming: 9 Steps
Step 1: Listen Closely and Identify the Source
Start with observation. Turn the light on and listen from a safe distance. Is the hum coming from the center of the fixture where the ballast sits? Is the plastic diffuser rattling? Does the sound begin immediately, or does it get louder after the light warms up? Does the tube flicker, blink, or glow dimly at the ends?
A steady low hum often points to an older magnetic ballast. A rattling sound may come from a loose cover, loose fixture body, or poorly seated tube. A louder buzz combined with flickering may indicate a bad tube, bad starter, failing ballast, or poor socket contact.
For example, if a garage light hums only when the plastic lens is installed, the lens may be vibrating against the metal frame. If the hum stays after the lens is removed, the ballast or lamp connections become more suspicious. Diagnosis first; screwdriver drama second.
Step 2: Turn Off Power Before Touching the Fixture
Once you are ready to inspect the fixture, turn off the circuit breaker. Confirm the light no longer turns on. If you have a voltage tester, use it before touching internal parts. This is especially important for ceiling-mounted fixtures, older homes, multi-switch rooms, basements, and any fixture where wiring history is unknown.
If you smell burning plastic, see melted lamp holders, notice scorch marks, or hear crackling instead of a simple hum, stop using the fixture and call an electrician. Humming is annoying; overheating is a different conversation entirely.
Step 3: Remove the Diffuser and Check for Loose Parts
Many fluorescent fixtures have a plastic diffuser, metal cover, clips, screws, or a wraparound lens. Remove the cover carefully and check whether anything is loose. A lightweight diffuser can vibrate enough to sound like an electrical problem even when the ballast is only mildly noisy.
Look for loose screws on the fixture housing, loose clips, bent metal, or a cover that no longer sits firmly. Tighten visible screws gently. Do not overtighten plastic parts because old plastic can crack faster than a cookie in a backpack.
After tightening loose exterior parts, restore power and test the light briefly if it is safe to do so. If the hum is gone, congratulations: your “ballast problem” was actually a cover doing percussion practice.
Step 4: Reseat the Fluorescent Tubes
A fluorescent tube that is not seated correctly can flicker, buzz, or make poor contact with the lamp holders. With power off, remove each tube by gently rotating it about a quarter turn until the pins align with the socket slots. Lower it carefully with two hands.
Inspect the tube pins. They should be straight, clean, and not corroded. Check the lamp holders for cracks, discoloration, or looseness. If everything looks normal, reinstall the tube by aligning the pins with the socket slots, pushing it into place, and rotating until it locks securely.
Loose tubes are common in laundry rooms, garages, and workshops where vibration from appliances, garage doors, or power tools can slowly work parts out of position. A tube that is even slightly misaligned may make the fixture behave like it has a much bigger problem.
Step 5: Replace Old or Mismatched Tubes
If the tubes are dark at the ends, slow to start, flickering, dim, or visibly old, replace them with the correct type. Match the lamp type printed on the tube, such as T8, T12, or T5, along with the wattage and length. A fixture designed for one lamp type may not work properly with another unless the ballast is compatible.
Old fluorescent tubes can make a ballast work harder, and a struggling ballast can hum more loudly. Replacing the tubes is often cheaper and easier than replacing the ballast, so it is a sensible early step.
Change all tubes in the same fixture at the same time if they are the same age. Mixing one tired tube with one new tube may keep the fixture technically alive, but it can also leave you chasing uneven brightness, flicker, and noise.
Step 6: Replace the Starter if Your Fixture Has One
Some older fluorescent fixtures use a small cylindrical starter. It usually twists into a socket and helps start the lamp. If the light blinks repeatedly, takes a long time to turn on, or hums during startup, the starter may be worn out.
With power off, remove the starter by pressing and twisting it counterclockwise. Replace it with the same type. Starters are inexpensive, and replacing one is often easier than trying to convince an old fixture to behave through positive thinking.
Not all fluorescent fixtures have starters. Many newer fixtures use rapid-start, instant-start, or electronic ballasts without a separate starter. If you do not see a starter, do not invent one. The fixture already made that design decision without you.
Step 7: Tighten the Ballast Mounting Screws
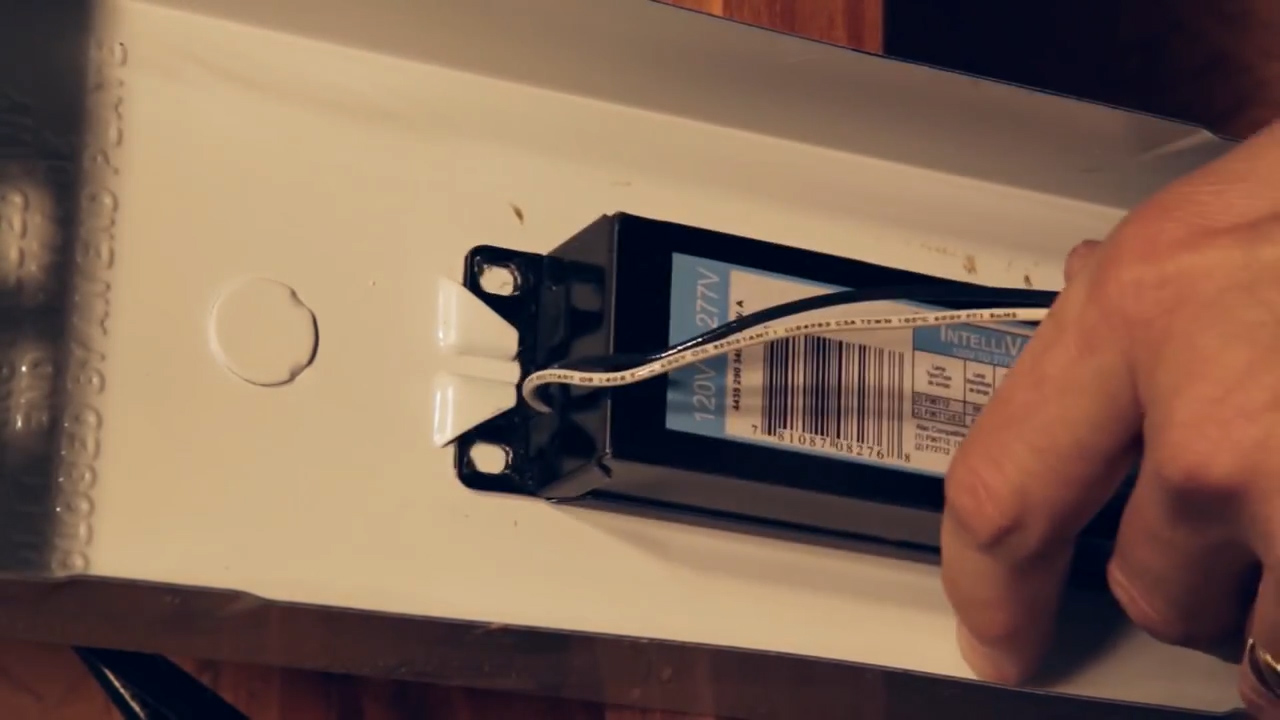
If the hum seems to come from the ballast area, the ballast may be loose. A ballast that is not tightly mounted can vibrate against the metal fixture body, turning a small internal buzz into a loud, resonant hum.
With power off and verified safe, remove the ballast cover if your fixture allows easy access. The ballast is usually a rectangular metal component mounted inside the fixture. Check whether its mounting screws are loose. Tighten them gently but firmly. The ballast should sit flat against the fixture housing.
This step can make a surprising difference. A slightly loose ballast can use the entire fixture as a speaker box. Tightening it is like telling the fixture, “Thank you for your concert, but the show is over.”
Step 8: Inspect for Ballast Failure Signs
If the humming remains loud, inspect for signs of a failing ballast. Warning signs include increased buzzing, flickering, delayed startup, dim or uneven light, excessive heat, oil leakage, swollen casing, burnt odor, scorch marks, or visible damage. Do not keep using a fixture that shows these symptoms.
A failing ballast should be replaced with a compatible unit. Compatibility matters. The replacement ballast must match the lamp type, number of lamps, voltage, starting method, and fixture requirements. For many homeowners, this is the point where hiring an electrician is the smartest and safest choice.
If you are comfortable with electrical work and local rules allow it, follow the ballast manufacturer’s wiring diagram exactly. Otherwise, let a qualified professional handle the replacement. A quiet light is nice; a correctly wired quiet light is much nicer.
Step 9: Upgrade to an Electronic Ballast or LED Fixture
If your fixture has an old magnetic ballast, replacing it with an electronic ballast can reduce or eliminate humming. Electronic ballasts operate differently and are usually quieter, more efficient, and better at reducing visible flicker. They are a common upgrade for older fluorescent fixtures.
Another option is converting to LED. LED shop lights, LED wraparound fixtures, and LED retrofit kits can remove the fluorescent hum problem entirely when installed correctly. Some LED tubes are designed to work with an existing ballast, while others require bypassing or removing the ballast. Read product instructions carefully because using the wrong LED tube with the wrong ballast can cause poor performance or safety issues.
If the fixture is old, rusty, poorly grounded, or has damaged sockets, replacing the entire fixture may be better than repairing one part at a time. This is especially true in kitchens, garages, laundry rooms, and workshops where dependable lighting matters.
Quick Troubleshooting Guide
If the Light Hums but Does Not Flicker
The most likely causes are an older magnetic ballast, loose ballast screws, loose fixture housing, or a vibrating diffuser. Start by checking covers and screws, then inspect the ballast mounting.
If the Light Hums and Flickers
Look at the tubes first. Replace dark-ended, mismatched, or old lamps. If the fixture has a starter, replace it. If the problem continues, the ballast may be failing.
If the Light Hums and Smells Hot
Turn it off and stop using it. A burnt smell, melted socket, discoloration, or excessive heat can indicate an unsafe condition. Call an electrician before turning the fixture back on.
If the Light Hums Only in Cold Weather
Cold temperatures can make older fluorescent lights start slowly and hum more noticeably, especially in garages and outdoor utility areas. Cold-rated lamps, a compatible ballast, or an LED fixture designed for the space may solve the issue.
Should You Repair the Fixture or Replace It?
Repair makes sense when the fixture is in good condition, the problem is a loose cover, the tubes are old, or the starter is bad. Ballast replacement can also be worthwhile if the fixture is high quality, built into a ceiling system, or part of a matching set.
Replacement makes sense when the fixture is old, noisy, rusty, ugly, inefficient, or repeatedly troublesome. If you have already replaced tubes and starters and the hum keeps coming back, the fixture may be telling you it is ready for retirement. Listen to it before it starts writing resignation letters in flicker code.
LED replacement is especially attractive in spaces where lights stay on for long periods. LEDs typically start instantly, run quietly, and avoid the classic fluorescent buzz. They also eliminate the need to keep spare fluorescent tubes leaning in the corner like fragile glass pool noodles.
Common Mistakes to Avoid
Buying the Wrong Tube
A T8 tube and a T12 tube may look similar at a glance, but they are not automatically interchangeable. Match the tube type and wattage to the fixture and ballast.
Ignoring the Ballast Label
The ballast label contains critical information about voltage, lamp type, wiring, and compatibility. Do not guess based only on fixture length.
Using the Wall Switch as Your Only Safety Step
Turning off the switch is not always enough when working inside a fixture. Use the breaker and verify power is off if you will touch internal parts.
Installing Random LED Tubes
LED tubes come in different types. Some use the existing ballast, some bypass it, and some can do both. Wrong combinations can lead to flicker, failure, overheating, or a very disappointing Saturday afternoon.
Ignoring Heat or Odor
A normal low hum is one thing. Heat, smoke, odor, melting, or discoloration is another. Stop using the fixture and get professional help.
Maintenance Tips to Keep Fluorescent Lights Quiet
Keep fixtures clean and dry. Dust can trap heat and make covers fit poorly. Replace tubes before they become severely darkened at the ends. Make sure tubes are seated firmly after cleaning or painting around a fixture. Avoid using fluorescent fixtures in damp areas unless they are rated for that environment.
In commercial spaces, schedule routine lighting checks. A humming fixture in an office, clinic, school, shop, or warehouse can affect concentration and comfort. Replacing old magnetic ballasts in batches may be more efficient than waiting for each fixture to complain individually.
For home use, pay attention to pattern changes. A fixture that has hummed softly for ten years may not be urgent. A fixture that suddenly gets louder, flickers, or smells hot deserves immediate attention. Your ears are useful diagnostic tools, even if they mostly spend the day listening to notifications.
Real-World Experiences: What Usually Works Best
In real homes and small workspaces, the most common fluorescent humming fixes are surprisingly ordinary. The first experience many people have is with a garage or basement fixture that starts buzzing louder over time. The homeowner assumes the whole fixture is dying, but after removing the plastic diffuser, the sound drops by half. A loose lens or bent metal tab was amplifying the ballast vibration. A few careful adjustments, and the light becomes tolerable again.
Another common scenario is the “old tube mystery.” A fluorescent fixture hums, flickers, and takes longer to start every week. Someone taps the tube, because tapping things is humanity’s oldest repair method. The light works for a day, then returns to buzzing. In this case, replacing both tubes with the correct type often improves performance immediately. If the fixture uses a starter, replacing that small part at the same time may solve the startup noise completely.
In workshops, humming often becomes noticeable because the space is otherwise quiet. A fixture over a bench may sound louder because the metal housing is attached to open framing, a thin ceiling panel, or a resonant surface. Tightening the fixture body and ballast screws can reduce vibration. Adding proper support to a slightly loose fixture can also help. The key is to avoid treating every hum as an electrical failure before checking the simple mechanical causes.
Office and kitchen fixtures tell a different story. These lights are often used for long hours, so old magnetic ballasts eventually become the main culprit. People replace tube after tube, but the hum stays. That is when replacing the ballast or upgrading to LED usually gives the best result. Many people describe the change as more than a lighting improvement; it makes the room feel calmer. A quiet fixture can make a kitchen, laundry room, or workspace feel less like a convenience store from 1998.
One useful habit is to take a photo of the tube label and ballast label before buying parts. This prevents the classic hardware-store guessing game where every box looks almost right. Matching lamp type, ballast type, voltage, and number of lamps saves time and avoids returns.
Another lesson from experience: if the fixture is old enough to have brittle sockets, yellowed plastic, rust, or a ballast that looks like it survived three presidents and a roof leak, replacement is often wiser than repair. A new LED fixture may cost more upfront than a tube, but it can remove the hum, improve brightness, reduce maintenance, and make the space feel instantly cleaner.
The final practical experience is about safety. Most people can reseat a tube. Many can replace a starter. Some can tighten a cover. But ballast replacement is where confidence should meet honesty. If you are not comfortable identifying wires, turning off the correct circuit, verifying power, grounding the fixture, and following wiring diagrams, hire an electrician. The best repair is the one that leaves the light quiet and the person fixing it completely un-zapped.
Conclusion
Fixing fluorescent light humming is mostly a process of narrowing down the source. Start with the simple possibilities: loose covers, loose tubes, old lamps, and bad starters. Then check for loose ballast mounting and signs of ballast failure. If the fixture uses an old magnetic ballast, upgrading to an electronic ballast or switching to LED can make the biggest difference.
The most important rule is not to ignore warning signs. A mild hum may be normal in an older fluorescent light, but loud buzzing, flickering, heat, burning odor, melted sockets, or visible damage means the fixture needs serious attention. When in doubt, call a licensed electrician. Your ceiling light should brighten the room, not audition for a safety training video.