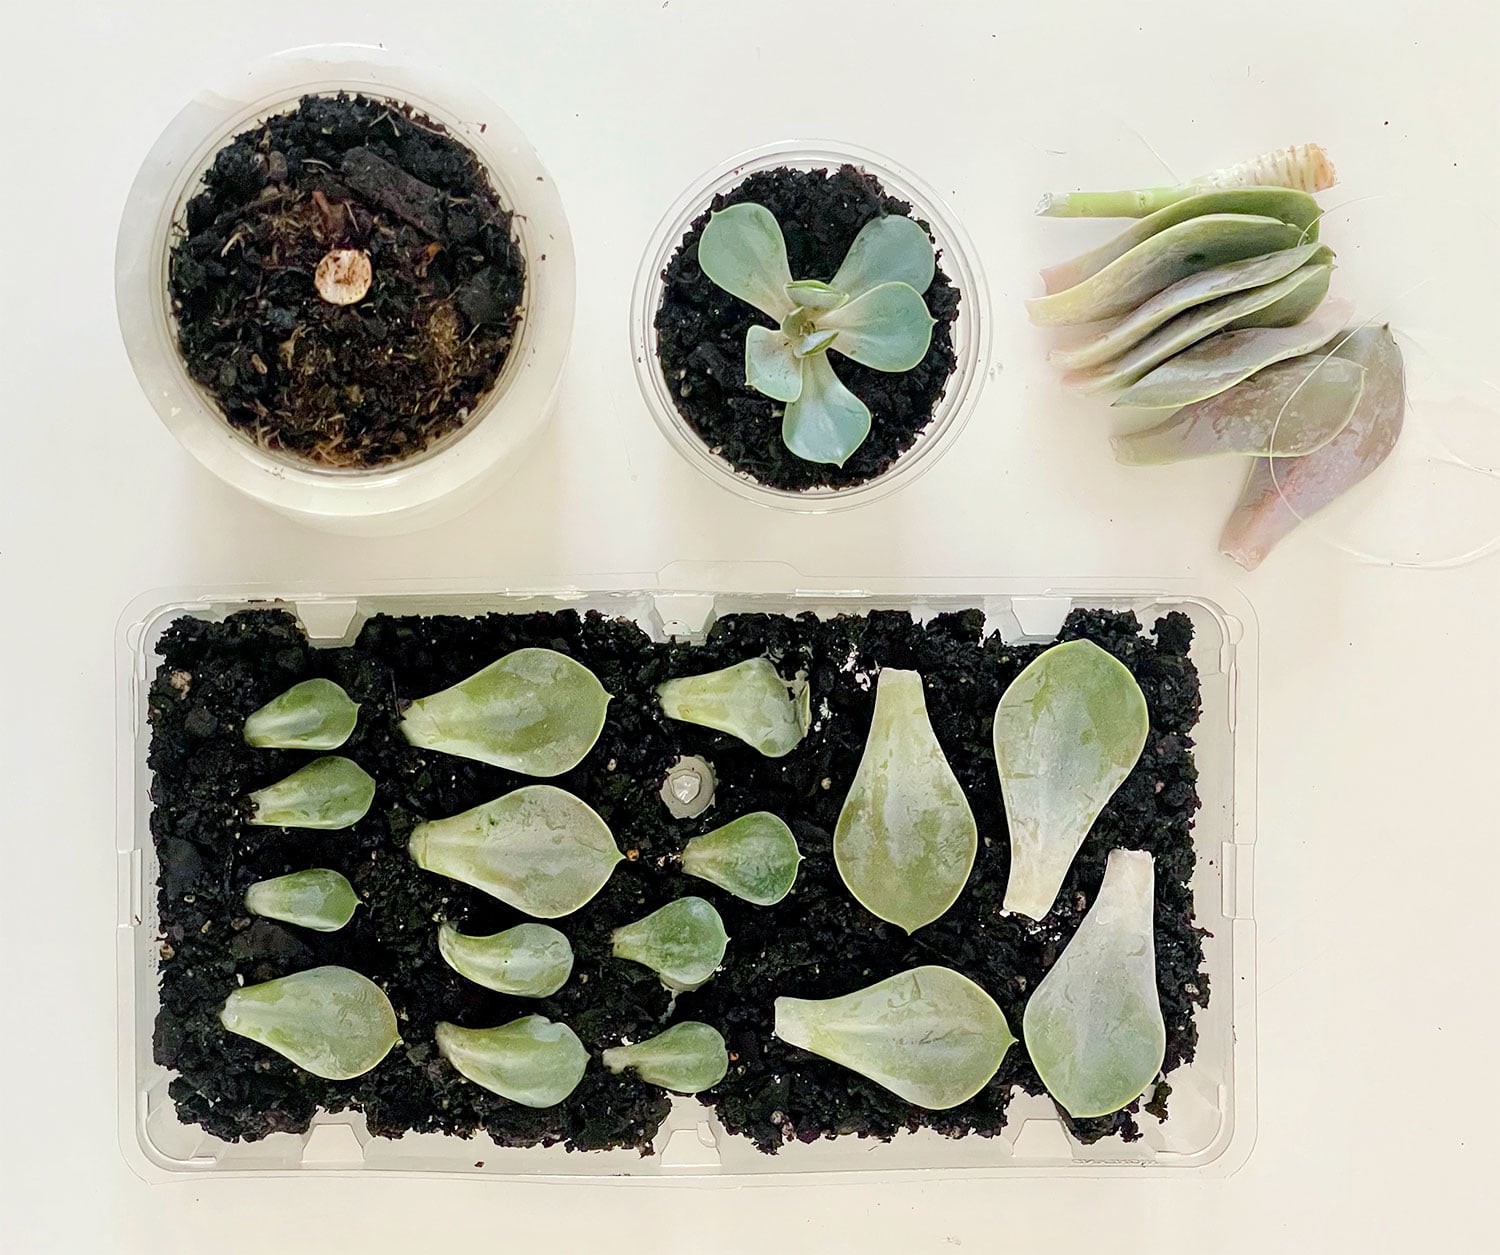
Succulents have a reputation for being the houseplants most likely to survive a busy week, a missed watering, and a little emotional distance. Better yet, many of them are remarkably easy to multiply. With a healthy parent plant, clean tools, gritty soil, and a touch of patience, one succulent can become a small windowsill army.
Learning how to propagate succulents is one of the most satisfying beginner gardening skills because it turns pruning scraps, fallen leaves, and tiny offsets into brand-new plants. The process is not complicated, but it does reward restraint. The biggest mistake is usually not doing too little. It is doing too much, especially with water.
This guide explains the most reliable ways to propagate succulents from leaves, stem cuttings, offsets, and divisions. You will also learn which plants respond best to each method, how to avoid rot, and what to expect while your tiny plant babies decide whether they are ready to grow.
What Does It Mean to Propagate Succulents?
Propagation is the process of creating new plants from an existing plant. Instead of starting with seeds, you use a healthy part of the parent succulent, such as a leaf, stem, pup, offset, or rooted division.
Many succulents naturally reproduce this way in the wild. A leaf may fall onto dry soil, a stem may break and root nearby, or a mature plant may produce small offsets around its base. Gardeners simply borrow that survival strategy and give it a clean pot, good drainage, and fewer squirrels.
The best propagation method depends on the type of succulent. Rosette-forming plants such as echeveria, graptoveria, graptopetalum, sedum, and many crassulas often grow well from individual leaves. Plants with branching stems, including jade plants, kalanchoe, string of pearls, and many sedums, usually respond beautifully to stem cuttings. Aloe, haworthia, agave, and hens-and-chicks often produce offsets or pups that can be separated and replanted.
Before You Start: Choose the Right Succulent and Supplies
Propagation works best when the parent succulent is healthy, actively growing, and free from pests or disease. Avoid using shriveled leaves, soft stems, or plants with suspicious dark spots. A cutting can only bring its best self to the pot if it came from a reasonably happy parent.
Basic Supplies for Succulent Propagation
- A healthy succulent plant
- Clean scissors, pruners, or a sharp knife
- Small pots or a shallow propagation tray
- Well-draining cactus or succulent potting mix
- Perlite, pumice, or coarse sand for extra drainage
- Bright, indirect light
- Patience, which is unfortunately not sold in garden centers
Choose containers with drainage holes whenever possible. Succulents dislike sitting in wet soil, especially before they have formed a strong root system. A shallow tray works well for leaf propagation, while individual pots are better for rooted offsets and larger stem cuttings.
A commercial cactus mix is convenient, but it can be improved by mixing in extra perlite or pumice. The goal is a loose, airy medium that lets water move through quickly. Dense, soggy soil is essentially a luxury resort for root rot.
How To Propagate Succulents From Leaves
Leaf propagation is one of the most popular ways to grow new succulents, especially with echeverias, sedums, graptopetalums, pachyphytums, and jade plants. It is also the method that makes gardeners stare at a tiny leaf for three weeks and whisper, “Is that a root, or am I imagining things?”
Step 1: Remove a Whole, Healthy Leaf
Gently twist a plump, healthy leaf from the parent plant. The key is to remove the entire leaf cleanly, including the small point where it attaches to the stem. A leaf that breaks in the middle usually will not produce a new plant because the growth tissue remains behind on the parent.
For rosette succulents, choose lower leaves that are mature but still firm. Do not strip the entire plant bare. Your succulent is trying to become a proud parent, not a salad ingredient.
Step 2: Let the Leaf Callus
Place the leaf on a dry plate, paper towel, or tray in a warm area with bright, indirect light. Leave it alone for several days until the broken end feels dry and sealed. This dry layer is called a callus, and it helps protect the leaf from rot once moisture is introduced.
Callusing time varies with the plant, room temperature, and humidity. Small leaves may be ready in two to four days, while thicker leaves can take a week or longer. When in doubt, give it another day. Succulents are not known for rushing into anything.
Step 3: Set the Leaf on Well-Draining Soil
Lay the callused leaf on top of dry or barely damp succulent mix. Do not bury the leaf deeply. The callused end only needs light contact with the soil. Tiny roots and a baby rosette will eventually emerge from that end.
Place the tray in bright, indirect light. Avoid hot, direct afternoon sun because unrooted leaves can dehydrate or scorch quickly. A bright windowsill with filtered light or a spot beneath a gentle grow light usually works well.
Step 4: Water Sparingly
Do not soak the tray. Once you see roots or a tiny baby plant forming, lightly moisten the soil around the roots only after it has dried. The mother leaf stores water and nutrients for the developing plant, so constant watering is unnecessary and may cause rot.
Eventually, the original leaf will wrinkle, dry up, and fall away. Let it happen naturally. Pulling it off too soon can damage the young succulent, which is still using the leaf as its packed lunch.
How To Propagate Succulents From Stem Cuttings
Stem cuttings are usually faster and more reliable than leaf propagation. They are especially useful for leggy succulents that have stretched toward the light, overgrown jade plants, branching sedums, kalanchoes, aeoniums, and trailing varieties such as string of bananas or string of pearls.
Step 1: Take a Clean Cutting
Use clean, sharp scissors or pruners to cut a healthy stem. A cutting about three to six inches long is usually easy to handle, although tiny trailing succulents may only need a few inches. Cut below a leaf node whenever possible because nodes are common places for roots to form.
Remove the leaves from the lower one to two inches of the stem. These bare nodes will sit near or just below the soil line and become root-producing sites.
Step 2: Allow the Cut End To Dry
Let the cutting sit in a dry, shaded spot until the cut end forms a callus. Thin stems may need only a few days, while thick jade or cactus cuttings may need a week or more. This waiting period is one of the most important steps for preventing rot.
Step 3: Plant the Cutting
Insert the callused end into dry or lightly moist succulent mix. Plant deeply enough that the cutting stands upright, but do not bury leaves. For tall cuttings, a small stake can keep the plant steady while roots form.
Keep the pot in bright, indirect light. After several days, begin watering lightly only when the mix has dried. Depending on the plant and growing conditions, roots may begin forming within a few weeks.
Step 4: Check for Roots Without Interrogating the Plant Daily
After two to four weeks, gently tug the cutting. Resistance usually means roots are developing. Do not repeatedly pull the plant from the soil to inspect it. Roots are fragile when young, and no plant appreciates being yanked out of bed every morning.
How To Propagate Succulents From Offsets and Pups
Offsets, often called pups, are miniature plants that grow beside the parent. This is one of the easiest propagation methods because the baby plants may already have their own roots. Aloe, haworthia, agave, hens-and-chicks, and many sempervivums commonly produce offsets.
Step 1: Wait Until the Offset Is Large Enough
Let the pup grow until it is at least one-third the size of the parent plant when possible. A larger offset has more stored energy and a better chance of rooting successfully after separation.
Step 2: Separate It Carefully
Remove the parent plant from its pot and gently brush away loose soil around the offset. Look for the point where the pup connects to the mother plant. Use clean scissors or a knife to separate it, keeping as many roots attached as possible.
If the offset has no roots, do not panic. Let the cut area dry and callus for a few days, then plant it in dry succulent mix like a stem cutting.
Step 3: Repot and Let It Settle
Plant the offset in a small pot with fast-draining soil. If it has roots, you can lightly water after planting, but do not drench the pot. Place it in bright, indirect light for the first week, then gradually move it toward the amount of light appropriate for its species.
Can You Propagate Succulents by Division?
Some clumping succulents can be divided into separate rooted sections. This works well for mature plants that have formed several crowns or rosettes. Carefully remove the plant from its pot, identify natural divisions in the root ball, and separate the clumps with clean hands or a sterilized tool.
Division is often less dramatic than leaf propagation, but it gives you a head start because each section already has roots. It is the gardening equivalent of moving into an apartment with functioning plumbing.
Light, Water, and Temperature for New Succulent Cuttings
Newly propagated succulents need a gentler environment than fully rooted mature plants. They should receive bright, indirect light rather than intense direct sunlight. Once they have established roots and new growth, gradually introduce more direct light if the species prefers it.
Watering is the part most likely to derail propagation. The rule is simple: do not keep propagation soil constantly wet. Leaves and cuttings without roots cannot use much water, so soaked soil creates a high risk of rot.
Warm room temperatures generally encourage rooting. A comfortable indoor range of about 65 to 80 degrees Fahrenheit works well for many common houseplant succulents. Avoid cold drafts, freezing temperatures, and extremely hot windows where cuttings may cook like tiny botanical nachos.
Common Succulent Propagation Problems and How To Fix Them
The Leaf Turns Mushy or Black
This usually means excess moisture or rot. Remove the affected leaf, let the soil dry completely, and improve airflow. Start again with a healthy leaf and make sure it is fully callused before placing it on soil.
The Cutting Shrivels Before Rooting
A little wrinkling is normal because the cutting is using stored water while it forms roots. Severe shriveling may mean the cutting is too small, too hot, or exposed to harsh sunlight. Move it to bright indirect light and avoid frequent watering.
No Roots Appear
Some succulents are simply slow. Give the cutting more time, especially during winter or low-light conditions. Check that the cutting came from a healthy plant and that the soil is loose, clean, and well drained.
The Baby Plant Is Stretching
Long, pale, stretched growth usually signals insufficient light. Move the propagation tray to a brighter location or use a grow light. Do this gradually so tender new growth does not scorch.
The Cutting Falls Over
Use a small stake, chopstick, or pebble to support the cutting while it roots. You can also trim a very top-heavy cutting into a shorter section before planting it again.
When Is the Best Time To Propagate Succulents?
Spring and early summer are usually the easiest times to propagate many succulents because plants are actively growing, days are brighter, and temperatures are warmer. That said, indoor propagation can work at almost any time of year when you provide enough light and avoid overwatering.
Winter propagation is possible, but growth may be slower. If your home is cool and dark during winter, do not expect instant roots. The cutting is not failing. It may simply be operating on a seasonal schedule while you are checking it every 36 minutes.
Quick Examples of the Best Propagation Method by Succulent Type
- Echeveria: Leaf cuttings, stem cuttings, or beheading a leggy rosette.
- Jade plant: Leaf cuttings and stem cuttings.
- String of pearls: Stem cuttings placed on top of soil.
- Aloe vera: Offsets or pups with attached roots.
- Haworthia: Offsets and divisions.
- Sempervivum: Offsets, often called chicks.
- Kalanchoe: Stem cuttings and, depending on the type, leaf cuttings.
- Sedum: Leaf cuttings, stem cuttings, and broken pieces that root easily.
Always identify your plant before propagating it. Not every succulent can grow from a single leaf, and some varieties are much happier with cuttings or offsets. A little research before snipping can save you from creating a tray full of decorative compost.
Practical Propagation Experiences: Lessons From the Potting Bench
Most people begin propagating succulents after an accident. A leaf falls off an echeveria. A jade branch snaps while moving a pot. A trailing sedum gets tangled in a curtain, loses an argument with gravity, and leaves a small pile of plant parts on the floor. Suddenly, the gardener has two choices: throw the pieces away or see what happens. Fortunately, succulents tend to reward curiosity.
One of the first lessons gardeners learn is that propagation is not a fast hobby. A leaf can sit quietly for days before showing a root. Then, after what feels like an entire geological era, a pink speck appears near the base. That speck becomes a tiny rosette, and suddenly you are emotionally invested in something smaller than a shirt button.
Another common experience is learning that more water does not mean more success. New propagators often mist leaf trays every day because the soil looks dry. Then the leaves turn translucent, soft, and sad. The better approach is usually to let the plant material do some of the work. Succulent leaves hold water. Cuttings have stored energy. They do not need to live in a tropical spa.
Lighting also teaches important lessons. A tray placed in a dark corner may stay alive but produce weak, stretched growth. A tray placed directly in harsh afternoon sun may scorch. The sweet spot is bright, gentle light, especially during the early rooting stage. Many gardeners find that an east-facing window, filtered southern exposure, or modest grow light produces stronger, more compact baby plants.
Propagation also makes pruning less stressful. A leggy succulent is not necessarily ruined. It may actually be an opportunity. You can cut the top rosette, let it callus, and root it as a new plant. The remaining stem may produce new pups or branches. Instead of one awkwardly tall succulent, you can eventually have several fuller plants. It is one of the rare times in life when a bad haircut can lead to more friends.
Gardeners also discover that not every leaf will succeed, even when the method is correct. Some leaves dry up. Some cuttings rot. Some pups simply stall for a while. That is normal. Propagation is a small experiment, not a factory line. Starting several leaves or cuttings at once improves your odds and makes the process more fun.
The most rewarding moment often comes months later, when a once-tiny pup has enough roots and leaves to move into its own pot. At that point, the original mother leaf may have disappeared completely, leaving behind a healthy miniature succulent. It is a quiet reminder that plants are excellent at turning modest beginnings into something surprisingly resilient.
Once you have propagated a few plants successfully, it becomes hard to stop. Friends may receive little jade cuttings in jars. Family members may leave your house with a tiny aloe pup “for their kitchen.” Before long, you may find yourself examining every fallen leaf on the floor as though it is a valuable investment. This is normal. Probably.
Conclusion
Learning how to propagate succulents is a simple, affordable way to expand your plant collection and understand how resilient these plants can be. Start with a healthy parent plant, use the right propagation method for the species, let cut surfaces callus, and resist the urge to overwater.
Whether you are rooting a jade cutting, separating aloe pups, or waiting for a single echeveria leaf to produce a tiny rosette, success comes from patience and good drainage. Give your cuttings bright light, a gritty potting mix, and a little breathing room. Soon, one succulent can become severaland your windowsill may begin to look like a very stylish desert.