A tired-looking tub faucet can make an otherwise clean bathroom feel as if it is still waiting for its renovation permit. Fortunately, replacing a wall-mounted bathtub spout is often a manageable DIY repair. The project usually requires basic hand tools, a compatible replacement spout, and the ability to resist using excessive force when something refuses to move.
Before reaching for a wrench, it helps to clarify the terminology. This guide focuses on removing and replacing the tub spoutthe part that projects from the wall and pours water into the bathtub. It does not cover replacing the mixing valve, cartridge, faucet handle, or a deck-mounted Roman tub faucet. Those repairs involve different parts and may require access inside the wall or below the tub.
The most important step is identifying whether the existing spout is a slip-fit tub spout or a threaded tub spout. A small mistake here can turn a 30-minute upgrade into an afternoon of staring suspiciously at a copper pipe.
Why Replace a Bathtub Spout?
A tub spout does more than provide a convenient exit ramp for water. In a tub-and-shower combination, it may also contain a diverter that redirects water to the showerhead. Replacement may be worthwhile when:
- The finish is corroded, peeling, stained, or permanently cloudy.
- Water leaks from the back of the spout near the wall.
- The spout moves, rotates, or pulls away from the wall.
- The diverter no longer sends enough water to the showerhead.
- Water continues pouring from the spout while the shower is running.
- The current spout does not match updated bathroom hardware.
- The body is cracked or damaged.
A small amount of dripping from the spout immediately after shutting off the faucet can be normal because water remains in the piping. Continuous dripping long after the faucet is off, however, usually points to a problem with the valve or cartridge rather than the spout itself.
Identify the Type of Tub Spout Before Removing It
Most wall-mounted tub spouts fall into one of two categories. Look underneath the spout near the wall with a flashlight before turning anything.
Slip-Fit or Slip-On Tub Spout
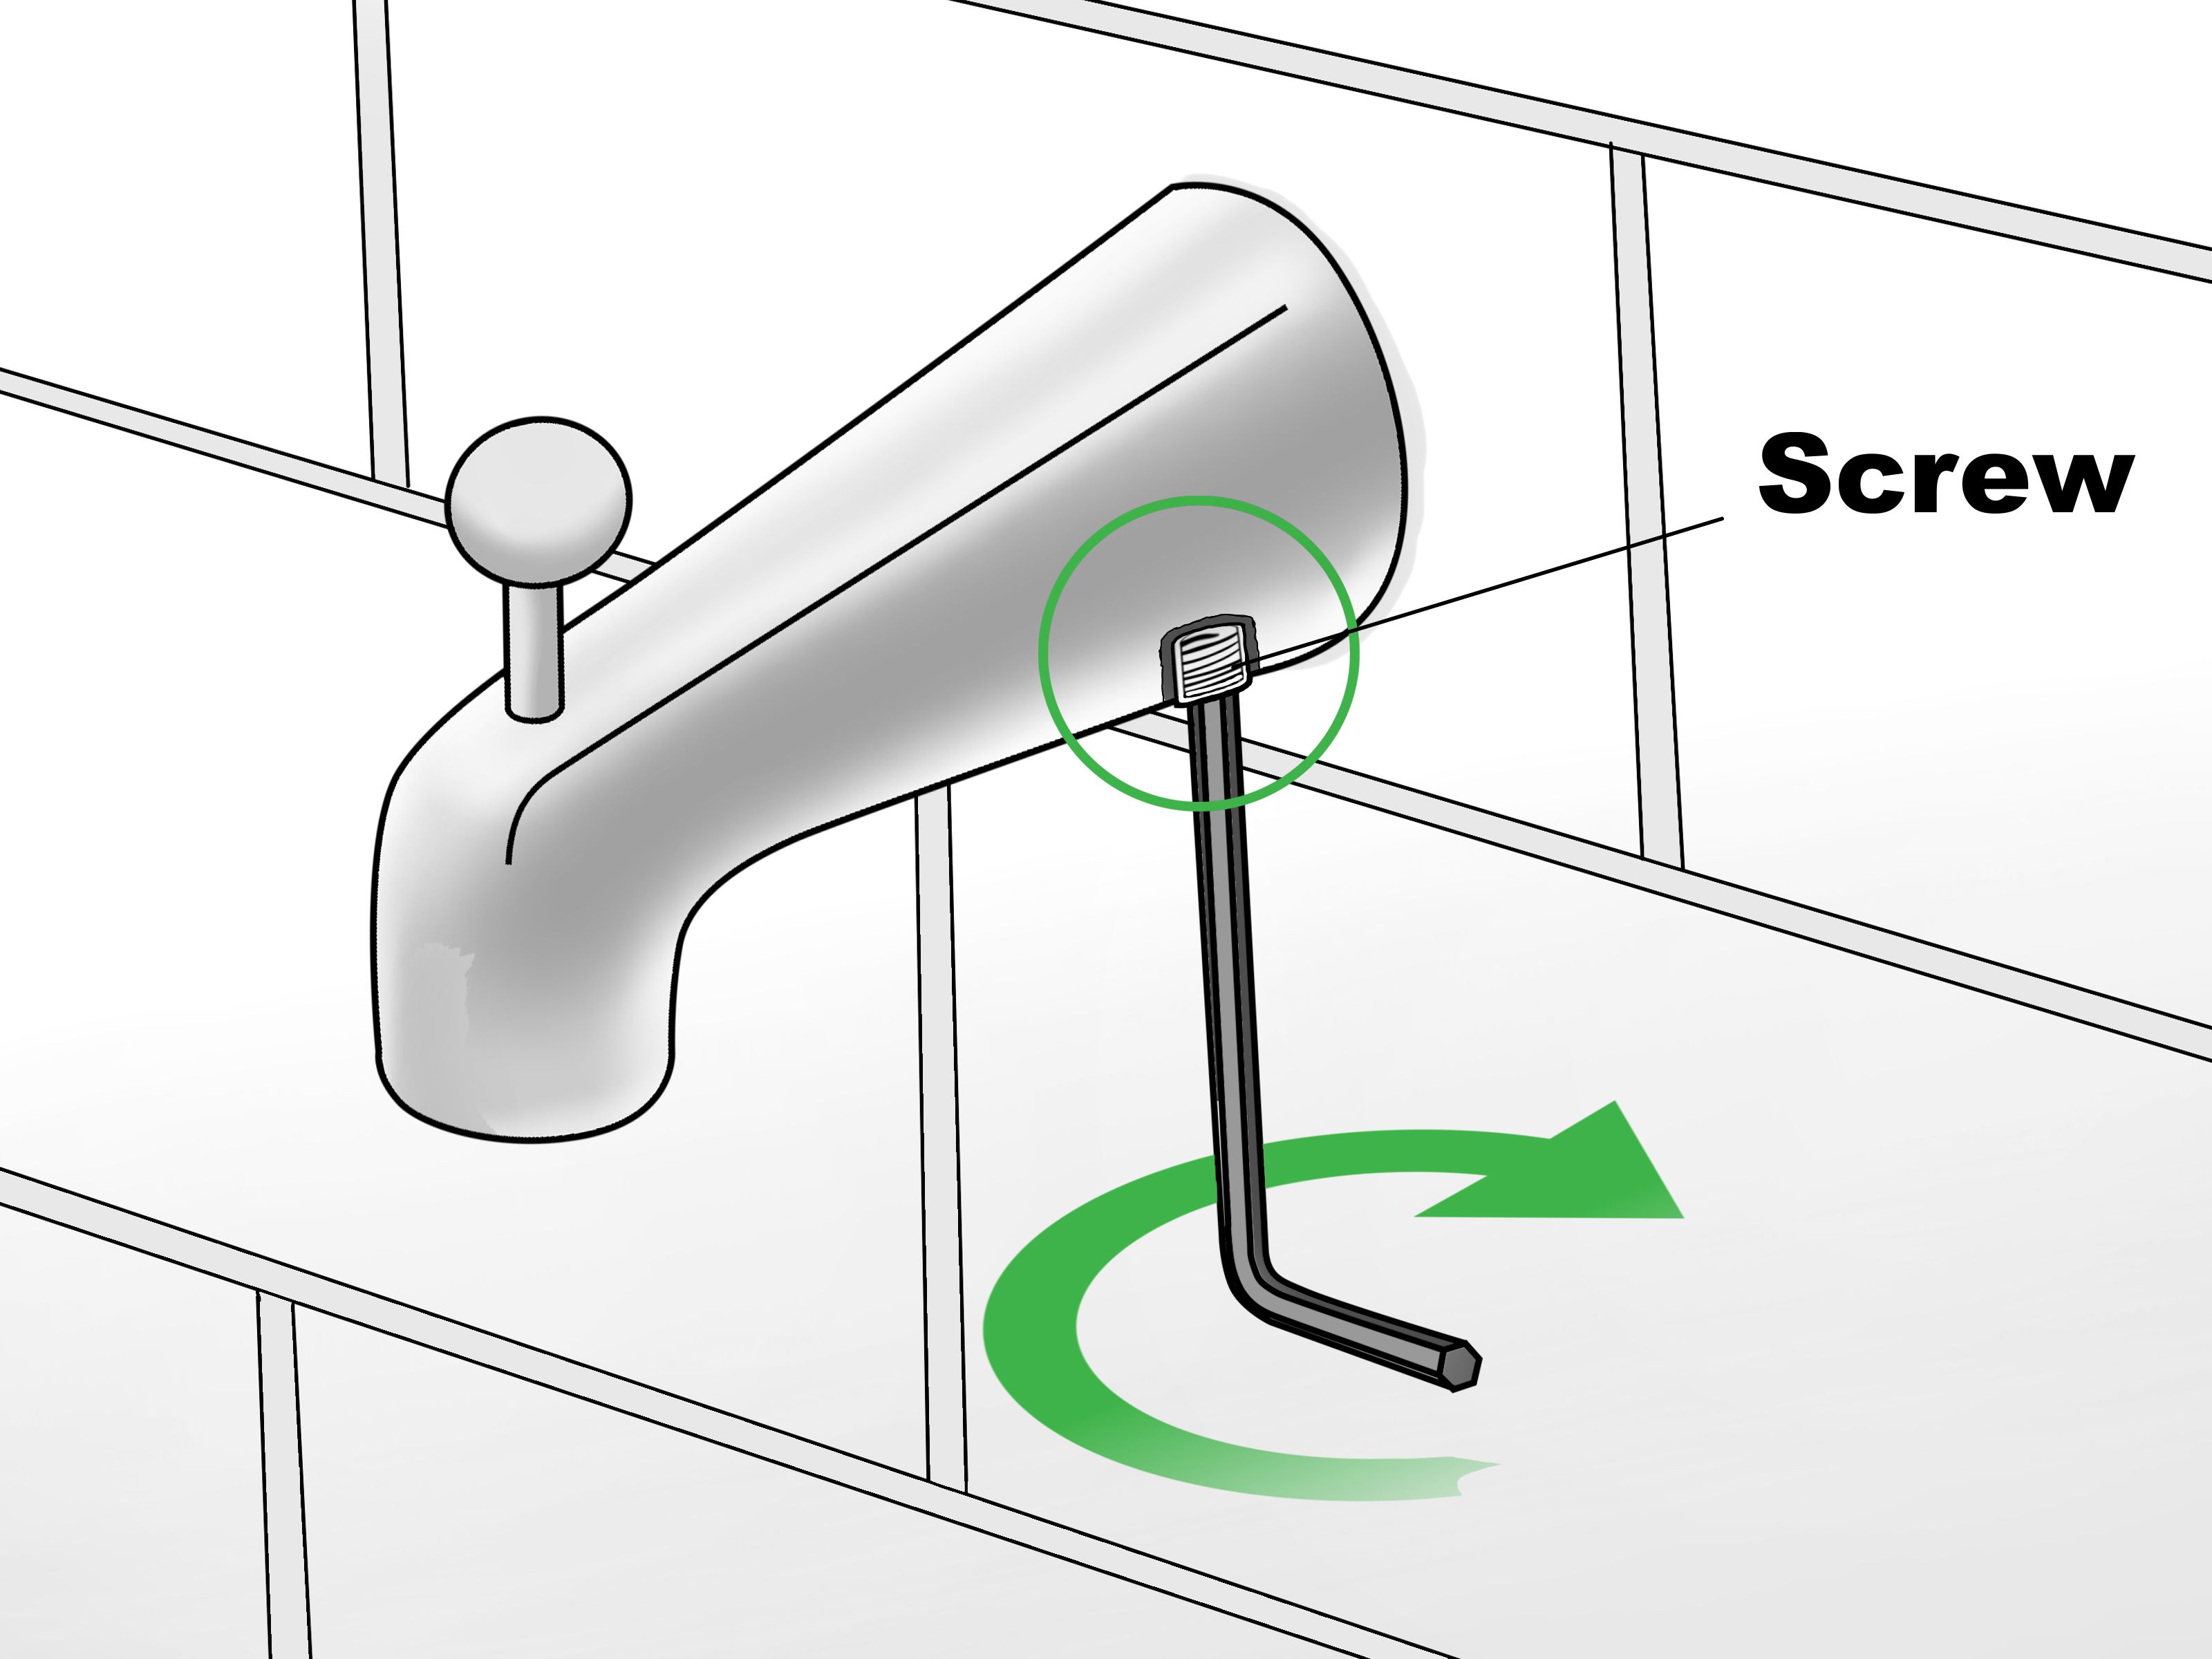
A slip-fit spout slides over a smooth copper stub-out pipe and is held in place by a set screw on the underside. The screw commonly accepts a hex key, although some older designs use a slotted or Phillips screw.
If you see an access opening with a visible screw, treat the spout as a slip-fit model. Do not try to unscrew the entire spout from the wall. Twisting it can score, bend, or loosen the copper pipe behind the finished surface.
Threaded or Screw-On Tub Spout
A threaded spout screws onto a male threaded pipe nipple or an installed adapter. It normally has no retaining screw underneath. Removal is performed by rotating the entire spout counterclockwise.
Threaded connections commonly use 1/2-inch pipe threads, but the required nipple length and location of the internal threads vary widely. Some spouts have threads close to the wall, while others connect near the nose of the spout. That is why measuring the exposed plumbing is more useful than buying a replacement based on appearance alone.
Universal and Quick-Connect Designs
Some replacement spouts include adapters for several connection arrangements. Others use proprietary quick-connect assemblies. These models can be convenient, but “universal” does not mean “fits every pipe without measuring.” Read the installation sheet and confirm the required pipe material, diameter, thread size, and projection from the finished wall.
Tools and Materials
The exact tools depend on the connection type, but a typical tub faucet replacement may require:
- Flashlight
- Utility knife or plastic caulk-removal tool
- Hex-key set, often including a 5/32-inch key
- Phillips and flathead screwdrivers
- Strap wrench or adjustable pliers
- Soft cloth or towel
- Tape measure
- Fine emery cloth or fine-grit abrasive pad
- Deburring tool for copper tubing
- PTFE plumber’s tape for threaded connections
- Bathroom-rated silicone sealant
- Replacement tub spout
- Bucket, drain cover, and protective tub mat
A strap wrench is preferable when tightening a finished spout because it is less likely to leave tooth marks. If metal pliers must be used during removal, protect the surface with a thick cloth. The old spout may be headed for the trash, but the wall and plumbing are not.
Preparation and Safety
Make sure the faucet valve is completely off. Replacing only the spout does not normally require opening the pressurized valve assembly, but shutting off the tub’s water supplyor the home’s main supplyis the safest choice when the pipe nipple may be disturbed, the valve does not close reliably, or the plumbing configuration is uncertain.
Cover the drain so a tiny set screw cannot perform its favorite magic trick: disappearing forever. Place a towel or protective mat in the tub to prevent scratches from dropped tools.
Score any old caulk where the spout meets the wall. Keep the blade shallow and angled away from fiberglass, acrylic, grout, and waterproofing materials. Cutting the seal first prevents dried caulk from tearing paint or pulling at the surrounding surface.
How to Remove a Slip-Fit Tub Faucet
Step 1: Locate and Loosen the Set Screw
Find the opening underneath the spout near the wall. Insert the correct hex key or screwdriver and turn the set screw counterclockwise. Loosen it enough to release the pipe, but avoid removing it completely unless necessary.
If the screw is packed with mineral deposits, clean the recess with a small brush or pick before inserting the tool. A partially seated hex key can strip the screw head.
Step 2: Slide the Spout Straight Off
Hold the spout with both hands and pull it directly away from the wall. A gentle side-to-side wiggle may help break loose mineral buildup, but avoid aggressive twisting. Slip-fit spouts seal against smooth copper, and unnecessary rotation can damage the pipe or loosen a fitting inside the wall.
If the spout will not move, confirm that the set screw is fully disengaged. Do not assume the solution is a larger wrench. Plumbing has a mischievous habit of breaking at the least accessible location.
Step 3: Inspect the Copper Stub-Out
The copper tubing should be round, straight, clean, and free of deep scratches. Remove old sealant and light oxidation with fine emery cloth. Smooth sharp burrs at the end because they can cut an internal O-ring during installation.
Do not grind the pipe aggressively or reduce its diameter. If the tubing is crushed, badly gouged, too short, loose in the wall, or covered with solder that prevents the new spout from sliding on, professional repair may be the safer option.
How to Remove a Threaded Tub Faucet
Step 1: Confirm There Is No Set Screw
Inspect the underside carefully. If there is no retaining screw, wrap the spout with a cloth and attempt to rotate it counterclockwise by hand.
Step 2: Use Controlled Leverage
If hand pressure is not enough, use a strap wrench. Apply steady pressure close to the wall rather than jerking the end of the spout. Sudden leverage can loosen the pipe nipple from the elbow inside the wall.
If the nipple begins rotating with the spout, stop. Allowing it to unscrew from the concealed elbow could create a leak behind the wall. An access panel or plumber may be needed to stabilize or replace the connection safely.
Step 3: Inspect the Threads and Nipple
Remove old thread tape and examine the pipe. Surface discoloration may be harmless, but severely rusted, split, deformed, or loose nipples should be replaced. Also measure the distance from the finished wall to the end of the pipe.
Record the thread diameter and the projection accurately. A replacement spout must tighten against the wall while pointing downward. If the nipple is too long, the spout stops with a gap behind it. If it is too short, the internal threads may not engage securely.
How to Choose the Correct Replacement Tub Spout
Bring the old spout, measurements, and photographs of the exposed plumbing when shopping. Match the following features:
- Connection type: slip-fit, threaded, quick-connect, or compatible universal adapter.
- Pipe material: many slip-fit models require smooth 1/2-inch copper tubing.
- Pipe projection: compare your measurement with the manufacturer’s specified range.
- Diverter: choose a diverter spout for a tub-and-shower combination and a non-diverter model for a tub-only installation.
- Spout reach: water should clear the tub wall and land inside the basin.
- Finish: chrome, brushed nickel, bronze, black, brass, and other finishes should coordinate with nearby trim.
Manufacturer dimensions are model-specific. A slip-fit design may call for roughly 1 1/2 to 3 inches of exposed copper, but another model may require a narrower range. Threaded models vary even more because their internal connection points are positioned differently. The instruction sheet outranks any generic measurement found on the internet.
How to Install a New Slip-Fit Tub Spout
Step 1: Measure and Dry-Fit
Confirm that the copper pipe falls within the approved projection range. Slide the spout on gently without tightening it. It should reach the wall without crushing an internal component or leaving a large gap.
If the pipe is too long, it may need to be cut squarely with a tubing cutter and deburred. If it is too short, do not attempt to compensate with a heroic mound of silicone. The plumbing must be extended or a compatible spout must be selected.
Step 2: Prepare the Wall Penetration
Clean and dry the wall and pipe. Apply the sealant specified by the manufacturer around the pipe opening or rear sealing surface to help keep splashing water from entering the wall cavity. Use only enough to form a continuous seal.
Step 3: Slide the Spout into Position
Loosen the set screw so it does not drag across the copper. Push the spout straight onto the pipe until its base sits flush against the finished wall. Point the outlet directly downward.
Step 4: Tighten the Set Screw
Tighten the set screw until the spout is secure and cannot rotate easily. Do not overtighten it. Excessive force can dent or puncture copper tubing and may damage the spout’s internal mounting assembly.
How to Install a New Threaded Tub Spout
Step 1: Dry-Fit the Spout
Thread the replacement onto the nipple by hand without sealant to check alignment and depth. Count the approximate turns required. The spout should finish flush with the wall and face downward without requiring extreme force.
If it stops too early or rotates beyond the correct position before becoming snug, verify the nipple length and internal thread location. Changing the nipple or using the manufacturer’s adapter is better than forcing the fixture.
Step 2: Apply Thread-Seal Tape
Remove the spout and clean the male threads. Wrap PTFE plumber’s tape clockwise as viewed from the pipe endthe same direction the spout turns during installation. Begin slightly back from the first thread so loose tape does not enter the waterway. Use the number of wraps recommended by the tape or fixture manufacturer.
Do not use plumber’s putty as a substitute for thread sealant on a pressurized threaded joint. Putty may be appropriate around certain trim surfaces when specifically directed, but threaded plumbing requires approved tape or pipe-joint compound.
Step 3: Thread the Spout On
Start the spout by hand to avoid cross-threading. Continue turning until it is nearly flush and pointing downward. Use a clean strap wrench only if additional tightening is required and permitted by the instructions.
Do not reverse the spout substantially to correct alignment after tightening because backing it off can compromise the thread seal. If the orientation is wrong, remove it, inspect the nipple length, reapply the tape, and try again.
Seal and Test the New Tub Faucet
Tool the rear seal neatly and remove excess material. When exterior caulk is used, apply a small, continuous bead suitable for wet bathroom areas. Follow the spout manufacturer’s sealing pattern rather than assuming every design should be treated identically.
Allow the sealant to cure for the stated time. Some products can handle light exposure quickly, while others require approximately 24 hours before regular use.
Restore the water supply if it was shut off. Run water through the tub spout and inspect:
- The connection at the wall
- The underside near the set screw
- The alignment and stability of the spout
- The flow into the tub
- The diverter operation, when present
- The showerhead while the diverter is engaged
A small amount of water escaping from the spout while the shower runs may occur with some diverter designs. A strong continuous stream, however, can indicate a defective diverter, incompatible spout, excessive restriction, or an installation problem.
Common Tub Spout Replacement Mistakes
Trying to Unscrew a Slip-Fit Spout
The presence of a set screw changes the entire removal method. Twisting a slip-fit fixture can deform the copper stub-out or loosen piping behind the wall.
Buying by Finish Instead of Connection
A polished black spout that does not fit the pipe is merely an expensive bathroom paperweight. Match the connection, dimensions, and diverter function first.
Overtightening the Set Screw
The screw needs to prevent movement, not audition for a role in a medieval torture device. Tightening beyond the manufacturer’s guidance can damage copper tubing.
Cross-Threading the New Spout
Threaded spouts should begin turning smoothly by hand. Resistance during the first turn suggests misalignment or incompatible threads. Stop before permanent damage occurs.
Using Excessive Caulk to Hide a Gap
A large gap usually means the spout, adapter, or pipe length is wrong. Caulk is a water seal, not structural filler or a substitute for compatible plumbing.
Ignoring a Loose Pipe
The stub-out should feel stable. Movement may indicate inadequate support or a loose concealed fitting. Installing a new spout over unstable plumbing does not fix the underlying risk.
When to Call a Plumber
Stop the project and contact a licensed plumber when:
- The pipe rotates or moves inside the wall.
- The copper stub-out is crushed, split, deeply scored, or too short.
- A threaded nipple is severely corroded or breaks during removal.
- Water appears inside the wall cavity or on the ceiling below.
- The replacement requires soldering near combustible materials.
- The wall must be opened to support or replace piping.
- The leak continues even after the faucet valve is shut off.
- You cannot identify a proprietary adapter or connection system.
Professional help is especially worthwhile when the tub backs onto a tiled wall with no access panel. Saving an hour of labor is not much of a victory if the celebration includes opening a wet ceiling downstairs.
Practical Experiences and Lessons from Tub Faucet Replacements
The most common real-world lesson is that removal is rarely the hardest part. Identification is. Homeowners frequently assume every tub spout unscrews because the replacement package resembles the old fixture. The moment a wrench comes out, the hidden set screw becomes an expensive detail. Spending two minutes with a flashlight underneath the spout can prevent damage that takes hours to repair.
Another recurring experience involves pipe length. An old threaded spout may have internal threads near its front, while a modern replacement connects close to the wall. Both packages may say “1/2-inch threaded,” yet they require completely different nipple projections. The reliable approach is to remove the old spout, measure from the finished wall to the pipe end, and check where the new spout’s threads begin. Keeping the receipt is also a surprisingly effective plumbing technique.
Mineral buildup creates its own category of confusion. A slip-fit spout may remain stuck after the set screw is loose because deposits have bonded the internal assembly to the copper. Slow, straight pulling and gentle movement are safer than twisting. In hard-water areas, cleaning the exposed copper thoroughly before installing the new spout can make the difference between a smooth installation and a damaged O-ring that leaks immediately.
Caulk often reveals whether the previous installer solved the underlying problem or simply covered it. A thick collar of sealant behind the old spout may conceal an incorrect pipe length, an oversized wall opening, or a spout that never sat flush. Once the caulk is removed, take time to inspect the opening rather than recreating the same decorative volcano with a fresh tube.
DIYers also discover that “tight” is not a universal measurement. A threaded spout must be secure and correctly oriented, but using a long wrench to force one additional rotation can loosen the nipple behind the wall. A slip-fit set screw needs enough pressure to hold the spout, but excessive torque can dent copper. Controlled hand pressure, followed by only modest tool assistance, is usually more successful than brute strength.
Testing deserves more patience than it usually receives. Turn the water on gradually, watch the wall connection, operate the diverter several times, and inspect again after the fixture has drained. A dry tissue held around the rear edge can reveal moisture that is difficult to see on glossy tile. Check the ceiling or wall on the opposite side when accessible.
Finally, the easiest replacements are the ones planned before shopping. Photograph the underside, exposed pipe, wall opening, and old spout. Record the pipe diameter, projection, connection type, and whether a diverter is needed. Those details eliminate most guesswork and make it easier to compare manufacturer specifications. The finish may be what everyone notices afterward, but the hidden dimensions are what make the installation successful.
Conclusion
Learning how to remove a tub faucet begins with one simple inspection: look underneath the spout. A visible set screw usually means the fixture slides off a smooth copper pipe, while a spout without a screw is generally threaded onto a nipple or adapter.
After removal, inspect and measure the exposed plumbing before choosing a replacement. Match the connection type, pipe material, thread size, projection, spout reach, and diverter function. Install the new fixture without excessive force, seal the wall penetration as directed, and test carefully for leaks.
Handled patiently, replacing a bathtub spout is a small upgrade with a noticeable payoff. The new fixture can improve water control, restore shower-diverter performance, and make the bathroom look more polishedwithout requiring a full remodel or a dramatic encounter with a sledgehammer.
Note: Tub-spout dimensions, adapters, sealing procedures, and approved pipe materials vary by manufacturer and model. Always follow the installation sheet supplied with the replacement fixture and comply with applicable local plumbing codes.