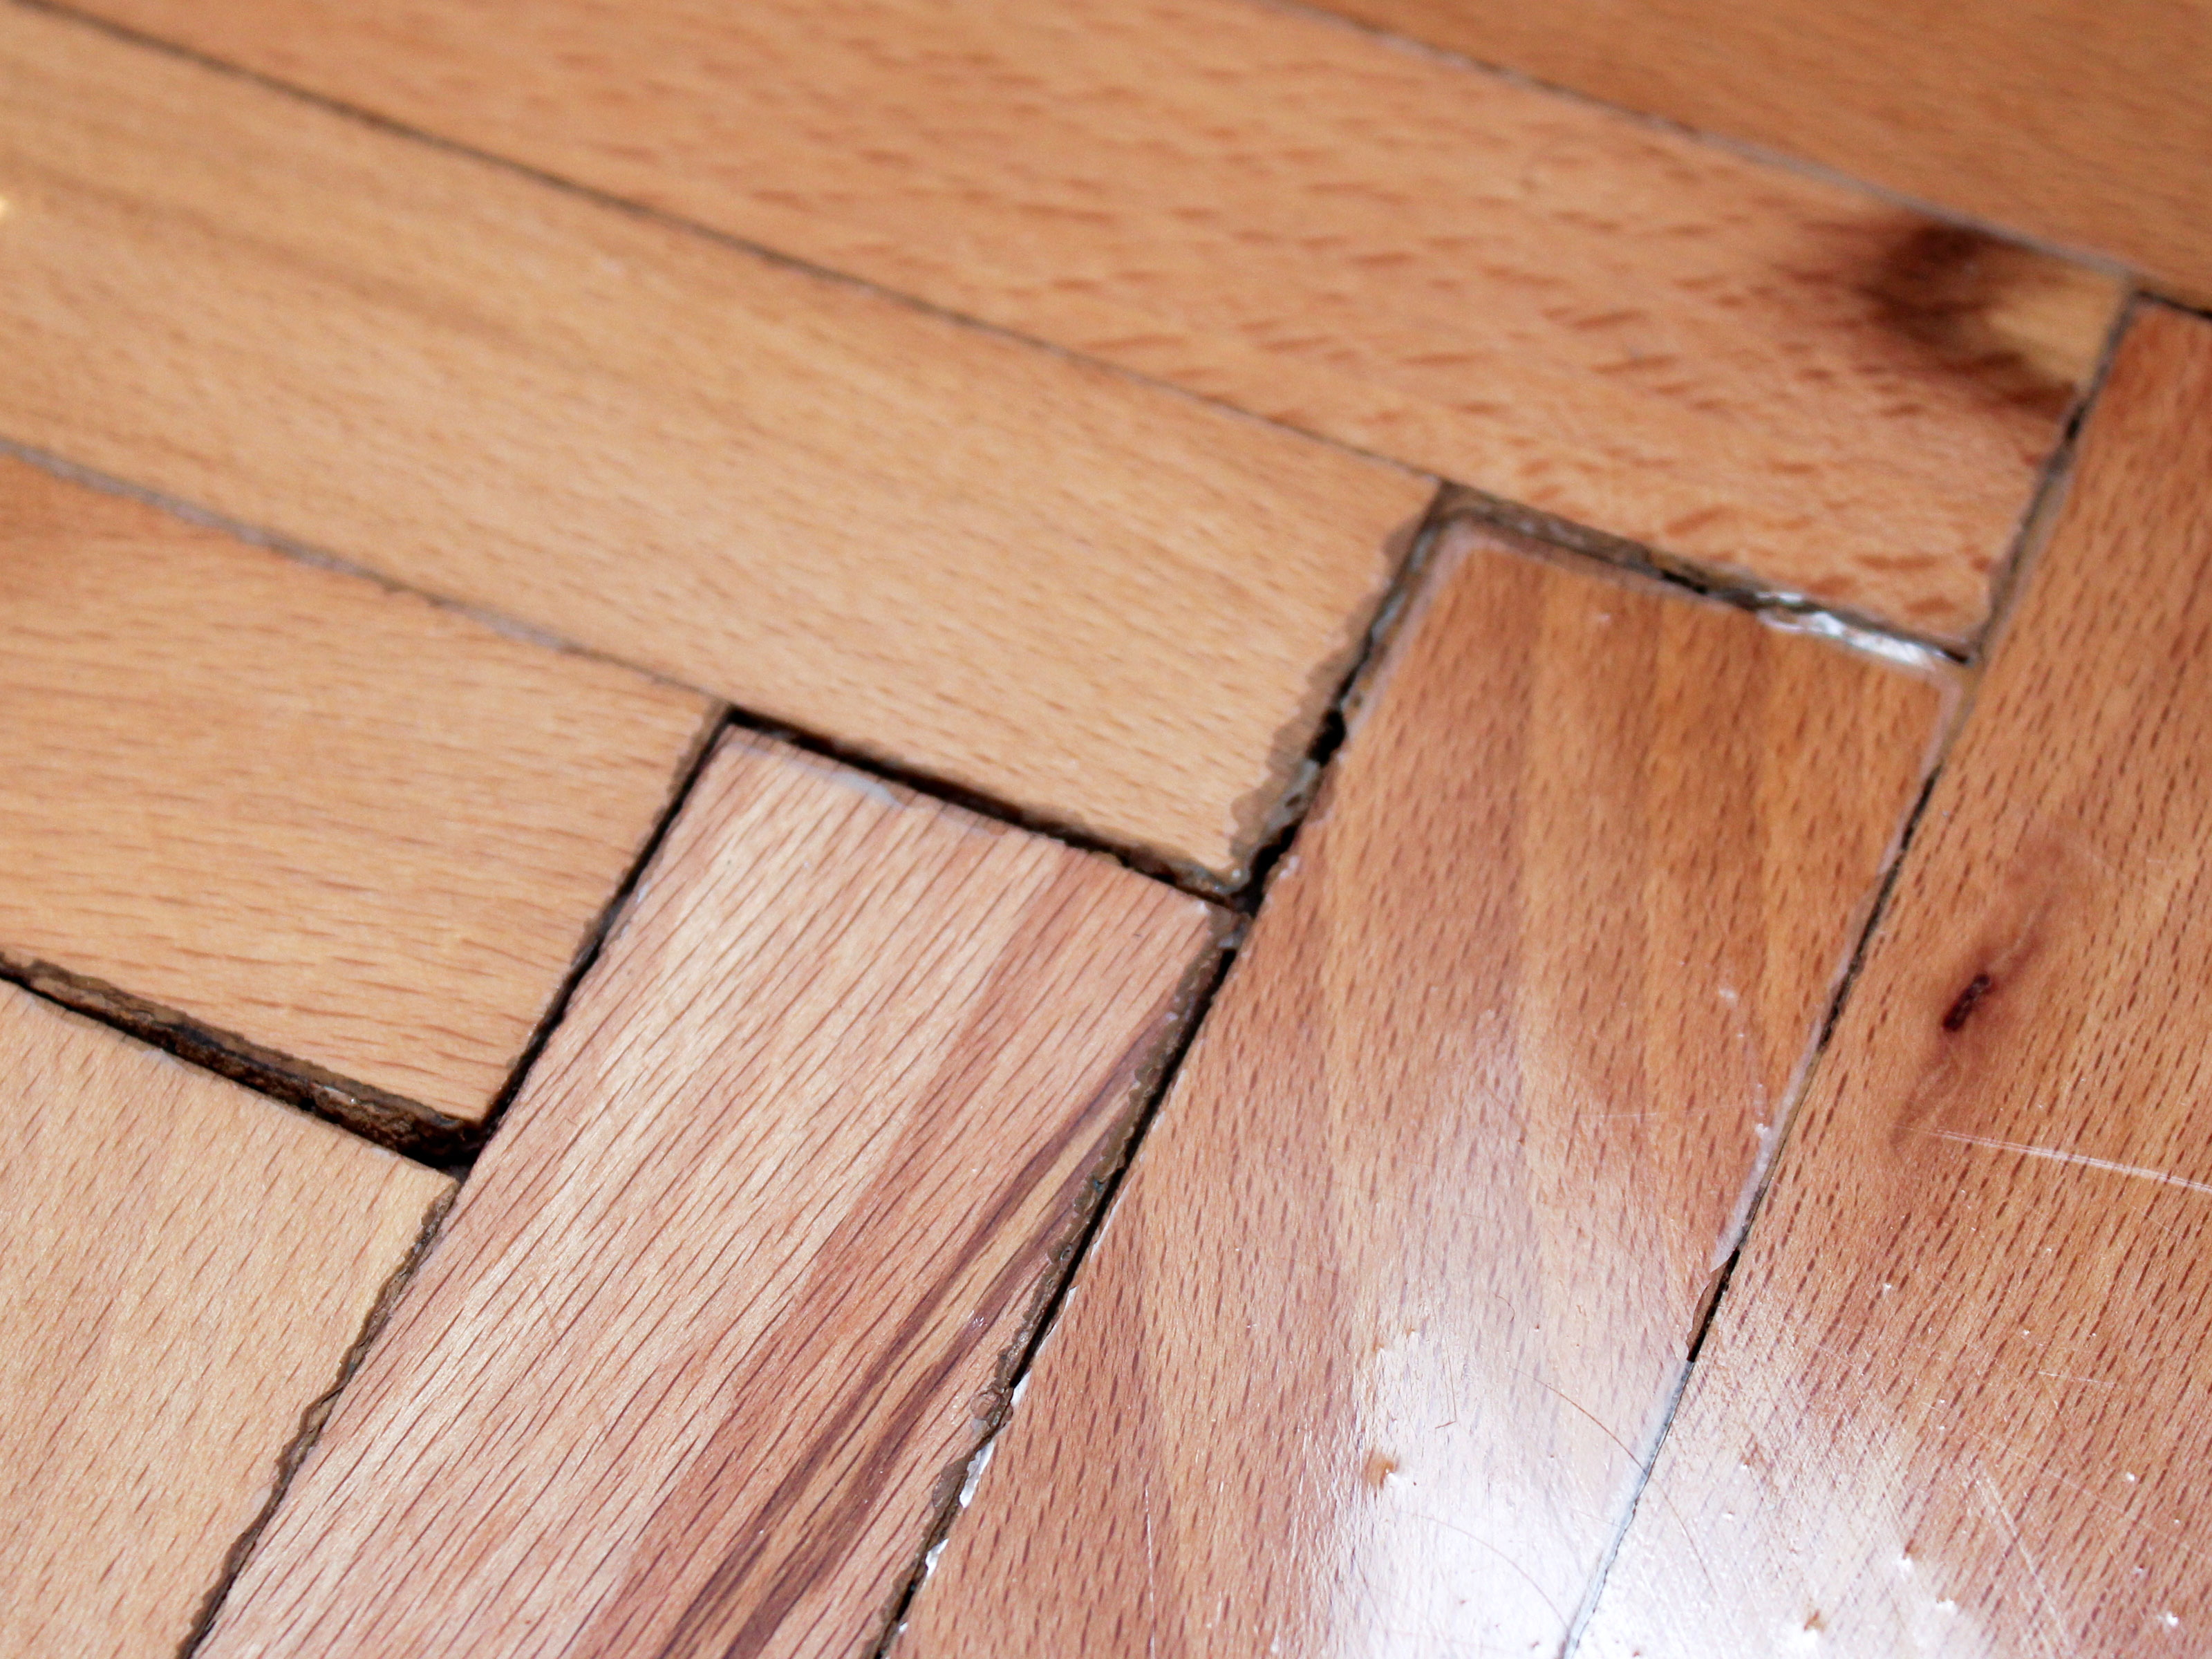
Wood floors have charm, character, and the magical ability to make a room feel instantly warmer. They also have a less charming habit: developing cracks, gaps, and little “hello there” lines between boards when humidity changes, boards age, or life happens. The good news? Many cracks in wood floors can be repaired without replacing the entire floor or dramatically whispering, “We have to move.”
This guide explains how to repair cracks in wood floors in 8 practical steps, from diagnosing the problem to sanding, staining, sealing, and preventing cracks from coming back. Whether you are dealing with hairline cracks, small gaps between boards, nail holes, or a few deeper splits, the right repair method can make your hardwood floor look smoother, cleaner, and better cared for.
Before grabbing wood filler like a tiny flooring superhero, remember this: wood moves. It expands when it gains moisture and shrinks when it loses moisture. That means some seasonal gaps are normal. The goal is not to make your floor look like plastic. The goal is to make it safe, attractive, stable, and protected.
Why Do Cracks Appear in Wood Floors?
Cracks in hardwood floors usually come from one of five causes: seasonal humidity changes, age, poor installation, water damage, or impact damage. In winter, indoor air often becomes dry, causing boards to shrink and reveal gaps. In humid months, boards may swell and close those gaps again. This is why filling every tiny winter gap can backfire. If you fill a gap when boards are at their driest, the filler may get pushed out or cause pressure when the boards expand again.
Cracks can also appear when finish wears away, allowing moisture and dirt to enter the wood. Heavy furniture, dropped tools, pet claws, and high heels can create dents or splits. In older homes, wide-plank floors may naturally have larger spaces between boards. Those gaps are not always a defect; sometimes they are part of the floor’s history. Think of them as wrinkles, but for your house.
Tools and Materials You May Need
For most wood floor crack repairs, gather a vacuum, soft brush, painter’s tape, putty knife, wood filler or wood putty, flexible floor gap filler, stain marker or matching stain, fine-grit sandpaper, tack cloth, clean rags, protective finish, and a humidity meter. For larger gaps, you may also need natural-fiber rope, thin wood strips, wood glue, a small chisel, or a professional flooring contractor.
Use wood filler for unfinished or sandable repairs. Use wood putty for small repairs on already finished floors when sanding is not ideal. Use flexible filler for cracks that may move slightly. For wide gaps in old plank floors, stained natural rope can work surprisingly well. Yes, rope. Old houses have been solving problems with practical weirdness for centuries.
How to Repair Cracks in Wood Floors: 8 Steps
Step 1: Inspect the Crack and Identify the Cause
Start by looking carefully at the crack. Is it a narrow surface crack in one board? A gap between two boards? A deep split? A crack near a water stain? A soft or dark area? Each situation needs a different approach.
Hairline cracks and small nail holes are usually good candidates for filler. Wider gaps between boards may need rope, wood strips, or no repair at all if they open and close seasonally. Cracks with black staining, softness, cupping, or a musty smell may indicate moisture damage. In that case, do not simply cover the problem. Find and fix the moisture source first.
A simple rule: if the floor feels solid and the crack is mostly cosmetic, DIY repair is reasonable. If boards move, feel spongy, show rot, or have major water damage, call a flooring professional before applying filler.
Step 2: Control Indoor Humidity Before Repairing
Because wood reacts to indoor conditions, humidity matters. Many hardwood floor problems can be reduced by keeping the home in a stable comfort range, often around 30% to 50% relative humidity. A small humidity meter is inexpensive and can save you from repairing the same crack twice.
If the crack appears only during dry winter months and closes during humid seasons, wait before filling it permanently. Seasonal movement is normal. Use a humidifier during dry months, avoid wet mopping, clean spills quickly, and keep the room temperature consistent. A stable environment helps the repair last longer and keeps the floor from staging a dramatic comeback.
Step 3: Clean the Crack Thoroughly
Filler will not bond well to dirt, wax, pet hair, crumbs, or mysterious floor debris from 2017. Use a vacuum with a crevice tool to remove dust from the crack. Then use a soft brush, old toothbrush, or plastic scraper to loosen anything stuck inside.
For stubborn debris, gently scrape along the crack without gouging the surrounding boards. Avoid soaking the area with water. If you need to wipe it, use a barely damp cloth and let the floor dry completely before applying any filler. Moisture trapped under filler can create more problems than the crack itself.
Step 4: Choose the Right Repair Material
The best filler depends on the crack size and floor condition. For small cracks, use stainable wood filler, color-matched wood filler, or a repair putty designed for wood floors. For shallow surface checks, a wax repair stick or stain marker may be enough. For deeper cracks, apply filler in layers rather than stuffing it all in at once like you are frosting a cake with panic.
For medium gaps that are stable, flexible gap filler may be better than hard filler. For large gaps in old floors, stained cotton or jute rope can fill the space while allowing a traditional look. For very large gaps or missing wood, a wood sliver or Dutchman patch may be the strongest repair. This involves cutting a thin piece of matching wood, gluing it into the gap, trimming it flush, and finishing it to blend with the floor.
Step 5: Test the Color First
Color matching is where many floor repairs go from “nice job” to “why is there peanut butter in the oak?” Always test filler, stain, or putty in an inconspicuous spot, such as inside a closet or under furniture. Wood filler can absorb stain differently than the actual floorboards, so the color may not match perfectly after drying.
If your floor has multiple tones, choose a filler that matches the darker grain lines rather than the lightest board color. Slightly darker repairs often disappear better than pale ones. You can also mix compatible fillers or use stain markers after sanding to adjust the final color.
Step 6: Apply the Filler or Gap Repair
For small cracks, press filler firmly into the crack using a putty knife. Work across the crack at an angle so the material gets packed down, not just smeared over the top. Slightly overfill the repair because many fillers shrink as they dry. Remove excess from the surrounding floor before it hardens.
For deeper cracks, fill in thin layers and allow each layer to dry according to the product instructions. Rushing this step can leave the repair soft underneath. For rope repairs, stain the natural-fiber rope first, let it dry, then press it tightly into the cleaned gap using a putty knife or painter’s tool. The rope should sit slightly below the floor surface, not bulge above it.
For wood-strip repairs, cut a thin strip of matching wood slightly wider than the gap. Apply wood glue to the sides, tap the strip into place, let it cure, then carefully plane or sand it flush. This method is best for stable, larger gaps and often looks more natural than a wide band of filler.
Step 7: Let It Dry, Then Sand Smooth
Drying time depends on filler type, crack depth, temperature, and humidity. Some shallow repairs dry in less than an hour, while deeper repairs may need several hours or overnight. Follow the product label, not wishful thinking. If the filler gums up your sandpaper, it is not dry yet.
Once dry, sand the repair gently with fine-grit sandpaper, usually around 120 to 220 grit depending on the surface and finish. Sand with the grain, not across it. Keep your sanding area small so you do not create a dull halo around the repair. After sanding, vacuum the dust and wipe the area with a tack cloth.
Step 8: Stain, Seal, and Blend the Repair
If the repair is on an unfinished or sanded area, apply matching stain carefully with a small brush, cotton swab, or cloth. Build color slowly. It is much easier to add another light coat than to remove a dark blotch that looks like the floor has developed a birthmark.
After the color looks right, protect the repair with a compatible finish. This might be water-based polyurethane, oil-based polyurethane, or another floor finish already used in the room. Feather the edges so the repair blends into the surrounding boards. Let the finish cure fully before dragging furniture over it, walking on it with shoes, or letting the dog inspect your work with enthusiastic paws.
Best Repair Methods by Crack Type
Hairline Cracks
Use color-matched filler, wax repair sticks, or stain markers. Clean first, apply sparingly, buff away excess, and seal if needed. Hairline cracks are usually cosmetic unless they continue spreading.
Small Gaps Between Boards
If the gaps are seasonal, focus on humidity control first. If they remain year-round, use flexible filler or a small amount of wood filler designed for floors.
Wide Gaps in Old Floors
Consider stained natural rope or custom wood strips. Avoid filling wide moving gaps with rigid filler because it may crack, crumble, or pop out.
Deep Splits in Boards
Use layered filler for minor splits. For large splits, loose boards, or structural concerns, replace the damaged board or hire a professional.
Cracks from Water Damage
Fix the leak or moisture problem first. Let the floor dry thoroughly. If boards are cupped, soft, moldy, or separating badly, filler is only a temporary disguise and not a real repair.
Common Mistakes to Avoid
Do not fill seasonal gaps during the driest part of the year without considering expansion. Do not use regular wall caulk in the middle of a hardwood floor. Do not wet mop before applying filler. Do not skip color testing. Do not sand aggressively through the floor finish unless you plan to refinish the area. And please, do not use concrete patch, random glue, or whatever is hiding in the garage from a project you barely remember.
Another mistake is overfilling large gaps with hard filler. It may look smooth for a short time, but movement can crack it apart. For gaps that move, choose flexible products or traditional rope. For gaps that are too large for filler, use wood strips or board replacement.
How to Prevent Future Cracks in Wood Floors
Prevention is mostly about moisture control, gentle cleaning, and regular maintenance. Keep indoor humidity steady, ideally in the comfort range recommended for homes. Use mats near exterior doors to reduce grit. Add felt pads under furniture legs. Clean spills quickly with a dry or slightly damp cloth. Avoid steam mops because heat and moisture can damage wood and finish over time.
Vacuum using a bare-floor setting and dust mop regularly. Dirt acts like sandpaper under shoes, slowly wearing away finish. Once the finish becomes thin, the wood underneath becomes more vulnerable to cracks, stains, and moisture. If your floor looks dull but the wood is not deeply damaged, recoating may protect it before major refinishing is needed.
When Should You Call a Professional?
Call a hardwood flooring professional if cracks are widespread, boards are loose, the floor is cupping or crowning, gaps are wider than normal, or you suspect moisture under the floor. Professional repair may include board replacement, sanding and refinishing, moisture testing, subfloor repair, or correcting installation issues.
You should also get help if your floor is historic, very thin from previous sanding, or finished with an unknown coating. A beautiful old floor can often be saved, but aggressive DIY sanding can remove too much wood. In that case, the best tool is not a bigger sander. It is humility, followed by a phone call.
Real-Life Experience: What Actually Works When Repairing Wood Floor Cracks
In real homes, wood floor crack repair is rarely as tidy as the label on a filler container suggests. The crack may be darker than expected, the filler may dry lighter, and the “quick 30-minute job” may become a Saturday project with three coffee breaks and one dramatic sigh. That is normal. The best results usually come from patience, color testing, and doing less at first.
One practical experience many homeowners share is that tiny cracks respond well to simple color blending. A stain marker, wax stick, or small amount of filler can make a hairline crack nearly vanish from standing height. The key phrase is “from standing height.” Floors are meant to be walked on, not judged with your face six inches from the boards like a detective in a flooring crime drama.
Another common lesson is that humidity control can solve what filler cannot. If gaps appear every winter, adding a humidifier and keeping indoor conditions stable may reduce them naturally. Filling those same gaps while the boards are shrunken can create trouble later when humidity rises. Homeowners often learn this the hard way when filler cracks, lifts, or forms little ridges between boards. The floor was not being rude; it was just expanding.
For older wide-plank floors, rope filling can be surprisingly attractive when done carefully. Natural jute or cotton rope accepts stain, softens the dark shadow between boards, and suits historic floors better than a shiny stripe of modern filler. It will not fool anyone into thinking the gap is wood, but it can make the floor look intentional, warm, and clean. In older homes, “perfect” is often less beautiful than “well cared for.”
Color matching is usually the trickiest part. Many wood floors have amber, brown, gray, red, and gold tones all living together in one board. A filler that matches the board in the container may look too pale after drying. A repair that matches in daylight may look different under warm evening lights. Testing in a hidden area is not optional; it is the tiny insurance policy that prevents regret.
Another experience worth noting: sanding should be gentle. A small sanding block gives better control than a power sander for spot repairs. Power tools are wonderful, but on a finished floor, they can turn one small crack into a very smooth, very obvious patch. Sand only enough to level the repair, then clean thoroughly before staining or sealing.
Finally, the most satisfying repairs are the ones that protect the floor without erasing its personality. A wood floor is a living material. It changes with the seasons, records the movement of a household, and occasionally complains through cracks and gaps. Repairing those cracks is not about making the floor look factory-new. It is about keeping it strong, comfortable, clean, and beautiful enough that the next person who walks in says, “Wow, nice floors,” instead of, “Did something happen here?”
Conclusion
Learning how to repair cracks in wood floors is mostly about choosing the right fix for the right crack. Small cracks can often be cleaned, filled, sanded, stained, and sealed. Seasonal gaps may need humidity control more than filler. Wider gaps may call for rope, wood strips, or professional repair. The smartest approach is to inspect first, repair carefully, and protect the floor afterward.
With patience and the right materials, you can make cracks less visible, prevent dirt from collecting, and extend the life of your hardwood floor. Your floor may never look like it has never hosted furniture, pets, guests, dropped keys, or snack crumbs. But with a good repair, it can look loved, maintained, and ready for many more years of real life.
Note: This article is written for general home-improvement education. For widespread cracking, moisture damage, loose boards, or historic floors, consult a qualified hardwood flooring professional before starting repairs.