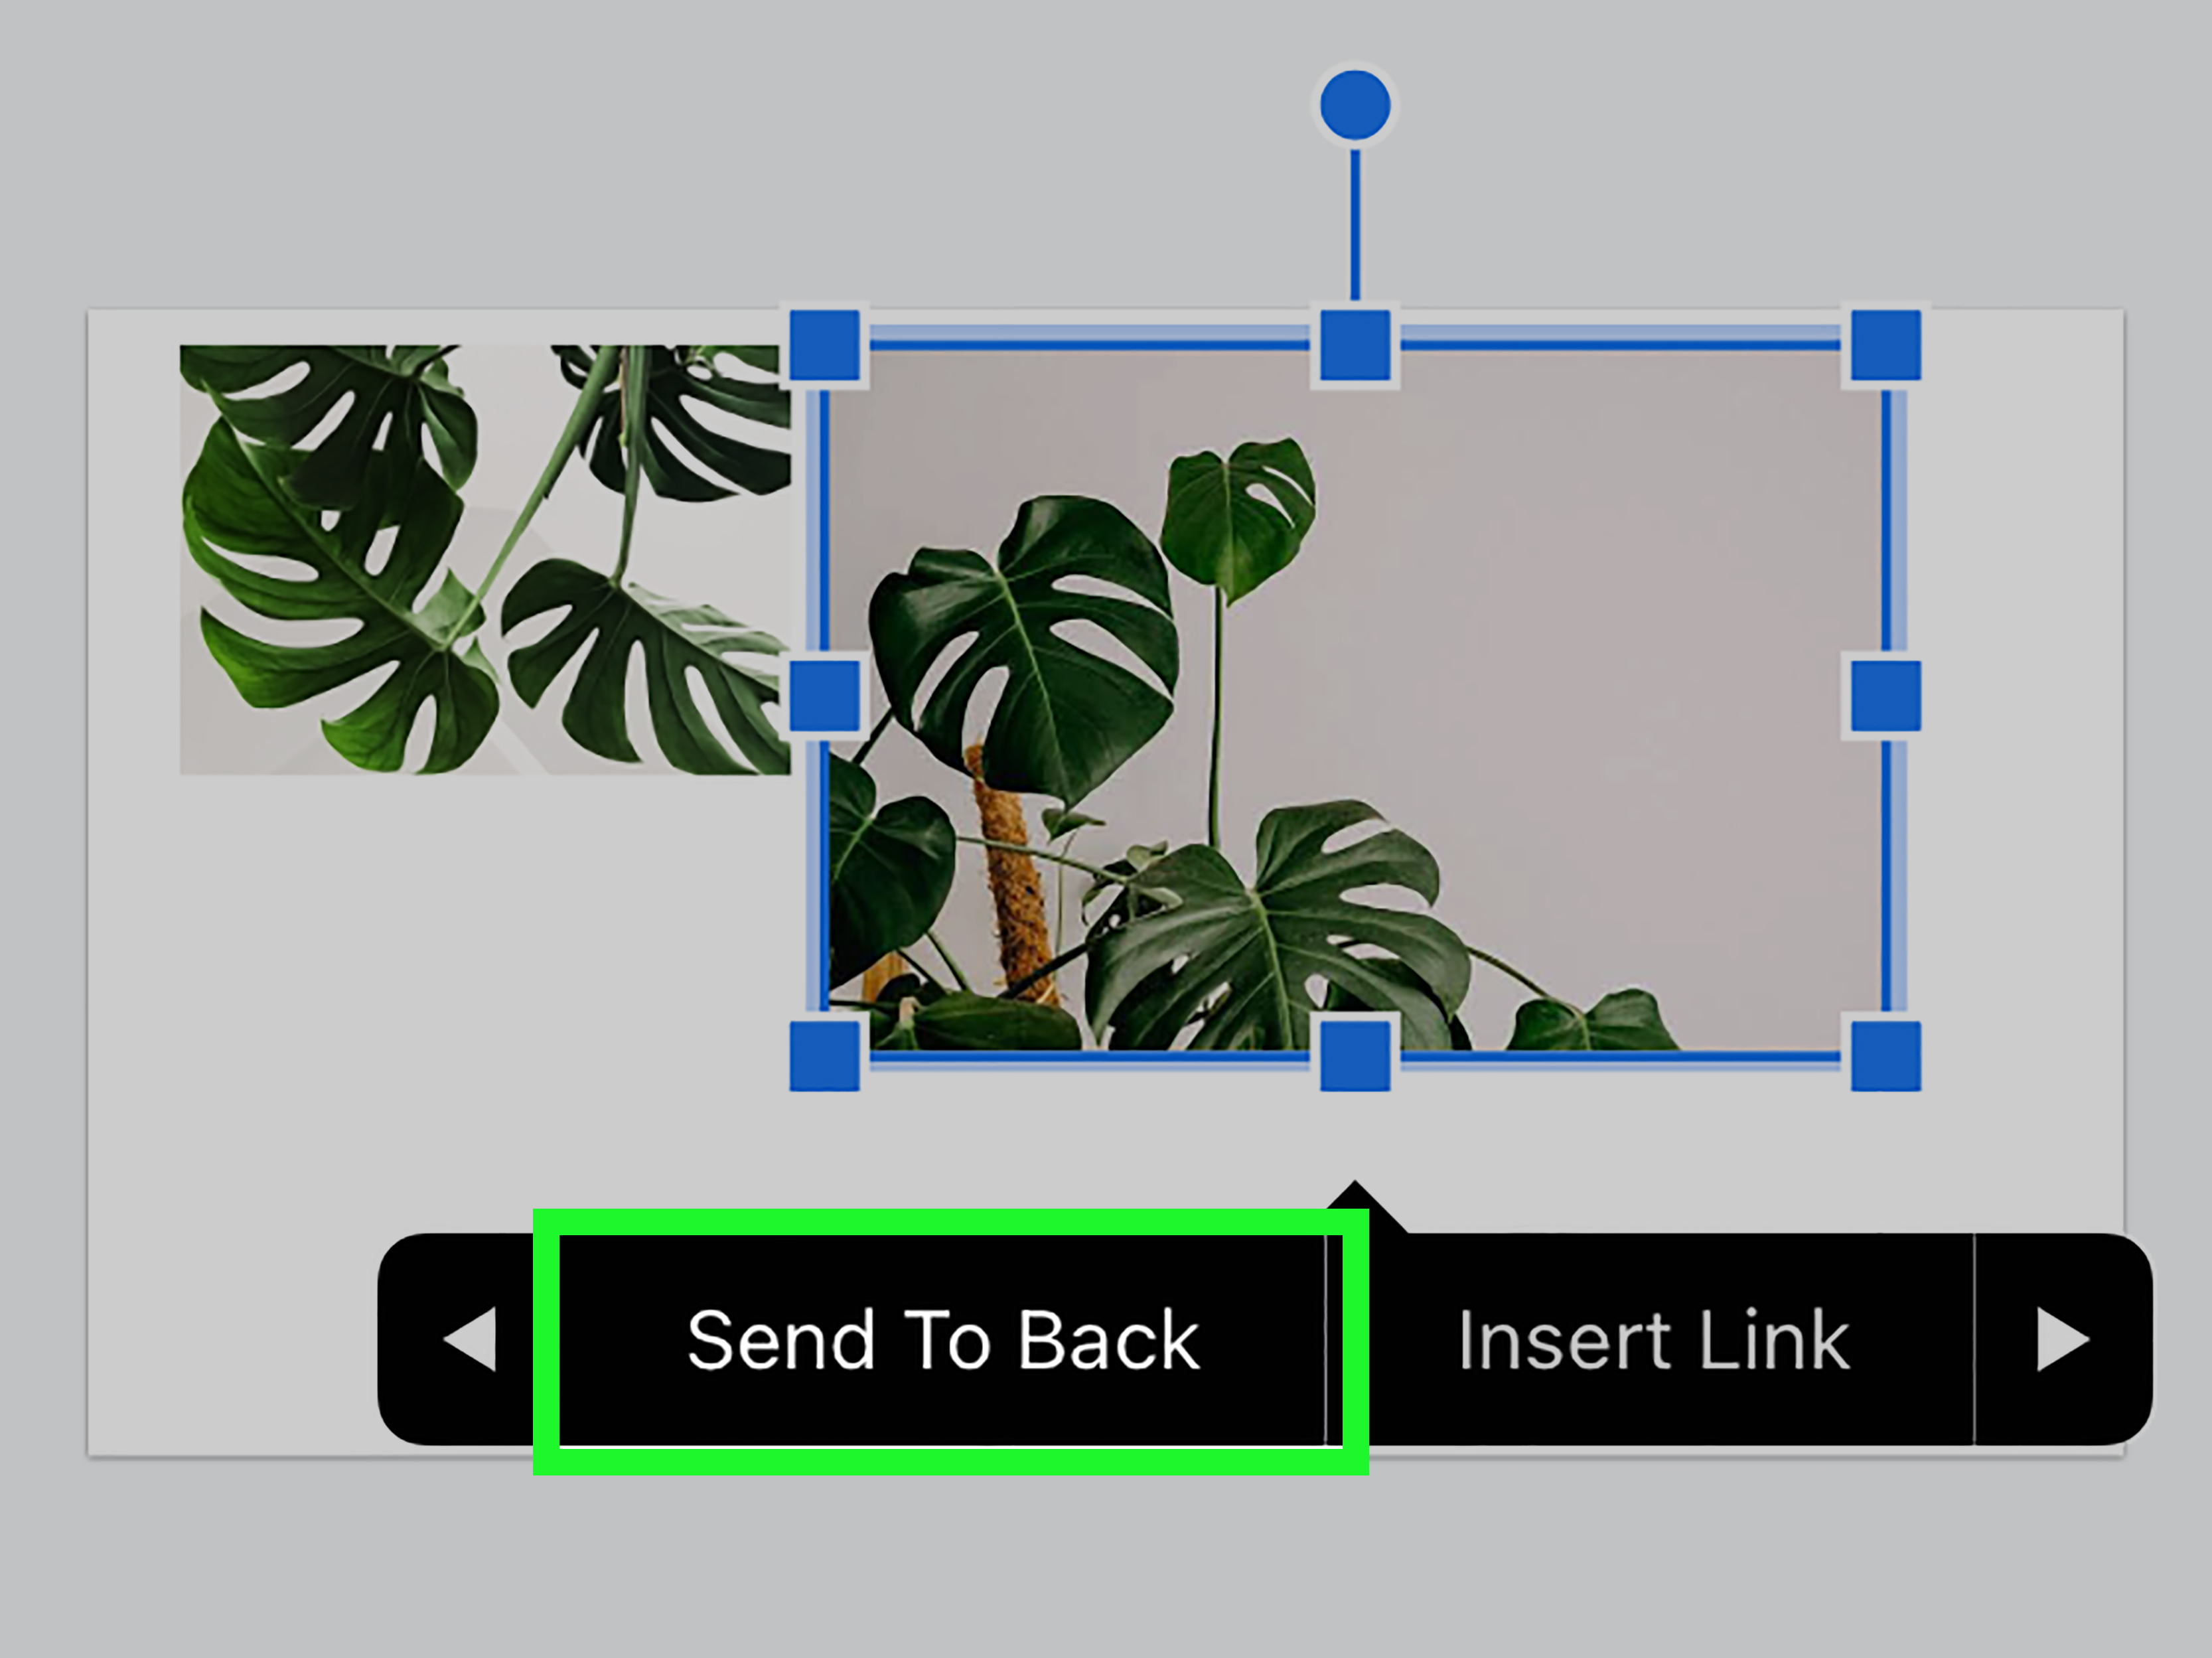
Editorial note: This guide focuses on the two fastest, most reliable ways to send an image to the back in Google Slides: the top menu method and the right-click method. Both work well when your picture is covering text, hiding shapes, blocking icons, or acting like it has appointed itself king of the slide.
Why Sending an Image to the Back Matters in Google Slides
Google Slides is friendly enough for beginners, but the moment you start layering images, text boxes, shapes, logos, arrows, and decorative doodads, your slide can become a tiny digital traffic jam. One image sits on top of your headline. A text box vanishes behind a photo. Your carefully placed button disappears like it joined a witness protection program. That is when you need to understand object order.
In Google Slides, every object on a slide sits in a layer. Images, text boxes, shapes, lines, icons, charts, and diagrams can appear in front of or behind one another. When you send an image to the back, you move it behind the other objects on that slide. This is especially useful when you want a photo to become a background, a watermark, a decorative texture, or a soft visual layer behind your main content.
The good news is that you do not need advanced design skills, a graphic design degree, or a dramatic montage with inspirational music. You only need to select the image and choose the correct order command. This guide explains exactly how to send an image backward or fully to the back in Google Slides using two practical methods.
Quick Answer: How Do You Send an Image to the Back in Google Slides?
To send an image to the back in Google Slides, select the image, click Arrange in the top menu, choose Order, and then click Send to back. You can also right-click the image, hover over Order, and select Send to back. If you only want to move the image behind one object at a time, choose Send backward instead.
That is the basic answer. Now let’s walk through the two methods in detail, because Google Slides has a way of making simple things feel mysteriously complicated right when you are five minutes away from presenting.
Method 1: Send an Image to the Back Using the Arrange Menu
The Arrange menu is the most official and predictable way to control layers in Google Slides. It is ideal when you want a clean workflow, especially if you are teaching someone else, creating a tutorial, or working in a shared presentation where everyone needs to follow the same steps.
Step 1: Open Your Google Slides Presentation
Start by opening the presentation that contains the image you want to move. Go to the slide where the image is located. If you have several images on the slide, click the specific one you want to send behind your text, shape, logo, or other visual elements.
Step 2: Select the Image
Click directly on the image. You should see a blue border or selection handles around it. Those handles are Google Slides’ polite way of saying, “Yes, this is the object we are about to boss around.” If you do not see the border, the image is not selected yet.
If the image is hidden behind another object, click the top object and move it temporarily, or use the keyboard Tab key to cycle through objects on the slide until the correct image is selected.
Step 3: Click Arrange in the Top Menu
Once the image is selected, look at the top menu and click Arrange. This menu contains several layout tools, including order, alignment, grouping, rotation, and centering options. For this task, the key option is Order.
Step 4: Choose Order, Then Send to Back
Hover over Order, then click Send to back. The image will move behind all other objects on that slide. If you have text boxes, shapes, icons, or diagrams placed above it, they should now appear clearly in front of the image.
This command is best when the image should behave like a background. For example, if you are designing a title slide with a city skyline behind the main heading, Send to back puts the photo behind everything else in one move.
When to Use Send Backward Instead
The Send backward command is different from Send to back. Instead of moving the image behind every object, it moves the image back one layer at a time. This is helpful when you want the image behind your title but still in front of a colored shape, border, or decorative frame.
Think of Send backward like taking one step down a staircase. Think of Send to back like sliding down the entire banister. Both get you lower, but one is more controlled, and the other is more dramatic.
Method 2: Send an Image to the Back Using the Right-Click Menu
The right-click method is fast, convenient, and perfect when you are already working directly on the slide canvas. Many users prefer this method because it keeps the action close to the object. No menu hunting, no scenic route, no tiny top-bar expedition.
Step 1: Click the Image
Open your slide and click the image you want to move. Again, make sure the blue selection border appears around the image. If you accidentally select a text box or shape instead, click away and try again.
Step 2: Right-Click the Image
Right-click the selected image. On a laptop trackpad, you may need to click with two fingers, depending on your device settings. A context menu will appear with options for formatting, ordering, copying, cutting, and other quick actions.
Step 3: Hover Over Order
In the right-click menu, hover over Order. This opens a smaller menu with layer controls such as Bring to front, Bring forward, Send backward, and Send to back.
Step 4: Select Send to Back
Click Send to back. Your image will move behind the other objects on the slide. If it still appears in front of something, that usually means the object you expected to see is part of the theme, master layout, or slide background rather than a normal editable object.
The right-click method is especially useful when you are making small adjustments during slide design. For example, you might insert a photo, stretch it to fill the slide, right-click it, choose Order, then Send to back. In just a few seconds, you have created a background image without needing to rebuild the slide.
Keyboard Shortcuts for Sending Images Backward
If you like speed, Google Slides also supports keyboard shortcuts for moving objects through layers. On Windows and ChromeOS, select the image and press Ctrl + Down Arrow to send it backward one layer, or Ctrl + Shift + Down Arrow to send it to the back. On Mac, use Command + Down Arrow to send backward and Command + Shift + Down Arrow to send to back.
Shortcuts are excellent when you are editing a large presentation and need to reorder many objects quickly. They are not one of the two main methods in this article because beginners usually find menus easier to remember, but they are worth keeping in your design toolbox. Once you memorize them, you may feel like a slide-layering wizard. A modest wizard, but still a wizard.
Send to Back vs. Set as Background: What Is the Difference?
Sending an image to the back and setting an image as the slide background are related, but they are not exactly the same thing.
When you use Send to back, the image remains an editable object on the slide. You can still click it, resize it, crop it, adjust transparency, change brightness, move it, rotate it, or delete it. This gives you flexibility, especially when you are still experimenting with the layout.
When you set an image as the actual slide background, the picture becomes part of the background layer. It is harder to accidentally move, which can be helpful for templates, classroom slides, company decks, and repeated branding. However, it also gives you fewer quick editing options directly on the slide.
Use Send to back when you want flexibility. Use a true background image when you want stability. In normal human language: send it to the back while designing; set it as the background when you are tired of accidentally dragging it around like a runaway carpet.
How to Make Text Readable Over a Background Image
Sending an image to the back is only half the design battle. The other half is making sure people can actually read what is on top of it. A beautiful image behind unreadable text is not a design victory. It is a decorative obstacle course.
Use Contrast
If the background image is dark, use light text. If the image is bright, use dark text. Simple contrast is one of the easiest ways to improve a Google Slides design. Avoid placing text over busy areas of a photo, such as faces, patterns, trees, city lights, or anything with many colors fighting for attention.
Add a Transparent Shape Behind Text
One practical trick is to add a rectangle behind your text and adjust its transparency. Place the shape between the image and the text box. This creates a soft reading panel without completely hiding the photo. It is like giving your headline a tiny stage instead of asking it to yell from the back of the room.
Adjust Image Transparency
You can also adjust an image’s opacity in Google Slides. Select the image, open Format options, and use the adjustment controls to change transparency, brightness, and contrast. Lowering opacity can help the text stand out, especially when the image is being used as a subtle background.
Crop the Image Carefully
Sometimes the problem is not the layer order; it is the image crop. If the most detailed part of the photo sits directly behind your title, crop or reposition the image so the calmest area sits behind the text. Negative space is your friend. Busy pixels are not always invited to the meeting.
Common Problems When Sending an Image to the Back
Even though the process is simple, a few common issues can make Google Slides feel stubborn. Here are the most likely problems and how to fix them.
The Image Disappeared
If the image seems to disappear after you send it to the back, it may be hidden behind a large shape or another image. Try selecting the top object and sending that object backward, or use Arrange > Order to bring the image forward again.
The Text Is Still Behind the Image
If text remains hidden after you send the image backward, select the text box and choose Arrange > Order > Bring to front. Sometimes it is easier to bring the important text forward than to keep sending the image backward.
You Cannot Click the Image Anymore
When an image is behind many objects, selecting it can become tricky. Try clicking near an exposed edge of the image. If that does not work, temporarily move or resize the objects above it. You can also use the Tab key to move through selectable objects on the slide.
The Object Is Part of the Theme
If you cannot move an element in front of or behind another item, it may be part of the slide theme or layout. In that case, go to the theme builder or change the layout. Objects built into the theme do not always behave like normal slide objects.
The Image Covers Everything After Importing
This often happens when you insert a large photo and it lands on top of existing content. Do not panic. Select the image, send it to the back, then resize and crop it. Google Slides is not trying to ruin your day. It is simply very enthusiastic about new images.
Best Uses for Sending Images to the Back
Knowing how to send an image to the back in Google Slides is useful in more situations than you might expect. It is one of those small skills that quietly improves almost every presentation.
Creating Title Slide Backgrounds
A full-slide image behind a bold title can make an opening slide look polished and professional. Use a high-quality image, send it to the back, then add your title and subtitle on top. For extra readability, add a dark transparent rectangle behind the text.
Designing Classroom Materials
Teachers often use Google Slides for worksheets, interactive lessons, digital notebooks, and classroom games. Sending an image to the back lets you create themed pages while keeping instructions, draggable objects, and student response areas in front.
Building Business Presentations
For business decks, background images can support a message without dominating the slide. A subtle office photo, product image, map, or abstract texture can add context. Just remember that the content should remain the star. The background is the supporting actor, not the one demanding a trailer with fresh fruit.
Making Social Media Graphics
Many creators use Google Slides as a lightweight design tool for social posts, thumbnails, quote graphics, and announcements. Layering images behind text and shapes makes it easier to create simple graphics without opening a separate design app.
Creating Watermarks
You can place a logo, icon, or faint image behind content as a watermark. Send the image to the back, reduce its opacity, and keep it subtle. A good watermark whispers. It does not walk into the room with a trumpet.
Design Tips for Better Layering in Google Slides
Layering can make a slide look clean and intentional, but too many layers can also create confusion. Follow these tips to keep your Google Slides presentation organized.
Use Fewer Objects When Possible
Every extra object adds another layer to manage. If you can simplify the design, do it. A clean slide is easier to edit, easier to present, and easier for your audience to understand.
Group Related Objects
If you have several shapes, icons, and text boxes that belong together, group them. Grouping helps keep related items aligned and prevents accidental movement. Just remember that grouped objects may need to be ungrouped before you can change the layer order of individual items.
Use Consistent Background Styles
If every slide uses a different background style, your presentation may feel chaotic. Choose a consistent approach: full-photo backgrounds, soft gradient overlays, muted textures, or simple brand colors. Consistency helps your audience focus on the message instead of wondering why slide three looks like it wandered in from another presentation.
Check Slides in Presentation Mode
Always preview your slides in presentation mode. A design that looks readable while editing may feel crowded when projected, shared in a video call, or viewed on a smaller screen. Presentation mode helps you catch contrast problems, hidden objects, and awkward layering before your audience does.
Practical Example: Turning a Photo Into a Clean Slide Background
Imagine you are creating a presentation about travel planning. You insert a beach photo, but it covers your title, subtitle, and three icons. Here is a simple way to fix it:
- Select the beach photo.
- Click Arrange in the top menu.
- Choose Order.
- Click Send to back.
- Select your title text and choose Bring to front if needed.
- Add a semi-transparent rectangle behind the text for readability.
- Crop or reposition the photo so the cleanest part sits behind the words.
Now the image supports the slide instead of smothering it. Your title is readable, your icons are visible, and the beach photo behaves itself. A small miracle, really.
Which Method Is Better?
Both methods work, but the best choice depends on your editing style. The Arrange menu is better when you want a clear, structured process. It is also easier to explain in a classroom, workplace training, or written tutorial. The right-click menu is better when you want speed and convenience while designing.
For beginners, I recommend learning the Arrange menu first. Once you understand where the order controls live, the right-click method becomes a faster shortcut. If you edit slides often, you will probably use both methods depending on the situation.
Extra Experience: What I’ve Learned From Layering Images in Google Slides
After working with many slide layouts, one lesson becomes obvious: sending an image to the back is easy, but making it look intentional takes a little judgment. The most common beginner mistake is treating a background image like decoration only. A good background image should support the message, guide attention, and create mood without stealing the microphone.
For example, if you are making a slide about productivity, a clean desk photo might work well behind a short title. But if the photo contains pens, notebooks, a laptop, a coffee mug, sticky notes, and someone’s dramatic houseplant, it may compete with the text. In that case, sending the image to the back is not enough. You may need to blur the image slightly before uploading, lower its opacity, crop it to a calmer area, or add a translucent overlay.
Another useful experience is to build slides from the back forward. Start with the background image, then add overlays, then text, then icons or decorative elements. This order matches how the final slide will appear visually. When you build randomly, you spend more time fixing layers. When you build from back to front, the slide feels more organized from the beginning.
I also recommend keeping important text away from the busiest parts of a picture. Faces, bright objects, sharp edges, and high-contrast patterns naturally attract attention. If your headline sits on top of those areas, the reader’s eye has to work harder. A better approach is to place text over sky, walls, blurred areas, empty tables, water, or other simple backgrounds. In design, empty space is not wasted space. It is breathing room.
One small trick that works surprisingly well is duplicating a background image before experimenting. Keep one copy off to the side or on a duplicate slide. That way, if you crop, stretch, darken, or reorder the image too aggressively, you have a backup. It sounds unnecessary until you accidentally turn your beautiful slide into a pixel pancake.
Layering is also easier when you name your design goal before touching the slide. Ask yourself: Is this image supposed to be a true background, a supporting visual, a watermark, or the main focus? If it is the main focus, do not bury it too deeply. If it is a background, send it to the back and reduce its visual strength. If it is a watermark, make it subtle enough that people notice the brand but not so bold that it argues with the content.
Finally, remember that Google Slides is a presentation tool, not a professional design suite. That is not a criticism; it is actually part of its charm. It gives you enough control to build attractive slides quickly without burying you under five thousand panels named things like “advanced chromatic layer hierarchy.” Learn the basic layer controls, use contrast wisely, and preview your work before sharing. Those simple habits will make your slides look cleaner, more professional, and much less like they were assembled during a caffeine emergency.
Conclusion
Learning how to send an image to the back in Google Slides is a small skill with a big payoff. Whether you are creating a polished business deck, a classroom activity, a social media graphic, or a simple photo-based title slide, layer control helps your content stay readable and professional.
The two easiest ways are simple: use Arrange > Order > Send to back, or right-click the image and choose Order > Send to back. Use Send backward when you want more control, and use Send to back when the image should sit behind everything else.
Once you understand these options, Google Slides becomes much easier to manage. Your images stop blocking your text, your layouts look cleaner, and your slides finally behave like civilized members of society.