Note: This article is written as original, publication-ready educational content based on established 3D printing principles, current additive manufacturing research, and practical maker experience.
When Small Prints Go Dramatic
Tiny 3D prints are supposed to be charming. A miniature dragon, a pencil-sized robot, a dollhouse chair, a micro gear, a decorative skull no bigger than a grapethese are the little trophies that make a 3D printer feel like a desktop magic machine. Then, without warning, one of them caves inward, cracks open, warps like a potato chip, or turns into a resin-filled horror egg. Congratulations: you have met the strange world of imploding tiny 3D prints.
The phrase can mean two different things. In advanced research, “imploding” can describe a controlled shrinking process where scientists build a larger structure and reduce it dramatically to create nanoscale objects. In hobby and professional 3D printing, however, it often refers to tiny prints that collapse, deform, crack, cup, suction, split, or fail after printing. One is a brilliant manufacturing trick. The other is a small plastic tantrum.
Either way, the lesson is the same: small prints are not automatically easy prints. In fact, the smaller a 3D print becomes, the more every detail matters. Layer height, nozzle size, resin exposure, wall thickness, drainage, support placement, material shrinkage, cooling, curing, and model design all become louder. Tiny parts do not forgive sloppy settings. They remember. Then they implode.
What Does “Imploding” Mean in 3D Printing?
In everyday 3D printing language, an imploding print is not usually experiencing a true physics-lab implosion. Your miniature wizard is not collapsing under deep-sea pressure, although it may look like it spent the weekend in a submarine accident. Instead, makers use the word to describe a print that caves inward, cracks from internal stress, buckles during printing, or fails because trapped air, trapped resin, suction, shrinkage, or weak geometry overwhelms the part.
With resin printing, implosion often appears as cracked hollow models, distorted miniatures, collapsed thin walls, or “cupping” failures where suction forces pull against the print during layer separation. With FDM printing, tiny parts may curl, detach from the bed, blob around the nozzle, melt from poor cooling, or become too fragile because the model’s details are smaller than the printer can reliably produce.
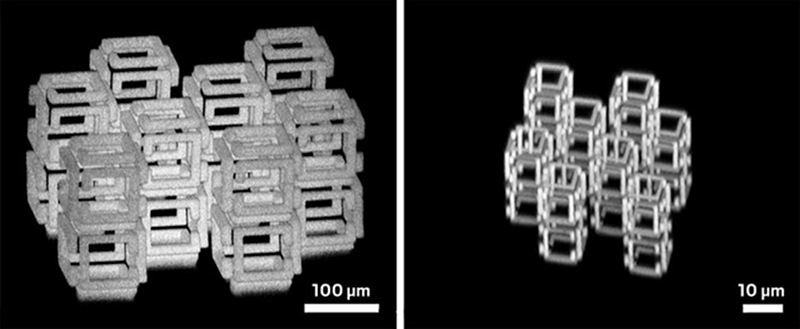
On the research side, the word “imploding” points to something far more elegant: implosion fabrication. This technique uses a larger scaffold, often a hydrogel or polymer structure, patterns material into it, and then shrinks the whole thing to a much smaller size. It is like making a sculpture in normal human scale and then asking science to do an Ant-Man impressionminus the superhero suit and questionable workplace safety protocols.
The Science Side: Implosion Fabrication and Shrinking 3D Structures
Implosion fabrication is one of the most fascinating ideas in modern nanofabrication. Instead of trying to directly print impossibly tiny structures at nanoscale resolution, researchers create a larger 3D scaffold, pattern materials into it with light, and shrink it down. This approach can produce structures with very fine features and complex shapes that would be difficult to build directly using traditional nanoscale manufacturing methods.
The basic idea is surprisingly understandable. First, create a swellable 3D framework. Second, use a laser or photopatterning process to place materials or define features inside that framework. Third, chemically or physically shrink the scaffold so the patterned structure becomes much smaller while preserving its overall shape. The magic is not that the object disappears inward like a cartoon collapsing tunnel. The magic is that shrinkage can improve resolution.
Researchers have explored this approach for metals, biomolecules, quantum dots, photonic structures, and other functional materials. In newer work, related shrinking techniques have been investigated for optical and photonic devices, including structures small enough to interact with visible light. That matters because controlling light at tiny scales could support future advances in optical computing, sensors, metamaterials, and miniaturized devices.
For regular makers, this research is not something you can do on a kitchen table next to a half-empty coffee mug and a spool of PLA. Still, it offers a valuable mindset: sometimes the smartest way to make something tiny is not to print it tiny from the start. You print larger, design carefully, and then use material behavior to your advantage. Hobbyists already use a simpler version of this thinking when they scale models up for printability, choose smaller nozzles for details, or use resin instead of FDM for miniatures.
Why Tiny 3D Prints Fail More Easily Than Big Ones
Tiny prints look simple because they use less material. That is the trap. A small print may finish faster, but it also leaves less room for error. A 0.3 mm design feature on a large model may be decorative. On a miniature, it may be a structural leg, a sword, a hook, or the only thing holding the entire model together. When details approach the physical limits of the printer, the slicer and material start making creative decisions you did not approve.
1. The Printer Cannot Reproduce Every Detail
FDM printers are limited by nozzle diameter, extrusion width, layer height, motion accuracy, cooling, and filament behavior. A standard 0.4 mm nozzle is excellent for many prints, but it is not a microscopic calligraphy pen. If a model includes tiny walls, raised lettering, thin horns, delicate chain links, or miniature window frames, the slicer may simplify them, merge them, or ignore them.
Layer height also matters. Lower layer heights can improve vertical detail, especially on curved or organic surfaces, but they increase print time and do not magically improve every feature. Horizontal detail depends heavily on nozzle size and XY resolution. This is why tiny FDM prints often benefit from a smaller nozzle, slower print speed, careful cooling, and realistic expectations. The first rule of tiny FDM printing is simple: if the part is thinner than your printer can physically draw, the printer will improvise, and printers are terrible jazz musicians.
2. Resin Shrinkage Creates Internal Stress
Resin printers are wonderful for small details, which is why tabletop miniatures, dental models, jewelry prototypes, and collectible figures often come from SLA, MSLA, or DLP machines. But resin printing has its own drama. Photopolymer resin hardens through curing, and that process can involve shrinkage and internal stress. If a model has thick sections, uneven wall thickness, sharp transitions, or trapped uncured resin, the printed part can crack or deform later.
This is one of the classic reasons hollow resin prints split after they look finished. A print can come off the build plate looking perfect, get washed, get cured, sit proudly on a shelf, and then crack days or weeks later. The culprit is often uncured resin hiding inside the model, poor internal cleaning, insufficient drain holes, uneven curing, or stress caused by thick resin masses. In other words, the print was not done. It was simply waiting for a dramatic entrance.
3. Suction Forces Attack Hollow Resin Prints
In bottom-up resin printing, each cured layer must separate from the film at the bottom of the vat. If a model creates a sealed or semi-sealed cavity, it can form suction. This is often called a “cup” problem. The printer is trying to lift the part, the vat film is resisting, and the model becomes the unfortunate rope in a microscopic tug-of-war.
For tiny hollow models, suction can cause layer shifts, cracks, support failure, distorted walls, or sudden release marks. Larger models get more attention for this issue, but small prints can suffer too because their delicate walls have less strength. Proper orientation, venting, hollowing, and drain holes help reduce this problem. A hollow model should never feel like a sealed bottle unless your goal is to create the world’s least useful snow globe.
4. Thin Walls Collapse or Warp
Thin walls are tempting because they save resin, reduce print time, and make small models feel delicate. But ultra-thin walls can bend during printing, flex during washing, deform while curing, or crack when supports are removed. In resin printing, consistent wall thickness is often more important than simply making everything thin. Sudden changes from thick to thin sections create stress concentrations, and stress concentrations are where tiny prints go to file complaints.
For FDM prints, thin walls may print as single extrusion lines. That can work for decorative pieces, but it creates weak seams, visible scars, and fragile edges. If the slicer cannot generate enough perimeters, the part may look complete while having the structural confidence of wet cereal.
5. Poor Cooling Turns Tiny FDM Prints Into Puddles
Small FDM prints suffer from heat buildup. When each layer is tiny, the nozzle returns to the same area before the previous layer has cooled. The result can be soft corners, drooping tips, glossy blobs, curled edges, or a print that looks as if it tried to become a candle. This is especially common with pointed ears, towers, mini cones, tiny figurines, and narrow columns.
Good part cooling, slower speed, minimum layer time, printing multiple copies at once, or using a sacrificial cooling tower can help. The goal is to give each layer enough time to solidify before the nozzle comes back for another hot visit.
Common Causes of Imploding Tiny Resin Prints
Resin is often the best technology for tiny, detailed prints, but it demands discipline. When a resin print implodes, cracks, or collapses, the cause usually falls into one of several categories.
Trapped Resin Inside Hollow Models
Hollowing a resin model saves material and weight, but a hollow print needs a way for resin and air to escape. Without drain holes, resin can remain trapped inside. That trapped resin may continue reacting, expanding, weakening the shell, or leaking through tiny cracks. The model may eventually split open like a cursed fortune cookie.
For hollow resin prints, include adequate drain holes in smart locations. Place them where they allow resin to leave during printing and washing, not merely where they look convenient after the model is already finished. Internal washing is just as important as external washing. A shiny exterior means very little if the inside is still a swamp.
Over-Curing or Uneven Curing
Post-curing strengthens resin parts, but more curing is not always better. Excessive or uneven curing can make some resins more brittle, increase stress, or exaggerate warping. Tiny parts are especially sensitive because they have little mass and can cure quickly. A miniature sword, wing, antenna, or thin wall may become brittle long before a thick base is fully cured.
Use resin-specific cure recommendations, rotate the part, avoid overheating, and do not blast a tiny model as if it personally offended you. Resin likes respect. It also likes gloves, ventilation, and proper disposal.
Bad Orientation
Orientation affects peel forces, support marks, surface quality, drainage, and dimensional accuracy. Printing a flat miniature base directly parallel to the build plate may seem efficient, but it can increase suction and stress. Angling the model often reduces cross-sectional area per layer and improves success rates.
The best orientation is not always the prettiest orientation. It is the one that balances support placement, drainage, layer forces, and visible surfaces. In resin printing, “flat and fast” can become “flat and failed” very quickly.
Weak or Poorly Placed Supports
Tiny prints need tiny supports, but “tiny” should not mean “decorative.” Supports must hold islands, resist peel forces, and stabilize thin features without destroying detail during removal. Undersupported parts can shift, stretch, or detach. Oversupported parts can scar or break when supports are clipped away.
Use heavier supports where the model begins, medium supports for load-bearing areas, and light supports for delicate details. Check islands in the slicer. If an unsupported island appears, do not ignore it. Unsupported islands are not mysterious artistic choices; they are future failures wearing invisibility cloaks.
Common Causes of Imploding Tiny FDM Prints
FDM tiny prints fail differently from resin prints. Instead of trapped resin or post-cure cracks, the main enemies are heat, adhesion, over-extrusion, nozzle limitations, vibration, and weak part geometry.
Poor Bed Adhesion
Small parts have small contact areas. That means they can detach easily, especially if the first layer is too high, the bed is dirty, the print surface is too cool, or the part has a narrow footprint. Once a tiny part detaches, it may stick to the nozzle and become a growing blob of molten regret.
Use a clean build plate, correct Z offset, proper bed temperature, brims when needed, and slower first-layer speeds. For very small objects, a brim can be the difference between “adorable miniature” and “plastic spaghetti confetti.”
Over-Extrusion and Blobby Details
Over-extrusion is especially visible on tiny prints. A little extra filament may barely matter on a large storage box, but on a miniature robot face it can erase eyes, weld gaps shut, and turn fingers into mittens. Calibrate flow, pressure advance or linear advance, retraction, and temperature. Lowering print speed can also help corners stay crisp.
Insufficient Cooling
As mentioned earlier, tiny layers do not have much time to cool. Enable appropriate part cooling for PLA, increase minimum layer time, slow down small layers, or print several small objects together. With PETG and ABS, cooling choices are more material-dependent, but heat management still matters. Tiny FDM prints are basically thermal negotiations.
Wrong Nozzle for the Job
A smaller nozzle can improve fine horizontal detail, but it also prints slower and can clog more easily. A 0.25 mm nozzle may be a better choice for miniatures, small text, tiny gears, and delicate decorative parts. A 0.4 mm nozzle remains a good general-purpose option, but it cannot reproduce every miniature feature cleanly.
Do not simply shrink a large model to 20% scale and expect miracles. Model features shrink too. A 1 mm wall becomes 0.2 mm. A sword becomes a whisker. A hand becomes a mitten. Scaling down is easy; preserving printability is the hard part.
How to Prevent Tiny 3D Prints From Imploding
Preventing tiny print failure begins before slicing. It starts with model design, material choice, and honest limits. A printer can do impressive things, but it cannot break physics just because the STL file looks cute.
Design for the Process
For resin printing, use consistent wall thickness, avoid large solid masses, hollow carefully, add drain holes, and reduce suction. For FDM printing, thicken fragile features, avoid unsupported needle-like details, use printable clearances, and make sure walls are wide enough for the selected nozzle.
Choose the Right Technology
Use resin printing for highly detailed miniatures, small figurines, jewelry-like details, and fine textures. Use FDM for functional mini parts, simple brackets, small enclosures, jigs, organizers, and durable shapes where extreme surface detail is less important. Resin wins on detail. FDM often wins on toughness, convenience, and cost.
Test Before Printing the Hero Model
Before printing a complicated tiny model, print a small test section. Try the wing, hand, connector, drain-hole area, snap-fit, gear tooth, or thin column first. Testing feels slow until it saves a six-hour print and half a bottle of resin. Then it feels like wisdom wearing safety glasses.
Use Slicer Preview Like a Detective
Slicer preview is not optional for tiny prints. Look layer by layer. Check whether thin details disappear. Look for unsupported islands in resin slicers. Watch for single-wall regions in FDM slicers. If the preview looks suspicious, the printer is not going to fix it for you. Printers are obedient, not psychic.
Specific Examples of Imploding Tiny 3D Prints
Example one: the hollow resin skull. A maker prints a tiny skull as a pendant. It is hollowed to save resin but has one small drain hole hidden under the jaw. The outside washes clean, but the inside remains partially filled. A week later, a crack appears along the crown. The likely cause is trapped resin and internal stress. The fix is to add better drainage, wash internally, dry thoroughly, and cure carefully.
Example two: the FDM mini tower. A tiny fantasy tower is printed in PLA with a 0.4 mm nozzle. The first layers look fine, but the narrow top becomes soft and wobbly. The nozzle keeps returning before each layer cools, turning the roof into a shiny blob. The fix is to increase cooling, slow down small layers, print multiple towers at once, or use a smaller nozzle and lower temperature.
Example three: the resin mini base. A flat circular base is printed parallel to the build plate. It sticks too strongly, creates suction, and warps during separation. The fix is to angle the base, add supports around the perimeter, reduce cross-sectional stress, and use proper exposure settings.
Example four: the scaled-down mechanical clip. A functional clip designed at 100 mm wide is scaled down to 20 mm. It looks adorable, but the spring arm becomes too thin and snaps immediately. The fix is not just changing slicer settings; the model must be redesigned for small-scale strength with thicker arms, larger radii, and appropriate clearances.
The Future of Tiny 3D Printing
The future of tiny 3D printing is moving in two directions at once. On one side, consumer printers are becoming faster, more accurate, easier to calibrate, and better at handling small parts. Resin printers continue to improve in resolution, light uniformity, speed, and material options. FDM printers are gaining better motion systems, smarter pressure control, improved input shaping, and more reliable first layers.
On the other side, research techniques like implosion fabrication and related shrinking methods are pushing far beyond hobby-scale printing. These approaches may help create complex nanoscale structures for optics, electronics, biomedical devices, sensors, and advanced materials. Instead of directly printing the smallest possible object, researchers can pattern a larger object and shrink it into a precise tiny structure.
For makers, this future is exciting because today’s laboratory idea often becomes tomorrow’s manufacturing method. The same basic questions remain: How do we control shrinkage? How do we preserve shape? How do we place material exactly where it belongs? How do we prevent tiny structures from failing under forces that seem invisible at larger scales?
Experience Notes: What Tiny Print Failures Teach You
After working with tiny 3D prints, one thing becomes clear: small objects are brutally honest teachers. A large print may hide weak settings under mass and momentum. A tiny print exposes everything. If your bed is slightly dirty, it tells you. If your resin exposure is too high, it tells you. If your cooling is weak, your miniature tower slumps like it just heard bad news. If your hollow model lacks drainage, it may wait several days before announcing the problem with a crack.
The first practical lesson is to stop trusting the model blindly. A beautiful STL file can still be a terrible printable object. Many models are designed for rendering, not manufacturing. That dragon may have paper-thin wings, floating scales, and teeth smaller than a nozzle width. On screen, it looks majestic. In the slicer, it becomes a negotiation with reality. Always inspect minimum wall thickness, unsupported areas, and fine details before printing.
The second lesson is that “more detail” is not always better. With resin printing, it is tempting to use the smallest layer height and highest detail settings for every miniature. But tiny prints also need reliable supports, clean drainage, and controlled curing. Overexposure may make supports stronger, but it can blur details. Underexposure may preserve sharp features, but it can cause failures. The sweet spot is not found by guessing once; it is found through calibration, test prints, and a little humility.
The third lesson is that post-processing is part of printing, not an afterthought. Resin miniatures need proper washing, internal cleaning if hollow, complete drying, and suitable curing. FDM miniatures may need careful brim removal, string cleanup, light sanding, or heat management. Many tiny prints are ruined after they succeed because someone removes supports too aggressively or cures delicate parts too long. Support removal should feel like surgery, not gardening.
The fourth lesson is to print small parts in batches when it helps. For FDM, printing multiple tiny objects at once gives each layer more time to cool. For resin, batching can be efficient, but it also increases peel forces and failure risk if the build plate becomes crowded with many suction-heavy parts. Smart batching is useful; reckless batching is just a group project where every model fails together.
The fifth lesson is to keep notes. Record resin type, exposure time, lift speed, layer height, nozzle size, temperature, supports, orientation, and curing time. Tiny print success is often repeatable only when the process is repeatable. Without notes, every failure becomes folklore. With notes, every failure becomes data. Data is less dramatic, but it wastes less resin.
Finally, tiny prints teach patience. They reward small adjustments: a slightly thicker wall, a better drain hole, a cleaner plate, a slower speed, a smarter orientation, a smaller nozzle, or a better support tip. The difference between an imploded miniature and a perfect tiny masterpiece may be only one setting. That is frustrating, yes, but also part of the fun. 3D printing is not just pushing a button. It is learning how materials behave when your ideas become physical objects.
So when a tiny 3D print implodes, do not treat it only as a failure. Treat it as feedback with theatrical flair. The print is telling you something about pressure, shrinkage, cooling, curing, geometry, or scale. Listen closely, adjust carefully, and print again. The next version may be smaller, sharper, stronger, and far less likely to perform a tiny plastic collapse in front of your disappointed eyes.
Conclusion
Imploding tiny 3D prints sit at the crossroads of science, design, and workshop comedy. In research, controlled shrinking can help create nanoscale structures with astonishing precision. In everyday 3D printing, unwanted implosion usually means a model is fighting trapped resin, suction, shrinkage, weak walls, poor cooling, bad supports, or unrealistic scaling.
The solution is not one magic setting. It is a smarter workflow: design for the printing process, respect printer limits, orient models carefully, add drainage where needed, calibrate exposure or extrusion, manage heat, and inspect slicer previews before committing material. Tiny prints may be small, but they demand big attention.
Whether you are printing tabletop miniatures, micro tools, jewelry prototypes, scale models, or experimental small structures, the same rule applies: physics always gets a vote. Give your tiny 3D prints enough support, enough drainage, enough cooling, and enough structural sense, and they will reward you with crisp details instead of dramatic implosions.