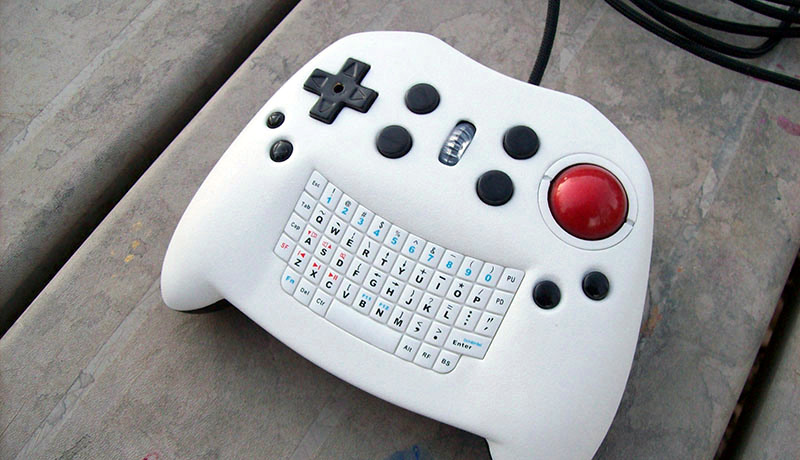
Analog sticks have ruled game controllers for decades, but ruling is not the same as being perfect. They are compact, inexpensive, and familiar, yet they can feel frustrating when a game asks for fast turns, tiny cursor adjustments, or mouse-like aiming. A trackball offers a wonderfully odd alternative: put a miniature pointing device under the player’s thumb and let the ball handle camera movement, targeting, menus, or even desktop navigation.
Putting a trackball inside a controller sounds like a weekend project involving one screwdriver and an unreasonable amount of confidence. In practice, it combines enclosure design, optical sensing, USB communication, firmware mapping, ergonomics, and the ancient engineering ritual of discovering that the component is three millimeters too tall.
Done well, however, a trackball controller can bridge the gap between the comfort of a gamepad and the responsive movement of a mouse. It can also create new control options for arcade games, strategy titles, accessibility setups, custom simulators, and experimental interfaces.
Why Put a Trackball in a Game Controller?
The fundamental difference is how the devices interpret movement. An analog stick is usually a rate-control device. Pushing the stick tells the game which direction the camera should move and how quickly it should continue moving. The camera stops when the stick returns to center.
A trackball behaves more like a mouse. Rolling the ball produces relative movement data. A quick flick can create a large turn, while a tiny movement can make a small correction. There is no spring pulling the ball toward a center point, and there is no fixed maximum physical deflection limiting how quickly the player can generate motion.
A York University study demonstrated the potential of this arrangement by replacing the right analog stick of an Xbox 360 controller with a Logitech trackball mechanism. In controlled pointing tasks, the trackball prototype produced approximately 60 percent higher throughput than the standard controller for both novice and experienced gamepad users. The standard analog stick still produced straighter pointer paths, showing that speed and precision do not automatically create perfectly smooth movement.
That trade-off explains both the appeal and the challenge. A trackball can move quickly and precisely, but the enclosure, sensitivity curve, ball height, friction, and software configuration must all work together. Otherwise, the controller feels less like an advanced input device and more like a marble trying to escape from a sandwich.
Three Ways to Build a Trackball Controller
1. Keep the Gamepad and Trackball as Separate USB Devices
The simplest prototype preserves the original controller electronics and installs the circuit board from a USB trackball inside the same shell. The controller still identifies itself as a gamepad, while the trackball identifies itself as a mouse.
This approach requires minimal firmware development because the computer already understands both devices. It is also ideal for testing whether the concept feels comfortable before designing a custom circuit board.
The disadvantage is that the finished controller may need two USB cables or an internal USB hub. Some PC games also behave badly when they receive gamepad and mouse input simultaneously. Button prompts may rapidly switch between keyboard and controller icons, aim assistance may turn on and off, or the game may ignore one device entirely.
2. Create a Composite USB Device
A cleaner solution uses one microcontroller to report multiple Human Interface Device functions through a single cable. Compatible boards based on the RP2040, ATmega32U4, or similar microcontrollers can appear as a mouse, keyboard, and gamepad at the same time.
Frameworks such as TinyUSB, QMK, and CircuitPython HID can simplify this process. The microcontroller reads buttons, triggers, joysticks, and trackball motion before sending the appropriate reports to the host computer.
This architecture provides much more control. Firmware can adjust sensitivity, create alternate layers, activate precision mode while a trigger is held, or convert a ball click into a right-stick button press. It also reduces cable clutter, which is important because nobody wants to finish an elegant custom controller and discover that it resembles an electronic squid.
3. Convert Trackball Movement into Virtual Analog-Stick Output
Some consoles and games accept only conventional controller input. In that case, firmware can translate trackball movement into virtual right-stick values.
Slow ball movement can generate a small stick value for precise aiming, while a fast flick can produce maximum deflection for rapid camera rotation. The firmware then gradually returns the virtual stick to center after each movement report.
This method improves compatibility but sacrifices some of the trackball’s mouse-like behavior. The game still applies its own analog-stick dead zones, acceleration curves, maximum turning speed, and aim-assist rules. Even a brilliant trackball cannot negotiate with a game engine that has already decided how fast the camera is allowed to move.
Mechanical Design: Where the Real Battle Begins
The first major decision is placement. For camera control, the trackball usually replaces the right analog stick. The player should be able to reach it without changing grip or stretching the thumb away from the face buttons.
A smaller ball saves space, but it may require frequent repositioning during large movements. A larger ball provides more surface area and can feel smoother, yet it occupies valuable room inside the controller. Many practical handheld designs fall somewhere between a tiny navigation ball and a desktop-sized finger trackball.
Ball Support and Retention
The ball needs a low-friction socket with three stable support points. Small ceramic or synthetic bearings are commonly used because three points define a plane without overconstraining the ball. Poorly positioned bearings cause drag, wobble, or uneven movement.
A retaining ring prevents the ball from falling out when the controller is turned upside down. The opening should expose enough of the sphere for comfortable movement while keeping the ball securely captured. OSHA guidance for desktop trackballs recommends generous exposure and free rotation in every direction; the same principle is useful in a handheld design, although the available space is much smaller.
Sensor Position
An optical sensor must maintain the correct distance and angle relative to the ball. If it sits too far away, movement may become intermittent. If it is too close, the ball can rub against the lens housing. Reflective, transparent, or unusually patterned balls can also produce inconsistent tracking.
Reusing the complete socket and sensor assembly from a donor trackball is generally easier than designing the optical geometry from scratch. The donor mechanism has already solved several unpleasant problems involving focal distance, illumination, and ball support.
Height and Thumb Angle
A trackball that protrudes too far above the shell forces the thumb into an awkward position. The York University prototype encountered this problem because the donor assembly could not sit deeply enough inside the Xbox 360 housing. The elevated ball contributed to thumb fatigue and made repeated repositioning more difficult.
Before cutting a controller shell, build a temporary mock-up using modeling clay, cardboard, foam, or a rough 3D print. Hold it for at least 20 minutes. A component that feels fine for 30 seconds may become a tiny plastic mountain after an hour of gaming.
Choosing the Electronics
Reuse a Donor Trackball
The fastest route is to salvage the sensor, circuit board, ball, bearings, and socket from an existing USB trackball. Thumb-operated models are particularly useful because their ball size and sensor arrangement already suit one-handed operation.
Before disassembly, connect the donor device to a computer and verify that the tracking is reliable. Record the wire colors, connector orientation, supply voltage, and button connections. Photographs taken during disassembly are more useful than confidently insisting that everything will be remembered later.
Use a Dedicated Optical Sensor
Advanced builders can use a sensor such as the PMW3360 or PMW3389 with compatible firmware. QMK supports several pointing-device sensors and allows settings such as counts per inch, rotation, movement scaling, and custom report processing.
A dedicated sensor creates a more compact and configurable design, but it requires a carefully designed lens mount, stable illumination, clean power, and reliable communication with the microcontroller. This path is best suited to builders who are comfortable reading datasheets and debugging SPI connections.
Plan the USB Architecture Early
Decide whether the controller will use separate devices, an internal USB hub, or one composite HID interface before finalizing the enclosure. The choice affects cable routing, power distribution, firmware complexity, and compatibility.
Include proper strain relief where the cable exits the shell. A beautiful solder joint can still fail if every excited couch movement pulls directly on it.
Firmware Tuning Makes or Breaks the Project
A mechanically perfect trackball can still feel terrible with poor software settings. The controller should therefore expose adjustable parameters rather than locking everything into one heroic guess.
Sensitivity
Start with moderate sensitivity. The player should be able to make a controlled adjustment without the camera leaping across the screen, but a normal thumb sweep should still produce a meaningful turn.
Different games interpret mouse input differently, so one universal setting is unlikely to work everywhere. Store several profiles or provide buttons that increase and decrease sensitivity during testing.
Acceleration
Acceleration allows a gentle roll to produce precise movement while a fast flick travels much farther. It also reduces clutching, which occurs when the user must lift and reposition the thumb repeatedly to continue moving in the same direction.
Too much acceleration makes aiming unpredictable. A useful curve should increase output gradually rather than suddenly launching the camera into another time zone.
Smoothing and Filtering
Light filtering can reduce sensor noise and hand jitter, especially with small balls. Excessive smoothing adds latency and makes the controller feel heavy. Competitive aiming usually benefits from minimal filtering, while menu navigation and strategy games may tolerate more.
Rotation and Axis Correction
The sensor may not be mounted perfectly parallel to the controller shell. Firmware can rotate or transform the X and Y values so that a natural leftward thumb movement produces horizontal cursor movement rather than an accidental diagonal tour.
Button Layers
A trigger or rear paddle can activate a precision layer, temporarily reduce sensitivity, enable scrolling, or change the ball from mouse control to virtual joystick control. Clicking the ball can act as the right-stick button, although a separate switch is often more reliable than requiring downward pressure on the entire mechanism.
Games and Applications That Benefit Most
First-person and third-person games are the obvious targets. A trackball can provide faster turning and finer adjustments than a conventional right stick, especially when the game supports raw mouse input alongside controller movement.
Real-time strategy, simulation, point-and-click, and management games may benefit even more. These genres depend on cursor positioning and menu navigation, tasks that often feel slow with an analog stick. Valve explored a similar idea with trackpad-based controllers, using configurable surfaces to bring mouse-oriented PC games to the couch.
Classic arcade games such as Centipede and Missile Command are natural candidates because their original cabinets used trackballs. Maker projects have already demonstrated USB trackballs controlling arcade software and even being translated into console-compatible input.
A trackball controller can also function as a living-room PC remote, CAD navigation device, media controller, or accessibility interface. A recent 3D-control project, for example, adapted the sensors in a commercial trackball so the physical ball could represent the rotation of a digital object.
Accessibility and Comfort Considerations
Custom inputs are not merely technical novelties. They can make games usable for players who cannot comfortably operate a standard dual-stick controller. Microsoft’s adaptive gaming hardware demonstrates the value of allowing buttons, switches, joysticks, and other devices to be arranged around an individual player’s abilities.
A stationary trackball may reduce the need for large arm or shoulder movements, and it can be operated without a desk. However, it is not automatically more comfortable for everyone. Thumb-operated trackballs can create thumb fatigue, while finger-operated designs may require a larger enclosure.
Comfort depends on ball position, hand size, grip style, resistance, session length, and the user’s mobility. UCLA ergonomics guidance notes that trackballs may reduce shoulder movement but can cause thumb or finger discomfort when used poorly. The correct design is therefore the one that fits the individual, not the one with the most impressive list of components.
A Practical Build Sequence
- Test the idea externally. Use a normal controller and a desktop trackball at the same time. Confirm that the target games accept both input types.
- Choose an output strategy. Decide between separate USB devices, composite HID reports, or trackball-to-stick conversion.
- Measure the controller interior. Check the shell, battery compartment, triggers, rumble motors, button membranes, and circuit-board clearances.
- Create a temporary mount. Test ball height, thumb reach, and access to the face buttons before cutting the final shell.
- Breadboard the electronics. Verify sensor readings, buttons, USB enumeration, and firmware mapping outside the enclosure.
- Print or fabricate the socket mount. Include bearing pockets, a sensor bracket, a retaining ring, and access for cleaning.
- Modify the shell gradually. Remove small amounts of material and test frequently. Plastic is easy to remove and surprisingly stubborn about growing back.
- Tune one game at a time. Adjust sensitivity, acceleration, smoothing, and button layers using repeatable test scenes.
- Stress-test the cable and ball retention. Rotate the controller, play for an extended session, and confirm that nothing shifts or disconnects.
Common Problems and How to Avoid Them
The Ball Feels Sticky
Check bearing alignment, socket clearance, and surface contamination. Skin oil and dust can accumulate quickly. Design the retaining ring so the ball can be removed without dismantling the entire controller.
The Sensor Skips During Fast Flicks
The sensor may be incorrectly spaced, poorly illuminated, or unable to track the selected ball surface. Reduce sensitivity only after confirming that the hardware is reading movement correctly.
The Thumb Becomes Tired
Lower the ball, reduce friction, change its angle, or move it closer to the natural resting position. A precision device is not useful if operating it feels like thumb day at the gym.
The Game Keeps Switching Input Modes
This usually occurs when the game alternates between mouse and gamepad interfaces. Try a virtual-stick output mode, map the entire controller to keyboard and mouse commands, or use a game-specific input layer.
Fast Spins Produce No Additional Movement
The firmware may be clipping large sensor reports or saturating virtual-stick output. Inspect the raw motion values and use larger report ranges where supported.
Hands-On Experience: What Using a Trackball Controller Actually Feels Like
The first few minutes with a trackball controller are usually strange. A player raised on analog sticks expects resistance, a center point, and a predictable maximum angle. The trackball offers none of those things. The thumb moves, the ball continues to rotate, and the camera responds according to movement rather than displacement. It feels less like steering a small lever and more like nudging the world itself.
The biggest surprise is often speed. Turning 180 degrees no longer requires holding the stick against its plastic gate while waiting for the camera to catch up. A quick ball flick can perform the turn almost instantly in a game that accepts mouse input. That speed feels liberating, but it can also be hilarious during early testing. One slightly enthusiastic swipe may leave the character staring at the ceiling while the player quietly pretends it was a tactical decision.
Fine aiming improves more gradually. Tiny ball movements can be extremely precise, but only after the sensitivity and acceleration curves are tuned. With sensitivity set too high, the reticle trembles around small targets. Set it too low, and every large turn requires several thumb repositionings. A modest acceleration curve usually provides the best compromise: slow rolls remain controlled, while quick flicks cover larger distances.
Ball height has a larger effect than expected. A trackball mounted only a little too high can force the thumb upward and outward. The controller may feel acceptable during a five-minute test, yet become tiring halfway through a longer session. Lowering the ball or tilting the socket toward the thumb’s resting position often improves comfort more than any firmware change.
Access to the face buttons also matters. On a conventional controller, the thumb travels between the right stick and the A, B, X, and Y buttons. A large trackball can block that route or require the player to lift the thumb over a raised retaining ring. Rear paddles help by relocating common actions such as jump, reload, or interaction, allowing the thumb to remain on the ball.
Strategy games and desktop navigation tend to provide the most immediately satisfying experience. Selecting units, moving a cursor, and clicking small interface elements feel natural because the trackball behaves like a compact mouse. First-person shooters require more experimentation, especially when games mix gamepad movement with mouse aiming. Some titles handle the combination beautifully; others flash button prompts, disable aim assistance, or momentarily pause input while deciding which device is in charge.
Cleaning becomes part of the ownership experience. Dust collects around the bearings and gradually increases friction. A removable ball and accessible socket transform maintenance from a five-minute task into a 30-second one. Permanently gluing the retaining ring may create a cleaner-looking prototype, but future you will have strong opinions about that decision.
The most rewarding moment arrives when the controller stops feeling like a prototype. The player no longer thinks about sensor reports, printed brackets, or acceleration coefficients. The ball simply becomes the camera control. That transition may take several revisions, but it is exactly why the project is worth attempting: it transforms a familiar controller into a personalized instrument that behaves in a way ordinary gamepads do not.
Conclusion
Putting a trackball inside a controller is more than replacing one round component with another. It changes the fundamental relationship between thumb movement and on-screen motion. A well-designed trackball can offer rapid turns, precise cursor positioning, compact mouse control, and new accessibility options without forcing the player to abandon the familiar gamepad form.
The best development path is to prototype before cutting, preserve adjustability in the firmware, keep the ball low and easy to clean, and test compatibility with real games early. The final result may not replace a traditional controller for every genre, but it can become an exceptional tool for aiming, strategy, arcade classics, desktop navigation, and experimental play.
It may also permanently change how ordinary analog sticks feel. After learning to flick a physical ball across a virtual battlefield, returning to a tiny spring-loaded lever can feel a little like steering a sports car with a hotel thermostat.
SEO Tags