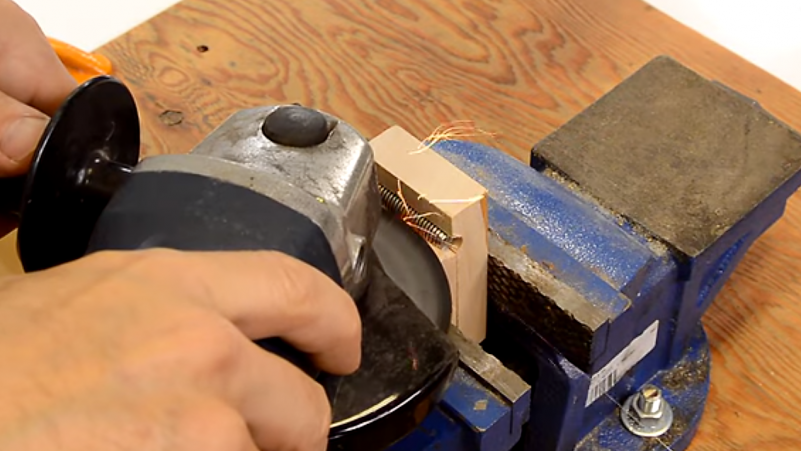
Threading a hole in wood sounds like a job that requires a shiny commercial tap set, a technical chart, and possibly an engineer standing nearby with a clipboard. In many everyday woodworking projects, however, you can make a perfectly useful tap from an ordinary bolt in less time than it takes to find the specialty tool catalog you misplaced.
A shop-made wood tap lets you cut internal threads that accept machine screws, bolts, threaded knobs, or custom jig hardware. It is inexpensive, customizable, and especially handy when you need an uncommon thread size at 9:30 on a Sunday night and the hardware store has already turned off the lights.
This guide explains how to make a tap from a bolt, select the right pilot hole, cut clean threads, strengthen them when necessary, and decide when direct threading is appropriate. It also covers common failures, because wood has a delightful habit of teaching lessons immediately and charging for them in ruined workpieces.
What Is a Shop-made Wood Tap?
A tap is a cutting tool that forms internal threads in a drilled hole. Commercial metalworking taps have tapered cutting ends, relieved cutting edges, and flutes that create space for chips. A simple shop-made version copies those essential features by modifying a bolt that has the same thread pattern as the fastener you plan to use.
For example, a tap made from a 1/4-20 bolt cuts a hole for a 1/4-20 machine screw. The first number identifies the nominal bolt diameter, while the second indicates 20 threads per inch. Metric threads use diameter and pitch, such as M6 × 1.0.
The homemade tool is not intended to replace a precision tap in metal. Wood fibers are far easier to cut than steel, so a carefully shaped bolt can perform surprisingly well in hardwood, medium-density fiberboard, and certain high-quality plywood applications.
Where threaded wood joints are useful
Directly tapped holes work particularly well in:
- Drill-press fences and adjustable stops
- Router-table accessories
- Assembly jigs and positioning fixtures
- Wooden knobs and handles
- Light-duty knockdown furniture
- Lathe faceplates and turning fixtures
- Temporary clamping devices
- Prototype mechanisms and shop experiments
The technique provides a clean connection with no visible nut on the opposite side. It also allows a machine screw to be removed and reinstalled more neatly than an ordinary wood screw, provided the threads are not overloaded or subjected to endless assembly cycles.
Why Make a Tap Instead of Buying One?
A commercial tap is the best choice when accuracy, speed, and long service life matter. Still, a homemade wood-threading tap has several advantages.
First, the material is inexpensive. You may already have a suitable bolt in a drawer labeled “miscellaneous hardware,” otherwise known as the drawer where organization went to retire.
Second, the tool automatically matches the fastener. If the tap is made from a spare bolt taken from the same package as the final hardware, questions about pitch and thread form largely disappear.
Third, a shop-made tap can be customized. You can create a long tap for a deep jig, a short bottoming tap for a blind hole, or a coarse tap from a lag screw to prepare dense hardwood for matching hardware.
Finally, making one is an excellent introduction to thread geometry. Once you understand why the cutting edge, taper, pilot hole, and chip space matter, commercial taps become far less mysterious.
Tools and Materials
You do not need a machinist’s workshop. A basic version can be made with the following supplies:
- A clean steel bolt matching the desired thread
- One matching nut
- A bench vise or secure clamping fixture
- A triangular file, rotary tool, or angle grinder with a thin cutoff wheel
- A drill and accurately sized bit
- A wrench, socket, tap wrench, or locking pliers
- Paste wax, paraffin, or another wood-safe lubricant
- Eye protection
- A small countersink bit
- Scrap wood from the project material
A file offers excellent control and produces less heat. A rotary tool is faster for smaller bolts. An angle grinder works well on large hardware but can remove far too much material in one enthusiastic second, so restraint is recommended.
<section so restraint is recommended.
How to Make a Tap From a Bolt
1. Select the correct bolt
Choose a straight, undamaged bolt with clearly formed threads. A hex-head bolt is convenient because a socket or wrench can drive it. The threaded portion should be long enough to reach the required depth without the smooth shank entering the hole.
Use a standard machine bolt when the final joint will accept a machine screw. For coarser threads, a spare lag screw can be modified in a similar manner. Coarse threads often tolerate wood movement and minor fiber damage better than very fine threads.
2. Install a nut before modifying the bolt
Thread a matching nut onto the bolt and move it beyond the section that will be filed or ground. After shaping the tap, removing the nut helps straighten minor burrs and clean the damaged thread edges.
This simple step is easy to forget and deeply satisfying to remember. It is the hardware equivalent of putting the trash bag in the bin before making dinner.
3. Taper the starting end
Commercial taper taps gradually introduce the thread into the material. Copy that idea by lightly reducing the first two or three threads at the end of the bolt. Do not grind the tip into a sharp pencil point. The goal is a gradual lead that centers the tool and increases the cutting depth progressively.
Rotate the bolt as you work so the taper remains reasonably even. Perfect concentricity is not essential for rough shop fixtures, but a visibly lopsided tip will encourage the tap to enter the hole at an angle.
4. Cut the flutes
Make two to four lengthwise grooves across the tapered end and several full threads behind it. These grooves perform two jobs: they create cutting edges where the groove intersects the threads, and they provide space for wood chips.
For a small tap, two opposed flutes are often adequate. Three or four flutes provide more cutting edges and better chip distribution on larger bolts. Cut each groove deep enough to interrupt the thread crest, but do not weaken the bolt until it resembles a tiny steel fork.
A slight angle can make the leading edge more aggressive, but straight axial grooves are easier to produce and work well in most woods.
5. Remove burrs
Dress sharp metal burrs with a fine file. Then back the nut off the bolt. As it passes over the modified section, it helps restore the thread profile and exposes any areas that still need cleanup.
The cutting intersections should feel sharp, while the unmodified threads should remain smooth enough to guide the tap.
Choosing the Correct Pilot Hole
The pilot hole is one of the most important parts of the process. A hole that is too small leaves too much material for the tap to remove, increasing torque, heat, splitting risk, and the possibility of a stuck tool. A hole that is too large produces shallow threads with limited holding power.
A practical starting point is the conventional tap-drill size for the selected machine thread. The following common sizes are useful for shop fixtures:
| Thread Size | Typical Starting Drill | Approximate Diameter |
|---|---|---|
| 1/4-20 | No. 7 | 0.201 inch |
| 5/16-18 | Letter F | 0.257 inch |
| 3/8-16 | 5/16 inch | 0.3125 inch |
| 1/2-13 | 27/64 inch | 0.4219 inch |
These dimensions are starting points rather than commandments carved into a maple tablet. Wood species, grain direction, moisture content, thread depth, and intended load all affect the result.
In extremely dense or brittle hardwood, a pilot hole a few thousandths of an inch larger may reduce tearing and make tapping easier. In softer material, the standard hole may produce fuller threads, but those threads may also crush under heavy tightening. Always test the complete process in an offcut from the actual project.
Keep the hole square
A drill press is ideal because it keeps the hole perpendicular to the surface. When drilling by hand, use a guide block made on the drill press. Clamp the block over the workpiece and drill through its accurately bored hole.
Add a small countersink at the opening. The chamfer guides the tap and reduces lifting or splintering around the rim.
How to Tap Threads in Wood
- Secure the workpiece. Clamp it firmly so both hands can control the tool.
- Lubricate the tap. Rub a small amount of paste wax or paraffin over the cutting end.
- Align it carefully. Hold the tap in line with the drilled hole from two directions.
- Apply gentle starting pressure. Turn clockwise while pressing just enough for the tapered threads to engage.
- Advance gradually. After roughly half a turn, back up slightly to loosen chips.
- Clear waste frequently. Remove the tap when resistance increases, brush away debris, rewax, and continue.
- Stop before bottoming out. In a blind hole, mark the required depth on the tap with tape.
- Back the tool out slowly. Keep it aligned to avoid damaging newly cut threads.
- Test the final fastener. It should enter smoothly with moderate resistance and no wobble.
Do not force a tap that suddenly becomes difficult to turn. Resistance usually means packed chips, poor alignment, an undersized pilot hole, or a knot that has decided to participate in the project.
Wood Selection and Grain Direction
Dense, fine-grained hardwoods generally produce the cleanest machine threads. Hard maple, birch, beech, and similar species are common choices for jigs, knobs, and shop fixtures. Coarse-grained or splinter-prone woods may still work, but the thread surface is less predictable.
Face-grain threads are generally stronger and cleaner than threads cut directly into end grain. In face grain, the thread crosses long fibers that support one another. In end grain, the thread can separate or crumble along the fiber direction, especially when repeatedly tightened.
Plywood presents mixed conditions. High-quality Baltic birch-style panels can hold tapped threads in some orientations, but voids and thin plies may interrupt the thread. MDF often taps cleanly because it is uniform, yet its fibers can wear rapidly if the fastener is repeatedly removed.
For softwood, particleboard, weak plywood edges, end-grain joints, or frequently disassembled furniture, a threaded insert, cross dowel, barrel nut, or T-nut is usually more dependable.
Making Wood Threads More Durable
For a lightly adjusted stop block, untreated hardwood threads may last for years. A fixture that is tightened daily needs more protection.
One common method is to harden the cut fibers with thin cyanoacrylate adhesive. Apply a small amount to the threads and allow it to cure completely. Then run the tap through the hole again to remove hardened fuzz and restore the fit.
Use this technique cautiously. Cyanoacrylate adhesive bonds skin rapidly, produces irritating vapors, and can generate heat when absorbed by certain materials. Follow the manufacturer’s safety instructions and keep the fastener out of the hole until the adhesive has fully cured.
A small amount of wax on the final machine screw reduces friction and thread wear. Avoid excessive tightening. Wood threads generally fail because the user treats a jig knob like the cylinder-head bolt on a pickup truck.
Common Problems and Practical Fixes
The tap will not start
Check that the hole has a small chamfer and that the tap has a gradual lead. Confirm that the bolt size and pilot hole are compatible. A guide block can help keep the tool square during the first turns.
The tap binds halfway into the hole
Back it out, clean the flutes, add wax, and try again. If resistance remains excessive in test material, increase the pilot hole by one small drill increment.
The threads tear or crumble
Try a tighter-grained species, sharpen the cutting intersections, or orient the hole through face grain. Make sure the tap is cutting rather than merely compressing fibers.
The bolt fits too tightly
Run the tap through the hole a second time after clearing the chips. Inspect the final bolt for damaged threads. Wood movement can also tighten a previously good fit, so avoid designing a zero-clearance connection.
The bolt fits loosely
The pilot hole may be oversized, the tap may have wandered, or the material may be too soft. Move to a larger fastener, reinforce the hole with an insert, or remake the part.
The hole splits near an edge
Increase the distance between the hole and the edge, use a slightly larger pilot hole, clamp across the grain while tapping, or switch to a threaded insert installed in an appropriately sized bore.
Shop-made Tap Versus Commercial Tap
A homemade tap is ideal for occasional work, emergency replacements, unusual lengths, coarse lag threads, and projects where small variations are acceptable. It costs little and can be tailored to the job.
A commercial tap has more accurate geometry, stronger cutting edges, better chip evacuation, and a predictable taper. It is the smarter choice for production work, expensive parts, small fine threads, deep holes, or any application where repeatability matters.
Threaded inserts are preferable when a joint must withstand high pullout force or frequent assembly. Inserts move the wear surface from wood to metal. They are especially useful in knockdown furniture, commercial fixtures, and components that must survive enthusiastic users armed with long-handled wrenches.
Conclusion
Simple shop-made taps for threading wood prove that a useful cutting tool does not always need a molded case and an instruction booklet translated into nine languages. A spare bolt, a matching nut, a file, and a few careful cuts can produce clean internal threads for jigs, knobs, fixtures, and experimental hardware.
Success depends less on brute strength than on preparation. Match the tap to the fastener, drill an accurate pilot hole, chamfer the opening, keep the tool square, clear chips often, and test everything in scrap. Choose fine-grained hardwood for durable threads and use metal inserts when the connection will experience heavy loads or repeated disassembly.
The result is an inexpensive technique that expands what you can build in the shop. It also gives lonely spare bolts a meaningful career change, which is more than most forgotten hardware can reasonably expect.
Experience Notes: Lessons That Usually Emerge in the Shop
The first homemade tap often looks more aggressive than it needs to be. It is tempting to grind enormous flutes because commercial taps have obvious grooves. In practice, a few controlled cuts that interrupt the threads are usually enough for wood. Removing too much steel weakens the tool and reduces the number of guide threads keeping it aligned. The most successful homemade taps tend to look almost disappointingly simple.
Pilot-hole experiments also teach an important lesson: the “strongest” thread is not always the one with the deepest profile. A very small hole may create full-looking threads, but the tapping force can split the workpiece or crush fibers before the tap reaches full depth. A slightly larger pilot hole often produces a smoother, more reliable connection. The ideal fit allows the bolt to turn without wobbling while still requiring deliberate hand pressure.
Another recurring discovery is that alignment errors begin during the first turn. Once a tap enters crooked, the following threads faithfully continue in the wrong direction. Looking at the tool from the front and side helps, but a square guide block is even better. A guide transforms the operation from a balancing act into a repeatable process, particularly in narrow stock where a slanted hole may emerge through the side.
Chip clearing matters more than many beginners expect. The tap may turn easily at first and then become stubborn without warning. That sudden resistance is often packed waste rather than hard wood. Backing out the tool, brushing the flutes, and applying fresh wax can make the next pass feel completely different. Forcing the tap usually produces one of three prizes: torn threads, a split part, or a bolt that has become a permanent resident.
Different woods create noticeably different results. Hard maple can produce crisp, attractive threads, but it punishes undersized holes. Softer woods tap with less effort but may not hold up to repeated tightening. MDF forms neat threads initially, although the edges can become powdery after many cycles. Plywood may work beautifully until the tap encounters a void between plies. Testing an offcut is therefore not wasted time; it is the least expensive part of the project.
Wax is another modest detail with an outsized effect. A light coating reduces friction, improves the feel of the cut, and makes chip removal easier. Flooding the hole with liquid lubricant is unnecessary and may interfere with later finishing or adhesive work. A quick rub of paraffin or paste wax is usually sufficient.
The final lesson is knowing when not to use direct threads. A threaded hole in hardwood is elegant for a fence stop or adjustable jig, but it is not automatically the right solution for a bed frame, load-bearing support, safety guard, or frequently moved commercial fixture. When failure could damage property or injure someone, engineered hardware and appropriately rated fasteners should take over. Good shop judgment includes recognizing when a clever shortcut has reached the end of its shift.