Hanging a bat house sounds simple: buy box, grab ladder, attach box, wait for tiny winged tenants to move in. Easy, right? Well, almost. Bats are not picky in a “marble countertops and heated floors” kind of way, but they are picky about temperature, height, sunlight, safety, and whether your chosen spot feels like a cozy summer roost or a drafty roadside motel with owl room service.
A good bat house can support local bats by giving them a safe place to roost, raise pups, and rest between nightly insect hunts. It can also make your yard more wildlife-friendly. Bats eat night-flying insects, many species depend on clean water and natural habitat, and their populations face pressures from habitat loss, disease, and human disturbance. In other words, installing a bat house is not just a charming backyard project. It is a small conservation upgrade with big “good neighbor to nature” energy.
The secret is placement. A poorly placed bat house may sit empty for years, silently judging your landscaping choices. A well-placed one has a much better chance of attracting bats because it gives them what they actually need: warmth, clear flight space, protection from predators, and access to feeding areas. Below are three practical ways to hang a bat house: on a building, on a pole or post, and on a tree only when no better option is available.
Before You Hang a Bat House: Choose the Right Spot
Before drilling holes into anything, think like a bat. Bats need to drop from the bottom of the house before taking flight, so the entrance should be high enough and unobstructed. Most bat house guidance recommends placing the box at least 10 to 15 feet above the ground, with 12 to 20 feet often being better. Higher placement helps bats launch safely and keeps the roost less accessible to cats, raccoons, snakes, and other predators.
Sunlight is another major factor. Bat houses are not decorative birdhouses with a goth wardrobe. They are warm roosting chambers. Many bats prefer interior temperatures around 80 to 100 degrees Fahrenheit, especially maternity colonies raising pups. In cooler and moderate climates, aim for at least six hours of direct sun per day. In hot southern areas, morning sun is usually better than harsh afternoon sun, so an east or southeast-facing wall can be ideal.
Also look for a location near good bat habitat. Bats are more likely to investigate a bat house near mixed landscapes such as yards, gardens, tree lines, fields, wetlands, streams, ponds, or natural edges where insects are active. A bat house within about a quarter mile of water often has a better chance of use because many bats drink shortly after emerging at dusk.
Quick Placement Checklist
- Mount the bat house at least 10 to 15 feet high; 12 to 20 feet is often better.
- Keep the entrance and the space below it clear of branches, vines, fences, and clutter.
- Choose a spot with at least six hours of sun in most regions.
- Use east, southeast, or south-facing placement for morning warmth.
- Avoid direct artificial lights, smoky areas, noisy high-traffic spots, and strong wind exposure.
- Keep the bat house away from predator perches such as nearby branches.
- Do not mount it where guano will fall on a doorway, patio table, or the place where your uncle insists on standing during cookouts.
Way 1: Hang a Bat House on a Building
Mounting a bat house on a building is often the best method. A house, garage, barn, shed, or other structure provides thermal stability because the wall behind the bat house helps hold heat. This is especially useful at night when air temperatures drop. Bats like warmth, and a building-mounted bat house can act like a little solar-powered apartment with better insulation than a freestanding box.
Wood, brick, stone, and similar surfaces tend to work well. Metal siding is less ideal because it can heat and cool quickly, sometimes creating uncomfortable temperature swings. If you are choosing between a brick garage wall and a thin metal shed, the garage wall wins unless the shed has the perfect combination of sun, height, and calm airflow.
Best Building Locations
Look for a sunny wall that faces east, southeast, or south. In northern or cooler climates, a south-facing wall may provide the longest warmth. In hotter states, an east-facing wall may be smarter because it gives bats morning sun without baking them during the late afternoon. Avoid placing the bat house directly under deep eaves if the eaves block too much sunlight. However, a small amount of roof protection can help reduce rain exposure, as long as the box still gets enough sun.
Keep at least several feet of open space in front of and below the bat house. Bats do not launch like helicopters. They usually drop, spread their wings, and fly. If shrubs, fences, awnings, wires, or decorative wind chimes are blocking the exit, the setup becomes less useful. Your bat house should say “welcome home,” not “obstacle course.”
Tools and Materials
- Bat house
- Exterior-grade screws or lag bolts
- Mounting cleats or brackets, if included with the bat house
- Drill and drill bits
- Level
- Stud finder for wood-frame walls
- Masonry anchors for brick, stone, or concrete
- Exterior caulk for sealing around mounting points when needed
- Stable ladder and a helper
How to Mount It on a Building
First, hold the bat house against the chosen wall and mark the mounting holes. Use a level so the box sits straight. A slightly crooked bat house will not offend bats aesthetically, but it can affect drainage and durability. For wood siding, fasten into studs or solid framing whenever possible. For brick, block, or concrete, use masonry anchors rated for outdoor use.
Next, attach the upper fasteners loosely, then check the level again before tightening everything. Secure the lower fasteners so the box does not wobble in the wind. A bat house should be firmly mounted, not swinging like a saloon sign in an old Western. If your bat house uses French cleats or mounting rails, make sure both the wall cleat and box cleat are tight and weather-resistant.
Finally, inspect the landing area below the entrance. Many bat houses have a roughened landing pad or extended back panel. If the surface is too smooth, bats may struggle to grip it. Do not paint the inside of the bat house, but make sure the landing surface is rough enough for tiny claws to hold.
Pros and Cons of Building Mounting
The biggest advantage is temperature stability. Building-mounted bat houses often stay warmer and are easier for bats to discover if the building already attracts insects or sits near good habitat. They are also easier to inspect from a ladder than a tall pole in the middle of the yard.
The downside is guano. Bat droppings will fall from the open bottom. This is normal, but you should plan for it. Do not mount the bat house directly above a doorway, deck, outdoor kitchen, children’s play area, or your favorite lawn chair. Choose a wall where occasional cleanup is easy and where people will not be startled by dusk departures.
Way 2: Hang a Bat House on a Pole or Post
A pole-mounted bat house is the next best option when a building is not available. Poles keep the box away from branches and climbing predators, and they allow you to control sun exposure more precisely. This method is excellent for open yards, garden edges, farms, parks, and properties where the best bat habitat is not close to a suitable wall.
The key is stability. A bat house on a pole should be tall, secure, and resistant to wind. If the pole sways like a fishing rod, bats may avoid it. If it leans after one thunderstorm, your backyard conservation project becomes modern sculpture.
Best Pole Locations
Place the pole where the bat house can receive good sun and still remain near cover or feeding habitat. A spot 20 to 50 feet from trees can work well because bats have nearby foraging edges, but predators cannot easily jump or perch right beside the entrance. Avoid the middle of a windy open field unless there is some wind protection nearby.
If you live in a hot climate, consider installing two bat houses back-to-back on the same pole, or place a second house nearby with a slightly different sun exposure. This gives bats a choice of microclimates. One box may warm faster in the morning, while another stays cooler in the afternoon. Bats are excellent at finding temperature comfort; they just need options.
Tools and Materials
- Pressure-treated wooden post, metal pole, or galvanized pipe
- Concrete mix
- Post-hole digger
- Level
- U-bolts, brackets, or exterior screws
- Predator guard or metal flashing
- Gravel for drainage at the base
- Safety gear and at least one helper
How to Mount It on a Pole
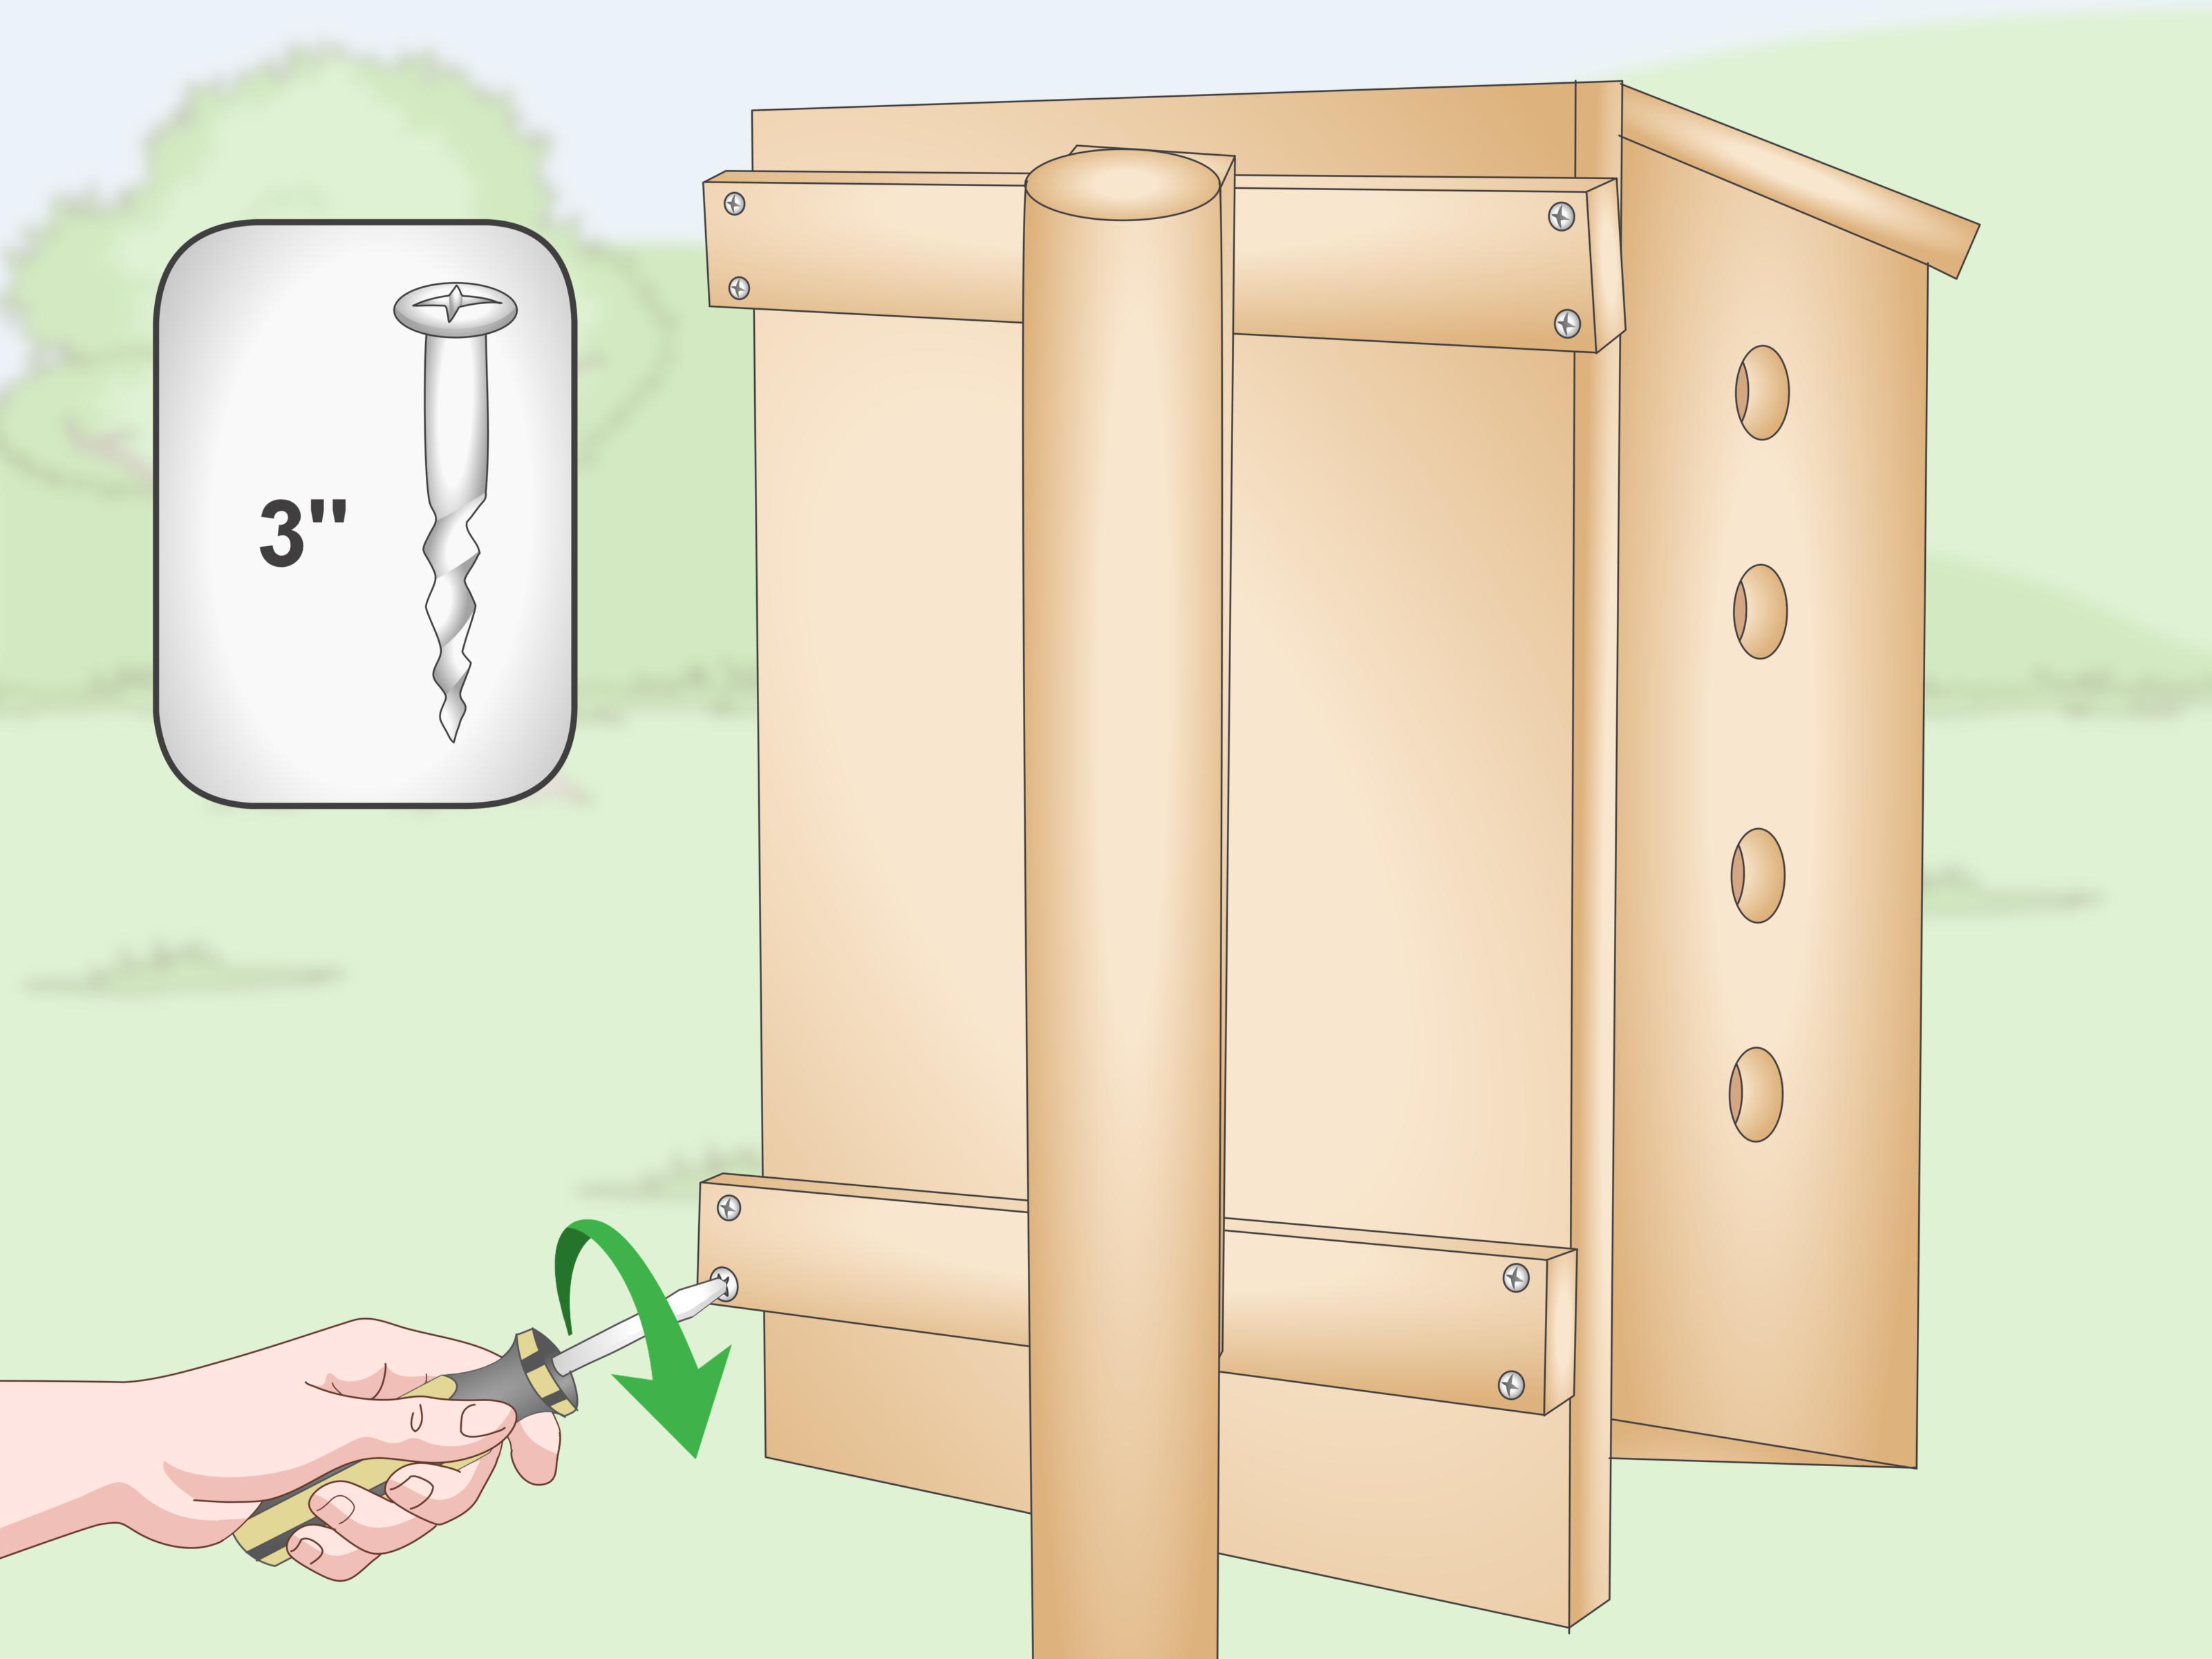
Start by choosing a pole long enough to place the bat house entrance at least 12 feet above ground, with 15 to 20 feet being a strong target. Dig a hole deep enough to stabilize the pole. A common approach is to set about one-fifth of the pole length into the ground. Add gravel at the bottom for drainage, place the pole, check it with a level, and pour concrete around the base.
Let the concrete cure according to the product instructions. Do not rush this step. Gravity has no respect for your enthusiasm. Once the pole is stable, attach the bat house using U-bolts, brackets, or heavy-duty exterior screws. If using a wooden post, predrill holes to prevent splitting. If using a metal pole, U-bolts often provide a strong connection.
Add a predator guard if snakes, raccoons, or cats may climb the pole. Metal flashing wrapped around the pole several feet above ground can make climbing more difficult. Keep grass and vines trimmed away from the pole, because vegetation can become a ladder for unwanted visitors.
Pros and Cons of Pole Mounting
The biggest advantage of pole mounting is control. You can place the bat house exactly where the sun, flight space, and habitat line up. Poles also avoid many problems caused by tree branches, shade, and predator perches.
The downside is effort. Pole installation takes more work, more materials, and usually more than one person. Pole-mounted boxes can also experience wider temperature swings than boxes mounted on buildings, especially in areas with hot days and cool nights. That is why sun direction, color, ventilation, and the possibility of multiple boxes matter.
Way 3: Hang a Bat House on a Tree Only as a Last Resort
Tree mounting is the least recommended of the three methods. That may sound surprising because bats naturally roost in trees, bark crevices, and cavities. But a bat house attached to a living tree often has several problems: too much shade, blocked flight paths, easy predator access, and branches that let owls, raccoons, snakes, or cats get close to the entrance.
Still, some homeowners have no usable building wall and no practical pole location. In that case, tree mounting can be considered a last-resort option if you are careful. The goal is to reduce the disadvantages as much as possible.
Choose the Right Tree
Pick a tall, sturdy tree at the edge of a clearing rather than deep inside dense woods. The bat house should receive direct sun for several hours and have a clear approach path. Avoid mounting it where branches hang over or beside the entrance. If the trunk is shaded all day, choose another method. A cool, dark bat house is unlikely to attract maternity colonies that need reliable warmth.
Never damage a healthy tree unnecessarily. Use mounting methods that minimize harm, and avoid wrapping wire tightly around the trunk. Trees grow, and a tight wire can girdle the tree over time. If you must use a tree, screws or lag bolts may be less damaging than strangling the trunk with wire, but local arborist advice can help if you are concerned about tree health.
How to Mount It on a Tree
Place the bat house at least 12 feet high, preferably higher, on the sunniest side of the trunk. The entrance must remain clear. Trim small interfering branches only when it is safe, legal, and appropriate for the tree species and season. Do not create a predator highway by leaving branches close to the landing area.
Use exterior-grade screws or lag bolts long enough to hold the box securely. Add spacers behind the bat house if needed to help the box sit flat against an uneven trunk. Check the box after storms and at least once each season. Trees move, bark changes, and fasteners can loosen over time.
Pros and Cons of Tree Mounting
The advantage is convenience. If you already have a tall tree at the right edge of your yard, mounting may be cheaper than installing a pole. The bat house may also sit near natural foraging routes.
The disadvantages are significant. Trees create shade, clutter, and predator access. If your goal is the best chance of occupancy, a building or pole is usually smarter. Think of tree mounting as Plan C: not forbidden, but not the first guest you invite to the strategy meeting.
Common Bat House Mistakes to Avoid
Mistake 1: Hanging It Too Low
A bat house mounted six feet off the ground may be easy to install, but it is not ideal for bats. Low boxes are easier for predators to reach and may not provide enough drop space for flight. Aim higher.
Mistake 2: Choosing Too Much Shade
Shade is one of the top reasons bat houses stay empty. Bats need warmth, especially in spring and summer. If your box sits in cool shade all day, it may look charming but function poorly.
Mistake 3: Pointing It at Bright Lights
Avoid placing the bat house where porch lights, security lights, or streetlights shine directly on it. Many bats avoid bright artificial light around roosts. A peaceful, dark approach path is better.
Mistake 4: Expecting Bats Immediately
Bats may take months or even a few years to find and use a new bat house. Do not panic if it stays empty the first season. Good placement improves your odds, but wildlife does not operate on Amazon Prime delivery times.
Mistake 5: Handling Bats
Never capture bats and put them into a bat house. It does not help occupancy, and handling bats can be dangerous and illegal without proper permits. If you find a bat on the ground, sick, injured, or inside a living space, contact a local wildlife rehabilitator, animal control office, or public health authority for guidance.
Maintenance After Hanging a Bat House
Bat houses are fairly low-maintenance, but they are not “install and forget forever” projects. Once or twice a year, inspect the outside for loose screws, cracked seams, peeling paint, warped panels, or wasp nests. Winter is often the safest time to do maintenance because bats are less likely to be using the house in many regions.
Reseal cracks with exterior caulk to help retain heat. Repaint or restain the outside as needed, using exterior-grade, water-based products. Do not spray pesticides inside the bat house. If wasps move in, remove nests only when bats are absent and when it is safe to do so.
Watch for signs of heat stress during extreme hot weather. Bats hanging out of the bottom, flying during the day, or pups falling from the box may indicate the house is overheating. Temporary shade or a second cooler bat house nearby may help, but contact a local bat rehabilitator or wildlife expert if you see distressed animals.
of Real-World Experience: What Hanging a Bat House Teaches You
The first thing most people learn from hanging a bat house is that the ladder is never quite tall enough, even when the label says it is. A bat house looks small in your garage. Then you carry it outside, look up at the recommended height, and suddenly it feels like you are installing a studio apartment on the side of a lighthouse. This is why having a helper matters. One person can hold the ladder, pass tools, and gently remind you that “a little to the left” is not a precise measurement.
The second lesson is that sunlight changes more than you think. A wall that looks sunny at 10 a.m. may be shaded by 2 p.m. A pole location that seems perfect in March may be covered by leafy branches in June. Before installing, it helps to observe your yard for a full day. Take photos in the morning, midday, and afternoon. This small step can save you from mounting the box in what later becomes the bat equivalent of a damp basement.
Another practical lesson: plan for guano before you install. Bat droppings are not a disaster, and they can even be used carefully as fertilizer, but you do not want them falling where people walk barefoot or set drinks. One homeowner-style rule works well: if you would not want bird droppings there, do not put a bat house above it. That means no placement over front steps, porch swings, grills, pet bowls, or the exact spot where guests line up for backyard photos.
Patience is also part of the experience. Many people expect bats to arrive the first week, as if a tiny real estate agent has already listed the box: “Warm roost, open floor plan, excellent insect access.” In reality, bats may need time to discover the house. Some boxes are used quickly; others take a year or two. Good habitat, correct height, enough sun, and clear flight space all help, but there is no guaranteed move-in date.
Finally, hanging a bat house changes how you look at your yard. You begin noticing whether your outdoor lights are too bright, whether your garden supports night insects, whether you have water nearby, and whether your landscape offers safe travel corridors for wildlife. You may start planting native flowers, reducing pesticide use, or leaving a quiet corner of the yard a little more natural. The bat house becomes more than a box. It becomes a reminder that a backyard can be useful, not just tidy. And if bats eventually move in, dusk becomes a small event: the sky dims, the yard goes quiet, and your new neighbors clock in for the night shift.
Conclusion
Learning how to hang a bat house is mostly about learning where bats feel safe and comfortable. A building-mounted bat house is usually the strongest option because it provides warmth and stability. A pole-mounted bat house is excellent when you need control over location, sun, and open flight space. A tree-mounted bat house should be treated as a last resort because trees often create shade, clutter, and predator access.
Whichever method you choose, focus on the essentials: height, sunlight, clear space, predator protection, nearby habitat, and patience. Install the bat house securely, maintain it seasonally, and give bats time to find it. You may not become the landlord of a bat colony overnight, but you will create a better backyard habitatand possibly earn the quiet satisfaction of helping nature do its night shift.