Every home has its “necessary villains.” You know the cast: the outdoor AC unit that looks like a metal lunchbox from 1998, the power cords that multiply like rabbits, the litter box that somehow appears in every photo, and the trash cans that ruin your carefully planned curb appeal in one dramatic swoop.
The good news? You don’t need to choose between function and beauty. With smart concealment, you can hide household eyesores while keeping everything accessible, safe, and easy to maintain. This guide blends practical home design tactics with real-world maintenance logic so you can make your space look polishedwithout sabotaging airflow, safety devices, or service access.
If your goal is a cleaner-looking home that still works like a home, these seven methods are your blueprint.
Before You Hide Anything: Follow the “Pretty but Practical” Rule
The fastest way to create an expensive-looking problem is to hide the wrong thing the wrong way. A gorgeous cover that blocks airflow, locks out technicians, or makes safety alarms harder to hear is not a design winit’s a future headache.
- Preserve airflow: AC condensers, radiators, and vents need breathing room.
- Keep service access easy: Electrical panels, meters, and septic lids must remain reachable.
- Don’t bury safety gear: Smoke and CO alarms should stay unobstructed and audible.
- Make cleaning simple: If access is hard, maintenance gets skipped.
1) Dress Up the Outdoor AC Unit with a Screened Enclosure
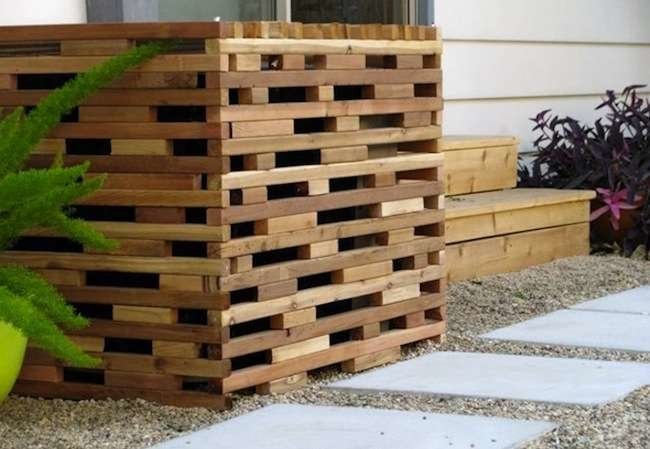
Your condenser is essential. It is also not winning any beauty contests. Instead of pretending it doesn’t exist, give it a stylish perimeter.
What works best
- Slatted wood screens
- Decorative metal panels
- Freestanding lattice walls
- Planter-and-screen combos
How to do it right
Keep the enclosure visually light and ventilated. Leave enough clearance around the unit and design at least one hinged or removable side for seasonal servicing. A common mistake is wrapping the condenser too tightly with dense shrubs or solid fencing. That might hide it for a monthand stress your system for years.
Pro tip: Match the screen color to your trim or fencing so it looks intentional, not like a last-minute disguise.
2) Camouflage Utility Meters and Exterior Boxes with Layered Landscaping
Electric meters, cable junction boxes, irrigation controls, and random utility hardware often end up in the most visible spots. Instead of one giant cover, think in layers.
Use the “three-layer hide” strategy
- Back layer: A clean backdrop like painted fence boards, slatted paneling, or masonry stain.
- Middle layer: A narrow trellis or lightweight privacy screen.
- Front layer: Tall planters, ornamental grasses, or shaped shrubs.
This method softens the visual impact while leaving enough room for meter reading and service calls. You get better curb appeal and fewer “what is that box?” comments from guests.
Design note
Stick with low-maintenance plants. If your concealment needs weekend-level pruning to survive, it will become another ugly thing you need to hide.
3) Disguise Septic Lids and Yard Access Points without Blocking Maintenance
Septic access lids, cleanouts, and irrigation access points can interrupt even the prettiest landscape design. The trick is to hide the look, not the location.
Smart concealment options
- Hollow-bottom planters placed around (not pressing on) lids
- Lightweight faux-rock covers sized to sit naturally in beds
- Mulch-ring framing with decorative stone edging
- Low decorative benches that can be moved quickly
Keep a simple yard map of access points (phone note = perfect). Future-youand any technician you callwill thank you when maintenance day arrives and no one has to dig up half your landscaping.
4) Hide Trash and Recycling Bins with Built-In “Bin Zones”
Trash cans are like that one loud relative at Thanksgiving: necessary, useful, and impossible to ignore. A dedicated bin zone keeps them functional but visually quiet.
Outdoor options
- Wood slat enclosures with front gate access
- Trellis walls with climbing plants
- Fence bump-outs that match existing exterior material
- Storage sheds with vented sections for bins
Indoor options
- Pull-out cabinet trash systems
- Tilt-out bins in island end panels
- Pantry-side hidden waste stations
- Decorative canisters for compost scraps
Place bins where workflow makes sense: near prep zones in kitchens and close to gate paths outdoors. If the solution is inconvenient, people stop using itand chaos returns.
5) Make Cord Chaos Disappear: TV Wires, Routers, and Charging Clutter
Cords are the confetti of modern life: they appear after every new gadget and never fully go away. The goal is to route, contain, and visually blend.
Fast upgrades with big visual impact
- Paintable cord raceways for wall-mounted TVs
- Cable sleeves and under-desk trays for workstations
- Lidded cable boxes for power strips and adapter clutter
- Nightstand charging drawers or “tech garages”
Router hiding rule
Conceal your router, but don’t suffocate it in a closed cabinet. Use ventilated baskets, open-back boxes, or styled shelving that keeps signal performance strong. Your decor should never make your video calls look like a stop-motion film.
Extra polish: label cords behind media consoles. It takes 15 minutes and prevents the annual “which cable did I just unplug?” panic.
6) Turn Pet Necessities into Furniture-Grade Features
Litter boxes, feeding stations, and pet supply bins are practicalbut they can dominate a room visually. The fix: convert pet zones into intentional furniture moments.
Ideas that blend pet function with home design
- Bench-style litter enclosures with side entry cutouts
- Console tables converted into hidden litter stations
- Laundry-room pet alcoves with washable mats
- Built-in feeding drawers inside lower cabinetry
Pet comfort checklist
- Quiet, low-traffic placement
- Easy entry and exit
- Good ventilation
- Simple daily cleaning access
If you have multiple cats, plan enough boxes and spread them sensibly. A hidden setup only works if your cat agrees with your design visionand cats are famously hard to impress.
7) Blend Indoor Eyesores: Electrical Panels, Radiators, Vents, and Wall Devices
Some of the most annoying visual clutter lives indoors: electrical panels in hallways, vintage radiators, oddly placed return vents, thermostats, and detector-heavy ceilings.
Electrical panels
Use hinged artwork, shallow cabinet doors, or framed panels that open quickly. Keep required working space clear and never create a setup that blocks emergency access.
Radiators and heating elements
Radiator covers can look beautiful if they are built with airflow in mind. Choose vented fronts and top grilles, and keep enough interior clearance so heat can circulate. A stylish cover that traps heat is just expensive disappointment.
Vents and returns
Don’t park furniture directly against vents and returns. Instead, use visual tricksmatching grille paint, symmetrical furniture placement, and soft landscaping indoors (like planters nearby, not in front)to reduce visual noise while preserving air movement.
Thermostats and detectors
Blend, don’t block. Frame around devices, use adjacent shelving for distraction, and choose paint-matched trim kits where applicable. For smoke and CO alarms, prioritize audibility, visibility, and maintenance access over aesthetics every time.
Common Mistakes to Avoid
- Overbuilding enclosures: Too much material reduces airflow and service access.
- Ignoring maintenance paths: Hidden doesn’t mean unreachable.
- Choosing trendy over practical: Your future cleaning routine matters more than a perfect photo.
- Forgetting weather resistance: Outdoor hides need moisture-safe materials and rust-resistant hardware.
- Not testing daily use: If it slows your routine, it won’t last.
A Simple 1-Weekend Plan to Start
Day 1: Audit and prioritize
- Walk room by room and list your top 10 eyesores.
- Mark each one: safety device, utility access, airflow-dependent, or purely visual.
- Pick the top 3 that will create the biggest visual improvement.
Day 2: Install three quick wins
- One cord management system (media or desk area)
- One concealment zone (trash or litter station)
- One exterior screen (AC, bins, or utility cluster)
You’ll be surprised how “finished” your home feels after only three targeted fixes.
Conclusion
Beautiful homes are not homes without systemsthey’re homes where systems are thoughtfully integrated. The ugly things your house can’t live without don’t need to dominate your space. With breathable covers, accessible enclosures, and smart visual layering, you can hide what’s functional without breaking what’s essential.
Start with one eyesore this week. Keep it safe, keep it serviceable, and make it look intentional. Repeat seven times. Suddenly your house looks custom, calm, and seriously well-designedwhile still handling real life like a champ.
Experience Section (500+ Words): What Homeowners Learn After Actually Doing This
This section captures experience-style lessons based on common homeowner scenarios. Think of it as the “what happens after the pretty photos” version of the guide.
Experience #1: The AC screen that looked perfectbut choked performance.
A homeowner installed a solid-panel fence box around a condenser because it looked sleek from the street. For two weeks, everything seemed fine. Then cooling felt weaker during hot afternoons, and energy use climbed. The fix was simple: replace two solid sides with slatted panels, increase spacing, and add a hinged side for service. Same style, far better airflow. Lesson: if a concealment idea feels airtight, your HVAC probably agreesin the worst way.
Experience #2: The electrical panel “masterpiece” nobody could open fast.
Another home used a heavy decorative cabinet door to hide a hallway panel. It looked amazing until a tripped breaker happened during a storm. In the dark, the door jammed against nearby decor, and it took several frustrating minutes to access the panel. The redesign used a lightweight, side-hinged art panel with magnetic catches and a clear swing path. Lesson: emergency access is part of interior design, whether Pinterest mentions it or not.
Experience #3: The trash can enclosure that failed because of friction, not style.
A beautiful backyard bin zone was built at the far corner of the lot. Gorgeous cedar, black hardware, tidy gates. But everyone in the house kept dropping small trash inside instead of walking it outside, so kitchen clutter piled up. They moved daily-use trash indoors to a pull-out cabinet and kept outdoor bins for weekly transfer. Lesson: good design follows behavior. If the route is inconvenient, the system fails.
Experience #4: Hidden litter box success came from cat-first planning.
One family converted a console table into a litter cabinet with a side entry and charcoal filter. It looked incredible, but their cat refused to use it for three days. Why? The opening faced a noisy washer door and the interior was too tight. They rotated the entry to a quieter side and enlarged the interior footprint. Immediate improvement. Lesson: if your pet’s comfort is an afterthought, your cleanup routine becomes the main event.
Experience #5: Cord management changed more than aesthetics.
A work-from-home setup had charger bricks, HDMI cables, and power strips sprawled under a desk. The owner expected a visual upgrade, but the bigger win was functional: labeled cables reduced troubleshooting time and made device swaps painless. They also moved the router from a closed cabinet to a ventilated shelf and saw fewer connection drops. Lesson: cable cleanup is not just “decor.” It’s also performance and sanity.
Experience #6: Radiator cover makeovercomfort improved after one small tweak.
A vintage home added custom radiator covers with decorative fronts. Beautiful, but rooms heated unevenly. The installer returned and added more top vent area plus extra spacing from the radiator body. Heat distribution improved quickly. Lesson: with heating elements, decorative joinery must partner with airflow science.
Experience #7: The maintenance map saved a landscaping project.
A homeowner carefully disguised septic and irrigation access points with mulch beds and planters. Six months later, a plumbing issue required quick access. Because they had a phone map with photos and measurements, the service team found everything in minutes and didn’t tear up plantings. Lesson: invisibility is great for daily life, but traceability is critical for repair day.
Across all these stories, the pattern is consistent: the best concealment projects are reversible, breathable, and human-friendly. They don’t fight the housethey collaborate with it. When in doubt, prioritize three things: access, airflow, and routine convenience. Do that, and your “hidden essentials” won’t come roaring back as visible problems later.