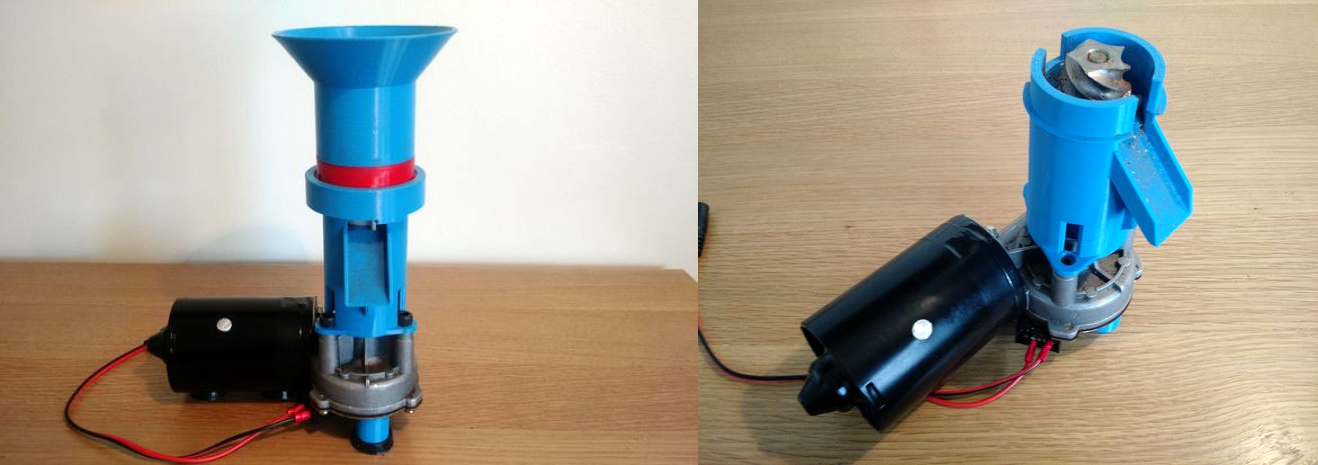
Note: This article describes a hybrid DIY concept in which printed components support commercially manufactured metal burrs.
Most coffee grinders are designed in a factory, assembled by machines, placed in a glossy box, and introduced to the world with phrases such as “precision engineered.” A 3D-printed coffee grinder takes a different route. It begins with a digital model, a spool of filament, a handful of mechanical components, and the cheerful belief that several hours of printer noise will eventually produce better coffee.
One widely discussed DIY grinder project demonstrated just how practical this idea can be. Instead of trying to print every component, its creator used a smart hybrid design: the housing, bean hopper, and shaft coupler were 3D printed, while the actual cutting surfaces came from a commercial steel burr set. An automotive windshield-wiper motor supplied the power.
The result was not merely a plastic kitchen novelty. It was a functional custom coffee grinder built around replaceable parts, familiar hardware, and the flexibility of additive manufacturing. More importantly, it showed where 3D printing excels and where metal should politely be allowed to continue doing its job.
What Is a 3D-Printed Coffee Grinder?
A 3D-printed coffee grinder is a machine whose structural or functional components are produced with a 3D printer. Depending on the design, printed parts may include the outer housing, hopper, adjustment collar, grounds chute, motor mount, feet, gears, shaft coupler, and collection cup.
The phrase does not necessarily mean that the grinding burrs are printed. In fact, using commercially manufactured steel or ceramic burrs is generally the more practical choice. Burrs require hard, wear-resistant surfaces and extremely accurate cutting geometry. A standard desktop filament printer can make an excellent burr carrier, but asking it to create a long-lasting precision cutting edge is like asking a butter knife to become a dental drill. Enthusiasm alone cannot overcome material science.
The strongest DIY designs therefore combine two manufacturing approaches:
- 3D printing for customized, low-volume parts with complex shapes
- Machined or commercial components for bearings, shafts, fasteners, motors, and burrs
This hybrid construction keeps the project affordable and repairable while preserving the grind quality needed for good coffee.
Why the Grinder Matters More Than Many Coffee Makers
A coffee brewer can only work with the grounds it receives. When coffee particles are reasonably uniform, water passes through them at similar rates and extracts their flavors more evenly. When a grinder produces a chaotic mixture of powdery fines and oversized chunks, brewing becomes much harder to control.
The smallest particles may extract quickly and contribute bitterness or dryness. Larger particles may release flavor too slowly, leaving the cup weak, sharp, or sour. The final drink can somehow taste over-extracted and under-extracted at the same timea rather impressive failure for something made from only coffee and water.
Burr grinders improve control by forcing beans through a defined space between two cutting surfaces. Moving the burrs closer together produces finer grounds; increasing the gap produces coarser grounds. Unlike a blade grinder, which repeatedly strikes beans in an enclosed chamber, a burr grinder gives each particle a more predictable route through the machine.
That is why the burr system must be the central feature of a serious 3D-printed coffee grinder. A beautiful printed enclosure may impress visitors, but burr alignment, adjustment accuracy, and stable rotation determine what ends up in the cup.
How the Main Components Work Together
The Hopper
The hopper stores beans and guides them toward the burrs. This is an ideal component for 3D printing because its shape can be customized without expensive molds or specialized tooling.
A steeply sloped hopper helps beans move downward instead of collecting on shallow surfaces. For single-dose grinding, the hopper can be made small enough to hold one measured serving. A lid or bellows can also be added to reduce dust and help push retained grounds through the chute.
The Burr Set
The burrs perform the actual grinding. Conical burr sets use an inner cone and an outer ring, while flat-burr systems place two circular burrs opposite each other. Either arrangement can work, but the surrounding structure must hold the burrs firmly and concentrically.
For a home-built grinder, adapting a replacement burr set from an existing commercial model is usually easier than designing one from the beginning. Replacement parts already have established dimensions, cutting profiles, and material properties. They also make future maintenance less dramatic. When a burr wears out, the owner can install another one instead of redesigning half the machine at midnight.
The Adjustment Mechanism
The adjustment system changes the distance between the burrs. Coarse settings may be forgiving, but espresso requires tiny, repeatable changes. A threaded collar, indexed ring, or geared adjustment dial can translate a larger hand movement into a very small change at the burr.
This part of the design deserves careful attention. Printed threads must move smoothly without excessive looseness, and the mechanism must resist drifting while the motor is running. An attractive dial is useful. An attractive dial that changes position during every grind is merely decorative mischief.
The Motor and Shaft Coupler
A motor must provide enough torque to crush roasted beans without stalling. The documented DIY project used a windshield-wiper motor, an appealing choice because such motors are designed for low-speed, high-torque operation and are widely available.
The shaft coupler connects the motor to the rotating burr. This small part experiences repeated twisting loads and must be dimensionally accurate. A flexible coupling can absorb slight misalignment, while a rigid coupling demands more precise positioning of the motor and burr shaft.
Motor speed also affects noise, heat, feed behavior, and grinding time. Faster is not automatically better. A powerful motor running at a controlled speed can be more useful than a high-speed motor that sends beans through the grinder as if they have missed an important appointment.
The Grounds Chute
After grinding, coffee must leave the burr chamber cleanly. Corners, ledges, and narrow passages can trap grounds. This is known as grind retention, and it matters because retained coffee becomes stale and may mix with the next dose.
A good chute should be short, steep, smooth, and easy to remove for cleaning. Printed prototypes are especially valuable here. Designers can test several chute angles and outlet shapes without paying for new molds every time a few grounds decide to hide inside the machine.
Design Challenges That Determine Grind Quality
Burr Alignment
The burrs should remain centered and parallel as they rotate. If one side of the burr gap is narrower than the other, beans encounter different cutting conditions around the circumference. This can widen the particle-size distribution and create more fines and oversized fragments.
Accurate bearing seats, rigid burr carriers, and properly positioned shafts are therefore essential. Printed components may require sanding, reaming, inserts, shims, or several test versions before the rotating assembly runs correctly.
Dimensional Tolerances
A digital model may specify a perfectly round hole, but the printed result can vary with material shrinkage, layer height, extrusion calibration, printer motion, and build orientation. Press fits and bearing pockets should be tested with small calibration pieces before an entire housing is printed.
Designers should also allow appropriate clearance between moving parts. Too little clearance creates friction or prevents assembly. Too much clearance creates wobble. The ideal fit is rarely discovered by staring intensely at a CAD model and hoping for the best.
Layer Orientation and Mechanical Strength
Fused-filament parts are built in layers, and their strength is directional. A component may be strong when a force runs along its printed layers but weaker when a load attempts to pull those layers apart.
Motor brackets, couplers, burr carriers, and threaded adjustment parts should be oriented according to the stresses they will experience. Fillets, ribs, thicker walls, and metal inserts can strengthen heavily loaded areas without turning the grinder into a solid block of plastic.
Vibration and Noise
Grinding beans creates vibration. If the frame flexes, the burr gap may change under load. Loose panels can also amplify motor noise, transforming a morning coffee ritual into a brief demonstration of experimental percussion.
A rigid base, secure fasteners, balanced rotating parts, and rubber feet can reduce movement. Thread-locking methods or captive nuts may help prevent fasteners from loosening during repeated use.
Choosing a Printing Material
PLA is easy to print, dimensionally stable, and suitable for prototypes or lightly loaded components. However, it can soften in elevated temperatures and may be relatively brittle under repeated stress.
PETG is often chosen for functional components because it offers good layer adhesion, impact resistance, and moisture resistance. It can be more difficult to print cleanly than PLA, particularly when stringing affects threads or bearing surfaces.
ABS, ASA, nylon, and reinforced engineering filaments provide other combinations of heat resistance, stiffness, toughness, and print complexity. Carbon-fiber-filled materials can produce stiff components, but they may require abrasion-resistant printer hardware and should not automatically be assumed suitable for food-contact surfaces.
The most sensible material may vary by component. A rigid material can support the burr carrier, a tougher material can form the coupler, and a softer elastomer can create vibration-damping feet. One spool does not have to solve every engineering problem simply because it happens to be loaded in the printer.
Food-Contact Safety and Cleaning
Food-contact safety requires more than selecting a filament advertised as food grade. Colorants, additives, printer components, nozzle materials, prior filament contamination, surface texture, and cleaning conditions can all affect the safety of the finished part.
Layer lines also create narrow crevices that may retain oils and fine particles. Coffee beans are dry, but roasted coffee contains oils that can accumulate over time. Printed parts that touch beans or grounds should therefore be removable, inspectable, and easy to clean.
A cautious design keeps the actual grinding zone inside commercial metal burrs and limits direct coffee contact with printed surfaces. Food-contact parts should use appropriately certified materials and printer hardware. A dedicated stainless steel nozzle may be preferable to an unknown brass nozzle, and parts should not be exposed to dishwasher temperatures unless their material and coating are specifically rated for that use.
Dry brushing, vacuuming, and wiping removable components according to the material manufacturer’s guidance are generally more appropriate than soaking the motor assembly. The grinder should always be disconnected from power before cleaning or adjustment.
Building and Testing the Grinder
The best development process begins with measurements. The burr set, shaft, bearings, motor, fasteners, and electrical controls should be selected before the final housing is modeled. Designing around real components is much easier than finishing a beautiful enclosure and discovering that the motor occupies the same physical space as the hopper.
Initial prints can be simplified to verify fit. A small bearing-test block, threaded collar section, or coupler prototype uses less filament and reveals problems quickly. Once the individual interfaces work, the complete structure can be printed and assembled.
Testing should begin without coffee. Rotate the mechanism by hand and check for rubbing, wobble, or binding. After confirming safe operation, run the motor briefly and observe vibration. Coffee can then be introduced in small amounts while monitoring feed rate, motor temperature, noise, and grind output.
Performance is best evaluated with repeated tests. Weigh the beans before grinding and the grounds afterward to estimate retention. Compare several samples at the same setting. Brew them using a consistent recipe, changing only one variable at a time.
A homemade grinder does not need laboratory equipment to improve. Careful observation, a kitchen scale, a timer, and repeatable brewing can reveal whether a design change is helping or merely producing a more sophisticated-looking problem.
Advantages of a Custom 3D-Printed Grinder
- Repairability: Broken housings, dials, or chutes can be printed again.
- Customization: The hopper, controls, color, size, and dosing system can match the user’s workflow.
- Rapid iteration: Components can be revised without manufacturing molds.
- Educational value: The project combines CAD, electronics, mechanics, materials, and coffee science.
- Parts reuse: Motors, burrs, bearings, and switches can be salvaged or adapted.
- Open development: Digital models can be shared and improved by other builders.
Limitations to Consider
A DIY coffee grinder may cost less than a premium commercial machine, but it is not automatically cheap. Burrs, bearings, a motor, a power supply, hardware, failed prints, and several bags of test coffee can quickly increase the budget.
It may also require more calibration and maintenance than a factory-built grinder. Printed parts can creep, crack, wear, or loosen. Electrical components require proper insulation and strain relief, while rotating assemblies require protective covers.
Most importantly, a printed grinder is not guaranteed to outperform a commercial model. Its value may lie in customization, repairability, experimentation, and learning rather than in winning a blind tasting against professional equipment.
A Representative Hands-On Experience With a 3D-Printed Coffee Grinder
A realistic first experience begins with unreasonable confidence. The parts look excellent on the computer screen, the slicer predicts a successful print, and the builder imagines drinking café-quality coffee before lunch. Then the first bearing refuses to enter its pocket because the printed hole is slightly undersized.
That small problem becomes the first useful lesson: mechanical projects are built through testing, not optimism. A revised bearing mount is printed with several hole sizes. One fits tightly without cracking the wall, and its dimensions are transferred to the main housing.
The next challenge is the shaft coupler. The first version looks sturdy but vibrates at operating speed. The motor shaft and burr shaft are not perfectly aligned, and the rigid coupler magnifies the error. A second design adds more precise set-screw positions and a small amount of flexibility. The machine immediately becomes quieter.
When beans are finally added, the grinder produces coffeebut also retains a surprising amount in the chute. Tapping the housing releases a small brown avalanche. The grounds path is remodeled with steeper walls and fewer internal corners. The revised chute does not eliminate retention, but it reduces the amount enough to make single-dose grinding more predictable.
The first brewed cup is acceptable rather than extraordinary. Some grounds are visibly larger than others, and the coffee tastes slightly hollow. Inspection reveals that the upper burr carrier can move under pressure. Thicker walls and reinforcing ribs are added, and metal threaded inserts replace screws driven directly into plastic.
After the modification, grind consistency improves. Pour-over coffee becomes sweeter and easier to repeat. Adjustments remain relatively large, however, so dialing in espresso is frustrating. The adjustment collar is redesigned with finer threads and clearer index marks. This produces smaller changes, although it also requires a longer, more careful print.
Cleaning introduces another practical discovery. A decorative internal texture looks wonderful when empty but collects coffee dust enthusiastically. The next version uses smooth walls, larger corner radii, and a removable chute. Appearance gives way to serviceability, which is a common sign that a prototype is becoming a real appliance.
Over several weeks, the most satisfying feature is not any individual cup of coffee. It is the ability to improve the machine. A commercial grinder invites the owner to adjust a dial. The printed grinder invites the owner to question the dial, redesign its threads, move the motor, change the hopper, strengthen the frame, and print a replacement before breakfast.
The project also creates a new appreciation for commercial grinder engineering. Components that once appeared simpleburr carriers, adjustment rings, anti-static chutes, and motor mountsreveal themselves as carefully balanced systems. Every fraction of a millimeter can influence alignment, retention, sound, or usability.
Eventually, the grinder becomes less of a science experiment and more of a dependable tool. Its surface may show layer lines, its motor may not whisper, and its appearance may suggest that a small robot built it in a garage. Yet it grinds fresh beans consistently, can be repaired with common parts, and has a design that exists nowhere else.
That experience explains the appeal of a 3D-printed coffee grinder. It is not simply a cheaper path to ground coffee. It turns an everyday appliance into an evolving engineering projectone that rewards patience with both practical knowledge and a considerably better morning beverage.
Conclusion
A 3D-printed coffee grinder demonstrates the best side of practical additive manufacturing. It does not try to replace every conventional material. Instead, it uses printing where customization matters and commercial metal components where hardness, accuracy, and wear resistance are essential.
The most successful design will feature rigid burr support, accurate alignment, controlled adjustment, low retention, appropriate materials, and removable parts that can be inspected and cleaned. It will also accept that the first version is unlikely to be the final version.
For coffee enthusiasts, the project offers control over grind size and workflow. For makers, it offers a compact course in mechanical design, prototyping, material behavior, and troubleshooting. For everyone else, it offers a useful reminder: with enough engineering, even a windshield-wiper motor can find a respectable second career in specialty coffee.