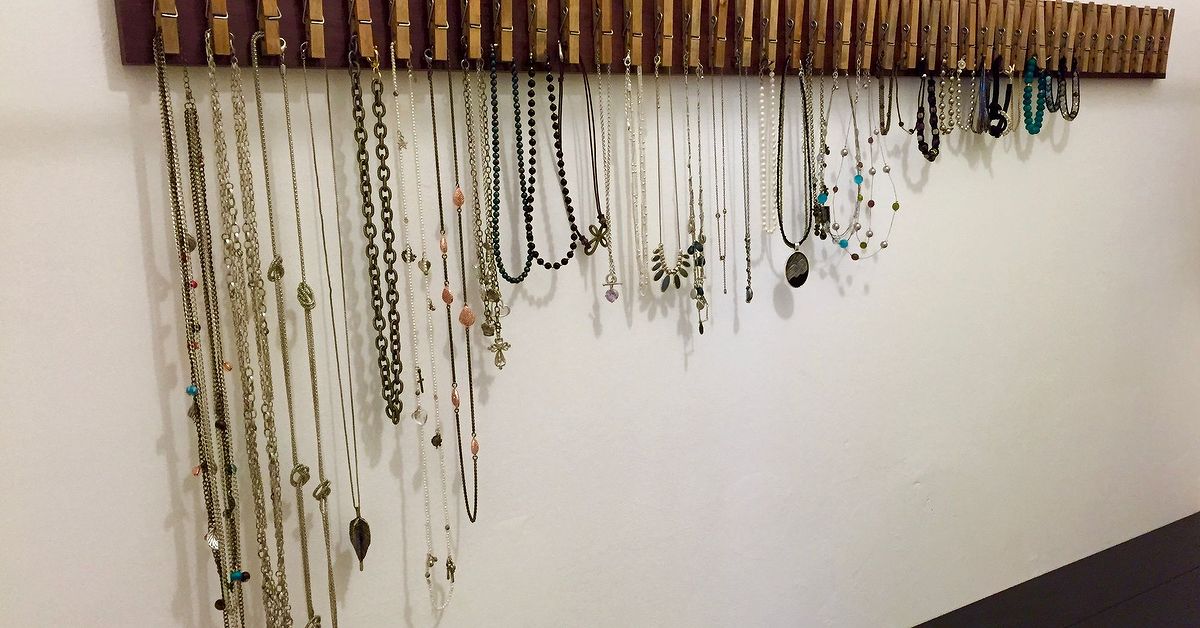
A clothespin jewelry hanger turns a handful of ordinary laundry supplies into a cheerful wall organizer for necklaces, bracelets, earrings, and other everyday accessories. It is inexpensive, customizable, beginner-friendly, and much more attractive than the tangled jewelry nest currently plotting against you inside that dresser drawer.
The basic design is wonderfully simple: wooden clothespins are attached to a painted or stained board, and the finished organizer is mounted near a closet, vanity, or bedroom mirror. Each pin becomes a miniature holder that keeps frequently worn pieces visible and easy to reach.
This project can be completed with basic hand tools and adapted to farmhouse, modern, coastal, bohemian, or colorful bedroom decor. More importantly, it gives every necklace a designated parking spot, reducing the morning ritual of trying to untangle three chains while already five minutes late.
Why Make a Clothespin Jewelry Hanger?
Traditional jewelry boxes are useful for delicate and valuable pieces, but they are not always convenient for accessories worn every day. Small chains become tangled, bracelets disappear beneath larger items, and earrings somehow separate despite having no known ability to walk.
A wall-mounted jewelry organizer solves several of these problems by using vertical space. Instead of occupying a dresser drawer or countertop, it turns a narrow section of wall into functional storage. The open design also lets you see your collection at a glance, which makes it easier to coordinate accessories and remember what you own.
A DIY clothespin jewelry hanger is especially practical for:
- Costume necklaces and lightweight chains
- Friendship bracelets and fabric wristbands
- Hoop and hook-style earrings
- Hair ties, scarves, and decorative pins
- Children’s or teenagers’ accessory collections
- Frequently worn jewelry kept near a mirror
The project is also a useful way to repurpose leftover wood, spare paint, scrapbook paper, or clothespins from another craft. In other words, the supply closet finally gets to justify its existence.
Choose the Right Design Before You Build
Decide What the Hanger Will Hold
Inspect your jewelry collection before choosing the board size or number of clothespins. Long necklaces require more vertical clearance than bracelets, while large earrings need extra space between adjacent pins.
A compact 12-inch organizer may be enough for a small collection. For a larger assortment, use an 18- to 24-inch board with two staggered rows of pins. Leaving approximately 1.5 to 2 inches between clothespins gives jewelry enough room to hang without becoming crowded.
Very heavy necklaces, valuable gemstones, fragile antique pieces, and pearl strands should not be suspended from ordinary clothespins. Store those items separately in padded compartments or soft pouches. The clothespin hanger is best treated as accessible display storage for lightweight, durable accessories.
Select the Clothespin Orientation
Clothespins can be installed vertically, horizontally, or in alternating directions.
- Vertical pins create a neat, uniform appearance and work well for bracelets and chains.
- Horizontal pins make the jaws easier to open when the organizer is mounted at eye level.
- Alternating pins create a playful pattern and provide slightly different hanging positions.
Temporarily arrange the pins on the board before using glue. Photograph the layout with your phone so you can recreate it later without relying on memory, which is famously unreliable whenever wet adhesive enters the room.
Materials and Tools
Essential Materials
- One unfinished wood board, approximately 1 inch by 4 or 6 inches
- Ten to twenty-four wooden clothespins
- Wood glue or a strong multipurpose craft adhesive
- 120-grit and 180- or 220-grit sandpaper
- Wood stain, acrylic paint, chalk paint, or spray paint
- Clear water-based protective finish, if desired
- Ruler or measuring tape
- Pencil
- Small paintbrush or foam brush
- Mounting hardware suitable for the wall
Optional Supplies
- Felt, cork, or thin craft foam
- Decorative paper or fabric
- Letter stencils
- Small cup hooks
- Wooden beads or miniature knobs
- Painter’s tape
- Hot glue for lightweight decorative elements
- Small D-rings, keyhole hangers, or sawtooth hangers
Choose flat wooden clothespins with firm springs. Pins that feel loose in the package will become even less impressive after supporting a necklace for several months. Test each one and set aside any that do not close evenly.
How to Make a Clothespin Jewelry Hanger
Step 1: Cut and Sand the Wood
Cut the board to the desired length, or ask a home-improvement store to cut it for you. A board measuring about 18 inches long is a versatile starting point for a medium-size collection.
Sand the front, back, edges, and corners with 120-grit sandpaper. Follow with 180- or 220-grit paper for a smoother finish. Wipe away all sanding dust with a clean, slightly damp cloth and let the wood dry.
Do not skip the edges. Jewelry chains, fabric bracelets, and human fingers all object to splinters with equal enthusiasm.
Step 2: Mark the Layout
Place the board on a flat work surface. Use a ruler and pencil to mark a light centerline where the pins will be installed. Measure equal spacing between the clothespins rather than estimating by eye.
For a single row, begin approximately one inch from the end of the board. For two rows, stagger the pins so that jewelry hanging from the upper row falls between items on the lower row.
Step 3: Paint or Stain the Board
Apply paint or stain before attaching the clothespins. Working on a flat, unobstructed surface produces a cleaner finish and prevents paint from clogging the clothespin springs.
Use two thin coats instead of one heavy coat. Let each coat dry according to the product instructions. Lightly sanding between coats can help create a smoother surface, particularly when using water-based paint that raises the wood grain.
For a rustic appearance, apply stain and gently distress the edges. For a modern organizer, use matte black, warm white, or a single saturated color. Painter’s tape can create stripes, geometric blocks, or a color-dipped effect.
Step 4: Finish the Clothespins
Leave the clothespins natural or paint them separately. Acrylic paint works well for small decorative details, while spray paint provides a more uniform coat.
Open and close each clothespin after the finish dries. Remove any paint that interferes with the spring or causes the jaws to stick. Jewelry organization loses some of its charm when every pin requires the grip strength of a professional rock climber.
Step 5: Attach the Clothespins
Apply a narrow bead of wood glue to the flat back of the first clothespin. Position it on the marked line and press firmly. Repeat with the remaining pins, checking the spacing as you work.
Use only enough adhesive to cover the contact surface. Excess glue may squeeze around the edges and leave shiny marks on the finished board. Wipe away any wet squeeze-out immediately.
Allow the adhesive to cure fully before testing the organizer. Depending on the product, this may require several hours or overnight. Hot glue can be used for decorations, but wood glue or an appropriate construction adhesive generally creates a more dependable bond between wooden parts.
Step 6: Add Protective Jaw Liners
For a gentler grip, glue tiny rectangles of felt, cork, or craft foam inside the clothespin jaws. This extra layer reduces direct contact between the wood and metal jewelry.
Keep the liners thin so the pins can still close properly. This modification is particularly useful for plated jewelry, painted pendants, and smooth bangles that might otherwise slide.
Step 7: Install the Hanging Hardware
Attach D-rings, a sawtooth hanger, or keyhole hardware to the back of the board. The best option depends on the board’s size, weight, and intended location.
If the organizer will be attached directly to drywall rather than a wall stud, use anchors rated for the combined weight of the board and jewelry. Follow the anchor manufacturer’s instructions, including any specified pilot-hole size. Use a level before tightening the final screw so your necklaces do not appear to be escaping downhill.
Step 8: Load the Organizer Carefully
Add jewelry gradually and distribute the weight across the board. Place longer necklaces toward the outer edges or lower row so they have room to hang freely. Avoid stacking several heavy pieces on one clothespin.
Check that chains are not caught in the metal spring. The jaws should hold the clasp, a fabric loop, an earring card, or another sturdy section rather than crushing a delicate chain.
How to Organize Different Types of Jewelry
Necklaces
Fasten each necklace before hanging it. A closed clasp is less likely to slip from the pin, and individual hanging positions help prevent chains from knotting together. Give long pendants extra clearance beneath the organizer.
Bracelets
Lightweight chain, cord, and beaded bracelets can be clipped directly by their clasp or loop. Rigid bangles may hang from small cup hooks installed between the clothespins.
Earrings
Hook earrings can hang from a narrow ribbon stretched across the board or from a small piece of mesh attached below it. Stud earrings are easier to manage when fastened to labeled cardstock and clipped together as a pair.
Rings and Small Accessories
Rings should not be gripped tightly between bare wooden jaws, especially if they have raised stones or delicate finishes. Add a small fabric pouch, shallow shelf, or ring dish beneath the organizer instead. The clothespins can then hold the pouch closed or display labels for each accessory category.
Creative Clothespin Jewelry Hanger Ideas
Rustic Farmhouse Hanger
Stain the board in a warm walnut tone and leave the clothespins natural. Add a hand-painted word such as “Sparkle,” “Adorn,” or “Accessories.” Use dark metal mounting hardware to complete the look.
Modern Color-Block Organizer
Paint the board matte white and divide the clothespins among two or three coordinating colors. Keep the spacing precise and omit extra decorations. The finished design will look clean enough for a minimalist bedroom without becoming visually bland.
Bohemian Display
Cover the board with patterned fabric, add wooden beads to the ends, and paint the clothespins in muted desert shades. A short row of fringe along the lower edge can soften the design, although moderation is advisable unless you want the organizer to resemble a very fashionable mop.
Personalized Teen Organizer
Use alphabet stickers, photographs, ticket stubs, or decorative paper to customize the background. Assign different pin colors to necklaces, bracelets, hair accessories, and earrings. This version also makes an affordable handmade gift.
Vintage Frame Version
Mount a narrow board inside an empty picture frame and attach the clothespins to the board. The frame gives the organizer a more finished appearance and helps it blend into a gallery wall.
Common Mistakes and Easy Fixes
- The clothespins fall off: Remove weak adhesive, sand the contact areas lightly, and reattach the pins with wood glue or another adhesive designed for wood.
- The pins are crooked: Use a ruler, centerline, and spacing template rather than attaching each pin independently.
- Paint peels from the board: Sand the surface, remove dust, and apply thin compatible coats over properly prepared wood.
- Jewelry slides out: Add thin felt pads inside the jaws or reposition the pin so gravity pulls the item toward the hinge.
- Necklaces still tangle: Increase the spacing, separate long and short pieces, and limit each pin to one necklace.
- The board tilts forward: Use two mounting points instead of one and keep the load balanced.
- The organizer looks crowded: Display only frequently worn pieces and store the remainder in divided, padded containers.
Jewelry Care and Hanger Maintenance
Dust the organizer regularly with a soft cloth. Remove the jewelry first rather than polishing around dangling chains like someone attempting a tiny obstacle course.
Inspect the glue joints, springs, wall screws, and mounting hardware every few months. Replace cracked or weakened clothespins before they fail. Do not install the hanger in a steamy bathroom, beside a sunny window, or directly above a heat source.
Open storage exposes jewelry to air, moisture, dust, and light. Use the hanger for durable everyday accessories rather than irreplaceable or highly valuable pieces. Fine jewelry, pearls, opals, antique items, and easily scratched stones generally benefit from separate, cushioned storage selected for their materials.
Remove jewelry before applying perfume, hairspray, lotion, or household cleaners. Let each piece dry completely before returning it to the organizer.
Conclusion: Small Project, Surprisingly Big Improvement
A clothespin jewelry hanger is proof that useful home organization does not require expensive cabinetry or advanced woodworking skills. With a small board, several wooden pins, a dependable adhesive, and a little imagination, you can create an organizer that keeps everyday accessories visible, separated, and ready to wear.
The best version is designed around your actual collection. Give necklaces room to hang, protect easily scratched pieces, use secure wall hardware, and reserve enclosed padded storage for delicate or valuable jewelry. Once those practical details are handled, the colors, patterns, and decorative flourishes are entirely up to you.
A Realistic Project Experience: What the Build Is Actually Like
The typical clothespin jewelry hanger begins as one of those projects that seems almost suspiciously easy. A maker places a board, a bag of clothespins, and several paint samples on the table and confidently predicts the entire organizer will be finished before lunch. Technically, this is possible. It is also possible that choosing between “Soft Linen” and “Cloud Whisper” will consume forty-five minutes.
The first genuinely satisfying moment comes after sanding. An ordinary piece of lumber quickly starts to resemble a finished decor item once the rough corners disappear. This step often reveals small dents or manufacturing marks that were difficult to see at the store. Spending a few additional minutes smoothing them is worthwhile because paint has a remarkable talent for highlighting every flaw it was expected to hide.
Arranging the clothespins usually takes longer than attaching them. A row that looked perfectly straight from one angle may suddenly resemble a roller coaster from another. Measuring every position prevents this problem, but a homemade cardboard spacing guide makes the process even easier. Once the layout is marked, the repetitive placement becomes oddly relaxing.
Painting the clothespins introduces the most common surprise: too much paint can make the jaws stick. Opening each pin while it dries, or keeping paint away from the spring and inner contact surfaces, saves considerable frustration. A few imperfect pins are not disastrous, however. Slight variations often add character, especially in rustic and bohemian designs.
The most difficult part is waiting for the glue to cure. The organizer looks finished, the jewelry is ready, and every creative instinct says, “Surely it has been long enough.” It usually has not. Loading the pins prematurely can pull them away from the board and transform a tidy project into an emergency repair involving clamps, adhesive, and language unsuitable for a family craft blog.
After installation, the practical benefit becomes obvious almost immediately. Necklaces that were previously forgotten at the bottom of a box become part of the daily wardrobe again. Bracelets stay paired with coordinating pieces, and selecting accessories takes seconds instead of requiring an archaeological excavation.
The first layout may also reveal what should be changed. Long necklaces might need more clearance. Earrings may work better on cards. A small dish beneath the board may be necessary for rings. These adjustments are not signs that the project failed; they are what turn a generic craft into a storage system designed for a particular routine.
The finished hanger tends to encourage better habits because putting jewelry away becomes easier than leaving it on the dresser. That is the quiet success of the project. It does not merely decorate the wall. It removes one small source of daily clutter while displaying accessories that already deserve to be seen.
Note: This experience section is a representative project diary based on common DIY building, finishing, installation, and organization outcomes. It is not presented as a claim of personal hands-on experience.