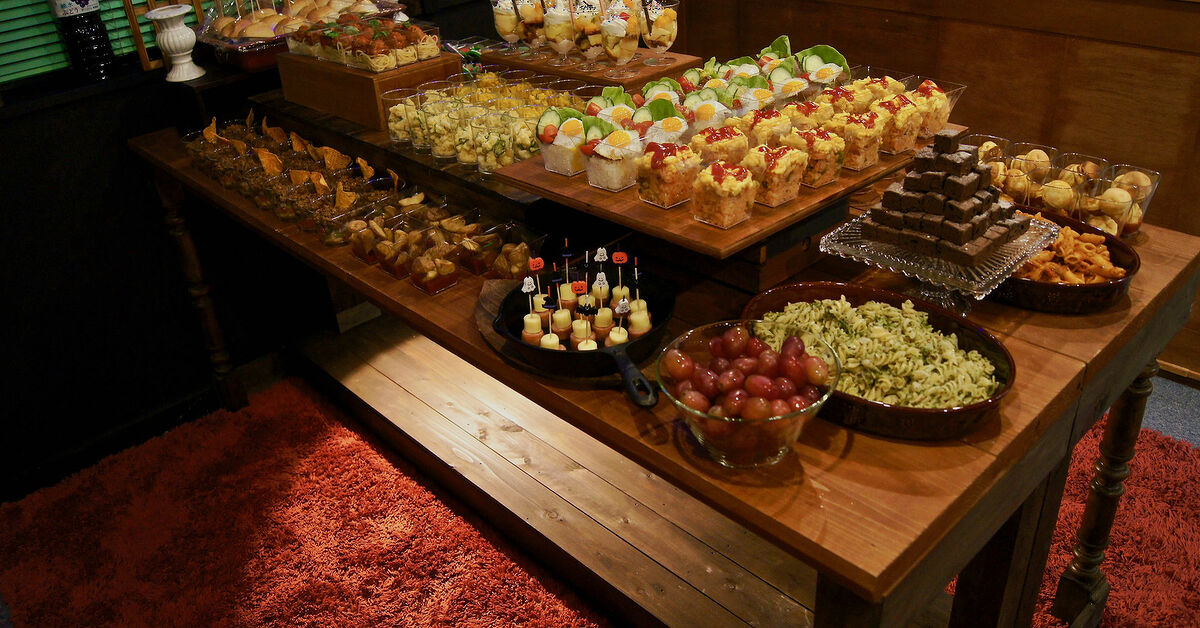
There is something magical about a rustic food display. Maybe it is the warm wood, the imperfect textures, the relaxed farmhouse charm, or the fact that cheese looks dramatically more expensive when it is sitting on a slab of reclaimed-looking wood. Whatever the reason, a rustic food display DIY can turn a regular snack table into the kind of spread guests photograph before they remember they came to eat.
The best part? You do not need a professional event stylist, a barn wedding budget, or a mysterious ancestor who left you an antique apple crate collection. With a few wood boards, crates, linens, serving pieces, greenery, and smart food-safety habits, you can create a beautiful rustic buffet, grazing table, dessert station, brunch bar, or appetizer display at home.
This guide walks you through how to create a rustic food display DIY from scratch: planning the layout, choosing safe materials, adding height, arranging food beautifully, and keeping everything practical. Because yes, your table should look charmingbut it should also not collapse under a wheel of brie. Rustic is lovely. Structural chaos is not.
What Is a Rustic Food Display?
A rustic food display is a styled food presentation that uses natural textures, warm colors, vintage-inspired pieces, and relaxed arrangements. Think wooden boards, burlap runners, linen napkins, galvanized trays, mason jars, ceramic bowls, woven baskets, fresh herbs, candles, seasonal fruit, and weathered-looking crates.
The style works beautifully for weddings, birthday parties, baby showers, holiday gatherings, backyard dinners, farm-to-table events, church potlucks, brunches, and casual family celebrations. It feels welcoming instead of stiff, handmade instead of mass-produced, and cozy instead of “please do not touch anything on this table.”
Common rustic food display elements include:
- Wooden serving boards and cutting boards
- Crates, boxes, barrels, or risers for height
- Burlap, linen, cotton, or muslin table runners
- Neutral colors with earthy accents
- Mason jars, small glass bowls, and ceramic ramekins
- Fresh herbs, greenery, flowers, fruit, or branches
- Handwritten labels or small chalkboard signs
- Layered platters for desserts, bread, cheese, fruit, or appetizers
Step 1: Choose Your Rustic Food Display Theme
Before buying supplies or raiding your garage like a determined raccoon, decide what kind of rustic look you want. “Rustic” can mean several things, and choosing a clear direction keeps your table from looking like a flea market had a buffet baby.
Popular rustic display styles
Farmhouse rustic: Whitewashed wood, soft linens, galvanized metal, mason jars, and simple comfort food. This works well for brunches, family gatherings, and casual parties.
Woodland rustic: Tree slices, moss accents, deep greens, berries, mushrooms, candles, and forest-inspired textures. It is excellent for fall parties, weddings, and outdoor events.
Vintage rustic: Antique trays, lace, old books, brass candlesticks, cream ceramics, and handwritten tags. Ideal for bridal showers, tea parties, and romantic dessert tables.
Western rustic: Leather accents, bandanas, barrels, cast iron, denim, rope, and hearty foods like sliders, cornbread, barbecue, and chili cups.
Modern rustic: Clean wooden boards, matte black accents, stoneware bowls, neutral linens, and minimal greenery. Perfect when you want cozy charm without going full “cabin in a syrup commercial.”
Step 2: Plan the Food Before the Decor
The food determines the display. A dessert table needs different serving pieces than a taco bar. A charcuterie board needs small bowls, knives, and empty spaces for crackers. A soup station needs heat-safe containers, ladles, and a plan for drips, because soup has no respect for your aesthetic.
Good foods for a rustic display
- Artisan bread, rolls, biscuits, and crackers
- Cheese wedges, sliced cheese, and spreads
- Cured meats, smoked meats, or roasted vegetables
- Fresh fruit, dried fruit, nuts, and olives
- Mini sandwiches, sliders, or wraps
- Cupcakes, cookies, pies, brownies, and bars
- Salads in jars or small bowls
- Brunch foods like muffins, bagels, pastries, and yogurt cups
- Hot foods in slow cookers, chafing dishes, or cast-iron pans
For a rustic DIY food display, choose foods that can be grouped naturally. For example, place bread near butter and jam, cheese near crackers and fruit, desserts near coffee or tea, and savory bites near napkins and small plates. Guests should not have to play a treasure hunt called “Where Is the Dip?”
Step 3: Gather DIY Materials and Supplies
You can build a rustic display with inexpensive items. Many supplies can come from thrift stores, craft stores, hardware stores, kitchen cabinets, or things you already own. The goal is to create layers, texture, and warmthnot to spend your entire party budget on a wooden tray named “Clementine” from a boutique catalog.
Basic supply list
- One sturdy table or buffet surface
- Tablecloth, kraft paper, burlap runner, or linen runner
- Wooden boards, trays, or cutting boards
- Wood crates, small boxes, cake stands, or risers
- Ceramic bowls, glass jars, ramekins, and small plates
- Serving utensils, tongs, spreaders, and cheese knives
- Food-safe parchment paper or butcher paper
- Labels, chalkboards, tent cards, or kraft tags
- Greenery, herbs, flowers, fruit, or seasonal decorations
- Ice bowls, chafing dishes, warming trays, or slow cookers when needed
Best wood pieces to use
Wood brings the rustic look to life, but not every piece of wood belongs near food. Use clean, smooth, sealed, food-safe wood for direct contact with food. Cutting boards, butcher blocks, and serving boards are excellent choices. If you are using decorative crates, reclaimed wood, pallets, or stained boards, place parchment paper, trays, plates, or bowls between the wood and the food.
That old board from the shed may have “character,” but if its past includes motor oil, mystery stains, or a suspicious smell, give it a new career as firewoodnot a cheese board.
Step 4: Build or Prepare Rustic Wood Display Pieces
If you enjoy DIY projects, you can make simple display pieces from unfinished wood boards, small crates, or wood slices. The key is to sand everything smooth, remove splinters, clean thoroughly, and use a suitable finish depending on whether food will touch the surface.
DIY wood board display
- Choose a hardwood board, such as maple, walnut, cherry, or beech, if food will touch it directly.
- Sand with the grain using medium-grit sandpaper, then finish with a finer grit for a smooth surface.
- Wipe away dust with a clean cloth.
- Apply food-grade mineral oil or a food-safe board conditioner if the board will be used for food.
- Let the oil absorb, wipe away excess, and allow the board to dry before styling.
For decorative risers that will not touch food, you can stain or paint the wood. Just make sure finished pieces are fully dry and cured before using them near serving dishes. Decorative finishes should not touch unpackaged food unless the product is specifically rated as food-safe.
DIY crate risers
Wood crates are the secret weapon of rustic food displays. Turn them upside down to elevate trays, stack them on their sides for a market-style look, or place bowls inside them for depth. To prepare crates, sand rough edges, wipe them clean, and use them with plates or lined trays. For extra charm, add a small linen napkin over the top before placing a platter on it.
Step 5: Start With a Strong Table Base
A rustic food display begins with the table foundation. Choose a sturdy table that can support the weight of food, wood, serving dishes, drinks, ice, and guests who lean in too closely while debating whether they need a third brownie.
Cover the table with a neutral tablecloth or leave a wooden table exposed if it looks good. Add a runner down the center to create a visual path. Burlap gives a classic farmhouse feel, linen looks softer and more elegant, kraft paper feels casual and practical, and cheesecloth adds a romantic, slightly undone look.
Layer textures for depth
Rustic style is all about texture. Pair wood with linen, stoneware with glass, greenery with metal, and smooth ceramics with rough baskets. A table with only wood can look flat. A table with too many decorations can look like a craft store sneezed. Balance is the sweet spot.
Step 6: Add Height and Levels
Height is what separates a professional-looking food display from a row of plates waiting for a cafeteria bell. Use crates, cake stands, wood slices, overturned bowls, stacked boxes, and risers to create different levels. Place taller items toward the back and lower items toward the front so guests can see everything.
Simple ways to add height
- Place a wooden board on top of two small crates.
- Use cake stands for desserts, fruit, or cheese.
- Turn a crate on its side and place jars or small bowls inside.
- Stack wrapped boxes under a tablecloth to create hidden platforms.
- Use wood slices under bowls or plates.
- Place bread in baskets lined with napkins.
A good rule is to create three height zones: low, medium, and tall. Low items include flat boards, small bowls, and plates. Medium items include cake stands, baskets, and short crates. Tall items include stacked crates, floral arrangements, tall jars, or drink dispensers.
Step 7: Arrange Food Like a Stylist
Now comes the fun part: arranging the food. Start with the largest pieces first, such as bread baskets, cheese boards, cake stands, trays, and hot food stations. Then fill in with smaller bowls, jars, fruits, herbs, crackers, and decorative accents.
Use the “anchor and fill” method
Place your anchor items first. These are the main visual pieces: a large grazing board, a tiered dessert stand, a soup pot, a cake, or a basket of bread. Then fill around them with supporting items. This method keeps the display organized instead of randomly scattered.
Group by flavor and function
Keep foods that belong together close together. Put crackers beside cheese, sauces beside appetizers, fruit beside yogurt, and toppings beside the dish they belong to. Nobody wants to carry a slider across the table while searching for pickles like they are on a tiny condiment pilgrimage.
Create natural movement
Design the table so guests move smoothly from plates to food to utensils to napkins. If the display is self-serve, place plates at the beginning and napkins and utensils near the end. For a grazing table, create several access points so guests do not form a traffic jam around the brie.
Step 8: Add Rustic Decorations Without Overcrowding
Decor should support the food, not compete with it. A rustic display looks best when decorations feel natural and purposeful. Use fresh herbs like rosemary, thyme, basil, or sage. Add seasonal fruit such as apples, pears, figs, grapes, citrus, or berries. Use small jars of wildflowers, eucalyptus sprigs, or greenery to soften the table.
Rustic decoration ideas
- Mini chalkboard signs for food labels
- Kraft paper tags tied with twine
- Mason jars filled with utensils
- Small lanterns or battery-operated candles
- Wood slices under jars or bowls
- Fresh herbs tucked around boards
- Seasonal produce as edible decor
- Neutral napkins rolled and tied with twine
Use candles carefully. Battery-operated candles are safer around napkins, greenery, and guests who wave their hands while telling stories. Real flames can be beautiful, but they should stay away from loose fabric, dry foliage, children, and anyone named Uncle Mike who gets overly animated near the dessert table.
Step 9: Keep Food Safety Beautiful and Boring
Food safety is not glamorous, but neither is sending guests home with “memories” that require ginger ale and regret. A rustic food display should follow basic buffet safety rules, especially when serving meat, dairy, seafood, eggs, cut fruit, salads, or cooked dishes.
Important food safety tips
- Keep cold foods at 40°F or below by nesting dishes in bowls of ice or using small trays that can be replaced often.
- Keep hot foods at 140°F or above with chafing dishes, slow cookers, warming trays, or insulated containers.
- Do not leave perishable food at room temperature for more than two hours, or more than one hour if the temperature is above 90°F.
- Use separate utensils for each dish to prevent cross-contact and messy flavor mixing.
- Do not refill old trays by dumping fresh food on top. Replace the tray with a clean, freshly prepared one.
- Wash hands, surfaces, serving tools, and cutting boards before setting up.
- Keep raw ingredients away from ready-to-eat foods.
For outdoor rustic displays, use shade, covers, coolers, and smaller portions. Bring out food in batches instead of displaying everything at once. Your table will stay fresher, safer, and more abundant-looking throughout the event.
Step 10: Label Everything Clearly
Labels are helpful, stylish, and surprisingly powerful. They tell guests what they are eating, reduce repeated questions, and help people avoid foods they cannot or do not want to eat. Rustic labels can be made with kraft cardstock, mini chalkboards, wooden tags, clothespins, toothpick flags, or simple folded tent cards.
Helpful label details
- Name of the dish
- Main ingredients
- Common allergens such as nuts, dairy, wheat, eggs, soy, fish, or shellfish
- Dietary notes like vegetarian, vegan, gluten-free, spicy, or contains pork
- Serving suggestions, such as “add honey” or “pair with fig jam”
Keep labels short. “Goat Cheese with Honey and Thyme” is charming. “A Whimsical Meadow-Inspired Dairy Experience” is how you get side-eye from hungry people.
Rustic Food Display Ideas for Different Events
Rustic wedding dessert table
Use stacked crates, wood slices, white cake stands, linen runners, and small vases of greenery. Display cupcakes, mini pies, cookies, brownies, and a simple cutting cake. Add labels with handwritten-style fonts and keep the color palette soft: cream, sage, warm brown, and muted gold.
Farmhouse brunch display
Set out muffins, biscuits, jams, fruit, yogurt parfaits, bagels, cream cheese, and coffee. Use baskets for bread, jars for spoons, and wood boards for pastries. Add small bowls of berries and honey for color.
Backyard barbecue display
Use butcher paper, metal trays, wooden crates, enamelware, and casual labels. Serve sliders, cornbread, pickles, coleslaw, chips, fruit, and sauces. Keep hot foods hot and cold salads cold, especially in summer weather.
Rustic charcuterie table
Use large wooden boards, slate trays, ramekins, and small bowls. Arrange cheeses, meats, crackers, fruit, nuts, olives, jams, and herbs. Cut some cheese in advance so guests feel invited to start eating. Whole, untouched cheese can look elegant, but it can also intimidate guests into politely starving beside it.
Budget-Friendly Rustic Display Hacks
A rustic food display DIY does not need to be expensive. In fact, the style rewards creativity. Use what you have, borrow what you can, and spend money only on pieces you will use again.
Affordable ideas
- Use kraft paper as a table runner and write food names directly on it.
- Wrap empty boxes in neutral paper and hide them under fabric for instant risers.
- Buy thrift-store baskets, trays, and ceramic bowls.
- Use mason jars for utensils, flowers, sauces, and breadsticks.
- Turn clean wood boards into serving platforms with parchment paper on top.
- Use seasonal fruit as decor instead of buying extra decorations.
- Repurpose cake stands for appetizers, not just desserts.
One of the easiest upgrades is lighting. String lights, lanterns, or small battery candles instantly make a rustic display feel warmer. Just keep cords hidden and away from food, liquids, and traffic paths.
Common Mistakes to Avoid
Using unsafe wood for direct food contact
Reclaimed wood can be beautiful, but it may have old paint, chemicals, splinters, or unknown residue. Use it as a riser or backdrop, not as a direct serving surface. Put food on plates, trays, parchment, or food-safe boards.
Making the table too crowded
Rustic does not mean “every object I own has been invited.” Leave breathing room so guests can reach food easily. Negative space makes the display look intentional and keeps elbows out of the dip.
Forgetting serving tools
Every dish needs its own utensil. Add tongs, spoons, spreaders, knives, scoops, and napkins before guests arrive. A gorgeous display without utensils is just edible museum art.
Ignoring traffic flow
If 20 people need to access one tiny corner of the table, congestion will happen. Spread popular foods across the display, place plates in more than one spot, and keep drinks separate if possible.
My Real-Life Experience Creating a Rustic Food Display DIY
The first time I created a rustic food display, I made the classic beginner mistake: I cared deeply about the look and only vaguely about the logistics. The table looked beautiful for exactly seven minutes. Then the crackers ran out, the brie knife vanished, someone put a wet spoon on the cookie tray, and a small child quietly relocated all the grapes to his pocket. It was rustic, yes. It was also a tiny buffet rodeo.
Since then, I have learned that the best rustic food displays are built in layersnot just visually, but practically. I now start with a simple sketch. Nothing fancy, just a rectangle on paper showing where the big items will go. I mark the beginning of the line, where plates will sit, where the cold foods need ice, where the hot dish needs power, and where people can easily grab napkins. This five-minute plan saves a surprising amount of table drama.
One of my favorite displays was for a backyard birthday dinner. The theme was casual farmhouse, so I used a plain folding table covered with a cream tablecloth and a strip of kraft paper down the center. I placed two small wood crates at the back, then set a long board across them to make a raised shelf for bread, rolls, and small jars of herb butter. Underneath, I placed bowls of salad, fruit, and pickles. The height made the table look full without needing twice as much food.
I also learned that food color matters more than people think. Bread, crackers, cheese, and wood are all beautiful, but together they can become one giant beige landscape. Delicious? Yes. Photogenic? Only if your camera enjoys toast-colored fog. Now I always add color with grapes, berries, citrus slices, cherry tomatoes, herbs, edible flowers, radishes, olives, or small bowls of jam. Even a handful of rosemary can wake up the whole table.
Another hard-earned lesson: keep extra food in the kitchen, not on the table. A rustic display looks more elegant when portions are refreshed in batches. Instead of putting out all the cheese, all the fruit, and every dessert at once, I set out smaller amounts and refill with clean platters. This keeps food fresher and helps the display stay neat. It also prevents the table from looking like a beautiful woodland creature was attacked by appetizers.
Labels have also become non-negotiable for me. At first, I thought labels were just decorative. Now I see them as hospitality. Guests appreciate knowing what contains nuts, what is vegetarian, what is spicy, and what mystery dip they are bravely approaching. Small kraft tent cards with black marker are enough. You do not need calligraphy. You only need legible handwriting and the emotional strength not to write “fancy cheese blob.”
The biggest experience-based tip is to do a test setup before the event. Place the empty boards, crates, bowls, and risers on the table the day before. Check height, stability, reach, and flow. If a crate wobbles when empty, it will not become more trustworthy under cupcakes. If a board hangs too far over the edge, move it. If guests will need to reach over candles to grab bread, rethink the layout. Pretty should never require minor acrobatics.
Finally, I have learned that rustic food displays are most successful when they feel generous but not perfect. A slightly rumpled linen runner, a few crumbs on a bread board, grapes spilling naturally from a bowl, and herbs tucked casually around platters all add charm. The goal is not showroom perfection. The goal is to make people feel welcome, hungry, and impressed enough to say, “Wait, you made this?” That is the sweet spot: beautiful, practical, safe, and relaxedwith just enough DIY magic to make the table feel personal.
Conclusion
Creating a rustic food display DIY is about blending beauty with function. Start with a clear theme, choose safe serving surfaces, build height with crates and stands, arrange food in logical groups, and add natural textures through wood, linen, herbs, fruit, and simple labels. Keep food safety at the center, especially for hot, cold, and perishable items. The final result should feel warm, abundant, and easy for guests to enjoy.
You do not need a professional styling team to make a rustic buffet look impressive. You need a sturdy table, thoughtful layers, safe materials, and a little creativity. Add good food, clear labels, and a few charming details, and your display will look like it belongs at a magazine-worthy gatheringeven if the party is in your backyard and someone is still looking for the bottle opener.
Note: This article is original, publication-ready content written in standard American English and synthesized from reputable food-safety, DIY woodworking, buffet styling, and home entertaining guidance.