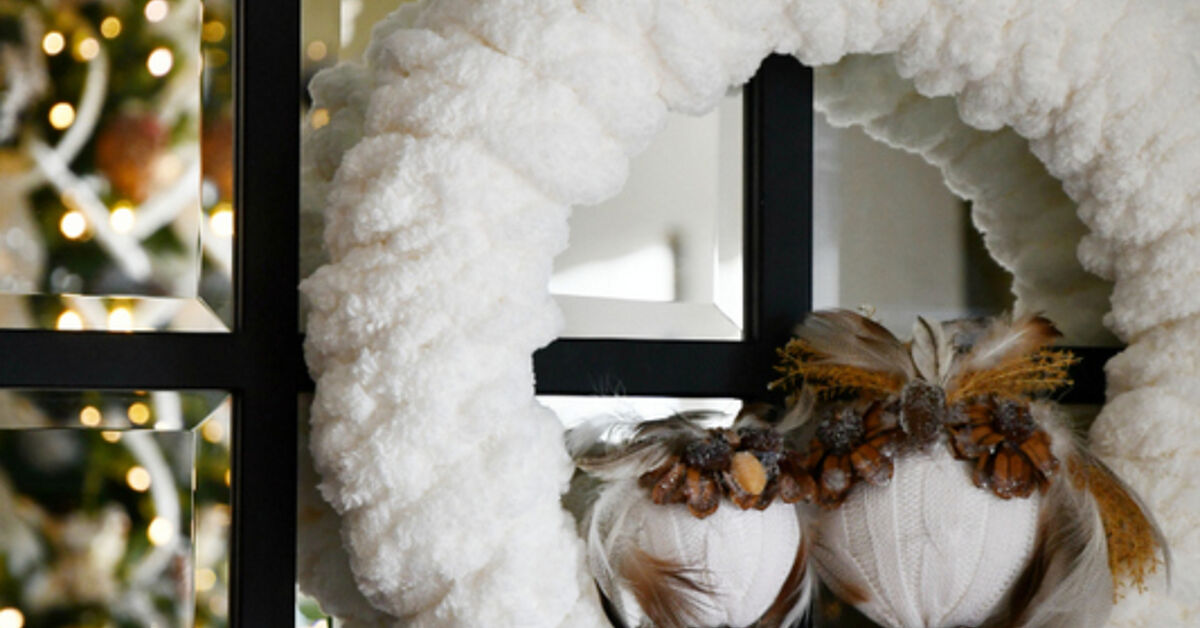
Some winter crafts ask you to own a sewing machine, three kinds of pliers, a professional floral studio, and the patience of a snow-covered mountain. This is not one of those crafts. If you have yarn, your hands, a wreath form, and maybe a cup of something warm nearby, you can make a cozy DIY winter wreath that looks charming, textured, and impressively handmade without needing knitting needles.
This easy finger knitting project is perfect for beginners because finger knitting turns yarn into a soft, rope-like chain using only your fingers. Then that chain wraps around a wreath form to create a plush winter decoration for your front door, mantel, entryway, or holiday wall display. The finished look can be snowy and neutral, rustic and woodland-inspired, bright and festive, or minimalist enough to stay up long after the Christmas decorations have retreated into storage.
In this guide, you will learn how to choose the best yarn, finger knit a simple chain, attach it to a wreath base, decorate it with winter accents, and fix common mistakes along the way. No complicated stitches. No knitting needles. No craft panic. Just yarn doing what yarn does best: making everything feel cozier.
Why Finger Knitting Is Perfect for a DIY Winter Wreath
Finger knitting is one of the friendliest yarn crafts because it removes the most intimidating part of knitting: the needles. Instead, your fingers act like a simple loom. You loop, pull, repeat, and slowly build a soft knitted cord. It is rhythmic, forgiving, and surprisingly satisfying. If traditional knitting feels like decoding a secret message written by a very stylish grandmother, finger knitting is the relaxed cousin who says, “Just loop it and keep going.”
For wreath making, the texture is the magic. A plain foam wreath form can look flat on its own, but once it is wrapped with chunky finger-knit yarn, it gains warmth, volume, and that handmade winter charm people notice immediately. Bulky and super bulky yarns work especially well because they create fast coverage and bold texture. They also hide tiny imperfections, which is wonderful news for anyone whose craft motto is “close enough, but make it cute.”
A finger knitted winter wreath is also highly customizable. Use white yarn for a snowdrift look, gray for modern farmhouse style, cream for cozy cottage decor, deep green for a classic evergreen mood, or red and plaid accents for a holiday finish. You can keep the wreath simple or add pinecones, faux berries, miniature ornaments, ribbon, wooden snowflakes, bells, or greenery picks.
Supplies You Need
Before you begin, gather everything on a clean table. This project is easy, but yarn has a mysterious talent for rolling under furniture the moment you look away.
Basic Materials
- 1 foam, straw, wire, or grapevine wreath form, ideally 12 to 16 inches
- 1 to 2 skeins of bulky or super bulky yarn
- Scissors
- Hot glue gun or low-temperature glue gun
- Floral pins, U-pins, or straight pins for extra hold
- Ribbon, twine, or yarn for hanging
- Optional decorations: pinecones, faux greenery, berries, bells, mini ornaments, snowflakes, or pom-poms
Best Yarn for This Project
Choose a soft bulky yarn if you want a plush, cozy wreath that works up quickly. Super bulky yarn creates a dramatic, chunky effect and covers the wreath form faster. Chenille, roving-style, wool-blend, and acrylic chunky yarns are all good options. Acrylic is budget-friendly and easy to find, while wool blends can give a warmer, more natural look.
If this is your first finger knitting project, avoid very thin yarn. Thin yarn takes longer to build volume and can make the finished wreath look skimpy unless you create a lot of cord. Also avoid yarn that sheds aggressively unless you enjoy looking like you wrestled a fashionable sheep.
Choose Your Winter Wreath Style
Before you start finger knitting, decide the mood of your wreath. A clear style plan helps you choose yarn colors and decorations that look intentional instead of “the craft drawer exploded, but politely.”
Snowy Cottage Wreath
Use cream, ivory, or white yarn. Add frosted pinecones, small silver bells, pearl picks, and a velvet ribbon. This style looks soft, calm, and elegant.
Rustic Cabin Wreath
Choose oatmeal, taupe, charcoal, or forest green yarn. Decorate with pinecones, burlap ribbon, small wood slices, and faux cedar sprigs. This version feels warm and woodsy.
Classic Holiday Wreath
Start with white, red, or green yarn. Add red berries, plaid ribbon, mini ornaments, and gold bells. It is festive without requiring the wreath to shout “Jingle Bells” at passing neighbors.
Modern Minimalist Wreath
Use one solid yarn color, such as soft gray, cream, or black. Add one asymmetrical cluster of greenery and a simple ribbon. This is perfect for people who like winter decor that whispers instead of sings karaoke.
Step-by-Step: How to Finger Knit the Yarn Chain
This tutorial uses a simple finger-knit chain method that is beginner-friendly and ideal for wrapping a wreath. You can make it while watching a movie, listening to music, or pretending you are too busy crafting to fold laundry.
Step 1: Make a Slip Knot
Pull a length of yarn from the skein and make a basic slip knot. Leave a 6-inch tail so you can secure the end later. Place the loop around your index finger. It should be snug enough to stay in place but loose enough to slide easily.
Step 2: Pull a New Loop Through
With your other hand, reach through the loop on your finger, grab the working yarn, and pull a new loop through the old loop. Slide the old loop off gently. You have made the first chain stitch.
Step 3: Repeat the Motion
Continue pulling a new loop through the previous loop. Try to keep your tension relaxed and even. If you pull too tightly, the chain becomes stiff. If you pull too loosely, the chain may look uneven. Luckily, wreaths are forgiving because the wrapping process hides many small differences.
Step 4: Check the Length as You Go
Every few feet, pause and loosely wrap the chain around your wreath form to estimate coverage. A 14-inch wreath form may need approximately 12 to 18 feet of finger-knit chain depending on yarn thickness, how tightly you wrap, and whether you want gaps or full coverage.
Step 5: Finish the Chain
When your chain is long enough, cut the yarn, leaving another 6-inch tail. Pull the tail through the final loop and tighten gently to secure it. Do not trim the tails yet; they are useful for tying and hiding the ends on the back of the wreath.
How to Turn Your Finger Knitting Project into a DIY Winter Wreath
Now comes the fun part: turning your soft yarn chain into a wreath that looks like it belongs in a cozy winter cabin, even if your actual crafting station is the kitchen table under suspiciously bright overhead lighting.
Step 1: Secure the First End
Place the beginning of your finger-knit chain on the back of the wreath form. Use hot glue, floral pins, or both to secure it. If you are using a foam wreath, pins work beautifully. If you are using a grapevine or wire form, hot glue and extra yarn ties may be easier.
Step 2: Wrap the Chain Around the Form
Wrap the knitted chain around the wreath form, keeping each round close to the previous one. For a full, plush look, slightly overlap the edges. For a more casual style, allow tiny spaces so the base peeks through. Keep the chain facing outward with the prettiest texture on display.
Step 3: Adjust the Texture
As you wrap, fluff and straighten the yarn. If a section looks too tight, gently loosen it. If a section looks bulky, spread the stitches with your fingers. This is where the wreath starts looking expensive, even though you are basically hugging a foam circle with yarn.
Step 4: Secure the Final End
When the wreath is covered, tuck the final yarn tail to the back. Glue or pin it securely. Trim any extra yarn, but leave enough to prevent unraveling. Press the wrapped areas lightly so the wreath feels stable.
Step 5: Add a Hanging Loop
Cut a length of ribbon, twine, or yarn and tie it around the top of the wreath. You can also create a loop on the back if you prefer a hidden hanger. Choose a ribbon that matches your style: velvet for elegant winter decor, plaid for classic holiday charm, burlap for rustic texture, or satin for a polished finish.
Decorating Ideas for Your Finger Knit Winter Wreath
The yarn base is beautiful on its own, but a few decorations can give your DIY winter wreath personality. The trick is to avoid covering too much of the finger knitting. Let the texture stay visible because that is the handmade star of the show.
Add a Natural Cluster
Glue a small bundle of faux greenery, pinecones, and berries to the lower left or lower right side of the wreath. Asymmetrical placement looks modern and balanced. Start with greenery, layer pinecones on top, then finish with berries or bells.
Make It Snowy
Use white yarn and add frosted pinecones, silver ornaments, or snowflake cutouts. A light dusting of faux snow can look pretty, but use it sparingly. Too much faux snow can turn a classy wreath into a craft blizzard.
Add Pom-Poms
Pom-poms are a perfect match for finger knitting because they continue the soft yarn theme. Add three to five pom-poms in different sizes for a playful winter look. White pom-poms resemble snowballs, while colorful pom-poms make the wreath cheerful and kid-friendly.
Use Mini Ornaments
Small ornaments can make the wreath feel festive without overwhelming it. Choose matte, metallic, or wooden ornaments for a coordinated look. Secure each ornament with hot glue or floral wire.
Finish with a Bow
A bow can be dramatic or simple. For a farmhouse wreath, use a plaid bow. For a romantic winter wreath, use velvet. For a minimalist design, skip the bow and let the yarn texture do the talking.
Helpful Tips for a Better Finished Wreath
First, do not pull the yarn too tight while finger knitting. A soft chain wraps more smoothly and gives the wreath a fuller look. Second, keep checking your wreath as you wrap. It is easier to fix spacing halfway through than after everything is glued down.
Third, decorate in layers. Place your largest pieces first, such as greenery and pinecones. Add smaller accents afterward. This keeps the design balanced and prevents the “random craft confetti” effect. Fourth, consider where the wreath will hang. If it will be outdoors, place it on a covered porch or sheltered door. Yarn can absorb moisture, collect dust, or fade in harsh weather.
Finally, embrace small imperfections. Finger knitting has a handmade texture, and that is the point. A perfectly machine-made wreath has its place, but this project shines because it looks warm, personal, and touchable.
Common Mistakes and Easy Fixes
The Finger Knit Chain Looks Uneven
Uneven tension is normal for beginners. Before wrapping the wreath, gently stretch the chain from end to end. Then use your fingers to fluff tighter sections. Once wrapped, the texture will look much more consistent.
The Yarn Does Not Cover the Wreath Form
If you run out of chain, simply finger knit another piece and attach it where the first one ends. Hide the join on the back of the wreath or under a decoration cluster.
The Decorations Feel Too Heavy
Use fewer accents or switch to lightweight faux pieces. Heavy pinecones and ornaments may need floral wire in addition to glue. If the wreath tilts, balance the opposite side with a small ribbon or greenery piece.
The Wreath Looks Too Plain
Add contrast. A cream yarn wreath looks beautiful with dark green foliage, brown pinecones, or red berries. A gray wreath pops with silver bells or white snowflakes. Texture plus contrast equals instant visual interest.
Creative Variations to Try
Once you learn this easy finger knitting project, you can use the same technique for more than one wreath. Try a Valentine wreath with blush pink yarn and felt hearts. Make a spring wreath with pastel yarn and faux flowers. Create a fall wreath with burnt orange yarn, acorns, and mini pumpkins. For Christmas, use alternating chains of red and white yarn for a candy-cane effect.
You can also make matching finger-knit garland for your mantel or tree. Use leftover yarn to create ornaments, gift toppers, or napkin rings. This is the sneaky beauty of finger knitting: once your hands learn the rhythm, every spare skein of yarn starts looking like potential home decor.
Experience Notes: What Making This Wreath Feels Like in Real Life
The first thing you notice when making a finger knit winter wreath is how quickly the project becomes relaxing. At the beginning, you may stare at the yarn loop and wonder if your fingers have suddenly forgotten how to be fingers. After a few minutes, though, the motion becomes automatic: pull a loop, slide it through, tighten gently, repeat. It has the same calming quality as doodling, except at the end you have decor instead of a notebook margin full of mysterious spirals.
This project is especially satisfying because progress is visible. Some crafts hide their results until the final step, but finger knitting rewards you immediately. The chain grows inch by inch, pooling in your lap like a soft little yarn snake. If you use chunky yarn, the results appear even faster, which is excellent for anyone who loves handmade decor but does not want to spend six weekends negotiating with thread.
Wrapping the wreath form is the moment when the project starts to feel impressive. A plain foam circle suddenly turns plush and designer-looking. The texture makes the wreath feel expensive, even when the materials are simple. There is also a pleasant freedom in adjusting the yarn as you go. If one wrap looks too loose, you nudge it. If one area looks thin, you overlap the next pass. The wreath does not demand perfection; it rewards patience and a good eye.
Decorating the finished wreath can be the most personal part. A single pinecone cluster gives it a woodland style. A velvet bow makes it elegant. Pom-poms make it playful. Red berries make it festive. The same finger-knit base can look completely different depending on what you add. That makes this project useful for families, classrooms, craft nights, and solo winter afternoons when you want to make something pretty without turning the house into a glitter crime scene.
One helpful experience-based tip is to pause before gluing decorations. Lay everything on the wreath first and take a quick photo with your phone. Photos make balance problems easier to see. You may notice that the bow is too large, the berries need to move upward, or the pinecones look better grouped in threes. Once hot glue enters the chat, decisions become more permanent.
Another tip is to make more finger-knit chain than you think you need. Running short near the end is not a disaster, but having extra gives you options. Leftover chain can become a matching mini garland, a gift wrap accent, or a small ornament loop. In fact, one of the best parts of this craft is that scraps do not feel wasted. They become bonus decorations.
Most of all, this project feels warm in the way winter crafts should. It is simple enough for beginners, pretty enough to display, and flexible enough to match your home. It turns ordinary yarn into a wreath that says, “Welcome, come in, it is cozy here,” even if your entryway currently contains three pairs of boots and one suspicious mitten.
Conclusion
Learning how to make an easy finger knitting project and turning it into a DIY winter wreath is a wonderful way to create handmade seasonal decor without complicated tools or advanced knitting skills. With chunky yarn, a wreath form, and a few simple accents, you can make a wreath that feels cozy, stylish, and personal. The process is beginner-friendly, budget-conscious, and endlessly adaptable for winter, Christmas, farmhouse, minimalist, or rustic decor.
Whether you hang it on your front door, above the mantel, in a hallway, or on an interior wall, your finger knit wreath brings texture and warmth to the season. It is the kind of project that looks impressive but feels approachable, which is basically the crafting sweet spot. Start with one wreath, and do not be surprised if you suddenly want to finger knit garlands, ornaments, gift toppers, and every spare yarn skein in sight.