Selecting non-adjacent cells in Excel sounds like one of those tiny spreadsheet tricks that should be obviousuntil you actually need it. You click one cell, then another, and suddenly Excel behaves like a moody cat: it ignores your first choice and follows the second one instead. Not ideal when you are trying to format scattered totals, highlight certain outliers, copy specific values, or apply the same formula to cells that are nowhere near each other.
The good news is that Excel gives you several reliable ways to select non-adjacent cells, also called non-contiguous cells. Whether you prefer using the mouse, keyboard shortcuts, the Name Box, or built-in tools like Find and Select, you can choose the method that fits your workflow. Some are perfect for beginners. Others feel like secret spreadsheet superpowers once you get used to them.
In this guide, you will learn four easy ways to select non-adjacent cells in Excel, plus practical examples, common mistakes, troubleshooting tips, and real-world experience from working with messy spreadsheets that seem designed by someone who enjoys chaos as a hobby.
What Are Non-Adjacent Cells in Excel?
Non-adjacent cells are cells or ranges that are not directly next to each other. For example, cells A1, C5, and F10 are non-adjacent because they are separated by other rows or columns. A non-adjacent range can also include multiple separate blocks, such as A1:A5, C1:C5, and E1:E5.
You may need to select non-adjacent cells when you want to format several important values, copy selected data points, compare scattered entries, fill the same value into multiple cells, or build a chart from specific ranges. Instead of performing the same action repeatedly, you can select all needed cells first and then apply the change once.
Why Learning This Skill Saves Time
Excel is often used for reports, budgets, schedules, inventory lists, invoices, dashboards, and data analysis. In real workbooks, the cells you need are rarely lined up like polite little soldiers. Your important numbers may be spread across different sections, rows, or columns. Knowing how to select multiple non-adjacent cells helps you move faster and avoid unnecessary clicking.
For example, imagine you have a monthly sales report and want to highlight only the quarterly total cells in March, June, September, and December. These totals may be in B15, E15, H15, and K15. Selecting each cell separately and formatting them one by one works, but it is slow. Selecting them together and applying bold text, fill color, or borders in one move is much smarter.
Method 1: Use Ctrl + Click to Select Non-Adjacent Cells
Best for quick selections with the mouse
The easiest way to select non-adjacent cells in Excel is to use the Ctrl key on Windows or the Command key on Mac. This method is simple, visual, and beginner-friendly. It works well when you only need to choose a handful of scattered cells or ranges.
Steps for Windows
- Open your Excel worksheet.
- Click the first cell you want to select.
- Hold down the Ctrl key.
- While holding Ctrl, click each additional cell or drag across each additional range.
- Release Ctrl when all desired cells are selected.
Steps for Mac
- Click the first cell or range.
- Hold down the Command key.
- Click or drag over the other cells or ranges you want to add.
- Release Command when finished.
For example, to select A2, C2, E2, and G2, click A2 first, hold Ctrl, and then click the remaining cells. Once selected, you can apply formatting, copy them, delete contents, or enter a value into all selected cells.
Pro Tip: Select Entire Non-Adjacent Ranges
You are not limited to single cells. You can select full blocks too. Click and drag over A2:A10, hold Ctrl, then drag over D2:D10 and G2:G10. Excel will keep each range selected. This is especially useful when formatting columns that are separated by other data.
Common Mistake
The most common mistake is releasing Ctrl too early. If you click another cell after releasing Ctrl, Excel usually clears your previous selection. It is the spreadsheet equivalent of “Oops, start over.” Keep Ctrl pressed until you have finished selecting everything.
Method 2: Use Shift + F8 to Select Non-Adjacent Cells with the Keyboard
Best for keyboard lovers and accessibility
If you prefer keyboard shortcuts, Shift + F8 is a powerful way to add non-adjacent cells or ranges to your current selection. This shortcut turns on Excel’s add-to-selection mode, allowing you to move around the sheet without losing the cells you already selected.
This method is especially helpful when you are working on a laptop trackpad, dealing with a large spreadsheet, or trying to avoid the click-and-miss frustration that happens when your mouse pointer has the precision of a sleepy raccoon.
Steps to Use Shift + F8
- Select the first cell or range.
- Press Shift + F8. In some Excel versions, this activates add-to-selection mode.
- Use the arrow keys to move to another cell.
- Select the next cell or range you want to include.
- Repeat the process until all desired cells are selected.
- Press Esc when you are done if you need to exit the mode.
Example
Suppose you want to select B4, D8, and F12 without using the mouse. Start at B4, press Shift + F8, navigate to D8, add it to the selection, then move to F12 and add it as well. Once selected, you can apply formatting or type a value.
When This Method Works Best
Shift + F8 is ideal when you know exactly where your target cells are and want a controlled keyboard-only workflow. It is also helpful when selecting cells in a very large worksheet where scrolling with a mouse can easily knock your selection off course.
Important Note for Laptop Users
On some laptops, function keys require the Fn key. If Shift + F8 does not work, try Fn + Shift + F8. Different keyboards handle function keys differently, because apparently keyboard manufacturers wanted Excel users to enjoy a tiny puzzle before breakfast.
Method 3: Use the Name Box to Select Non-Adjacent Cells
Best for precise cell references
The Name Box is the small field located to the left of the Formula Bar. It usually displays the address of the active cell, such as A1 or D12. Many users barely notice it, but it can be extremely useful for selecting exact non-adjacent cells or ranges.
This method is best when you already know the cell references you want to select. Instead of hunting around the worksheet, you can type the references directly into the Name Box.
Steps to Select Non-Adjacent Cells Using the Name Box
- Click inside the Name Box to the left of the Formula Bar.
- Type the cell references or ranges separated by commas.
- Press Enter.
Example
To select A1, C3, and E5, click the Name Box and type:
Then press Enter. Excel will select all three cells.
To select multiple non-adjacent ranges, type something like:
This selects three separate vertical ranges at once.
Why the Name Box Is So Useful
The Name Box is fast, accurate, and perfect for structured spreadsheets. If someone gives you a list of cells to check, you can enter them directly instead of manually scrolling around. It is also helpful in big workbooks where the target cells are far apart.
Practical Use Case
Imagine your manager asks you to review values in B12, G12, K12, and N12. Instead of clicking around the worksheet, type the references into the Name Box separated by commas. Excel selects them instantly, and you can format, inspect, or copy them as needed.
Method 4: Use Find and Select or Go To Special
Best for selecting cells based on conditions
Sometimes you do not know the exact cells you need. You only know the type of cells you want to select. For example, you may want to select all blank cells, all cells with formulas, all visible cells after filtering, or all cells containing a specific value. This is where Find and Select and Go To Special become very handy.
Unlike Ctrl + Click or the Name Box, this method selects cells based on rules. That makes it powerful for cleaning data, auditing formulas, preparing reports, and fixing workbook errors.
How to Use Find to Select Matching Cells
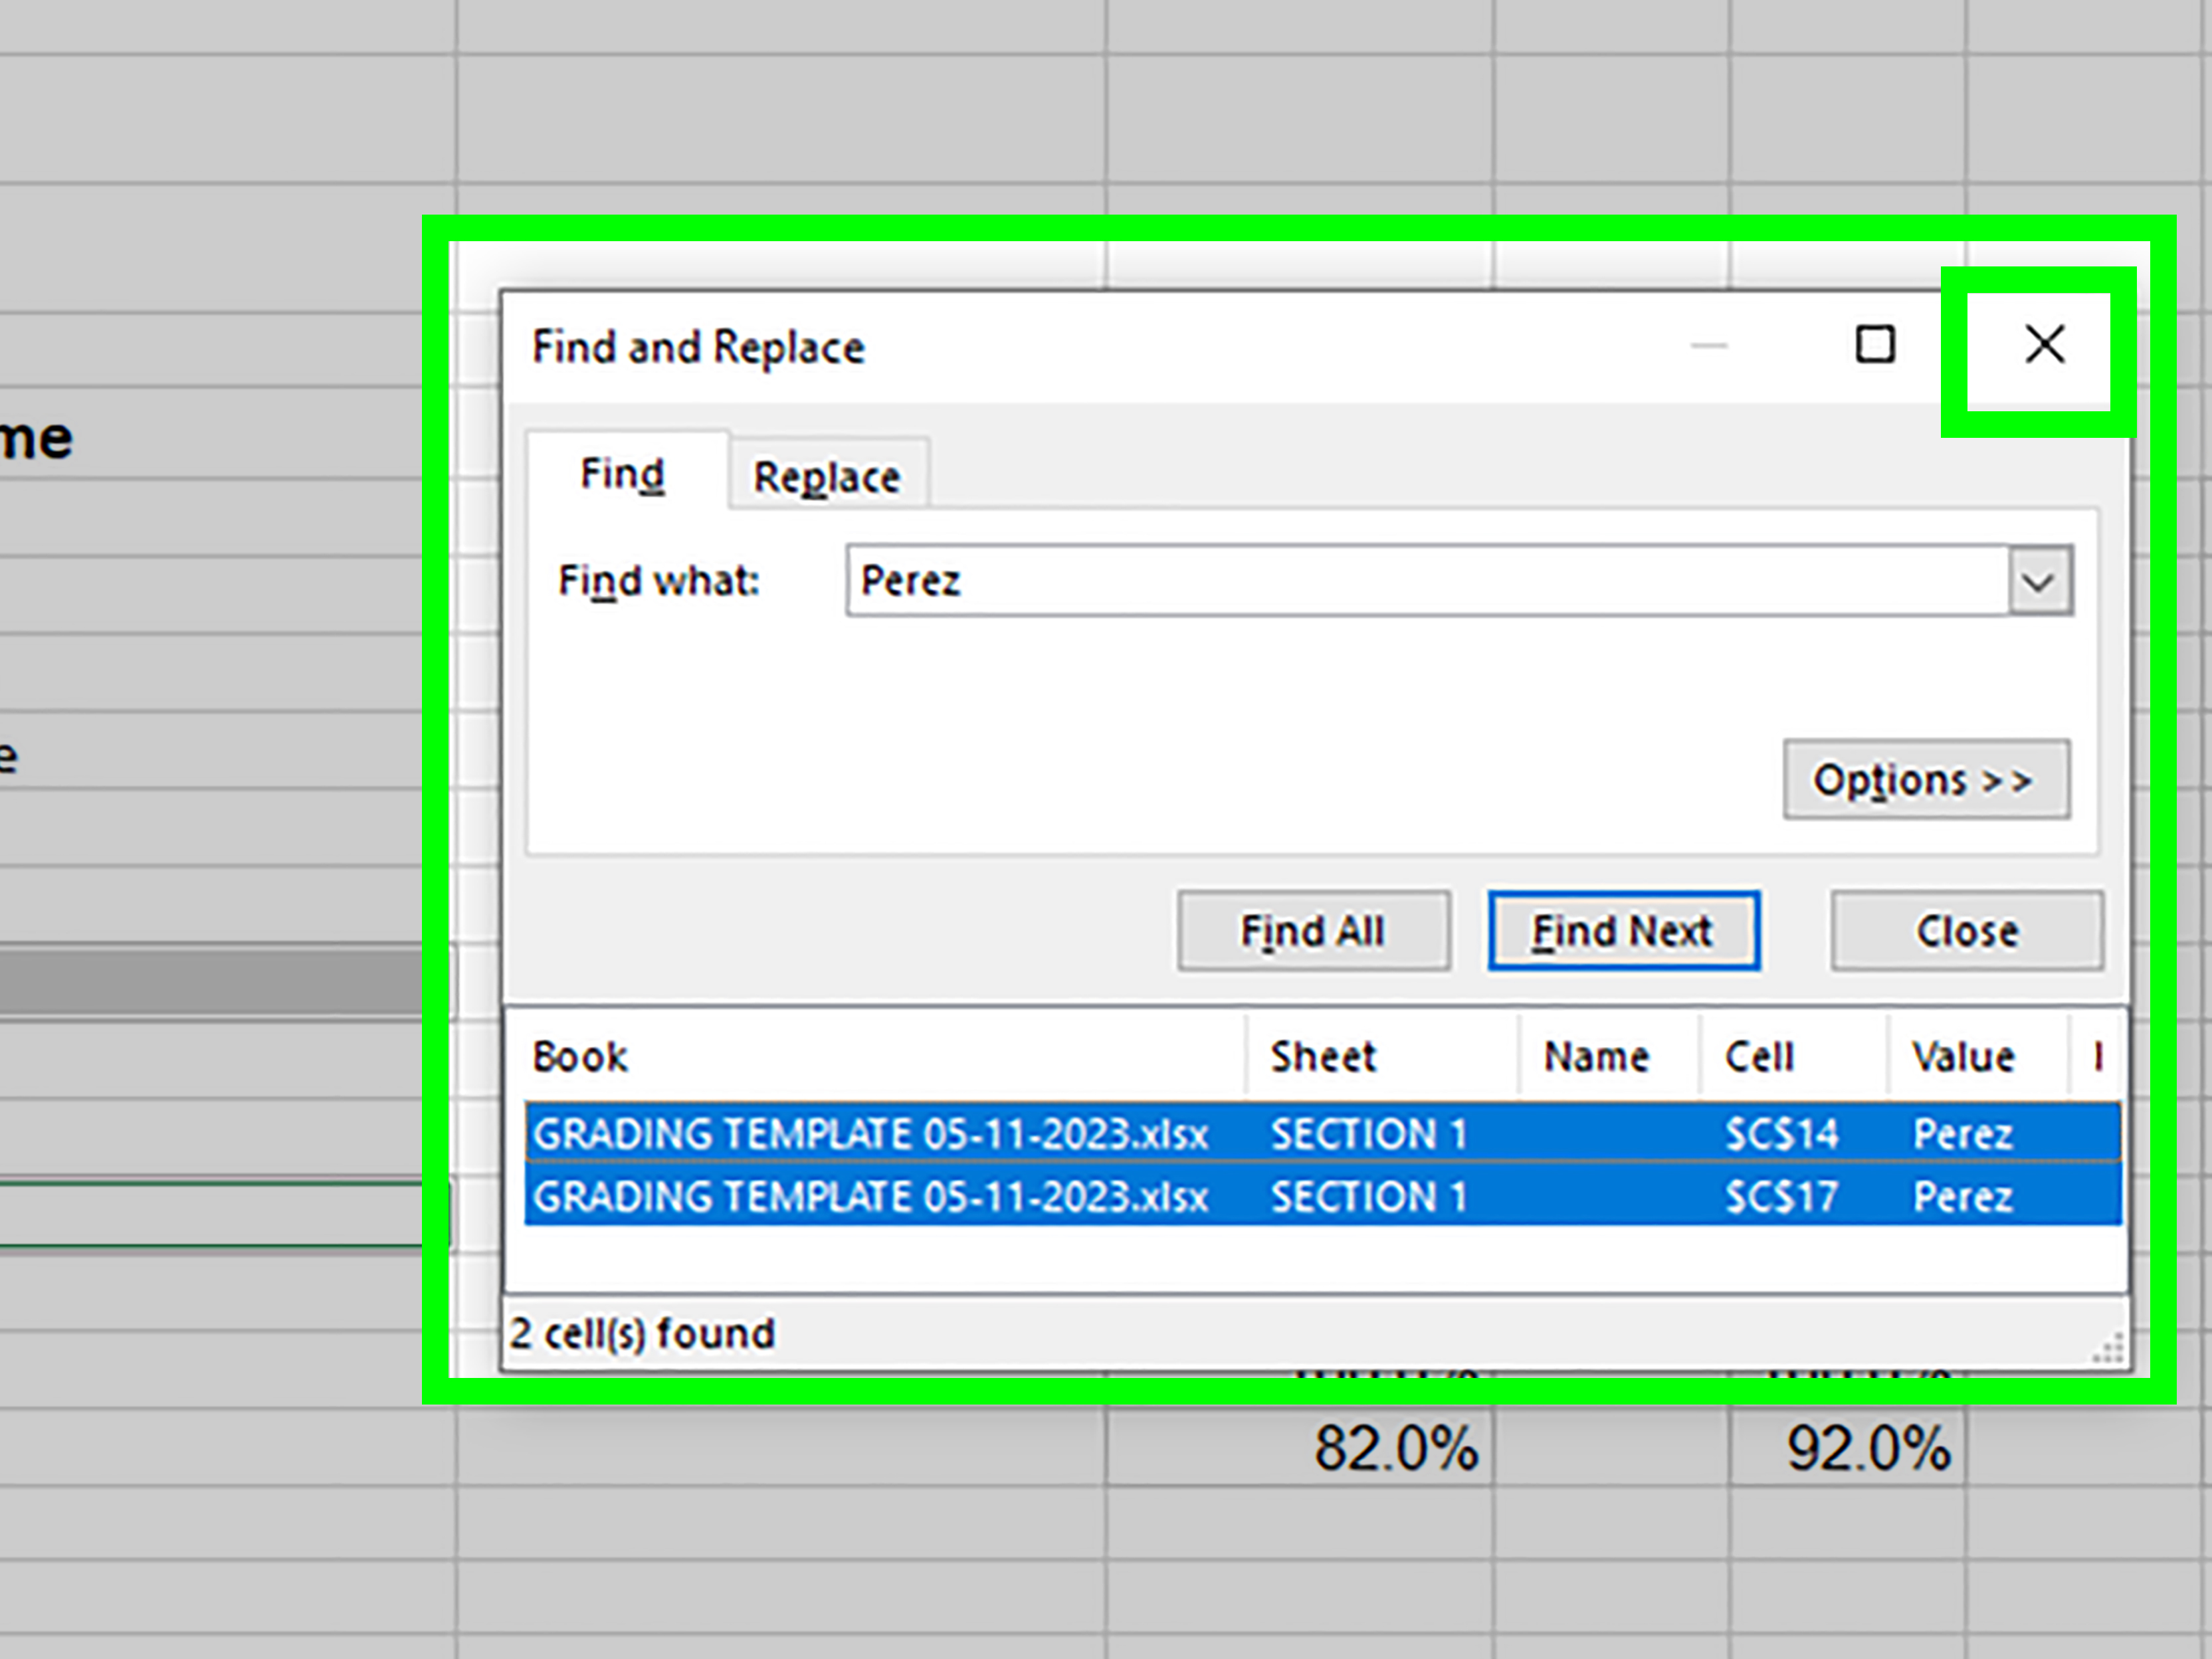
- Press Ctrl + F to open the Find dialog box.
- Type the value, text, or number you want to find.
- Click Find All.
- In the results list, select the matching results.
- Close the dialog box if needed, and Excel will keep the matching cells selected.
For example, if you want to select every cell that contains the word “Pending,” use Find All. This can instantly select scattered cells across your worksheet without manually clicking each one.
How to Use Go To Special
- Select the area of your worksheet you want to search.
- Go to Home > Find & Select > Go To Special.
- Choose the condition you need, such as Blanks, Formulas, Constants, or Visible cells only.
- Click OK.
Excel will select all cells that match the condition inside the selected area. This is incredibly useful when your target cells are spread out across a dataset.
Example: Select All Blank Cells
Suppose you have a customer list with missing email addresses. Select the email column, open Go To Special, choose Blanks, and click OK. Excel selects all blank cells in that column. You can then fill them with “Missing,” apply a highlight color, or review them one by one.
Example: Select Visible Cells Only
If your worksheet has hidden rows or filtered data, copying a range may accidentally include hidden cells. To avoid this, select the range, open Go To Special, and choose Visible cells only. This allows you to copy only what is visible on screen.
Comparing the 4 Methods
| Method | Best For | Skill Level |
|---|---|---|
| Ctrl + Click or Command + Click | Quick manual selection of scattered cells | Beginner |
| Shift + F8 | Keyboard-only selection | Intermediate |
| Name Box | Precise known cell references | Beginner to Intermediate |
| Find and Select / Go To Special | Condition-based selections | Intermediate |
What Can You Do After Selecting Non-Adjacent Cells?
Once you select non-adjacent cells in Excel, you can perform many actions at once. You can change font style, apply fill color, add borders, clear contents, copy selected values, enter the same value, format numbers, or create charts from selected ranges.
One useful trick is entering the same value into all selected cells. After selecting the non-adjacent cells, type the value you want, then press Ctrl + Enter. Excel fills that value into every selected cell. This is great for adding labels, status updates, placeholder text, or repeated formulas.
Common Problems and Fixes
Problem: My Selection Disappears
This usually happens when you click another cell without holding Ctrl or Command. To fix it, start over and keep the correct key pressed while adding cells.
Problem: Shift + F8 Does Not Work
Try using the Fn key on your keyboard. Some laptops require Fn + Shift + F8. Also check whether function keys are assigned to media controls, such as brightness or volume.
Problem: I Selected the Wrong Cell
In many cases, you cannot easily remove just one cell from a non-adjacent selection without restarting. If the selection is small, it may be faster to begin again. If the selection is large, consider using the Name Box or Go To Special for better accuracy.
Problem: Copying Non-Adjacent Cells Gives Unexpected Results
Excel may paste non-adjacent selections differently depending on the shape of your selected ranges. If you need a clean copy, try selecting ranges with the same size and structure. For complex copying tasks, consider using filters, helper columns, or Power Query instead of forcing Excel to guess your intentions like a spreadsheet fortune teller.
Best Practices for Selecting Non-Adjacent Cells
Start with the simplest method. If you only need three or four cells, Ctrl + Click is perfect. If you have a long list of exact references, use the Name Box. If you need cells that match a pattern, use Find and Select or Go To Special. If you want a keyboard-driven workflow, practice Shift + F8 until it becomes natural.
Also, avoid selecting too many random cells manually when a rule-based method would work better. For example, do not spend ten minutes clicking blank cells one by one when Go To Special can select them in seconds. Excel is powerful, but it rewards users who choose the right tool instead of wrestling with the worksheet like it owes them money.
Experience-Based Tips for Working With Non-Adjacent Cells in Excel
After working with many Excel sheets, one lesson becomes clear: selecting non-adjacent cells is not just a small trick. It is a practical skill that makes spreadsheet work feel smoother, cleaner, and less frustrating. The first time most users discover Ctrl + Click, it feels like finding a hidden door in a room they have walked through for years.
In real business files, non-adjacent selection is especially useful for reports that have repeated sections. For example, a sales workbook may show each region in a separate block, with totals at the bottom of each block. If you want to format only the total cells, you can hold Ctrl and select each total row. Then you can apply bold text, a top border, and currency formatting all at once. This makes the report look consistent without wasting time formatting each section separately.
Another common experience involves cleaning imported data. Data exported from websites, accounting systems, customer relationship management tools, or inventory software often contains blank cells in awkward places. Instead of scrolling through hundreds or thousands of rows, Go To Special can select blanks instantly. From there, you can highlight missing values, fill them with placeholders, or delete problem rows after reviewing them. This is much safer than randomly sorting the data and hoping everything still makes sense afterward.
The Name Box is underrated in professional workflows. When working with formulas, dashboards, or audit sheets, you may already know exactly which cells need attention. Typing references such as B5,D5,F5,H5 into the Name Box is faster and more accurate than dragging around a busy worksheet. It also reduces the risk of accidentally selecting the wrong cell, especially when columns are narrow or the workbook is zoomed out.
For keyboard users, Shift + F8 can feel strange at first. It is not as instantly obvious as Ctrl + Click, but it becomes valuable when your hands are already on the keyboard. Analysts, accountants, students, and anyone who spends long hours in Excel may appreciate not having to switch constantly between keyboard and mouse. Once you learn the rhythm, keyboard-based selection can make data review faster.
One practical habit is to decide your selection method before you start clicking. Ask yourself: Do I know the exact cells? Use the Name Box. Are the cells visually easy to spot? Use Ctrl + Click. Do I need cells with a condition, such as blanks or formulas? Use Go To Special. Do I want to avoid the mouse? Use Shift + F8. This tiny decision can save a surprising amount of time.
It is also smart to zoom in when manually selecting scattered cells. Many selection mistakes happen because the worksheet is too zoomed out, columns are too thin, or the user is rushing. Zooming to 120% or 130% can make it easier to click accurately. Your spreadsheet will not judge you. It has seen worse.
Finally, remember that selecting non-adjacent cells is often the first step, not the final goal. The real value comes from what you do next: format important numbers, fill missing values, copy selected data, inspect formulas, or prepare a cleaner report. Once you master these four methods, Excel feels less like a maze and more like a tool you can actually control.
Conclusion
Learning how to select non-adjacent cells in Excel is a small skill with a big payoff. You can use Ctrl + Click for quick manual selections, Shift + F8 for keyboard control, the Name Box for precise references, and Find and Select or Go To Special for condition-based selections. Each method has its place, and the best one depends on what you are trying to accomplish.
If you work with reports, budgets, lists, formulas, or messy imported data, this skill can save time and reduce errors. Instead of repeating the same task over and over, select the cells you need once and apply your action in a single move. Excel may still have its mysterious moments, but at least non-adjacent cell selection will no longer be one of them.