Setting up a Thunderbird email account is one of those tasks that sounds simple until a tiny checkbox, server name, or authentication setting decides to behave like a raccoon in a keyboard factory. The good news? Mozilla Thunderbird is designed to make email setup easier than it used to be. In many cases, you enter your name, email address, and password, click a button, and Thunderbird finds the correct IMAP, POP, and SMTP settings automatically.
Still, real life has plot twists. Gmail may ask for OAuth2. Outlook may require modern authentication. Yahoo may want an app password or OAuth2 depending on your account. iCloud Mail usually expects an app-specific password. Business email accounts may come with custom server settings from your hosting provider or IT department. This complete guide walks you through the clean, practical way to set up Thunderbird without turning your desk into a snack-covered troubleshooting shrine.
What Is Thunderbird and Why Use It?
Thunderbird is a free, open-source email client that lets you manage multiple email accounts from one desktop app. Instead of opening Gmail in one browser tab, Outlook in another, and your custom domain email in yet another tab, Thunderbird brings everything into one organized place. It supports common email protocols such as IMAP, POP, and SMTP, and it works with major providers including Gmail, Outlook, Yahoo Mail, iCloud Mail, and many custom business email services.
The biggest advantage is control. You can organize messages with folders, filters, tags, search tools, signatures, local archives, and a unified inbox. For people who handle several accounts, Thunderbird can feel like going from a messy junk drawer to a labeled toolbox. Same emails, fewer headaches.
Before You Start: Gather These Details
Before setting up a Thunderbird email account, collect a few basics. You need your full email address, your account password, and access to your phone or browser if your provider uses two-step verification. If your account belongs to a school, company, hosting plan, or custom domain, you may also need manual server settings.
Basic Information You Need
- Your display name, such as “Alex Johnson” or your business name.
- Your full email address, including the part after the @ symbol.
- Your password, app password, or provider sign-in approval.
- Incoming mail settings, usually IMAP or POP.
- Outgoing mail settings, usually SMTP.
IMAP vs. POP: Which One Should You Pick?
For most users, IMAP is the better choice. IMAP keeps email synced across devices, so when you read, delete, move, or archive a message in Thunderbird, the change appears on your phone and webmail too. POP downloads messages to your computer and may not sync changes cleanly across devices. POP can still be useful for special cases, such as keeping a local-only archive, but for modern email life, IMAP is usually the smooth road.
Step 1: Download and Install Thunderbird
Start by downloading Thunderbird from the official Thunderbird website. Choose the version for your operating system, such as Windows, macOS, or Linux. Install it like any normal desktop application. On Windows, you may see an option to make Thunderbird your default email application. Choose that only if you want mail links on websites to open in Thunderbird automatically.
After installation, open Thunderbird. If this is your first time using it, the app may immediately show an account setup screen. If Thunderbird opens to the main interface instead, you can start setup manually from the application menu.
Step 2: Open the Existing Email Setup Screen
In Thunderbird, open the main menu and choose the option to add an existing email account. The wording may vary slightly by version, but the usual path is:
Menu → New Account → Existing Email
You will see fields for your name, email address, and password. Enter your name the way you want recipients to see it. Use your full email address, not just the username. For example, enter [email protected], not simply alex. If you are using a provider that supports OAuth2, Thunderbird may not actually store your normal password; it may open a secure sign-in window from the provider instead.
Step 3: Let Thunderbird Find the Settings Automatically
After you enter your information, click Continue. Thunderbird will check its configuration database and try to find the right incoming and outgoing server settings. This automatic configuration works well for many common providers. In most cases, Thunderbird will recommend IMAP because it is better for syncing mail across computers, phones, tablets, and webmail.
Review the detected settings before clicking Done. Look for three important things: the incoming server, the outgoing server, and the authentication method. For Gmail, Outlook, Yahoo, and many modern providers, OAuth2 is often preferred because it lets you sign in through the provider’s secure login page instead of handing your main password directly to the email client.
Step 4: Use Manual Configuration When Needed
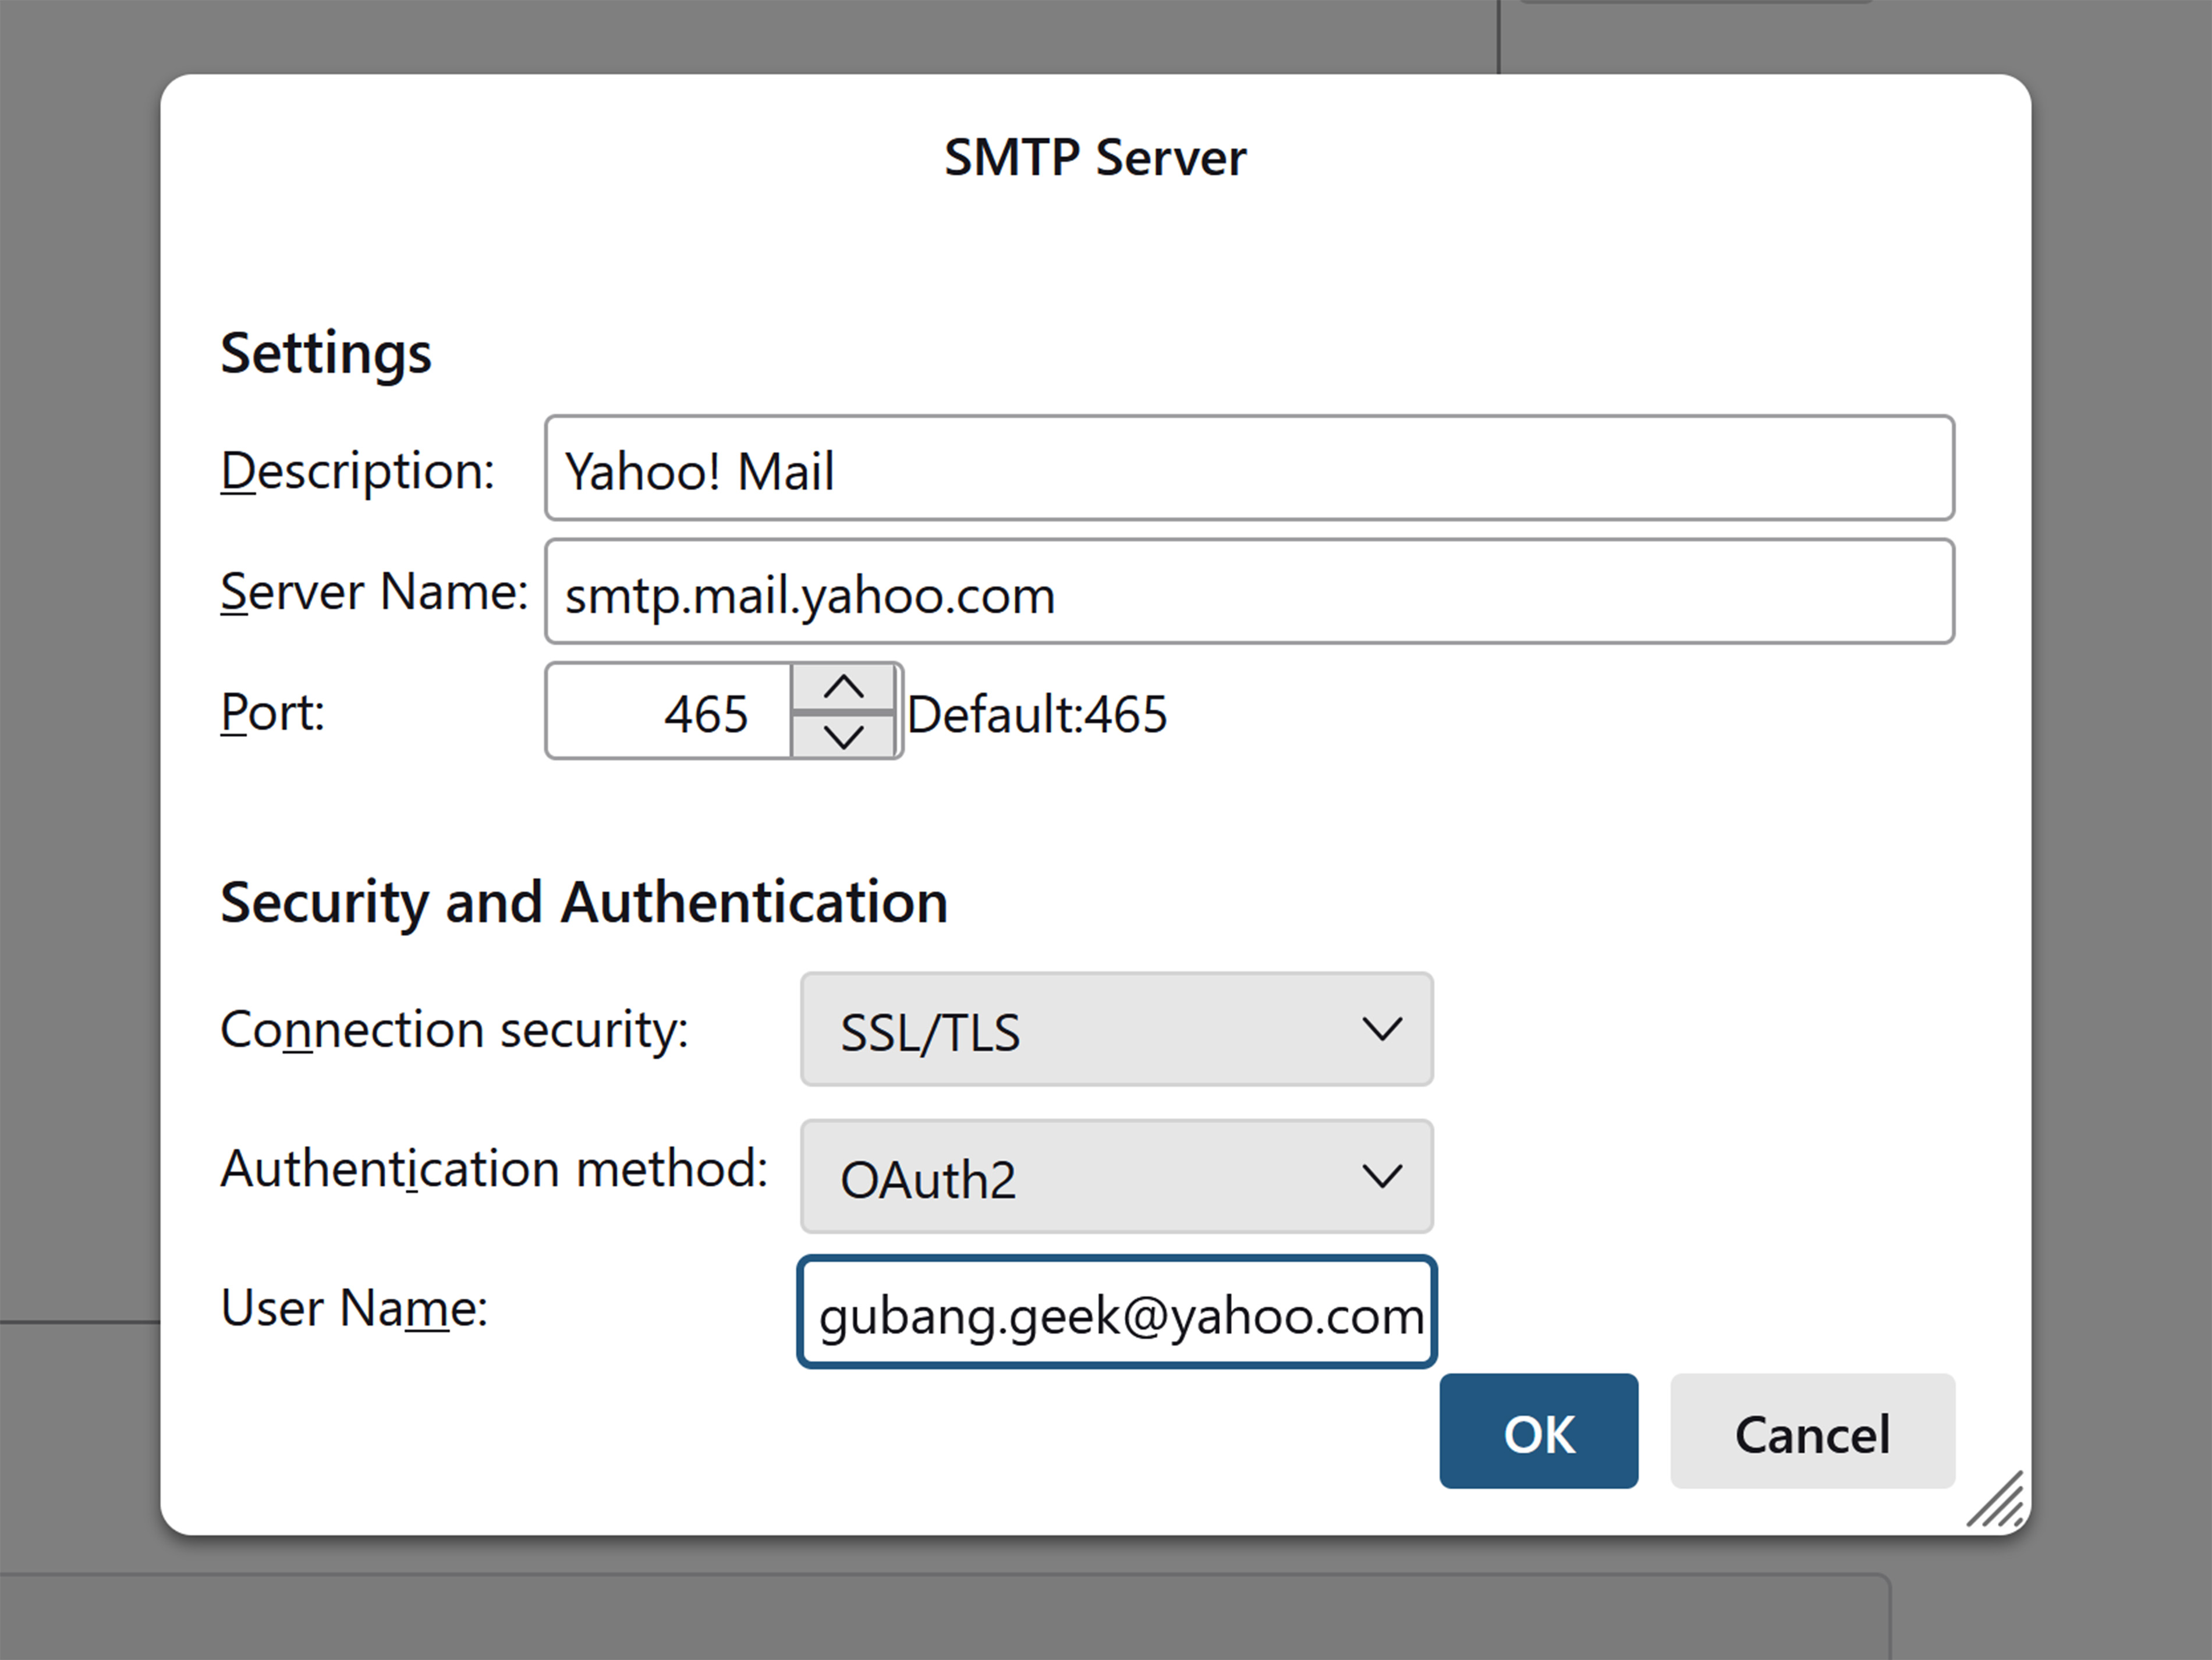
If Thunderbird cannot find your provider settings, choose Configure Manually. Manual setup is not scary; it is basically filling out a small form. The important pieces are the server hostname, port number, connection security, authentication method, and username.
Common Provider Settings
| Email Provider | Incoming Server | Outgoing Server | Authentication Notes |
|---|---|---|---|
| Gmail | imap.gmail.com, port 993, SSL/TLS | smtp.gmail.com, port 465 SSL/TLS or 587 STARTTLS | Use OAuth2 when available. IMAP may need to be enabled in Gmail settings for some accounts. |
| Outlook.com / Microsoft 365 | outlook.office365.com, port 993, SSL/TLS | smtp.office365.com, port 587, STARTTLS | Use OAuth2 or modern authentication. Business accounts may need SMTP AUTH enabled by an administrator. |
| Yahoo Mail | imap.mail.yahoo.com, port 993, SSL | smtp.mail.yahoo.com, port 465 or 587, SSL | Use OAuth2 when supported, or an app password if your account requires one. |
| iCloud Mail | imap.mail.me.com, port 993, SSL | smtp.mail.me.com, port 587, TLS/STARTTLS | Use your full iCloud email address and an app-specific password. |
| Custom Domain Email | Provided by your host or IT department | Provided by your host or IT department | Use the exact server settings from your hosting control panel or administrator. |
Always use your full email address as the username unless your provider specifically says otherwise. Many setup failures happen because someone enters “alex” when the server expects “[email protected].” Email servers are picky little creatures.
Step 5: Understand OAuth2, App Passwords, and Normal Passwords
Email authentication has changed a lot. In the old days, many mail clients simply used your normal account password. Today, major providers prefer safer methods. OAuth2 opens a secure provider login window and gives Thunderbird permission to access your mail without storing your main account password in the same old-fashioned way.
App passwords are different. An app password is a special password generated for one app or device. It is commonly used when two-step verification is turned on and the app cannot use the provider’s preferred sign-in method. For example, iCloud Mail commonly uses app-specific passwords for third-party email clients. Gmail generally recommends modern sign-in methods when available, while app passwords are only for certain account situations.
Simple Rule
If Thunderbird offers OAuth2 for your provider, try OAuth2 first. If your provider specifically tells you to create an app password, use the app password instead of your normal account password. If your company or school manages the account, ask the administrator which authentication method is allowed.
Step 6: Finish Setup and Test Sending Mail
Once your incoming and outgoing settings look correct, click Done. Thunderbird may open a browser-style login window for Gmail, Outlook, Yahoo, or another provider. Sign in, approve access, and return to Thunderbird. Your inbox should begin syncing. Large mailboxes may take time, especially if you have years of messages, attachments, newsletters, receipts, and that one promotional email from 2014 you somehow never deleted.
Do not stop after receiving mail. Always test sending mail too. Create a short message and send it to another account you control. Then reply back. This confirms that both IMAP and SMTP are working. Many users discover that incoming mail works perfectly while outgoing mail fails because the SMTP server uses a different port, security setting, or authentication method.
Step 7: Customize Thunderbird After Setup
Once the account works, spend a few minutes adjusting Thunderbird so it fits your workflow. A good setup is not just “email appears.” A good setup helps you find, send, sort, and protect messages without thinking too hard.
Turn On a Unified Inbox
If you use multiple accounts, Thunderbird can show them separately or combine them in a unified inbox. A unified inbox is helpful if you want one main view for all new mail. Separate inboxes are better if you need a strong wall between personal, school, business, and client accounts.
Create a Signature
Go to account settings and add an email signature if you want your name, job title, website, or phone number to appear automatically. Keep it short. A signature should be a handshake, not a billboard.
Set Up Folders and Filters
Folders and message filters are where Thunderbird becomes powerful. You can automatically move newsletters, invoices, client emails, school updates, or family messages into specific folders. Filters are especially useful for busy inboxes because they reduce the daily “where did that email go?” treasure hunt.
Check Sync and Storage Settings
Thunderbird can keep local copies of messages for offline access. This is convenient, but it can use disk space if your mailbox is huge. Review synchronization settings if your computer has limited storage.
Troubleshooting Thunderbird Email Setup Problems
If setup fails, do not panic. Most Thunderbird account setup problems come from a small mismatch: wrong password, wrong authentication method, wrong SMTP server, old saved credentials, blocked cookies, VPN interference, or a provider security setting.
Problem: Thunderbird Says “Unable to Log In at Server”
First, confirm that you can sign in to webmail in a browser. If webmail fails, Thunderbird is not the problem. If webmail works, check whether the email account requires OAuth2, an app password, or IMAP access enabled in account settings. For Gmail, confirm IMAP access is allowed. For iCloud, generate an app-specific password. For work or school Microsoft 365 accounts, ask whether SMTP AUTH and third-party mail clients are permitted.
Problem: Receiving Works, Sending Fails
This usually points to SMTP settings. Open Account Settings, find the outgoing server section, and verify the server name, port, connection security, username, and authentication method. For Microsoft accounts, using the wrong SMTP hostname can prevent OAuth2 from appearing as an option. For custom hosting, the outgoing server may be different from the incoming server.
Problem: Thunderbird Keeps Asking for the Password
Remove old saved passwords from Thunderbird’s password manager and try again. This helps when you changed your account password, switched to OAuth2, or created a new app password. Restart Thunderbird after clearing old credentials.
Problem: The Provider Login Window Will Not Open
Check that Thunderbird is updated. Also make sure cookies and JavaScript are not blocked inside Thunderbird’s settings. Temporarily disable VPNs, strict firewalls, or security tools that may interrupt the login window. You can re-enable them after setup, but during authentication they can sometimes act like overprotective bouncers.
Problem: Certificate Warning Appears
A certificate warning can be harmless on some private servers, but never ignore it blindly. Check the server name carefully. If you are using a business or hosting provider, compare the certificate warning with the official settings from your provider. If the warning appears on a major provider such as Gmail, Outlook, Yahoo, or iCloud, stop and recheck the hostname.
Security Best Practices for Thunderbird Email Accounts
Use two-step verification on important email accounts whenever possible. Use OAuth2 when your provider supports it. If you must use an app password, generate a unique one for Thunderbird and revoke it if you stop using the app. Do not reuse your main email password across random programs, devices, or old computers.
Keep Thunderbird updated. Updates improve security, compatibility, and provider support. Also back up your Thunderbird profile before moving computers, reinstalling your operating system, or making major changes. Thunderbird stores account settings, messages, address books, and preferences in a profile folder. The built-in export tool can help create a backup, but very large profiles may need extra care.
When Should You Use Manual Setup Instead of Automatic Setup?
Automatic setup is best for common email providers. Manual setup is better when you use a custom domain, private mail server, company account, school account, or hosting service. Manual setup is also useful when Thunderbird detects settings that are technically valid but not ideal for your situation. For example, you may prefer IMAP over POP, or your provider may require a specific SMTP port for outgoing mail.
Manual setup gives you control. It lets you choose the right protocol, security type, and authentication method. Think of automatic setup as cruise control and manual setup as steering through a narrow parking garage. Most days, cruise control is wonderful. Some days, you want both hands on the wheel.
Real-World Experience: What Actually Helps During Setup
After helping people set up Thunderbird accounts many times, one pattern becomes obvious: the problem is rarely Thunderbird alone. Usually, Thunderbird is doing exactly what it was told to do, while the email provider is standing nearby with a clipboard saying, “Actually, we changed the rules.” That is why the best setup habit is to verify the provider’s current requirements before blaming the app.
One common example is Gmail. A user enters the correct Gmail password, Thunderbird rejects it, and everyone stares at the screen like it insulted the family. The real issue is often authentication. If OAuth2 is available, choose it for both incoming and outgoing servers. If the incoming server uses OAuth2 but the SMTP server uses normal password, receiving may work while sending fails. That mismatch is easy to miss because the inbox looks successful at first.
Outlook and Microsoft 365 accounts create a different kind of confusion. Personal Outlook.com accounts and organization-managed Microsoft 365 accounts can behave differently. A personal account may work after OAuth2 sign-in, while a business account may need administrator permission for SMTP authentication or third-party client access. In that case, changing the password twelve times will not help. It only creates a new hobby called “suffering.”
Yahoo Mail and iCloud Mail are also good reminders that app passwords still matter. With iCloud, an app-specific password is usually the correct path for Thunderbird. With Yahoo, the answer can depend on account security settings and whether OAuth2 is used. The practical lesson is simple: when your normal password fails, do not assume you typed it wrong. Check whether the provider wants OAuth2 or a special app password.
Custom domain email has its own personality. Hosting companies may use server names like mail.example.com, imap.hostingcompany.com, or a branded mail server that looks nothing like your domain. The username may be your full email address. The outgoing server may require authentication even if the incoming server already works. The most reliable trick is to copy the exact IMAP and SMTP settings from the hosting control panel into Thunderbird, then test receiving and sending separately.
The final experience-based tip is to document your working setup. Save the incoming server, outgoing server, ports, security settings, and authentication method in a password manager note or private setup file. Do not store the actual password in a plain text document, but do save the configuration details. Future you will appreciate it, especially when moving to a new laptop at 11:47 p.m. with a deadline nearby and snacks running dangerously low.
Conclusion
Setting up a Thunderbird email account is straightforward when you understand the moving parts. Start with automatic configuration, choose IMAP for normal syncing, use OAuth2 when available, and switch to manual setup when your provider requires specific IMAP, POP, or SMTP settings. Always test both receiving and sending, because email setup is a two-door system: incoming mail gets you into the building, but SMTP lets you leave with style.
Thunderbird remains a practical choice for anyone who wants to manage multiple accounts in one place without living inside a browser tab jungle. With the right server settings, authentication method, and a little patience, your Thunderbird inbox can become clean, reliable, and pleasantly boringwhich, in email management, is basically paradise.