Apple Messages is wonderfully convenient right up until your texts start showing up on a shared iPad, an old MacBook, or the family computer in the kitchen. Suddenly, “Can you pick up milk?” becomes a privacy event worthy of a documentary soundtrack. The good news: learning how to sign out of Apple Messages is not difficult once you know which setting controls what.
The tricky part is that “Apple Messages” can mean a few different things. On iPhone and iPad, you may want to sign out of your Apple Account for iMessage, turn off iMessage entirely, stop message syncing through iCloud, or deregister your phone number before switching to Android. On Mac, you may need to sign out inside the Messages app itself. Each option solves a different problem, so this guide walks you through the clean, practical version in 11 steps.
Below, you’ll learn how to sign out of Messages on iPhone, iPad, and Mac, how to stop messages from appearing on other Apple devices, and what to check afterward so your blue bubbles do not behave like tiny digital gremlins.
Before You Sign Out: Know What You Actually Want to Do
Before tapping buttons like a game-show contestant, pause for one minute. Signing out of Apple Messages can mean three different things:
Signing out of iMessage
This removes your Apple Account from iMessage on a specific device. It is useful when you are sharing a device, troubleshooting iMessage, changing Apple Accounts, or selling a Mac or iPad.
Turning off iMessage
This disables Apple’s iMessage service on that device. On iPhone, your conversations may switch to SMS, MMS, or RCS depending on your carrier, device, and recipient. Green bubbles may appear, and yes, group chats may suddenly feel like they moved into a different weather system.
Deregistering iMessage
This matters when you leave iPhone for a non-Apple phone. If your number is still registered with iMessage, texts from iPhone users may keep trying to arrive as iMessages instead of regular texts. Deregistering tells Apple, “This number lives outside the blue bubble kingdom now.”
How to Sign Out of Apple Messages: 11 Steps
Use these 11 steps as a complete checklist. You may not need every step, but following the sequence helps prevent missed messages, surprise syncing, and the classic “why is my old laptop still receiving texts?” mystery.
Step 1: Back Up or Save Important Conversations
Before signing out, save anything important. If Messages in iCloud is enabled, your messages may sync across devices, but you should still be careful before making big account changes. Take screenshots, copy key details, export information manually, or make sure your device backup is current.
This is especially important if the device is being erased, sold, repaired, or handed to another person. Signing out of iMessage does not automatically create a neat scrapbook of every conversation. Apple is good, but it is not your personal archivist wearing a tiny cardigan.
Step 2: Open Messages Settings on iPhone or iPad
On recent iPhone and iPad software, open the Settings app, tap Apps, then tap Messages. On some older versions, you may see Messages directly in the main Settings list.
This screen controls iMessage, Send & Receive addresses, Text Message Forwarding, message filtering, audio message behavior, and other messaging features. For signing out, the most important area is usually Send & Receive.
Step 3: Tap Send & Receive
Inside Messages settings, tap Send & Receive. This section shows the phone numbers and email addresses that can receive iMessages and start new conversations. If your Apple Account is connected, you should see it listed on this screen.
This is also the place to check whether your messages are starting from your phone number or an email address. If friends say your texts are suddenly coming from an email instead of your number, this screen is the first place to investigate.
Step 4: Tap Your Apple Account and Choose Sign Out
Tap your Apple Account in the Send & Receive screen, then choose Sign Out. This signs the device out of iMessage for that Apple Account. Your phone number may still be available for regular carrier messaging on iPhone, but your Apple Account email addresses will no longer be active for iMessage on that device.
This step is ideal when you want to stop iMessages tied to your Apple Account from appearing on a particular iPhone or iPad. It is also helpful if you accidentally signed into Messages with the wrong Apple Account, which is a surprisingly easy mistake when devices are passed around in a household.
Step 5: Turn Off iMessage If You Want to Disable It Completely
If your goal is to stop using iMessage on the device entirely, go back to Settings, tap Apps, tap Messages, and turn off iMessage.
Turning off iMessage is stronger than simply removing an email address. On iPhone, it tells the device not to use Apple’s iMessage service. This is useful before switching phones, troubleshooting activation issues, or temporarily forcing messages to send through carrier-based texting.
After turning it off, send a test message to someone who uses an iPhone. If the bubble is green, that usually means the message is not traveling through iMessage. Do not panic. The bubble has not betrayed you; it is just using another route.
Step 6: Turn Off FaceTime Too If You Are Leaving iPhone
If you are switching from iPhone to Android or another non-Apple phone, turn off FaceTime as well. Go to Settings, tap Apps, tap FaceTime, and turn off FaceTime.
Why does FaceTime matter in a Messages article? Because Apple often links your phone number to both iMessage and FaceTime. If you are leaving the Apple ecosystem, turning off both services gives your number a cleaner break. Think of it as closing both the front door and the side gate.
Step 7: Deregister iMessage If You No Longer Have the iPhone
If you already sold, lost, traded in, or factory-reset the iPhone, you can still deregister your phone number from iMessage using Apple’s deregistration tool online. You enter your phone number, receive a confirmation code by text, and submit that code to remove the number from iMessage.
This step matters most for people who moved to Android and stopped receiving some texts from iPhone users. If iMessage still thinks your phone number belongs to an iPhone, messages may get routed incorrectly. Deregistering helps future messages arrive as standard texts instead.
Step 8: Sign Out of Messages on Mac
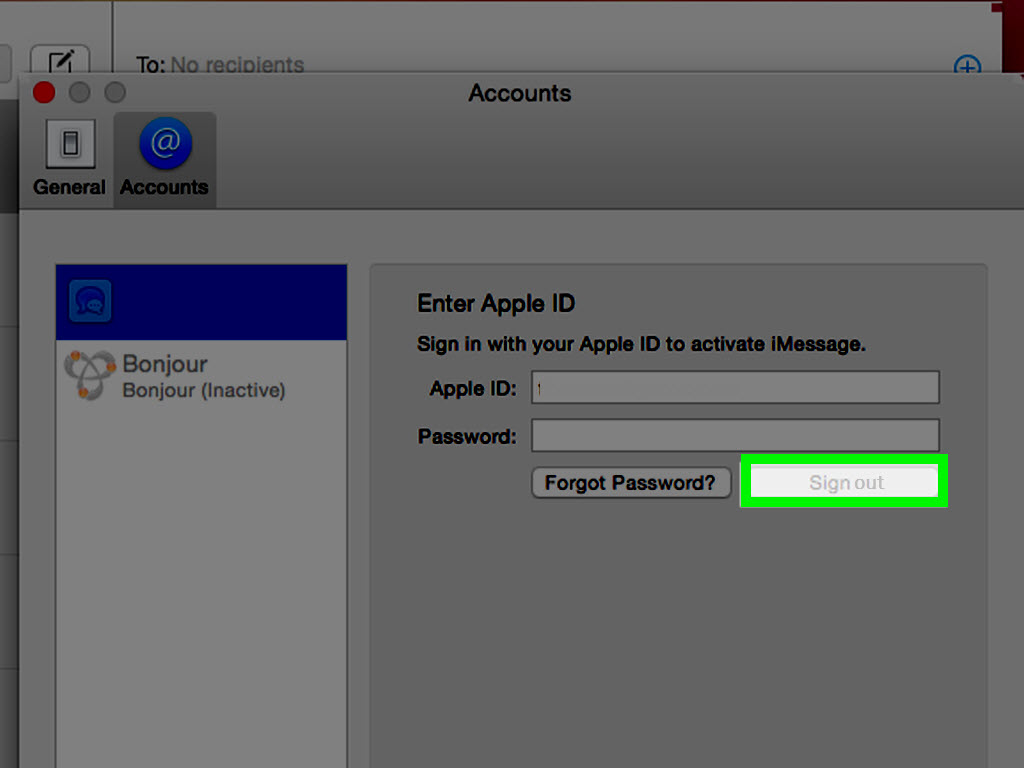
On a Mac, open the Messages app. In the menu bar, choose Messages, then Settings. Click the iMessage tab, then click Sign Out.
This is the direct way to sign out of Apple Messages on Mac. It stops that Mac from sending and receiving iMessages through your Apple Account. It is a smart move before selling a Mac, sharing a computer, sending it for repair, or lending it to someone who does not need a front-row seat to your group chats.
If you only want fewer interruptions, you may not need to sign out. You can adjust notifications instead. But if privacy is the goal, signing out is cleaner than simply muting alerts. Muting is like closing the curtains; signing out is like moving the conversation to another house.
Step 9: Disable Messages in iCloud If You Want Syncing to Stop
Messages in iCloud keeps your messages updated across devices signed in with the same Apple Account. That can be excellent when you own all the devices. It can be less charming when an old iPad on the coffee table becomes a message billboard.
On Mac, open Messages, choose Messages > Settings, click iMessage, and deselect Enable Messages in iCloud. On iPhone or iPad, check your iCloud settings and Messages settings to manage whether Messages uses iCloud syncing.
Disabling Messages in iCloud on one device can stop that device from syncing message changes through iCloud. Read the prompts carefully because Apple may ask whether you want to disable syncing on one device or across devices.
Step 10: Turn Off Text Message Forwarding
If SMS messages from your iPhone are showing up on your Mac or iPad, check Text Message Forwarding. On iPhone, go to Settings, tap Apps, tap Messages, then tap Text Message Forwarding. Turn off any devices that should not receive texts from your iPhone.
This step is especially helpful if you still want iMessage on your iPhone but do not want regular texts copied to another Apple device. It separates “I want Messages on my phone” from “I want my Mac to announce every bank code, delivery update, and family group chat while I’m in a meeting.”
Step 11: Check Your Apple Account Device List
After signing out, review the devices connected to your Apple Account. On iPhone or iPad, open Settings, tap your name, and scroll down to see signed-in devices. On Mac, open System Settings, click your name, and review the device list.
If you see a device you no longer own or recognize, remove it from your account after reviewing Apple’s warning prompts. This is an important privacy step. Signing out of Messages is helpful, but making sure old devices are no longer tied to your Apple Account is even better.
What Happens After You Sign Out of Apple Messages?
After you sign out, that device should stop sending and receiving iMessages through your Apple Account. Existing conversations may remain visible on the device unless you delete them, erase the device, or disable syncing in a way that removes local copies. Signing out is not the same as wiping message history.
On iPhone, turning off iMessage may cause messages to send as SMS, MMS, or RCS depending on your carrier and settings. On Mac and iPad, signing out usually means the Messages app can no longer use your Apple Account for iMessage until you sign in again.
If you are switching away from iPhone, wait a little while and ask an iPhone-using friend to text you. If the message arrives on your new phone as a regular text, you are probably in good shape. If messages still fail, use Apple’s iMessage deregistration tool and check that your number is no longer tied to iMessage.
Common Problems and Easy Fixes
Messages Still Show Up on Another Device
Check three things: Send & Receive, Messages in iCloud, and Text Message Forwarding. A device may be signed out of one feature but still receiving messages through another route. Apple’s ecosystem is convenient, but sometimes convenience wears roller skates.
You Do Not See the Sign Out Option
Make sure you are in the correct place. On iPhone or iPad, look under Messages > Send & Receive. On Mac, look inside the Messages app under Messages > Settings > iMessage. If you are trying to sign out of your entire Apple Account, that is handled in device-level Apple Account settings, not only inside Messages.
Your Phone Number Will Not Activate Again
If you turn iMessage back on and see an activation message for a while, check your cellular connection, restart the device, and confirm that your phone number appears in Send & Receive. If you recently added an eSIM or changed carriers, toggling iMessage off and back on may help the device recognize the number correctly.
You Are Selling or Giving Away a Device
Do more than sign out of Messages. Sign out of your Apple Account, turn off Find My if required, erase the device, and remove it from your trusted device list. Messages privacy is one part of the handoff, but your photos, iCloud data, saved passwords, and payment settings deserve attention too.
Privacy Tips for Apple Messages
Signing out is useful, but good message privacy is broader than one button. Use separate Apple Accounts for different people instead of sharing one account across a family. Family Sharing is designed for shared purchases and subscriptions without mixing everyone’s private messages into one emotional soup.
Also review which email addresses are enabled for iMessage. If you do not want people reaching you through an old email address, uncheck it in Send & Receive. Choose your preferred “Start New Conversations From” address carefully so new chats come from the identity you actually want people to see.
Finally, use a strong Apple Account password and two-factor authentication. If someone signs in to your Apple Account, messages and verification codes can become a security risk. Treat your Apple Account like the front door to your digital life, not like a spare key hidden under a suspiciously obvious flowerpot.
When Should You Sign Out of Apple Messages?
You should sign out of Apple Messages when you are selling, trading, donating, or lending a device; when your messages appear somewhere they should not; when you are troubleshooting iMessage; when you are changing Apple Accounts; or when you are switching from iPhone to a non-Apple phone.
You may not need to sign out if you only want silence. In that case, turn off notifications, hide previews, or use Focus modes. Signing out is best for privacy, account changes, and device cleanup. Notification settings are best for peace and quiet. One solves access; the other solves annoyance. Both are noble causes.
Personal Experience: What Signing Out of Apple Messages Is Really Like
The first time many people learn how to sign out of Apple Messages is not during a calm Saturday afternoon with tea and perfect lighting. It is usually during a tiny emergency. Maybe your Mac starts pinging during a Zoom call. Maybe your iPad receives a private message while someone else is using it to watch a recipe video. Maybe you switch to a new phone and realize your texts are wandering through Apple’s servers like tourists without a map.
In real life, the biggest lesson is that Messages is not just one app. It is a web of iMessage, Apple Account settings, phone numbers, email addresses, iCloud syncing, and forwarding. That sounds dramatic, but it explains why one toggle does not always fix everything. You can sign out of iMessage on a Mac and still have your iPhone forwarding SMS messages. You can turn off iMessage on your phone but still see old conversations stored locally. You can remove one email address and forget that another address is still checked. It is less “one big red button” and more “small control panel on a spaceship.”
A practical habit is to check devices in pairs. If you change something on your iPhone, also check your Mac or iPad. If you sign out on your Mac, look at your iPhone’s Text Message Forwarding list. If you are leaving iPhone completely, turn off iMessage and FaceTime before moving the SIM or eSIM when possible. That one step can save you from the classic problem where iPhone users send messages that never reach your new phone.
Another helpful experience-based tip: do not rush through prompts. Apple usually tells you whether a change affects one device, iCloud syncing, or your whole account. Those prompts are easy to ignore because everyone wants to finish the task quickly, but they often contain the difference between “stop messages here” and “change syncing everywhere.” Read them like they are instructions on a frozen pizza you actually care about.
For shared households, the best long-term solution is separate Apple Accounts. Sharing one Apple Account may feel convenient at first, especially for apps and subscriptions, but it can make Messages messy. Family Sharing exists so people can share purchases without sharing private conversations. If multiple people use the same Apple Account, signing out of Messages on one device may only be a temporary patch.
For work devices, signing out of Apple Messages is also a boundary-setting move. A MacBook used for presentations, repairs, contractors, or office work should not quietly receive personal messages. Even if notifications are hidden, the account connection may still exist. Sign out directly inside Messages, disable Messages in iCloud if needed, and remove devices from your Apple Account when they are no longer yours.
The best feeling after cleaning up Messages is boring silence. No mystery pings from an old Mac. No texts appearing on the wrong iPad. No missed messages after switching phones. Just your conversations arriving where they should. In the world of technology, boring is underrated. Boring means it works.
Conclusion
Learning how to sign out of Apple Messages is really about choosing the right level of disconnection. If you only want a Mac to stop receiving iMessages, sign out in the Messages app. If you want an iPhone or iPad to stop using your Apple Account for iMessage, use Send & Receive and sign out there. If you are leaving iPhone, turn off iMessage and FaceTime, then deregister your number if needed.
The most reliable approach is to check Messages settings, iCloud syncing, Text Message Forwarding, and your Apple Account device list. Once those are clean, your messages should stay where they belong: on the devices you actually use, not on a forgotten laptop hiding in a drawer like a gossip columnist.