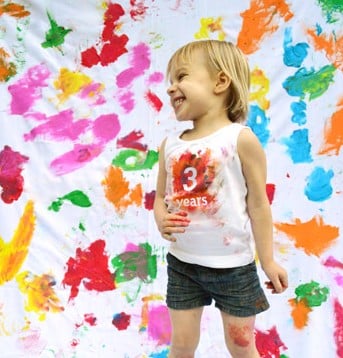
Note: This publication-ready guide explains how to make a homemade painted fabric background for photography, video, crafts, events, flat lays, and creative home projects using practical, real-world methods.
A homemade painted fabric background is one of those projects that looks suspiciously fancy until you realize it is basically fabric, paint, patience, and a willingness to let your floor look like an art studio for one afternoon. Whether you need a moody photography backdrop, a soft neutral background for product shots, a colorful fabric wall hanging, or a custom surface for craft displays, painting your own fabric background gives you control over size, color, texture, and personality.
Store-bought backdrops can be beautiful, but they can also cost enough to make your wallet quietly leave the room. A DIY painted fabric background lets you create a custom look for a fraction of the price, especially if you start with cotton canvas, muslin, duck cloth, or a clean canvas drop cloth. Even better, the finished piece can be rolled, clipped, hung, draped, steamed, and reused many times.
The secret is not being “naturally artistic.” The secret is choosing the right fabric, preparing it properly, using paint that stays flexible, and building color in thin layers instead of attacking the cloth like you are trying to win a wrestling match. This guide walks through the full process, from materials and planning to painting techniques, drying, storage, and lessons learned the mildly messy way.
Why Make a Homemade Painted Fabric Background?
A painted fabric background is useful because it adds depth without stealing the show. In photography, a plain wall can look flat, and a printed backdrop can sometimes feel too busy. Painted fabric lands in the sweet spot: it has movement, texture, and tone, but it still lets the subject remain the star.
For portraits, a mottled gray, warm beige, soft blue, or earthy olive background can create a studio feel. For product photography, a pale painted fabric backdrop can make handmade goods, food, jewelry, candles, ceramics, and home decor look more polished. For video calls or content creation, a painted fabric panel gives you a portable background that is much more charming than the laundry chair lurking behind you.
It is also highly customizable. You can make a large wall-size backdrop, a small tabletop fabric background, a double-sided photography surface, or a dramatic floor-to-wall sweep. Want soft clouds of taupe and cream? Done. Want a bold abstract background that looks like a modern art museum and a paint spill had a stylish baby? Also done.
Best Fabric for a Painted Background
The fabric you choose affects how the paint spreads, how heavy the backdrop feels, and how easily it hangs. For most homemade painted fabric backgrounds, natural fibers are the easiest to work with because they absorb paint well and create a soft, organic finish.
Cotton Canvas
Cotton canvas is sturdy, textured, and durable. It is a strong choice for photography backdrops because it hangs with some weight and does not feel flimsy. Canvas also accepts layered paint beautifully, especially when you want a painterly, clouded, weathered, or fine-art look. The downside is weight. A large canvas background can become heavy once painted, so plan your hanging system before you create a masterpiece that requires a small construction crew.
Muslin
Muslin is lighter than canvas and easier to fold, clip, and transport. It is popular for backdrops because it is affordable and comes in wide widths. It can wrinkle more easily, but that can be managed with steaming, ironing from the back, or simply embracing a relaxed, lived-in texture. Muslin is excellent for soft washes of color and subtle mottled effects.
Canvas Drop Cloth
A canvas drop cloth from a hardware store is a budget-friendly option for making a DIY painted backdrop. Look for cotton canvas rather than plastic-backed cloth. Drop cloths often have seams, hems, or uneven sizing, so inspect the fabric before buying. If a seam runs through the middle, it may be visible in photos unless you paint and style around it.
Duck Cloth or Heavy Cotton
Duck cloth is tightly woven and durable. It works well for smaller backgrounds, product photography, craft booths, or decorative panels. Because it has a tighter weave, paint may sit more on the surface, so thin layers and fabric medium are helpful.
Materials You Will Need
You do not need a professional studio setup. You do need a work area where the fabric can lie flat and dry without a pet walking across it like a tiny unpaid art critic.
- Cotton canvas, muslin, duck cloth, or canvas drop cloth
- Acrylic paint, fabric paint, or acrylic paint mixed with fabric/textile medium
- Fabric medium if using regular acrylic paint
- Large paintbrushes, foam brushes, sponges, rags, or rollers
- Spray bottle with water
- Plastic sheet, tarp, or old drop cloth for floor protection
- Painter’s tape or clamps
- Disposable cups or trays for mixing colors
- Gloves and an apron
- Iron, pressing cloth, or steamer if heat setting is recommended by your paint
- PVC pipe, cardboard tube, or dowel for rolling and storing the finished background
Choosing Paint for a Fabric Background
The big question is simple: can you use regular acrylic paint on fabric? Yes, but with a warning label written by common sense. Acrylic paint alone can dry stiff, especially when applied thickly. For a background that needs to fold, hang, roll, or drape, flexibility matters.
Fabric paint is made for textiles and usually gives a softer finish. Acrylic paint mixed with fabric medium is another excellent option because the medium helps the paint bond to fibers while keeping the surface more flexible. For a backdrop that will not be washed often, craft acrylics with textile medium can work well. For anything that might be laundered, always follow the paint or medium manufacturer’s instructions for mixing, drying, heat setting, and washing.
For large backgrounds, avoid heavy globs of paint. Thick paint can create crunchy areas, cracking, and shiny patches that reflect light unevenly. Thin layers are your friend. Think “soft watercolor clouds,” not “frosting a birthday cake with a house brush.”
How to Prepare Fabric Before Painting
Preparation is the part everyone wants to skip, which is exactly why it matters. Fabric often contains sizing, finishes, dust, or fold lines that can interfere with smooth painting.
Step 1: Wash the Fabric
Prewash the fabric in mild detergent and skip fabric softener. Fabric softener can leave residue that affects paint adhesion. Dry the fabric completely before painting. If you are using a hardware-store drop cloth, washing can also soften the texture and remove some stiffness.
Step 2: Iron or Steam
Wrinkles can become permanent-looking lines once painted over. Iron or steam the fabric before laying it out. If you like a distressed or aged look, a few soft wrinkles may be fine, but harsh fold lines can show up in photos like they were invited personally.
Step 3: Protect the Work Area
Paint can bleed through fabric, especially muslin or loosely woven cotton. Cover the floor with plastic sheeting, cardboard, or an old tarp. Tape the fabric edges down gently or weigh the corners with jars or books. Keep the fabric flat but not stretched so tightly that it warps.
Step 4: Test First
Before painting the entire background, make a test swatch. Try your paint mix, brush, sponge, and water dilution on a scrap piece or hidden corner. Let it dry. Colors often dry lighter or duller than they appear wet, and testing saves you from discovering that your “warm beige” has become “sad oatmeal.”
Planning the Design
A homemade painted fabric background does not need a detailed sketch, but it does need a direction. The best backdrops usually have color variation without obvious shapes that distract from the subject.
For portraits, consider soft neutrals, muted blues, warm grays, earthy browns, olive greens, or charcoal tones. For product photography, lighter backgrounds such as cream, stone, blush, pale gray, or linen beige often work well. For creative shoots, try deep jewel tones, moody gradients, or abstract brushwork.
A helpful rule is to choose three to five related colors: one base color, one shadow color, one highlight color, and one or two accent tones. For example, a warm neutral backdrop might use ivory, tan, raw umber, gray-beige, and a tiny touch of warm white. A dramatic blue backdrop might use navy, slate blue, smoky gray, and pale blue highlights.
Step-by-Step: Making A Homemade Painted Fabric Background
Step 1: Mix the Paint
Mix acrylic paint with fabric medium according to the product directions. If you want a softer, more transparent finish, add a little water, but do not over-dilute the mixture. Too much water can weaken coverage and cause uneven bleeding. Mix more paint than you think you need because recreating the exact same custom shade later can feel like solving a mystery with a spoon.
Step 2: Apply a Base Wash
Start with a thin base layer over the entire fabric. Use a roller, large brush, sponge, or rag. The goal is not perfect coverage. In fact, imperfect coverage creates natural texture. Work in broad, loose movements and keep the edges soft.
Step 3: Add Depth with a Second Color
While the base is still slightly damp, blend in a darker or lighter tone. Use a sponge, rag, or wide brush to tap, swirl, or feather the color into the surface. Avoid making repeated patterns. If your hand starts creating identical circles, pause and rotate your sponge or change your motion.
Step 4: Build Texture Slowly
Add layers gradually. A beautiful painted fabric background usually comes from several transparent layers rather than one heavy coat. Mist the fabric lightly with water if you need softer blending. Use dry brushing for smoky texture, ragging for cloudy variation, and a wide brush for sweeping movement.
Step 5: Soften Harsh Areas
If one section looks too bold, blend over it with a damp rag or a thin glaze of the base color. This is one reason fabric backgrounds are forgiving. You can push color back, add highlights, mute edges, or create more depth as you go.
Step 6: Let It Dry Flat
Allow the background to dry completely before moving it. Drying time depends on fabric weight, paint thickness, humidity, and airflow. A thinly painted muslin piece may dry quickly, while a large canvas with multiple layers may need overnight drying.
Step 7: Heat Set If Required
Some fabric paints and textile mediums require heat setting to become permanent or washable. Follow the instructions for your specific product. In many cases, heat setting is done with a dry iron and a pressing cloth after the paint has fully dried. If the backdrop is large, work section by section and avoid scorching the fabric.
Painting Techniques That Look Professional
Mottled Studio Backdrop
This classic look uses soft, irregular patches of color. Start with a mid-tone base, then sponge in darker corners and lighter center areas. This creates natural focus for portraits or product shots. Keep the brightest area where your subject will be placed.
Ombre Fabric Background
An ombre backdrop fades from dark to light. It is excellent for fashion, beauty, handmade products, and social media content. Use a darker color at the bottom or edges, then blend upward into a pale tone. Work while the paint is damp for smooth transitions.
Faux Plaster or Old Wall Effect
To mimic plaster, use warm grays, creams, taupes, or muted browns. Apply paint with rags and wide brushes in uneven layers. Add dry-brushed highlights and cloudy shadows. This style looks expensive, even if your supplies came from the bargain aisle.
Abstract Brushstroke Background
For a bolder look, use large, expressive strokes. Limit the color palette so the design feels intentional rather than chaotic. Abstract backgrounds work best when the subject is simple, such as a chair, vase, garment, or person in solid-colored clothing.
Speckled or Distressed Finish
Use an old toothbrush, stiff brush, or flicking motion to add subtle speckles. Keep this technique light. A few speckles add character; too many can make the backdrop look like it survived a coffee accident.
How to Hang a Painted Fabric Background
A finished painted fabric background can be hung in several ways. The easiest method is to clamp it to a backdrop stand. You can also clip it to a curtain rod, staple it to a wooden strip, sew a rod pocket, or hang it from removable wall hooks.
For photography, let the fabric curve gently from wall to floor if you want a seamless sweep. Avoid sharp folds where the vertical and horizontal surfaces meet. If the fabric is heavy, use strong clamps and a sturdy support system. Safety is less glamorous than styling, but it is much better than a backdrop dramatically collapsing mid-photo like a stage curtain with attitude.
Care, Storage, and Reuse
Once the background is dry and cured, roll it instead of folding it whenever possible. Folding can create creases and cracked paint lines. A cardboard shipping tube, PVC pipe, or wooden dowel works well. Roll the painted side outward or inward depending on the paint finish and flexibility, testing gently first.
Store the backdrop in a dry place away from direct sunlight. If it becomes wrinkled, steam from the back or use a low-to-medium iron with a pressing cloth, depending on the fabric and paint. For cleaning, use a dry cloth or lightly damp cloth for spot treatment. Avoid aggressive scrubbing, especially on textured paint layers.
Common Mistakes to Avoid
Using Too Much Paint
Heavy paint makes fabric stiff. It can also create reflective patches in photos. Use thin layers and build depth slowly.
Skipping the Test Swatch
A test swatch shows how the fabric absorbs paint and how the color dries. It takes a few minutes and can prevent a full-size disappointment.
Choosing Colors That Are Too Saturated
Bright colors can work, but for photography, muted tones are often more versatile. A backdrop should support the subject, not shout over it with a tiny megaphone.
Painting Over Deep Wrinkles
Wrinkles become more visible once painted. Iron or steam first unless texture is part of your design.
Not Considering Scale
A small tabletop background can be bold and detailed. A large portrait backdrop usually looks better with broader, softer transitions. Step back often while painting so you can judge the whole design.
Best Uses for a Homemade Painted Fabric Background
A painted fabric background can serve many creative purposes. Photographers can use it for portraits, headshots, maternity sessions, product photos, and editorial styling. Small business owners can use it to photograph candles, soaps, jewelry, pottery, stationery, baked goods, and handmade items. Content creators can hang it behind a desk for videos or live streams. Crafters can use it as a booth display, wall hanging, or decorative panel.
It is also useful for seasonal styling. A deep green or burgundy background feels festive for holiday photos. A soft cream or blush background works for spring. A charcoal or navy background creates drama year-round. Once you understand the basic process, you can make several backgrounds for different moods without needing to redecorate an entire room.
Real-World Experience: What You Learn After Painting Your Own Fabric Background
The first thing you learn when making a homemade painted fabric background is that fabric has opinions. It may drink paint quickly in one area, resist it in another, wrinkle when you thought it was flat, or reveal a hidden seam only after you have painted the prettiest section of the entire project. This is normal. The trick is to stop chasing perfection and start working with the material.
One of the best experiences comes from discovering how forgiving the process is. If a corner gets too dark, you can glaze over it with a lighter color. If the center looks flat, you can add a soft highlight. If a brushstroke looks obvious, dab it with a damp rag until it blends. Unlike painting a wall, where every roller mark feels like a public announcement, fabric welcomes irregularity. The texture is part of the charm.
Another practical lesson is that less paint usually looks better. Beginners often load the brush because they want fast coverage. Then the fabric dries stiff, shiny, and slightly crunchy. Thin layers create a softer hand and a more natural finish. A background with three delicate layers often photographs better than one thick layer because light moves across it gently.
Color also behaves differently on fabric than it does in the mixing cup. A gray that looks sophisticated when wet may dry pale and dusty. A beige may become more yellow. A blue may suddenly feel colder under daylight. The smartest habit is to dry a test patch before committing. It is not dramatic, but neither is repainting six feet of fabric while muttering at a cup of taupe.
Hanging the background teaches another lesson: weight matters. A painted canvas drop cloth can become surprisingly heavy. Lightweight muslin is easier to clip, but it may show wrinkles and movement. If you plan to use the backdrop often, add a rod pocket or clip it to a sturdy crossbar. For small product photography, cut a manageable piece rather than wrestling a full drop cloth onto a table.
The most satisfying part is seeing the backdrop in photos for the first time. What looked blotchy on the floor often looks rich and dimensional through a camera. Subtle shadows become atmosphere. Uneven brush marks become texture. The handmade quality gives images warmth that a flat paper backdrop sometimes lacks.
The biggest advice from experience is simple: make the first one for learning, not perfection. Choose affordable fabric, mix more paint than you need, protect your floor, and give yourself permission to adjust as you go. By the second background, you will understand how wet fabric moves, how much pressure to use with a sponge, which colors blend beautifully, and when to stop before “just one more layer” becomes famous last words.
Conclusion
Making a homemade painted fabric background is a practical, budget-friendly project that can elevate photography, video, crafts, displays, and home styling. With the right fabric, flexible paint, thoughtful preparation, and patient layering, you can create a custom backdrop that looks artistic without feeling overworked. The process is approachable for beginners, but it still offers enough creative freedom for experienced makers to experiment with texture, color, and mood.
The best results come from simple habits: prewash the fabric, test your paint mix, work in thin layers, choose a limited color palette, let everything dry thoroughly, and store the finished background rolled instead of folded. A DIY painted fabric background does not need to be flawless. In fact, the tiny variations are what make it beautiful. It is handmade, useful, reusable, and just unpredictable enough to keep things interesting.