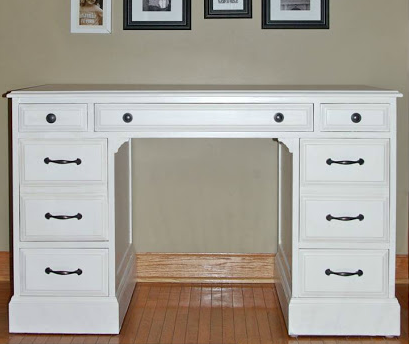
A Pottery Barn inspired desk makeover is the DIY equivalent of putting your old desk through finishing school. One day it is sitting in the corner wearing mystery scratches, tired hardware, and maybe a coffee ring shaped like Nebraska. A few smart upgrades later, it looks calm, tailored, expensive, and ready to host a laptop, a linen notebook, and someone who definitely owns matching file folders.
The beauty of this project is that you do not need a designer budget to get a designer look. Pottery Barn furniture is known for warm wood tones, classic silhouettes, practical storage, soft neutrals, substantial hardware, and a polished-but-lived-in finish. That means your makeover should focus less on making a desk look “new” and more on making it look intentional. Think creamy paint, stained wood, brass or bronze pulls, clean styling, and a surface that can survive real life.
This guide walks through how to transform an old desk into a Pottery Barn style home office piece with planning, prep, paint or stain, hardware, styling, and long-term care. It is practical, budget-aware, and just fancy enough to make your printer feel underdressed.
What Makes a Desk Look Pottery Barn Inspired?
A Pottery Barn inspired desk usually blends classic design with everyday usefulness. The look is not overly trendy, shiny, or fussy. Instead, it feels grounded: solid shapes, warm finishes, neutral colors, and storage that hides the chaos of receipts, pens, chargers, and that one cable nobody can identify.
Key Style Elements
Start by studying the common ingredients of the look. Many Pottery Barn style desks feature wood grain, relaxed coastal finishes, black or antique brass hardware, simple drawer fronts, and balanced proportions. The goal is a desk that looks substantial but not bulky, refined but not museum-level fragile.
For a DIY version, choose one of these directions:
- Classic white and wood: Paint the base warm white or soft ivory, then stain the top medium brown.
- Moody office style: Paint the desk charcoal, deep navy, or soft black with brass hardware.
- Coastal natural: Use a light oak or sandwash-inspired stain with matte black pulls.
- Vintage executive: Keep darker wood tones, polish the top, and replace dated knobs with aged bronze hardware.
The trick is restraint. If the finish is dramatic, keep the hardware simple. If the desk has ornate details, use a quieter color. A successful DIY desk makeover feels curated, not like the craft store exploded politely.
Before You Start: Choose the Right Desk
Not every desk is worth saving, and that is okay. Some furniture pieces are future heirlooms. Others are particleboard with ambition. Before investing time and supplies, check the bones of the piece.
Look for Good Structure
A solid candidate should have sturdy legs, smooth drawer function, minimal wobble, and enough surface area for your work habits. Real wood is wonderful, but veneer can also work if it is intact. Laminate can be painted too, but it requires extra attention to cleaning, sanding, and bonding primer.
Avoid pieces with severe water swelling, major structural cracks, strong mildew smells, or drawers that cannot be repaired. A makeover should be satisfying, not an unpaid apprenticeship in furniture surgery.
Measure Your Space
Before falling in love with a thrifted executive desk, measure your office nook, doorways, staircases, and chair clearance. A beautiful desk that cannot enter the room is not a desk. It is a hallway sculpture.
For small spaces, a writing desk or slim computer desk works best. For a dedicated home office, a larger desk with drawers, cabinets, or file storage can create that built-in, polished look associated with higher-end office furniture.
Supplies for a Pottery Barn Inspired Desk Makeover
The exact supply list depends on whether you paint, stain, or combine both. For most projects, gather these basics before you begin:
- Degreasing cleaner or mild dish soap
- Microfiber cloths and tack cloth
- Screwdriver for removing hardware
- Wood filler for dents and old hardware holes
- Sandpaper or sanding sponges in medium and fine grits
- Painter’s tape and drop cloth
- Primer suited to wood, veneer, or laminate
- Furniture paint, enamel paint, chalk-style paint, or stain
- Brushes and small foam or fine-finish rollers
- Clear protective topcoat if needed
- New knobs or pulls
Buy the best brush you can reasonably afford. A cheap brush sheds bristles into wet paint like it is trying to season soup. A smooth roller also helps reduce brush marks on large flat areas such as drawer fronts and side panels.
Step 1: Clean Like the Finish Depends on It
Because it does. Furniture collects hand oils, dust, wax, polish, food crumbs, and suspicious sticky spots. Paint and stain do not bond well to grime, so cleaning is the first real makeover step.
Remove drawers and hardware. Wipe every surface with a degreasing cleaner or mild soap solution. Pay attention to drawer edges, corners, and the area around handles, where years of use tend to leave a film. Rinse with a clean damp cloth and let the desk dry completely.
Do not rush this part. A desk may look clean from a distance, but paint has a talent for finding the one greasy patch you ignored and turning it into a peeling little tragedy.
Step 2: Repair Dents, Gaps, and Old Hardware Holes
If you plan to replace hardware with pulls of a different size, fill old holes with wood filler. Also fill dents, deep scratches, chipped corners, and small gaps. Let the filler dry according to the product instructions, then sand it smooth.
This is where the makeover starts looking professional. Pottery Barn inspired furniture rarely looks accidental. Clean drawer fronts, smooth edges, and aligned hardware make a big difference. Even if your desk began life as a yard-sale rescue, these small repairs help it stand taller emotionally.
Step 3: Sand for Adhesion, Not Punishment
Sanding helps primer and paint grip the surface. For many painted furniture projects, you do not have to strip the entire finish down to raw wood. You simply need to dull glossy surfaces and smooth rough areas.
Use medium-grit sandpaper for scuff sanding, then follow with a finer grit for a smoother touch. If the desk has a thick old finish, peeling paint, or damaged varnish, you may need more aggressive sanding or a chemical stripper. For laminate, sand gently because the top layer is thin.
After sanding, remove dust carefully. Vacuum crevices if needed, then wipe with tack cloth or a slightly damp microfiber cloth. Dust left behind can create bumps in the finish and weaken adhesion. In other words, your desk will remember your laziness and bring receipts.
Step 4: Prime for a Long-Lasting Finish
Primer is not glamorous, but it is the quiet hero of a durable painted desk makeover. It helps paint adhere, blocks stains, evens out color, and creates a better base for the final finish.
Choose primer based on the desk material and condition. For raw wood, a quality wood primer works well. For glossy finishes, laminate, or slick veneer, use a bonding primer. For stains or bleed-through from wood tannins, consider a stain-blocking primer.
Apply a thin, even coat with a brush for corners and a roller for flat surfaces. Let it dry fully. Lightly sand the primed surface with fine-grit sandpaper, then remove the dust. If coverage looks uneven or the original finish is still showing strongly, apply a second coat.
Step 5: Choose the Perfect Pottery Barn Style Color
The safest colors for a Pottery Barn inspired desk makeover are timeless neutrals. You want shades that look beautiful in natural light, artificial light, and during 11 p.m. email sessions when everyone involved has lost the will to format spreadsheets.
Best Paint Colors for the Look
- Warm white: Great for a classic home office, especially with a stained wood top.
- Cream or greige: Softer than bright white and forgiving in busy rooms.
- Soft black: Elegant, dramatic, and excellent with brass hardware.
- Navy: Traditional but fresh, especially in a study or bedroom office.
- Sage or olive gray: Subtle color with a relaxed, designer feel.
- Natural wood stain: Ideal if the desk has attractive grain worth showing off.
If you are unsure, test paint or stain on the back, underside, or inside of a drawer. Colors change dramatically once they meet your lighting. The shade that looked “warm linen” at the store may become “sad oatmeal” at home.
Step 6: Paint or Stain with Patience
For a painted finish, apply thin coats rather than one heavy coat. A brush works well for trim and corners, while a small roller creates smoother coverage on flat areas. Paint in the direction of the wood grain when possible. Let each coat dry fully before adding the next.
Two coats are usually the minimum for a polished look. Dark colors, white over dark wood, or thin paints may need more. Lightly sanding between coats can improve smoothness, especially on the desktop and drawer fronts.
For a Stained Desktop
If you want the classic painted-base-and-wood-top look, sand the top more thoroughly. Apply wood conditioner if the wood is prone to blotching, then stain evenly with a lint-free cloth or brush. Wipe off excess stain and let it dry. Follow with a protective finish such as polyurethane, polycrylic, or another clear topcoat suitable for desks.
A stained top adds warmth and makes the desk feel more expensive. It also hides small signs of use better than a painted desktop. This is helpful if your work style includes coffee, notebooks, elbows, and occasional dramatic leaning.
Step 7: Seal the Desk for Real Life
A desk is a hardworking surface. It handles laptops, cups, lamps, books, pens, wrists, paper clips, and the emotional weight of tax season. A protective topcoat helps prevent scratches, stains, and water marks.
Some furniture paints and enamels cure to a durable finish without a separate sealer, but many painted desks benefit from a clear topcoat on high-touch areas. Use thin coats and let each one dry properly. Avoid heavy application, which can create cloudiness, streaks, or a plastic-looking surface.
For a Pottery Barn inspired finish, choose a satin, matte, or low-sheen topcoat. Gloss can be beautiful in the right room, but too much shine may push the piece away from the relaxed, classic look.
Step 8: Upgrade the Hardware
Hardware is the jewelry of furniture, and a desk makeover without new hardware is like wearing a tuxedo with flip-flops. It might technically function, but questions will be asked.
For the Pottery Barn style, look for:
- Aged brass knobs
- Antique bronze cup pulls
- Matte black handles
- Classic ring pulls
- Simple bar pulls in warm metal finishes
Measure the center-to-center distance between existing hardware holes before shopping. If your new pulls are a different size, fill the old holes before painting and drill new holes after the finish cures. Use a hardware template for alignment. Crooked handles are tiny, shiny heartbreakers.
Step 9: Style the Desk Like a Designer
Once the finish has cured, styling brings the makeover together. Keep the surface useful but calm. Pottery Barn inspired styling often includes natural textures, warm lighting, woven baskets, ceramic accessories, framed art, and simple greenery.
Desk Styling Ideas
- Add a linen or leather desk pad for texture and protection.
- Use a ceramic cup or small tray for pens.
- Place a table lamp with a fabric shade for warm light.
- Use matching boxes or baskets to hide office supplies.
- Add one framed photo or small art print.
- Keep cords grouped with clips or a cable sleeve.
The goal is not to make the desk unusable by covering it with decorative objects. Leave space to work. A beautiful desk should still allow you to open a laptop without relocating a ceramic village.
Budget-Friendly Ways to Get the Look
A designer-style desk makeover can be surprisingly affordable. Start with a secondhand desk, leftover paint, and hardware from a home improvement store or online marketplace. Spend money where it matters most: primer, durable paint, smooth tools, and hardware.
If your budget is tight, keep the original hardware and spray paint it in an antique brass or matte black finish. Line drawers with peel-and-stick paper. Add a thrifted lamp. Use a basket you already own for files. The Pottery Barn inspired look is about warmth and cohesion, not buying everything new.
Common Desk Makeover Mistakes to Avoid
The biggest mistake is skipping prep. Cleaning, sanding, and priming are not optional chores invented by people who hate fun. They are what keep the finish from peeling, scratching, or looking uneven.
Watch Out for These Problems
- Painting over dust: This creates bumps and weak spots.
- Using thick coats: Heavy paint can drip, stay tacky, or show brush marks.
- Ignoring cure time: Paint may feel dry before it is fully hardened.
- Choosing tiny hardware: Small knobs can look awkward on a substantial desk.
- Forgetting function: A gorgeous desk still needs storage, legroom, and cable control.
Give the desk time to cure before loading it with equipment. Even durable paint can be vulnerable in the first days or weeks. Use coasters, felt pads, and a desk mat to protect your work.
Specific Makeover Example: From Orange Oak to Classic White and Walnut
Imagine an old orange oak desk from the 1990s. It has good drawers, sturdy construction, and a shape that says “responsible adult,” but the finish says “basement fax machine.” Here is a practical Pottery Barn inspired plan:
- Remove the old brass-plated hardware.
- Clean the desk thoroughly with a degreasing cleaner.
- Fill scratches and unused hardware holes.
- Scuff sand the base and drawer fronts.
- Sand the desktop down enough to accept stain evenly.
- Prime the painted areas with bonding primer.
- Paint the base a warm white or soft greige.
- Stain the top a medium walnut tone.
- Seal the entire piece with a durable satin finish.
- Add aged brass cup pulls and matching knobs.
The result is classic and practical: a bright base, warm top, upgraded hardware, and a finish that looks intentional rather than rescued. Pair it with a woven chair, a warm lamp, and a small plant, and suddenly your home office has main-character energy.
Experience Notes: What a Pottery Barn Inspired Desk Makeover Really Teaches You
The first thing this project teaches is that furniture has a personality. Some desks cooperate immediately. Their drawers slide smoothly, their finish sands nicely, and their hardware comes off without drama. Other desks act like they have hired legal counsel. Screws strip. Veneer chips. A mystery stain appears after primer. This is normal. The key is not perfection; it is patience.
One of the most satisfying parts of a Pottery Barn inspired desk makeover is watching the piece change from “old furniture” to “custom home office desk.” The transformation usually happens in stages. Cleaning makes it look less neglected. Sanding makes it feel possible. Primer makes it look temporarily worse, which is rude but expected. Then the first coat of paint goes on, and suddenly you understand why people start saying things like, “I could flip furniture.” Be careful. That sentence is how garages fill up.
Another lesson is that color choice matters more than expected. A bright white desk can look fresh in a sunny room but harsh in a darker corner. A soft greige can look elegant beside wood floors but muddy next to cool gray walls. Testing colors is not a delay; it is insurance. The same goes for stain. A walnut stain on one wood species may look rich and balanced, while on another it may turn nearly black. Always test first, preferably somewhere hidden.
Hardware is also more powerful than it seems. Replacing small, dated knobs with larger antique brass pulls can make a desk look twice as expensive. It gives the piece visual weight and makes the makeover feel finished. If the desk has many drawers, consistent hardware creates rhythm. If it has only one center drawer, a single beautiful pull can become a focal point.
The most practical experience tip is to protect the desktop more than you think you need to. A desk is not a decorative console table that politely holds a vase. It is a daily workhorse. It will face coffee mugs, laptop heat, notebooks, pens, chargers, and the occasional snack plate because humans are optimistic. A good topcoat, a desk pad, and felt protectors under accessories help preserve the finish.
Finally, the project feels best when the desk fits your real life. Do not style it only for photos. Add a drawer organizer if you use pens daily. Create a charging station if cords drive you wild. Use baskets if papers multiply in your presence. The Pottery Barn inspired look is warm, useful, and collected. It should make your workspace calmer, not turn it into a showroom where you are afraid to place a coffee cup.
Conclusion
A Pottery Barn inspired desk makeover is one of the most rewarding ways to refresh a home office without buying a brand-new piece of furniture. By choosing a sturdy desk, cleaning and sanding properly, using the right primer, selecting timeless colors, adding durable protection, and upgrading the hardware, you can create a desk that looks polished, expensive, and completely personal.
The secret is balance. Combine beauty with function. Use warm finishes, classic details, and practical storage. Give the piece enough prep to last. Then style it with restraint so it still works as an actual desk, not just a very pretty place for unread mail to gather.
With a little effort, your old desk can become the centerpiece of a calm, stylish workspace. And yes, it may inspire you to organize your files, buy a better lamp, or finally stop using a coffee mug as a pen holder. No promises on the last one.