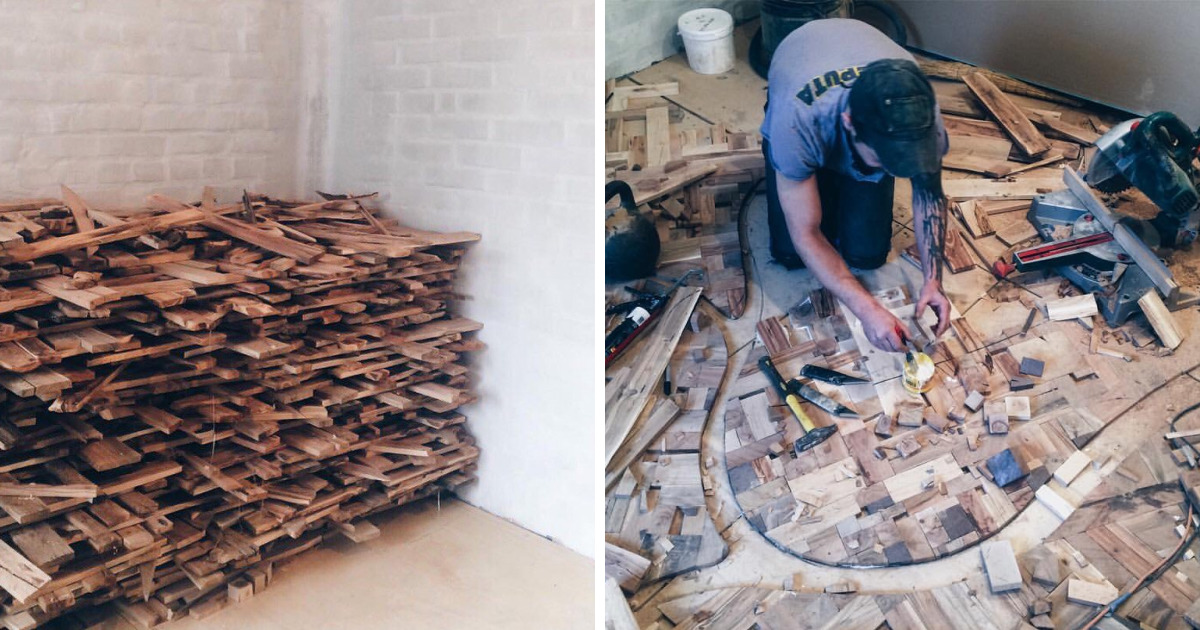
Some people see a pile of random wood pieces and think, “Trash.” I see the same pile and think, “That could become a floor, a conversation starter, and possibly the reason my neighbors stop lending me tools.” That is how my floor art project began: with leftover boards, offcuts, scraps from previous DIY adventures, and one stubborn belief that a floor does not have to be boring just because gravity keeps it underfoot.
This is the story of how I turned random wood pieces into floor artpart reclaimed wood flooring, part DIY mosaic, part therapy session with a miter saw. It was not perfect. It was not fast. It did involve dust in places dust should never be. But the finished result gave the room character, warmth, and a handmade look that no big-box carton of identical planks could ever quite deliver.
If you have been wondering whether scrap wood floor art is practical, beautiful, budget-friendly, or merely a warning sign that you spend too much time on home improvement websites, the answer is: yes. Let’s walk through the full process, from sorting the wood to sealing the floor, with honest lessons from the sawdust battlefield.
Why Make Floor Art From Random Wood Pieces?
The main reason is simple: random wood has personality. New flooring often looks clean, polished, and predictable. Scrap wood looks like it has stories. One piece may have old nail holes. Another may be darker from age. A third may have a grain pattern so dramatic it looks like it has been practicing for a furniture catalog.
Using random wood pieces also gives you more creative control. Instead of installing a standard straight plank layout, you can create a patchwork floor, a herringbone-inspired design, a border, a sunburst, a checkerboard, or a chaotic-but-charming pattern that says, “I planned this,” even if you only planned half of it and negotiated with the rest.
The Big Benefits of Scrap Wood Floor Art
First, it can reduce waste. Leftover lumber, broken pallets, cabinet scraps, and old boards often end up in disposal piles even when they still have plenty of life left. Second, it can save money, especially if you already have usable wood. Third, it creates a custom floor design that no one else has. Even if someone copied your idea, they would not have the same pile of weird little boards judging them from the garage corner.
There is also a deeper satisfaction in making something useful from leftovers. Floor art from random wood pieces is not just decoration. It is a small rebellion against the idea that home upgrades must always come shrink-wrapped, perfectly matched, and expensive enough to make your wallet whisper, “Please stop.”
Planning the Design Before Cutting Anything
Before I touched a saw, I spread the wood pieces out on the floor like a giant puzzle. This step matters because random wood is not really random once it becomes flooring. Every piece needs to cooperate with the others in thickness, shape, direction, and overall pattern.
I sorted the boards into groups: long strips, short chunks, narrow pieces, wider pieces, dark pieces, light pieces, and “mystery wood that might be oak or might be emotionally complicated pine.” Sorting helped me see what kind of design was possible. I had enough narrow strips for borders, enough medium pieces for the main field, and enough odd pieces for accent areas.
Choosing a Pattern That Forgives Imperfection
With scrap wood, perfection is a dangerous goal. A precise parquet pattern requires consistent sizing, careful milling, and the patience of a monk assembling a watch. I chose a more forgiving geometric patchwork: short boards arranged in blocks, with the grain direction alternating from section to section.
This gave the floor movement without demanding that every single board be identical. It also allowed small gaps and slight color changes to look intentional. That is one of the great secrets of DIY floor art: if you repeat an irregularity often enough, people call it “design language.”
Preparing the Wood Pieces
Preparation is where the project becomes real. Random wood may be beautiful, but it is also suspicious. It can hide nails, staples, splinters, old glue, dirt, paint, or uneven edges. Before using any piece, I inspected it carefully.
I removed metal fasteners, trimmed damaged ends, and rejected pieces that were cracked, warped, soft, or questionable. A floor has to survive shoes, furniture, pets, dropped coffee mugs, and the occasional person pacing dramatically while thinking about life. Weak boards do not belong in that job interview.
Cleaning, Sanding, and Leveling
Once I had my usable pile, I cleaned each piece and sanded the surface enough to remove roughness while keeping character. I did not want the floor to look factory-new. I wanted it to look warm, aged, and handmadebut not like it might give guests a splinter and a tetanus lecture.
The trickiest part was thickness. Random boards are often not the same height. For floor art, that matters. A beautiful pattern becomes annoying fast if every step feels like hiking across tiny wooden speed bumps. I planed or sanded thicker pieces where necessary and kept thinner pieces for low-traffic accent areas.
Checking the Subfloor
The subfloor is the unsung hero of this project. Nobody compliments it. Nobody photographs it. Nobody says, “Wow, your subfloor has incredible emotional range.” But if it is uneven, damp, dirty, or unstable, the finished floor will eventually complain.
I made sure the subfloor was clean, dry, flat, and securely fastened. Any loose spots were screwed down. Any debris was removed. Any bumps were leveled. The goal was to give the wood art a stable foundation so the final floor would feel solid instead of crunchy, bouncy, or haunted.
Do Not Ignore Moisture
Wood moves. It expands and contracts with changes in humidity and temperature. That means moisture is not a tiny technical detailit is the main character in many flooring disasters. Before installation, I let the wood sit in the room so it could adjust to the indoor environment. I also left a small expansion gap around the edges, later covered by trim.
This is one of those steps that feels boring until you skip it. Then the floor cups, buckles, gaps, or starts making noises like it is trying to communicate in Morse code. Acclimation and expansion space are not glamorous, but neither is explaining to guests why your floor has developed a wooden mountain range.
Dry-Fitting the Floor Art Layout
Dry-fitting means arranging the pieces without permanently attaching them. This was my favorite part because it felt like making a giant wood collage. It was also the part where I changed my mind approximately 47 times.
I started from the center of the room and worked outward, checking the balance of colors and grain directions. I did not want all the dark boards on one side or all the dramatic grain in one corner. The idea was to create visual rhythm, like a good playlist, except made of lumber and mild back pain.
Using Borders to Make Chaos Look Intentional
A border changed everything. Once I added a simple frame around the main design, the random pieces suddenly looked curated. Borders are magical in floor art because they tell the eye, “This is not a mistake. This is a feature.”
I used longer, straighter strips for the border and saved shorter pieces for the interior pattern. The border also helped hide slight layout adjustments near the walls. In a project made from random wood pieces, a good border is like a polite host at a chaotic dinner party.
Cutting and Fitting the Pieces
Cutting scrap wood for floor art requires patience and consistent measuring. I used a miter saw for straight cuts and a jigsaw for awkward shapes near corners and edges. Every piece was measured, trimmed, checked, and sometimes re-trimmed after I remembered that walls are rarely as straight as they pretend to be.
For a cleaner look, I tried to keep the gaps between pieces small and consistent. But I also accepted that handmade floor art should not look like a machine produced it. A little variation adds charm. Too much variation looks like a raccoon installed it during a thunderstorm. The sweet spot is somewhere in between.
Safety While Cutting and Sanding
This project creates sawdust, noise, and flying little bits of wood with absolutely no respect for your eyeballs. I used eye protection, hearing protection, and a proper dust mask or respirator while cutting and sanding. I also worked with ventilation and cleaned often so dust did not take over the room like a tiny beige snowstorm.
Safety gear is not optional decoration. It is what allows you to keep enjoying DIY projects instead of explaining to a doctor that you lost a fight with a decorative pine offcut.
Attaching the Wood Pieces
There are different ways to attach wood flooring depending on the material, subfloor, and project type. For my floor art, I used construction adhesive suitable for flooring, along with finish nails in strategic places where needed. The goal was a strong bond without turning the floor into a porcupine of visible fasteners.
I worked in small sections so the pattern did not drift. This is important. A tiny angle mistake early in the project can become a giant wedge-shaped problem later. I used chalk lines and reference marks to keep the layout aligned. The floor did not always listen, but at least we had a system.
Keeping the Surface as Even as Possible
After attaching sections, I checked for high spots. Some were minor and could be sanded later. Others needed attention immediately. When you are working with random wood pieces, it is better to fix uneven areas as you go than to discover later that your floor doubles as a foot massage device.
I also kept heavy objects off the fresh sections until the adhesive had time to cure. This required stepping around the room like I was crossing lava, which was fun for about six minutes and inconvenient for the rest of the day.
Filling Gaps Without Losing the Handmade Look
Even with careful fitting, small gaps happen. I used wood filler in the most noticeable gaps and left tiny character lines where they made the design look natural. The key is restraint. Overfilling every tiny line can make reclaimed wood look fake. Ignoring big gaps can make the floor collect crumbs like it is preparing for winter.
For wider seams, a mixture of sanding dust and compatible filler can help blend repairs with the surrounding wood. I tested filler on scrap pieces first because filler color has a sneaky habit of looking perfect in the container and completely different once dry.
Sanding the Finished Floor Art
Sanding was the moment when the project transformed from “pile of attached wood pieces” into “actual floor.” I started with a coarser grit to smooth high spots, then moved to finer grits for a more polished surface. I was careful not to erase all the character, because the whole point was to showcase the variety of reclaimed and leftover wood.
Edges and corners needed hand sanding. This part was not glamorous. It involved crouching, sweating, and making sounds usually associated with people opening difficult jars. But it was worth it. Smooth edges made the finished floor feel intentional and comfortable.
Cleaning Between Sanding Steps
After each sanding pass, I vacuumed thoroughly and wiped the surface to remove dust. Dust left behind under finish can create roughness, dull spots, or tiny bumps. In other words, dust is the glitter of woodworking: it appears everywhere, refuses to leave, and ruins your plans if ignored.
Staining the Floor Art
I debated whether to stain the floor. The wood already had natural color variation, and I did not want to flatten that personality. In the end, I used a light stain in selected areas and left other pieces closer to their natural tone. This helped unify the design without making every board look identical.
If you try this, test stain on leftover pieces first. Different species absorb stain differently. Pine may go blotchy. Oak may show grain beautifully. Mystery wood may do whatever mystery wood wants because apparently it has a personal brand.
Creating Contrast With Natural Wood Tones
One of the best parts of floor art from random wood pieces is contrast. Light boards, dark boards, straight grain, wild grain, old nail marks, and fresh cuts can all work together. The trick is to repeat tones across the floor so the design feels balanced.
I avoided placing all the most dramatic boards in one area. Instead, I scattered them like visual seasoning. Too little, and the floor looks bland. Too much in one spot, and it looks like the room is pointing at that corner.
Sealing and Protecting the Floor
A floor is not finished until it is protected. I chose a durable clear floor finish that could handle foot traffic and show off the wood grain. Several thin coats worked better than one heavy coat. Heavy coats can dry unevenly, trap bubbles, or create a finish that looks less like craftsmanship and more like pancake syrup.
Between coats, I lightly sanded as recommended by the product instructions and cleaned the surface carefully. Patience matters here. The finish is what protects all the cutting, fitting, sanding, and creative problem-solving that came before it.
Matte, Satin, or Gloss?
I chose satin because it gave the wood a soft glow without turning the floor into a mirror. Gloss can look elegant, but it also highlights scratches, dust, and every sock-slide decision you later regret. Matte looks modern and relaxed. Satin sits comfortably in the middle, like the friend who brings snacks and does not start arguments.
What the Finished Floor Looks Like
The final result looks like a wooden quilt. Each piece has its own tone and grain, but together they create a warm, textured floor that feels handmade in the best way. It is not perfectly uniform, and that is exactly why it works.
Guests notice it immediately. Some ask where I bought it. Others ask how long it took, which is a dangerous question because the answer includes sanding, sorting, second-guessing, and several moments of staring silently at a corner piece that refused to fit.
Common Mistakes to Avoid
Using Wood That Is Too Damaged
Not every scrap deserves a second life as flooring. Rotten, soft, heavily cracked, or badly warped wood should be skipped. A floor needs strength. Save the fragile pieces for wall art, small crafts, or the ceremonial pile of “maybe someday” materials every DIY person secretly owns.
Skipping the Dry Fit
Dry-fitting may feel slow, but it prevents ugly surprises. It helps you balance colors, check the pattern, and avoid ending with a weird skinny strip at the edge of the room. Measure first, attach later, panic less.
Forgetting Expansion Space
Wood needs room to move. If you install it tight against every wall, it may push, buckle, or gap as humidity changes. Leave space at the perimeter and cover it with baseboard or trim.
Rushing the Finish
The finish protects the floor. Rushing coats, ignoring cure times, or walking on it too soon can damage the surface before the project has even had its victory lap. Let the finish cure properly. Your future self will appreciate not having sock prints immortalized in polyurethane.
Is Scrap Wood Floor Art Worth It?
Yes, if you enjoy hands-on projects and want a floor with character. No, if you want a fast, perfectly uniform installation with no surprises. This kind of DIY wood floor is more like making art than installing standard flooring. It requires creativity, patience, and a willingness to solve weird little problems as they appear.
For me, the payoff was worth it. I spent less than I would have on premium custom flooring, used materials that might have been discarded, and created a room that feels personal. Every board has a place. Every variation tells a story. Every tiny flaw reminds me that real handmade work has fingerprints.
Extra Experience: What I Learned While Living With My Random Wood Floor
After the floor was finished, I expected to admire it for a week and then stop noticing it. That did not happen. A handmade scrap wood floor has a way of staying visible because it changes with the light. Morning sun brings out golden tones. Evening light deepens the darker pieces. On cloudy days, the grain patterns become softer and moodier, like the floor is trying out different personalities.
The first big lesson was that texture matters as much as color. When I was laying out the pieces, I focused mostly on tones: light, medium, dark, warm, cool. But after living with the floor, I realized the grain direction and surface feel were just as important. Some boards had tight, calm grain. Others had dramatic lines that looked like tiny rivers. Alternating those textures made the floor more interesting than color alone could have.
The second lesson was that people love a story. When someone visits, they rarely say, “Nice floor finish system.” They say, “Wait, did you make this?” That question opens the door to the whole tale: the leftover boards, the sorting, the mistakes, the piece I cut wrong twice, the border that saved the design, and the moment I realized I had created something that looked expensive even though it started as a pile of wood scraps with commitment issues.
The third lesson was about maintenance. A floor made from random wood pieces is not fragile if it is properly sealed, but it does reward gentle care. I use furniture pads, sweep regularly, and clean with products appropriate for finished wood floors. I avoid soaking it with water because wood and standing moisture are not best friends. They are more like coworkers who should not be left alone together in a conference room.
I also learned to embrace small marks. At first, every tiny scratch felt personal. Then I remembered that the entire floor was built from imperfect pieces. A small dent or scuff does not ruin the design; it joins the story. That is the beauty of reclaimed wood floor art. It is already layered, varied, and alive-looking, so normal wear blends in more gracefully than it would on a flawless, glossy, uniform surface.
If I made another one, I would label my sorted piles more clearly. During the project, I had categories in my head, which worked until I got tired and every pile became “wood I might use soon.” I would also prepare more pieces than I thought I needed. Random layouts consume material in strange ways, especially when you reject cracked boards or need specific sizes near edges.
Most of all, I learned that DIY floor art is not just about saving money. It is about changing how you see materials. A short board is not useless. A stained piece is not automatically ugly. A pile of leftovers can become the most memorable part of a room. Sometimes the best design material is not the perfect thing you buy; it is the imperfect thing you decide to notice.
Conclusion
Making floor art from random wood pieces taught me that creativity can live in the most ordinary materials. What began as scraps became a custom wood floor with warmth, movement, and personality. The project required planning, sanding, fitting, patience, and enough dust cleanup to question my life choices, but the final result made every step worthwhile.
If you want a DIY flooring idea that is practical, budget-conscious, and genuinely unique, scrap wood floor art is a rewarding option. Start with sound wood, plan a forgiving pattern, respect moisture and expansion, protect yourself while cutting and sanding, and finish the surface properly. The goal is not perfection. The goal is a floor that feels like it belongs to your homeand maybe makes visitors look down and say, “Okay, that is seriously cool.”
Note: This HTML contains only the body section for easy copying and publishing.